Apex REST services are used to expose Salesforce data and functionality via RESTful APIs. They allow developers to create custom endpoints to access data and execute custom logic. In this blog, we will explore the various aspects of Apex REST services and provide some examples to illustrate their usage. 
Creating an Apex REST Service:
To create an Apex REST service, you need to define a class that is annotated with the @RestResource annotation. This annotation tells Salesforce that the class is a REST resource and provides some additional configuration options.
Here is an example of a simple Apex REST service that retrieves an account by ID:
@RestResource(urlMapping='/account/*')
global class AccountService {
    //GET method to fetch account details
    @HttpGet
    global static Account getAccountById() {
        RestRequest request = RestContext.request;
        String accountId = request.requestURI.substringAfter('/account/');
        Account result = [SELECT Id, Name, Phone, Website FROM Account WHERE Id = :accountId];
        return result;
    }
}
In this example, the @RestResource annotation specifies the URL mapping for the service, which in this case is /account/*. This means that the service will respond to requests that match the /account/ URL pattern, followed by any additional path information.
The @HttpGet annotation specifies that this method will handle GET requests. The method implementation retrieves an account by ID using a SOQL query. The RestContext.request object provides access to the HTTP request that triggers the service. We use this object to extract the account ID from the URL.
Consuming an Apex REST Service:
Once you have created an Apex REST service, you can consume it from external systems using standard HTTP requests.
To consume the Apex REST service, you can use any programming language which supports making HTTP requests, ex. JavaScript, Java, Python, or C#.
Here is an example of how to consume the service using different programming languages:
Javascript
fetch('/services/apexrest/account/001xxxxxxxxxxxx')
            .then(response => response.json())
            .then(data => console.log(data))
            .catch(error => console.error(error));
In this example, we use the fetch() function to make a GET request to the Apex REST service. The response is returned as a Promise, which we handle using the .then() and .catch() methods.
Here are instructions on how to consume the Apex REST service using Workbench and Postman.
Consuming REST Service Using Workbench:
Visit https://workbench.developerforce.com/login.php.
- In Environment, select Production.
- Choose the latest API version from the API Version drop-down.
- Click Allow.
- Log in to Salesforce.
- select utilities | REST Explorer.
- Select GET.
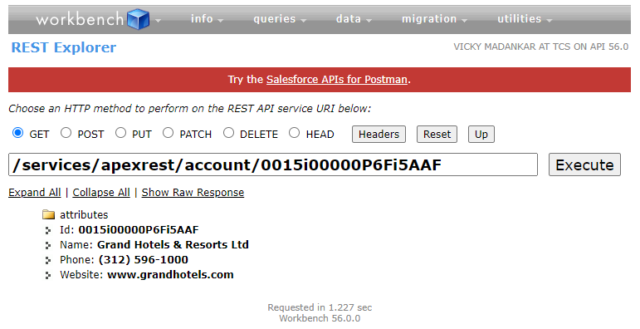
- Enter the URL of the Apex REST service, using your own Salesforce instance and account ID: /services/apexrest/account/001xxxxxxxxxxxx
- Click “Execute”.
The result will look similar to this.

Creating a new record:
Add the HttpPost method in the web service(AccountService) below the getAccountById method as shown:
@RestResource(urlMapping='/account/*')
global class AccountService {
  //GET method for fetching account details
    @HttpGet
    global static Account getAccountById() {
        RestRequest request = RestContext.request;
        String accountId = request.requestURI.substringAfter('/account/');
        Account result = [SELECT Id, Name, Phone, Website FROM Account WHERE Id = :accountId];
        return result;
  }

  //newly added POST method for creating account record
   @HttpPost
    global static ID createAccount(String name, String industry, String phone, String website) {
        Account objacc = new Account(
                          Name=name,
                          Industry=industry,
                          Phone=phone,
                          Website=website );
        insert objacc;
        return objacc.Id;
    }
}
- After logging in to Workbench, select utilities | REST Explorer.
- Select POST.
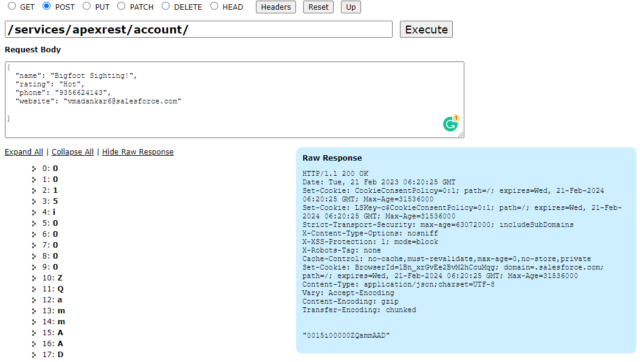
- Enter the URL of the Apex REST service like this. — /services/apexrest/account/
- For the request body, insert the following.
{ "Name": "Workbench Test Account !", "Industry": "Technology", "phone": "9356XXX143", "website": "vmadankar6@salesforce.com" } - Click Execute. This calls the creatAccount method that is associated with the POST HTTP method.
- To view the response, click on Show Raw Response.
The result will look similar to this.

Consuming REST Service Using POSTMan:
- Open Postman and create a new request.
- Set the request type to “GET”.
- Enter the URL of the Apex REST service, using your own Salesforce instance and account ID: https://your-instance.salesforce.com/services/apexrest/account/001xxxxxxxxxxxx
- In the “Headers” section, add a new header with the key “Authorization” and the value “Bearer access_token”, where “access_token” is a valid OAuth 2.0 access token for your Salesforce org.
- Click the “Send” button.
- The “Body” section displays the response in JSON format.
Conclusion
In conclusion, Apex REST services are a powerful way to expose Salesforce data and functionality via RESTful APIs. With just a few lines of code, you can create custom endpoints that can be consumed by any external system. Apex REST services also provide a variety of security features. Apex REST services allow you to control access to your services and protect your data.
