Welcome to the comprehensive guide on mastering JEST React Testing Library! In this tutorial, we will explore the ins and outs of the JEST React Testing Library, a powerful tool for testing React components. Whether you are a beginner or an experienced developer looking to enhance your testing skills, this guide will equip you with the knowledge and techniques to write effective tests using JEST React Testing Library.
What is JEST?
JEST is a JavaScript testing framework that enables developers to write tests for JavaScript and React applications. It offers features like test runners, assertions, mocks, and code coverage analysis. JEST simplifies the process of writing and running tests, making it a popular choice for testing React applications.
Official Documentation:
Prerequisites:
Before exploring the JEST React Testing Library, ensure that you have the following prerequisites:
- Basic knowledge of React
- Node.js and npm are installed on your machine.
- React project setup.
Now, let’s get started with JEST React Testing Library!
Getting Started:
Step 1. Install JEST and React Testing Library:
Open your terminal and navigate to the main directory of your project. Then, execute the following command:
npm install –save-dev jest
Step 2. Implementing the Button component:
Create a new file named “Button.js” in the src directory and paste the following code:
import React from "react";
const Button = ({ label }) => {
  return <button>{label}</button>;
};
export default Button;
The Button component is functional and renders a button with a provided label prop.
Step 3. Writing your first test:
Create a new file named “Button.test.js” in the src directory and paste the following code:
import React from "react";
import { render, screen } from "@testing-library/react";
import Button from "./Button";
test("renders button correctly", () => {
  render(<Button label="Click me" />);
  const buttonElement = screen.getByText(/click me/i);
  expect(buttonElement).toBeInTheDocument();
});
In this example, we import and used the necessary functions from @testing-library/react to render our component and interact with the rendered output, so let’s explore the purpose of those functions:
Render: This function is provided by React Testing Library and is used to render React components for testing purposes.
Screen: The screen object provides utilities to access and interact with the rendered components. Functions like getByText, getByRole, and more can be used to search for specific elements within the rendered component.
Expect: This is an assertion function provided by JEST. It allows us to make assertions about the behavior of our code and the rendered components.
toBeInTheDocument: This is a matcher provided by JEST that checks if an element is present in the document.
Then we render the Button component with a specific label and use the screen.getByText method to find the button element by its text content.
Step 4. Running the test:
Open your terminal and navigate to the main directory of your project. Then, execute the following command:
npm test
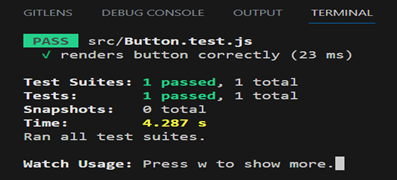
JEST will run the tests, and you will observe the test results in the terminal.
Screenshot of successful test execution:

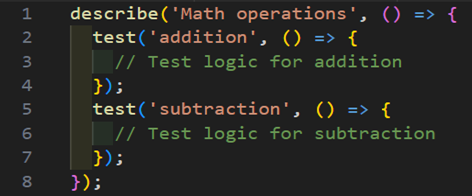
- Understanding describe(), test() and it():
- describe(): describe() is used to group related test cases together. It creates a test suite or category of tests, allowing you to organize and structure your tests.
- test() and it(): Both test() and it() are used to define individual test cases. They take a description of what the test is doing and a function where you write the test logic.

These functions help organize and structure your tests, making them more readable and maintainable. They provide a way to group related tests and clearly define the purpose of each individual test case.
-
Search Variants and Types:
- Search Variants: Search Variants in JEST React Testing Library are methods to find elements in the rendered output based on specific.
- getBy(): Finds a single element that matches the query. In case no element is found, it will raise an error.
Example:
const buttonElement = <button>Click Me</button>;
test("To test getBy search variant", () => {
  render(buttonElement);
  const foundButton = screen.getByRole("button");
  expect(foundButton).toBeInTheDocument();
-
- getAllBy(): Finds multiple elements that match the query. In case no element is found, it will raise an error.
Example:
const linkElements = (
  <div>
    <a href="#">Link 1</a>
    <a href="#">Link 2</a>
    <a href="#">Link 3</a>
  </div>
);
test("To test getAllBy search variant", () => {
  render(linkElements);
  const foundLinks = screen.getAllByRole("link");
  expect(foundLinks.length).toBe(3);
});
-
- queryBy(): Finds a single element that matches the query. Returns `null` if no element is found.
Example:
const headingElement = <h1>Hello, world!</h1>;
test("To test queryBy search variant", () => {
  render(headingElement);
  const foundHeading = screen.queryByText(/hello/i);
  expect(foundHeading).not.toBeNull();
});
-
- queryAllBy(): Finds multiple elements that match the query. When no elements are found, it returns an empty array.
Example:
const inputElements = (
  <div>
    <input type="text" />
    <input type="text" />
    <input type="text" />
  </div>
);
test("To test queryAllBy search variant", () => {
  render(inputElements);
  const foundInputs = screen.queryAllByRole("textbox");
  expect(foundInputs.length).not.toBe(0);
})
-
- findBy(): Finds a single element asynchronously that matches the query. Resolves the promise with the element when found.
Example:
async function fetchData() {
  return new Promise((resolve) => {
    setTimeout(() => resolve(<div>Data Loaded</div>), 1000);
  });
}

const asyncElement = fetchData();

test("To test findBy search variant", async () => {
  render(await asyncElement);
  const foundElement = await screen.findByText(/data loaded/i);
  expect(foundElement).toBeInTheDocument();
});
-
- findAllBy(): Finds multiple elements asynchronously that match the query. Resolves the promise with an array of elements when found.
Example:
async function fetchDatas() {
  return new Promise((resolve) => {
    setTimeout(
      () =>
        resolve(
          <ul>
            <li>Item 1</li>
            <li>Item 2</li>
            <li>Item 3</li>
          </ul>
        ),
      1000
    );
  });
}

const asyncElements = fetchDatas();

test("To test findAllBy search variant", async () => {
  render(await asyncElements);
  const foundElements = await screen.findAllByRole("listitem");
  expect(foundElements.length).toBe(3);
});
-
Search Types:
Search Types are used in conjunction with the search variants to target specific attributes of elements for querying.
-
- ByRole: Matches elements by their role attribute, such as `button,` `link,` `textbox,` `listitem,` etc.
Example:
const buttonElement1 = <button>Click Me</button>;
test("To test ByRole search type", () => {
  render(buttonElement1);
  const foundButton = screen.getByRole("button");
  expect(foundButton).toBeInTheDocument();
});
-
- ByText: Matches elements based on their visible text content.
Example:
const headingElement1 = <h1>Hello, world!</h1>;
test("To test ByText search type", () => {
  render(headingElement1);
  const foundHeading = screen.getByText(/hello/i);
  expect(foundHeading).not.toBeNull();
});
-
- ByLabelText: Matches elements based on their associated label text.
Example:
const usernameInput = (
  <div>
    <label htmlFor="username">Username</label>
    <input type="text" id="username" />
  </div>
);
test("To test ByLabelText search type", () => {
  render(usernameInput);
  const foundInput = screen.getByLabelText(/username/i);
  expect(foundInput).toBeInTheDocument();
});
-
- ByPlaceholderText: Matches elements based on their placeholder text.
Example:
const searchInput = <input type="text" placeholder="Search" />;
test("To test ByPlaceholderText search type", () => {
  render(searchInput);
  const foundInput = screen.getByPlaceholderText(/search/i);
  expect(foundInput).toBeInTheDocument();
});
-
- ByDisplayValue: Matches form elements based on their displayed value.
Example:
const checkboxElement = (
  <input type="checkbox" checked={true} value={"checked"} />
);
test("To test ByDisplayValue search type", () => {
  render(checkboxElement);
  const foundCheckbox = screen.getByDisplayValue("checked");
  expect(foundCheckbox).toBeInTheDocument();
});
-
- ByAltText: Matches elements based on their alt attribute value.
Example:
const imageElement = <img src="https://blogs.perficient.com/2023/08/16/exploring-jest-react-testing-library-a-complete-overview/logo.png" alt="Logo" />;
test("To test ByAltText search type", () => {
  render(imageElement);
  const foundImage = screen.getByAltText("Logo");
  expect(foundImage).toBeInTheDocument();
});
-
- ByTitle: Matches elements based on their title attribute value.
Example:
const tooltipElement = <div title="Tooltip">Hover me</div>;
test("To test ByTitle search type", () => {
  render(tooltipElement);
  const foundElement = screen.getByTitle("Tooltip");
  expect(foundElement).toBeInTheDocument();
});
-
- ByTestId: Matches elements based on their data-testid attribute value.
Example:
const elementWithTestId = <div data-testid="my-element">Element</div>;
test("To test ByTestId search type", () => {
  render(elementWithTestId);
  const foundElement = screen.getByTestId("my-element");
  expect(foundElement).toBeInTheDocument();
});
These examples demonstrate how to use JEST React Testing Library search variants and types with both React components and test cases. These combinations allow you to precisely query elements and assert their presence or absence based on specific criteria.
- JEST Debugging Functions and Methods: JEST React Testing Library offers debugging functions like debug() and screen.logTestingPlaygroundURL() for effective troubleshooting and inspection of tests.
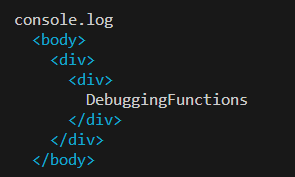
- screen.debug(Screens) function logs the current state of the rendered output to the console. It helps inspect the rendered HTML structure and component properties during test execution.
Example:
import { render, screen } from "@testing-library/react";
import DebuggingFunctions from "./DebuggingFunctions";

test("To debug the DebuggingFunctions component using debug() function", () => {
  render(<DebuggingFunctions />);
  screen.logTestingPlaygroundURL();
});
When you run this test case and call screen.debug(), it will output the rendered component structure and its attributes in the console:

- screen.logTestingPlaygroundURL(): This function logs a URL to the console that can be opened in a browser. It allows you to view and interact with the rendered output in the Testing Playground.
Example:
import { render, screen } from "@testing-library/react";
import DebuggingFunctions from "./DebuggingFunctions";

test("To debug the DebuggingFunctions component using logTestingPlaygroundURL() function", () => {
  render(<DebuggingFunctions />);
  screen.logTestingPlaygroundURL();
});
The Testing Playground is a web-based tool that provides an interactive environment for debugging and exploring your React components. It allows you to inspect the component hierarchy, modify props, and test different scenarios. You can export logs and share the testing playground URL with others for collaborative debugging.
Conclusion:
This detailed guide has covered the fundamentals of the JEST React Testing Library. We learned how to write tests, simulate user interactions, and use various methods to find elements. Additionally, we explored debugging functions. Now, you have the knowledge to create solid and reliable tests for your React components.
