Are you looking to enhance your WordPress website and make it more engaging for your visitors?
You can add widgets to enhance interactivity, and functionality to your site.
However, for beginners, widgets might seem overwhelming. Where can you find them? How do you use them? What are the things that you can achieve with them?
Don’t worry, we are here to help.
In this post, we will discuss the basics of adding widgets in WordPress and how to customize them based on your needs. We will also explore the various types of widgets that are available in WordPress.
So, are you ready? Let’s get started!
Widgets are an essential feature of WordPress that allows users to add various elements and functionality to their website’s sidebar, footer, or other widget-ready areas without having to write any code.
They are small blocks that perform specific functions and can be easily added, removed, and rearranged on a WordPress website.
Widgets can be used to display a wide range of content, such as recent posts, categories, tag clouds, search bars, CTAs, calendars, and custom text.

Additionally, widgets can be used to integrate external content and services, such as social media feeds, newsletter sign-up forms, and advertising banners.
They are an excellent way to provide additional information to your site visitors without cluttering the main content area of your website.
The areas for placing widgets are determined by your WordPress theme, so they may vary based on the theme you’re currently using.
Adding widgets to your WordPress website can be done in two simple ways: through the Customizer or the Widgets screen.
In the upcoming sections, we will provide detailed explanations for each method. Let’s dive in!
2.1 Add Widget Using the Customizer
The Customizer is a user-friendly tool that enables you to personalize the look and features of your website easily. Additionally, you can conveniently add and modify widgets directly from the Customizer page.
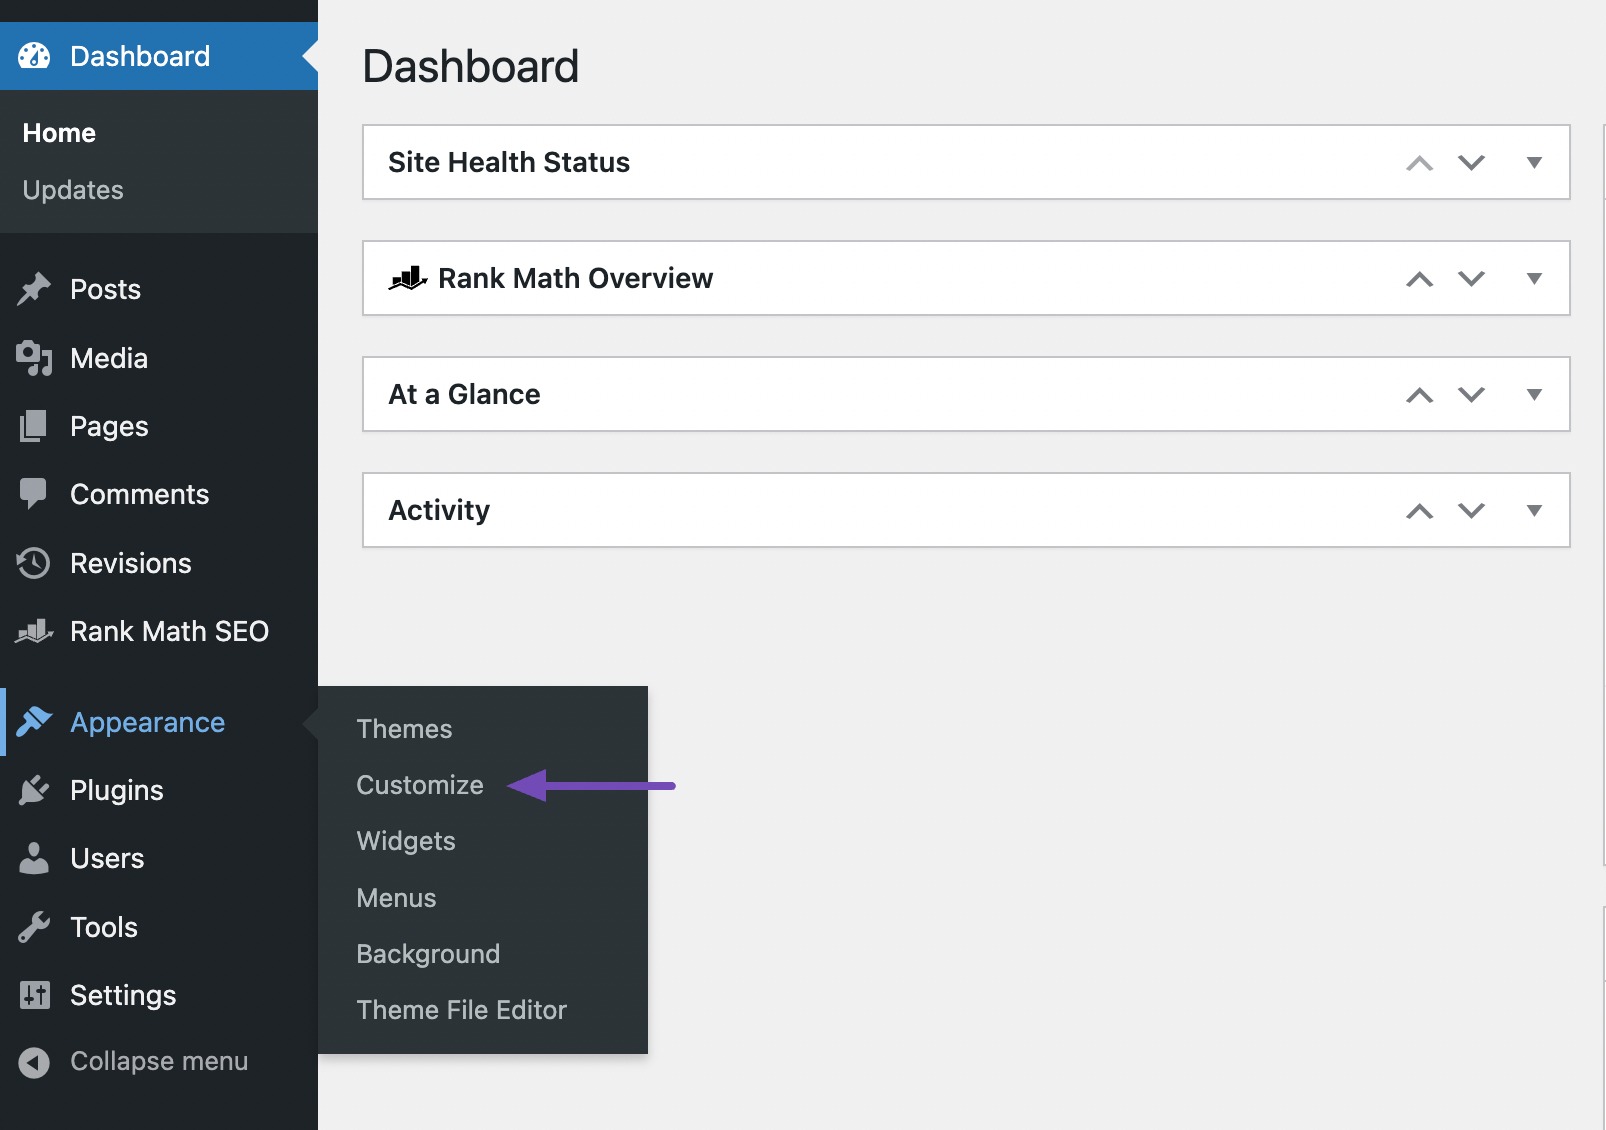
To add widgets using the Customizer, start by accessing your WordPress dashboard and locate the Appearance → Customize option.
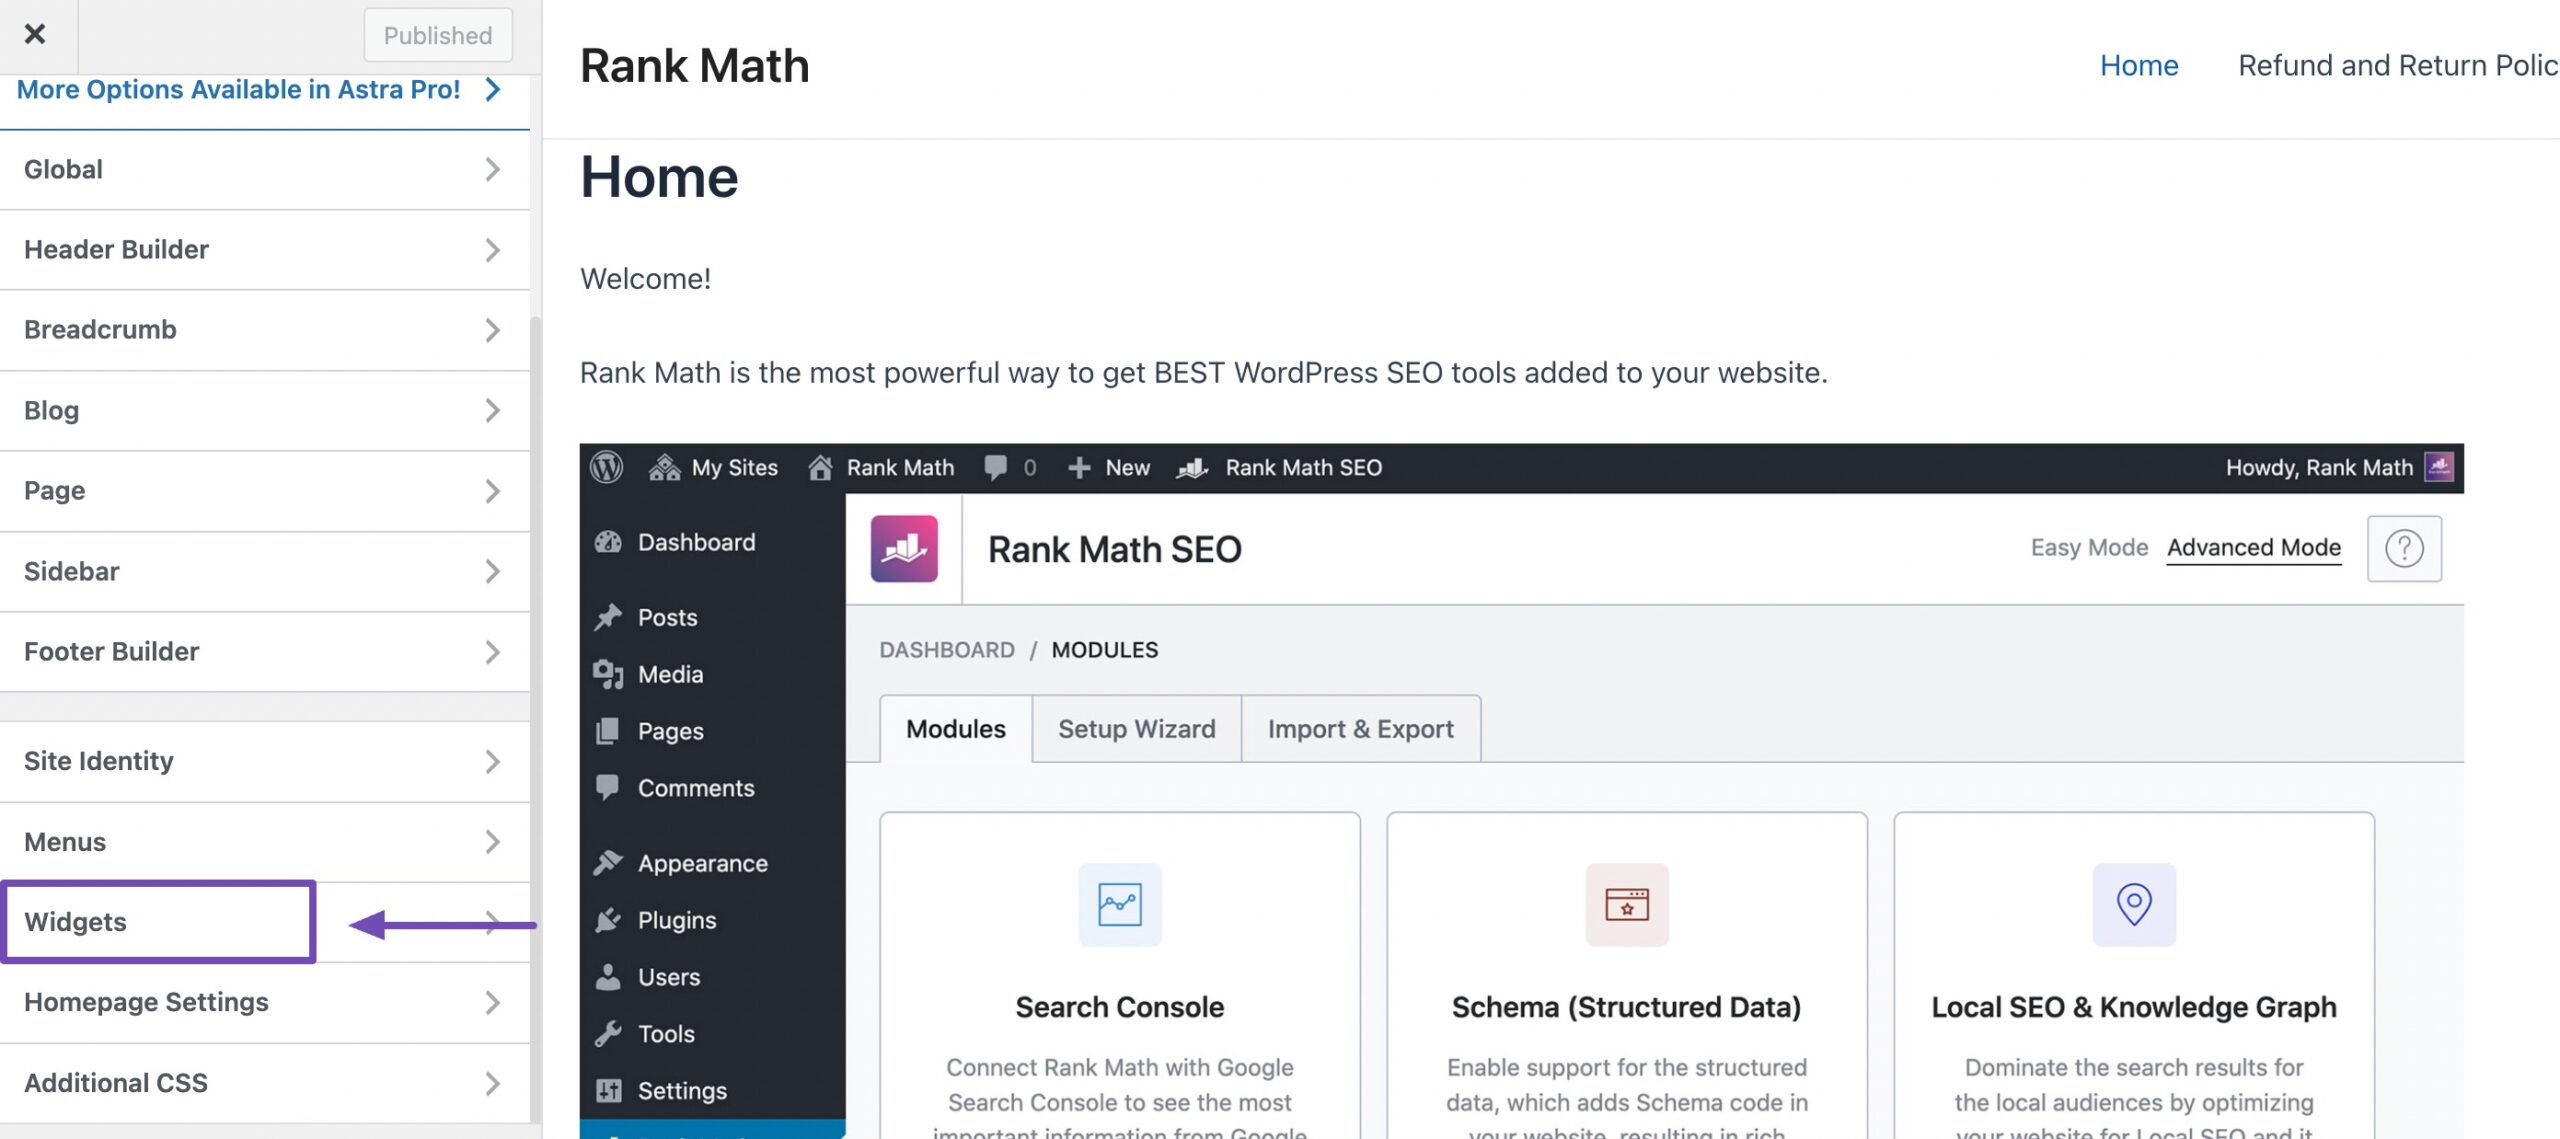
On the Customizer page, locate the Widgets option and click on it. This will allow you to access the widget customization settings.
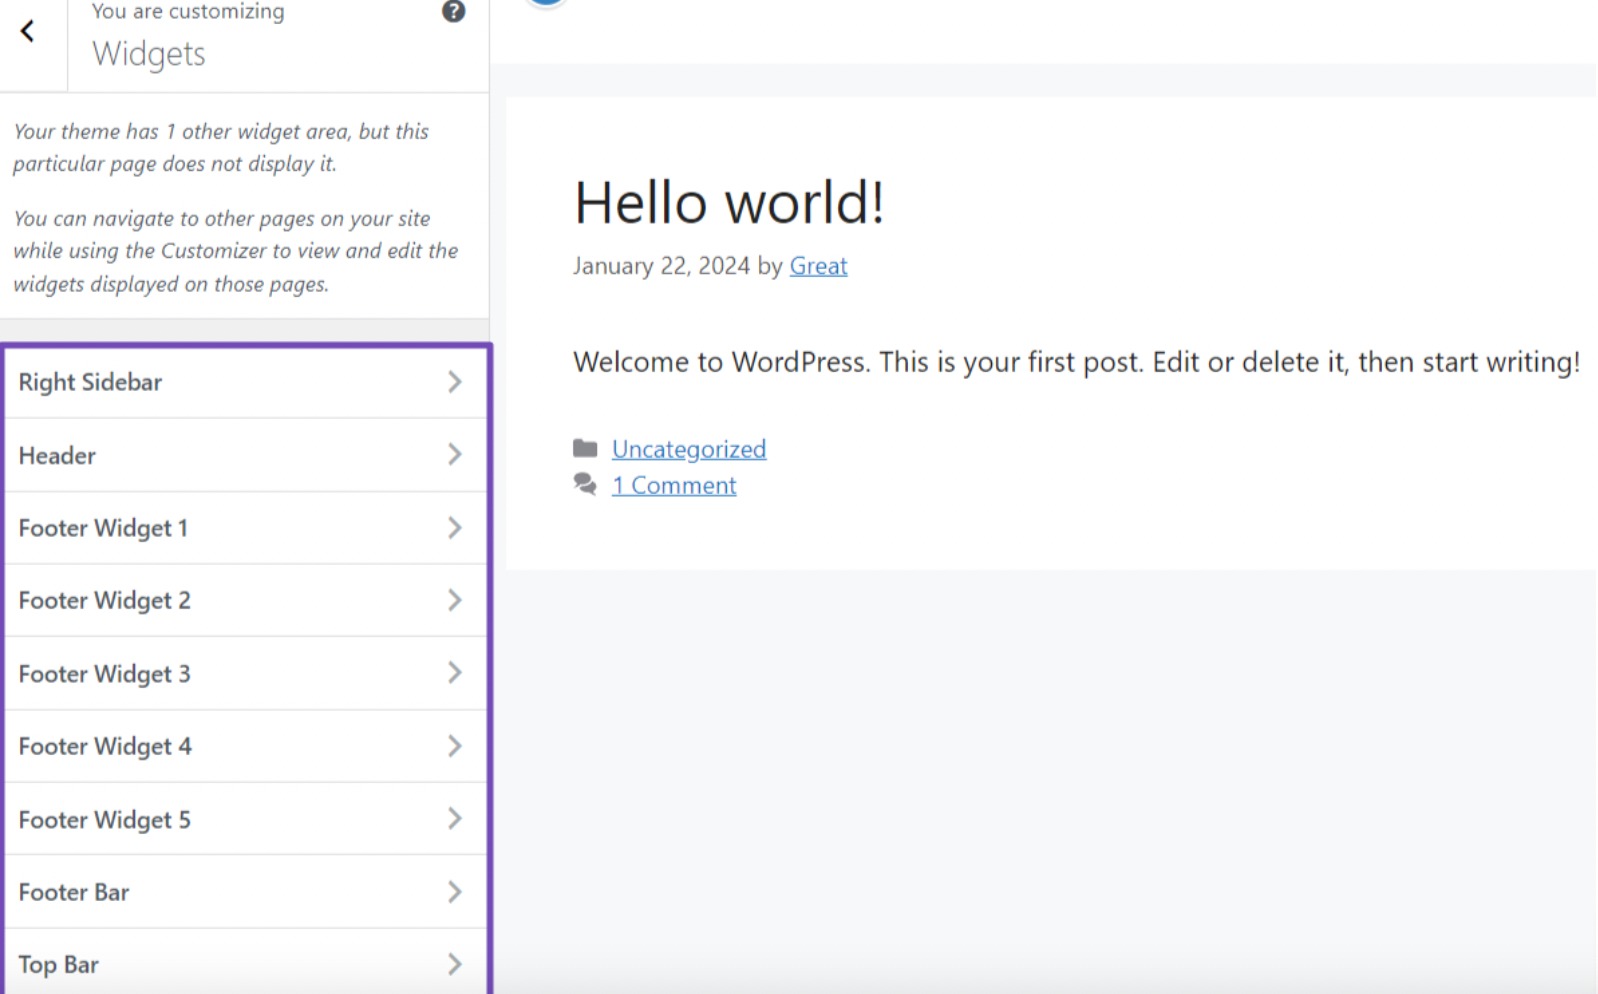
On the widget page, you’ll come across various widget areas supported by your WordPress theme.
Next, choose the desired widget area by clicking on it, which will then direct you to the widget editor for that specific area.
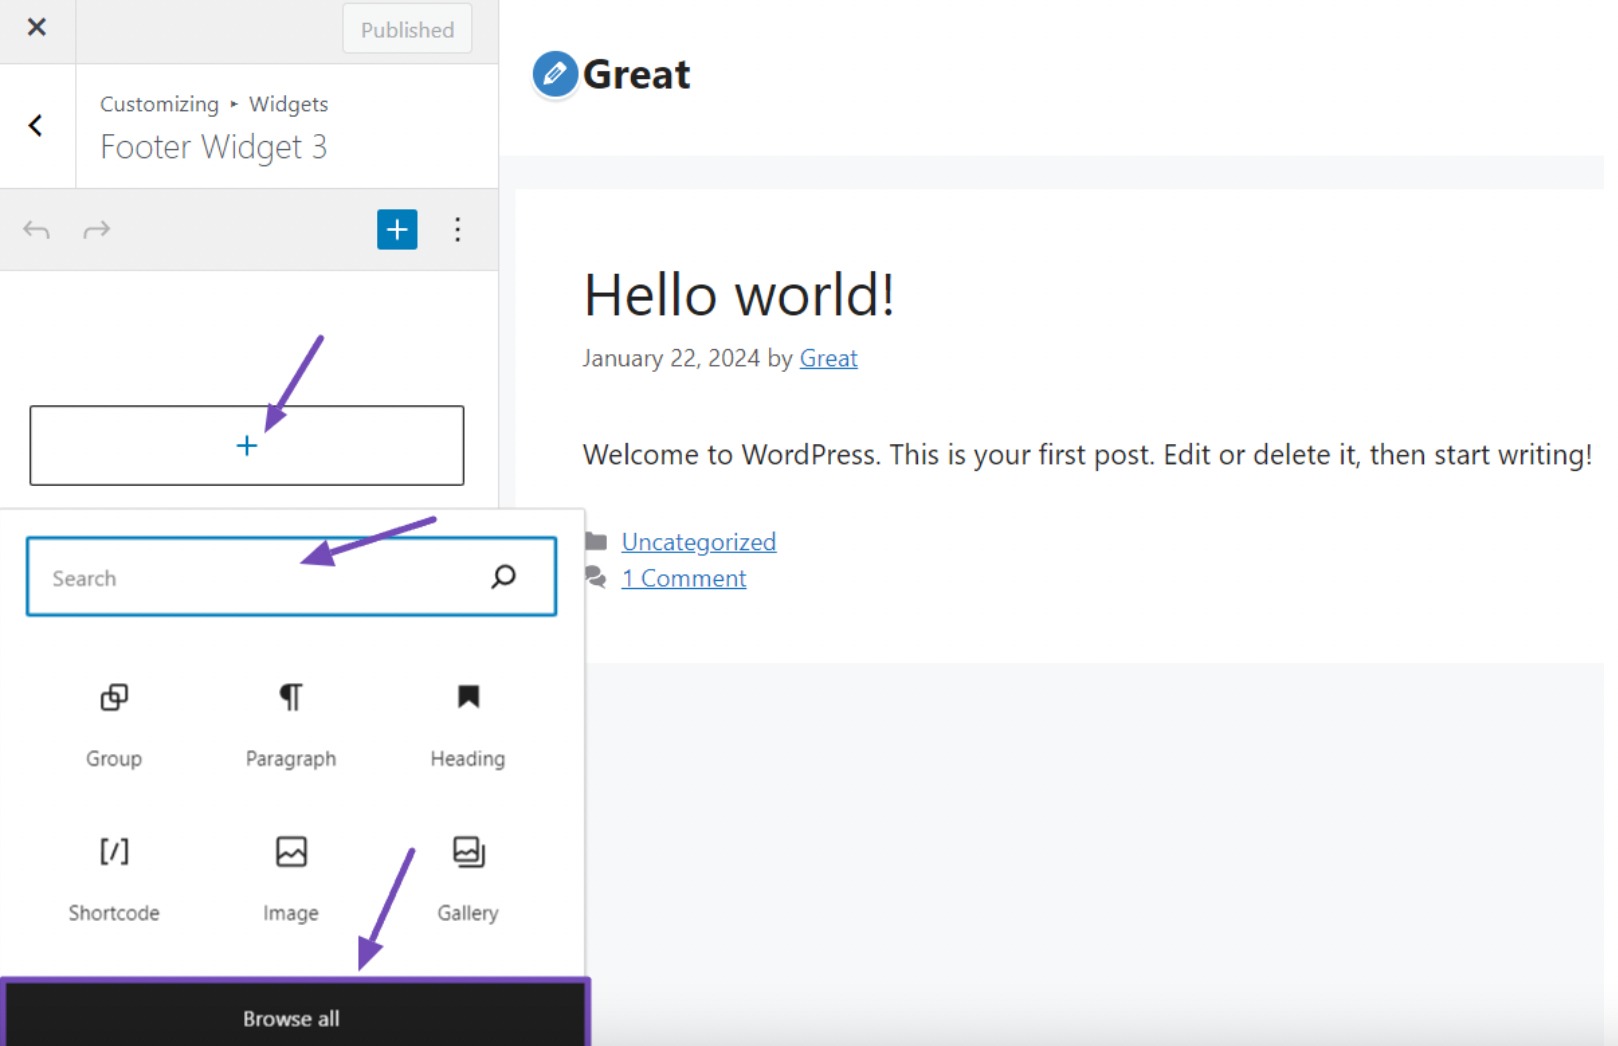
On the widget editor, click on the “+” icon located in the field. This action will reveal a selection of widgets that you can utilize. Also, you can utilize the search bar to find a specific widget you have in mind.
Moreover, if you want to explore additional widget options, simply click on the Browse all button to view a wider range of available widgets.
Once you have found the desired widget, you can click or use drag and drop it to the widget field.
After adding the widget, it will appear in the designated field. Now, you can proceed to configure it according to your preferences and requirements.
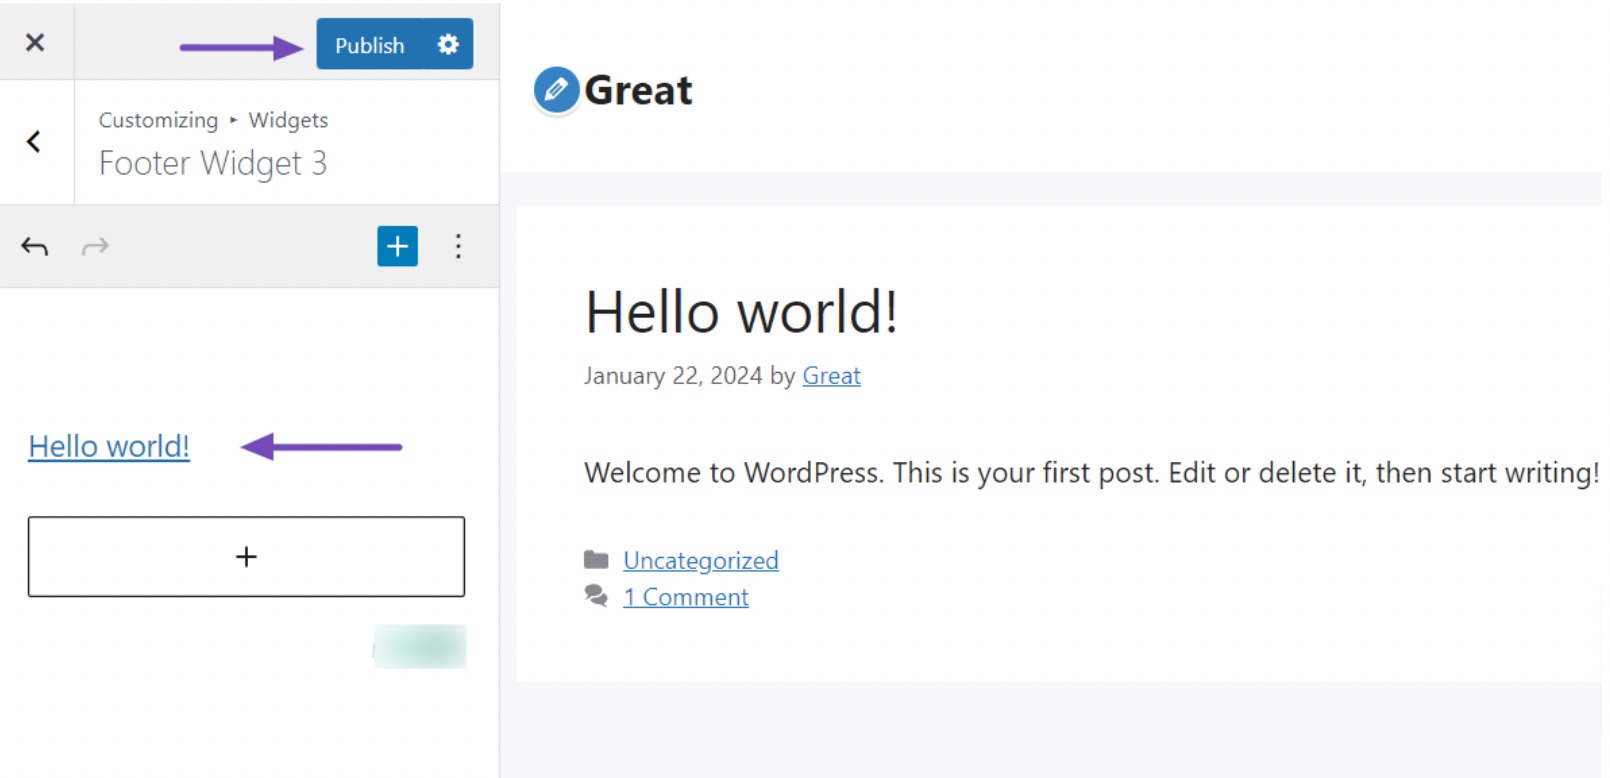
Once you are satisfied with the changes you made to the widget, simply click on the Publish button to make the widget live on your website.
After publishing, you can navigate to the specific area where you added the widget and view it in action.
2.2 Using the Widgets Screen
Another way to add widgets is by using the Widgets screen in your WordPress dashboard.
Simply go to Appearance → Widgets. There, you’ll find a list of available widget areas on your website.
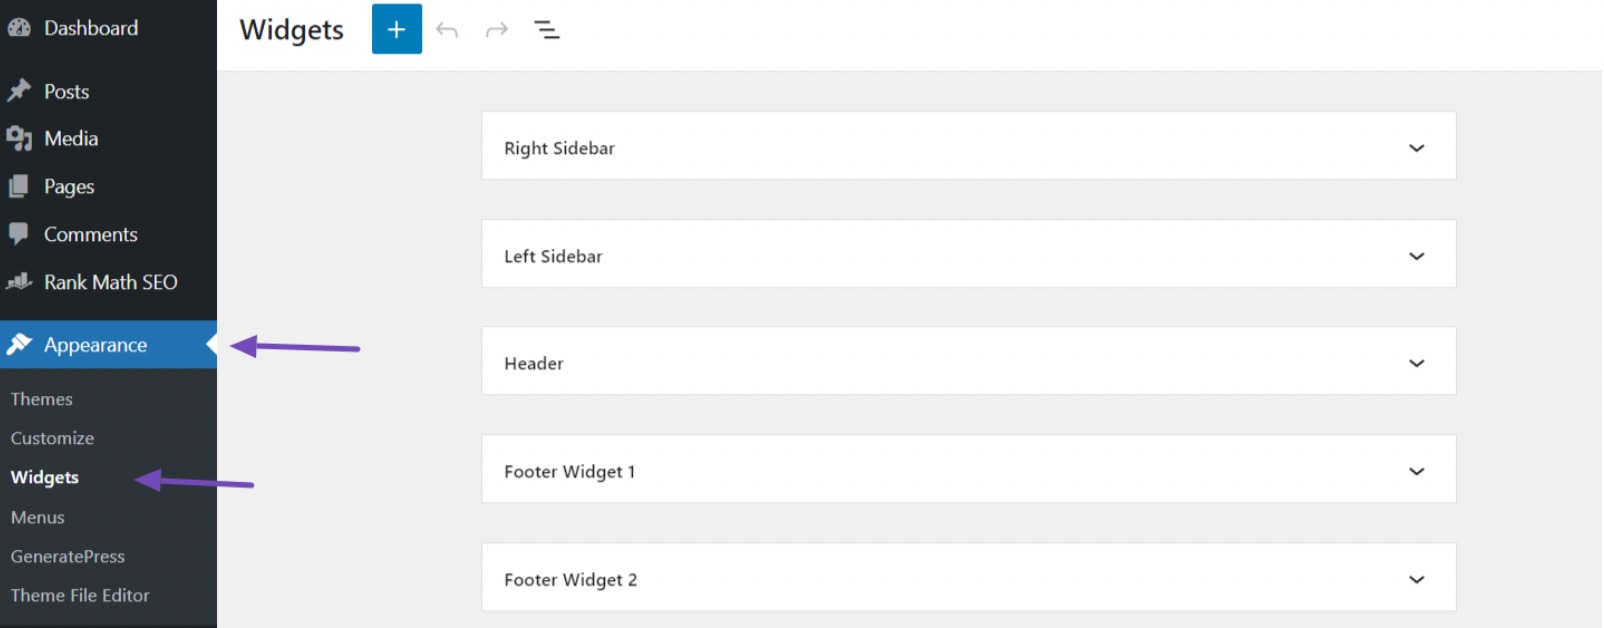
Now it’s time to select the specific area where you want to add the widget, such as the header, footer, left or right sidebar.
Once you see the widget area you wish to customize, click on the dropdown icon to open the field and explore more options for adding your widget.
Once you have selected the widget area, you will notice the appearance of the “+” icon. Click on this icon to browse through the various widgets available and choose the one that suits your needs.
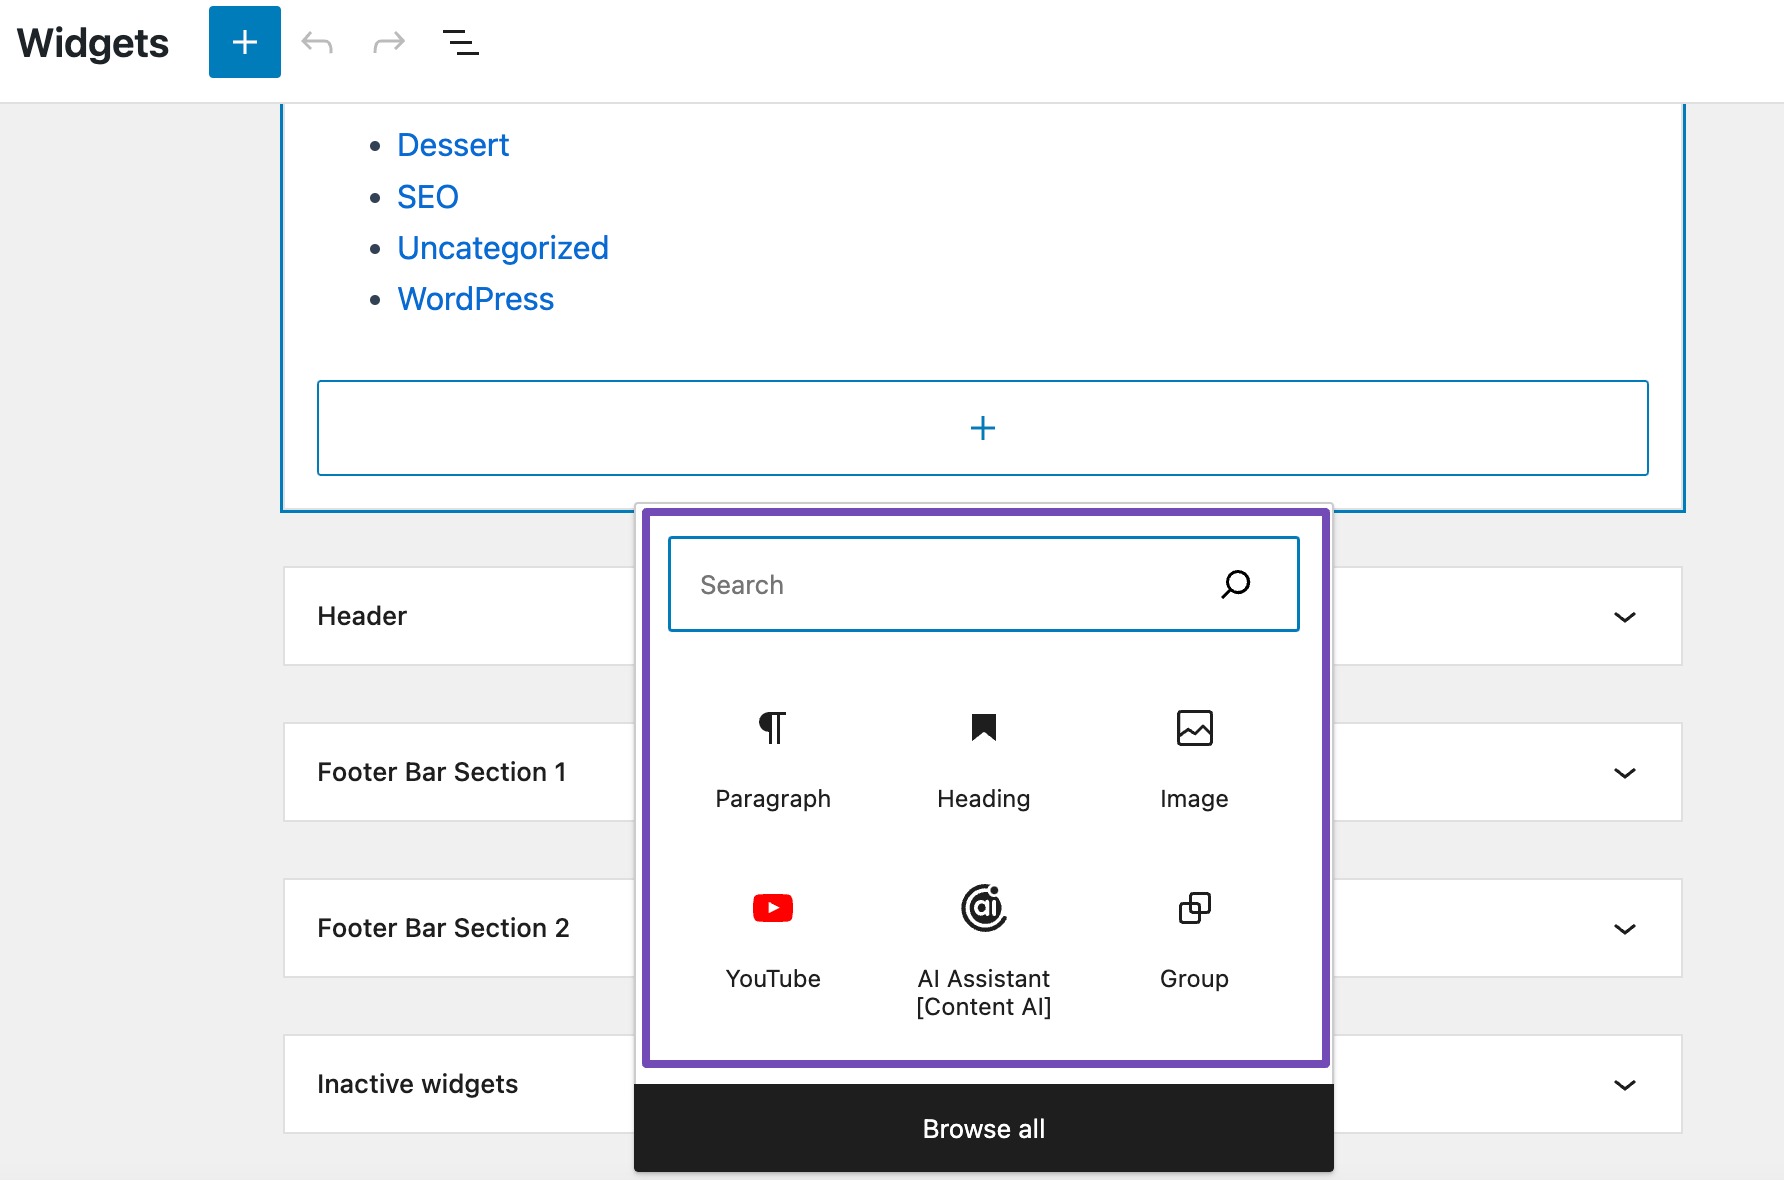
Just like in the previous method, you can search for your desired widget or click on the Browse all button to explore additional widgets. Once you have added the widget, you can customize it to align with your requirements.
When you have finished configuring the widget settings, use the Update button located above to apply the changes and make the widget live.
However, depending on the theme you are using, you may not see an Update button. Instead, you can use the ‘Save’ option in the widget area to save any modifications made to the widget.
That’s it! You’ve successfully added a widget to your website!
In case you accidentally added a widget that you don’t need, removing it is a breeze. Simply click on the widget you added, and a set of editing tools will appear. Next, click on the three dots.
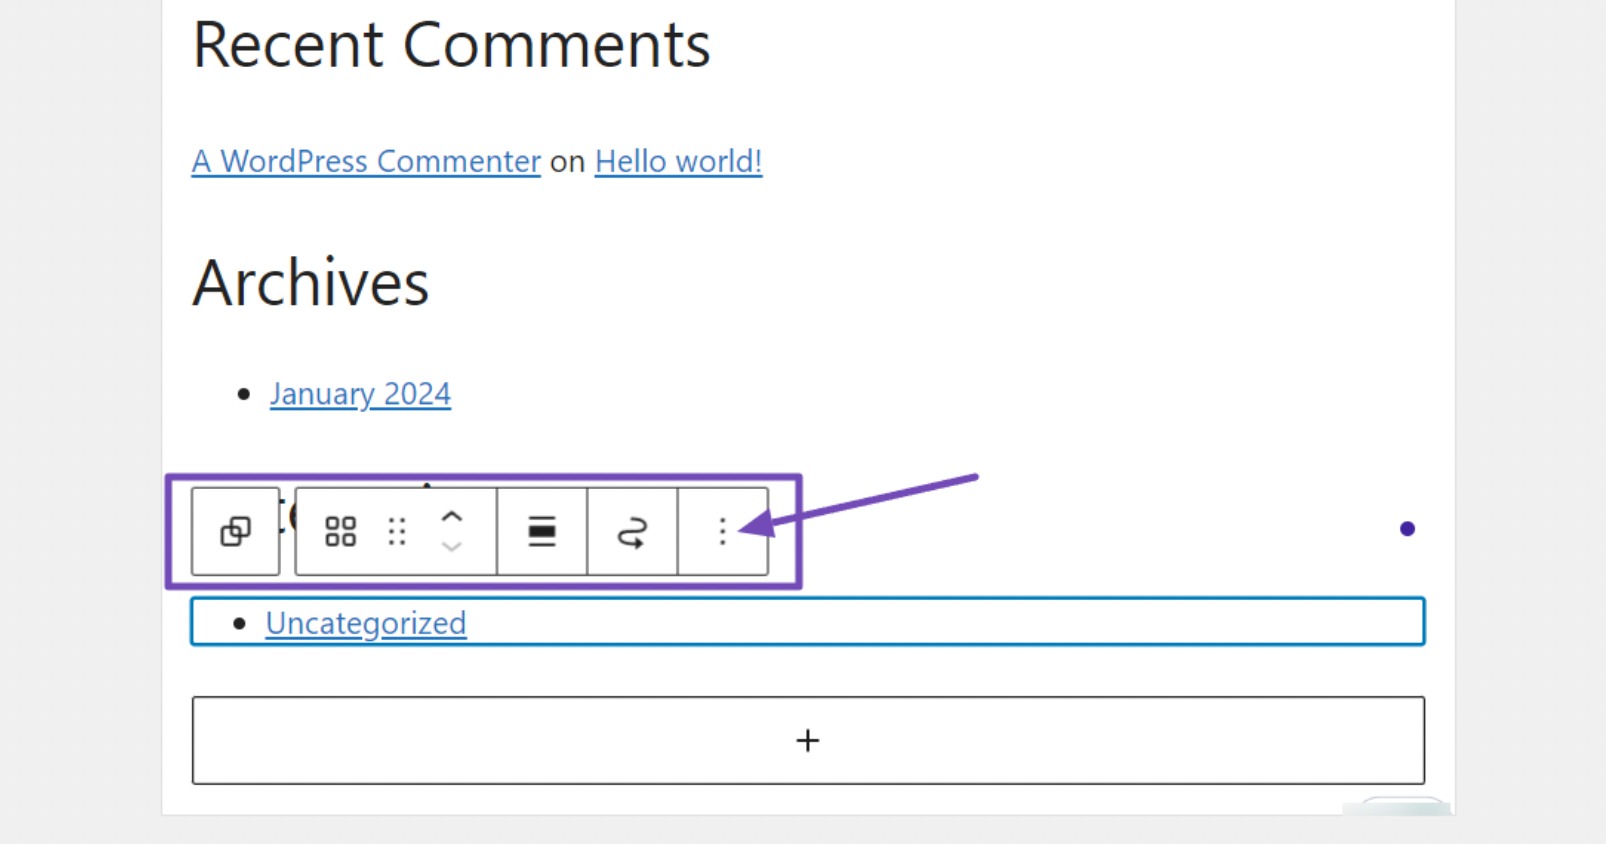
When you click on the three dots option, a menu with various relevant functions will appear.
Navigate through the menu and click on the Delete option to remove the widget, as shown below.
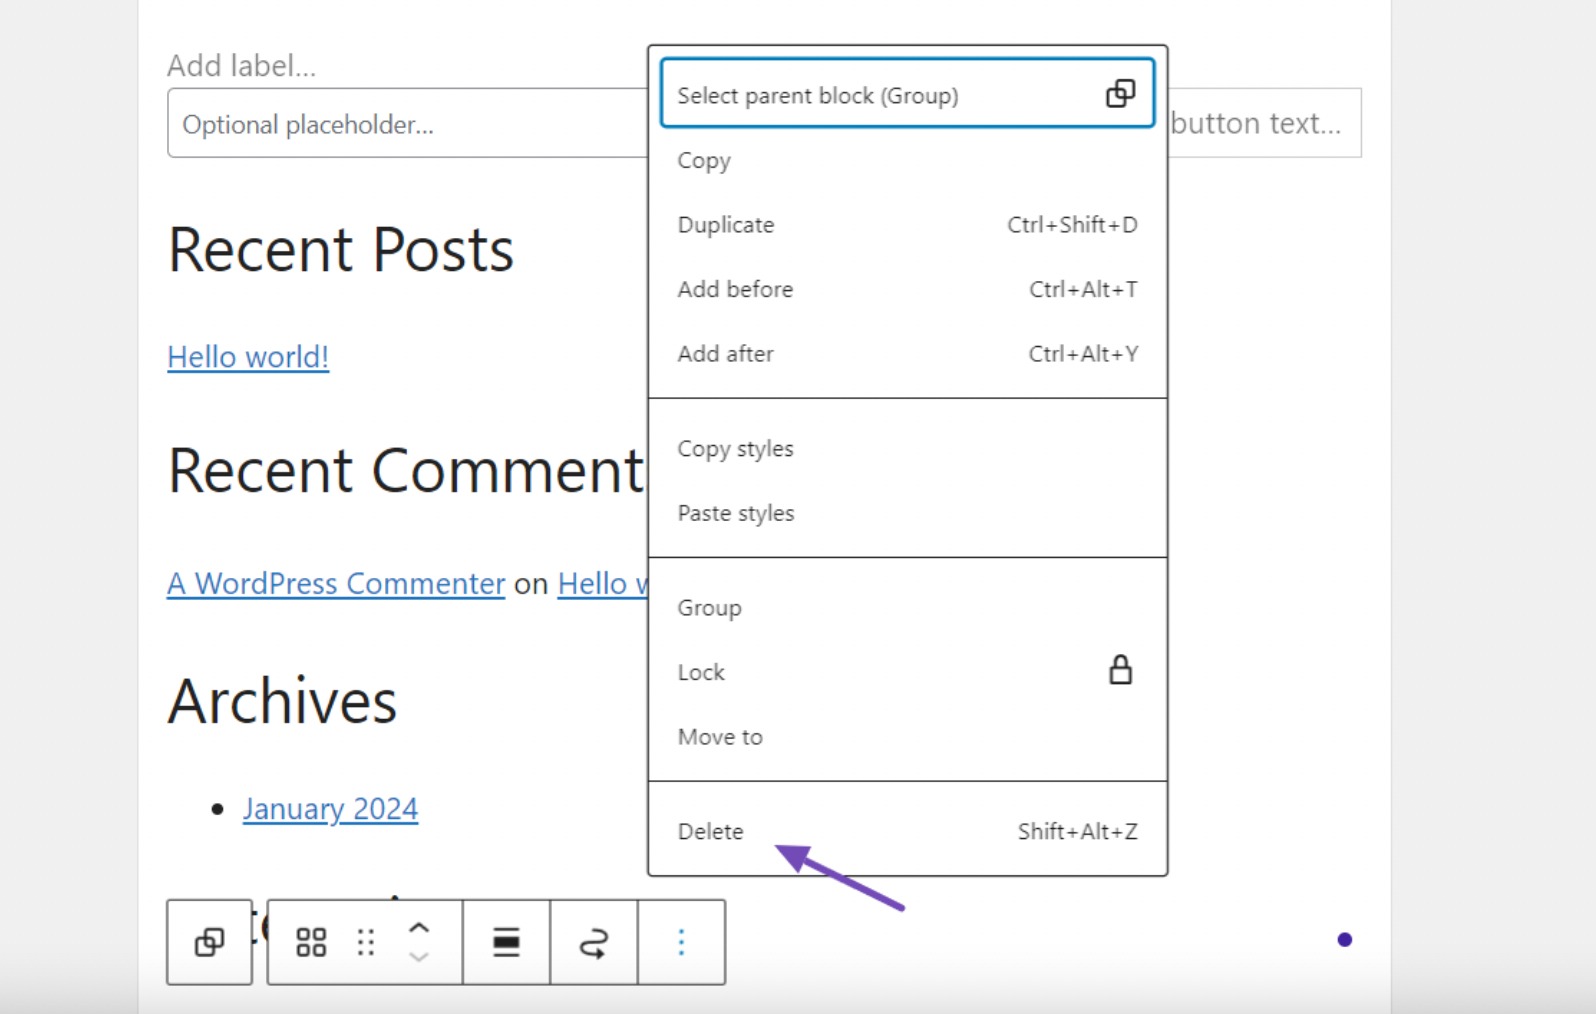
Once you click on the Delete option, the widget will be removed completely, without any further steps or confirmation required.
3 Types of Widgets Available in WordPress
A default WordPress installation comes with built-in widgets, including Latest Posts, Tag Cloud, Search, Categories List, Calendar, Custom HTML, and more.

However, most WordPress plugins and themes also come with their own widget blocks that you can add to your site.
You can easily add these widgets to your website’s sidebar or other areas by dragging and dropping them.
Additionally, if you have coding skills, you can create your own custom WordPress widgets to add even more functionality to your website.
With so many options available, you can create a unique and personalized website that meets your needs and preferences.
4 Frequently Asked Questions
Can I rearrange the order of widgets in WordPress?
Yes! In both the Customizer and Widget Management Screen, you can easily rearrange widgets by dragging and dropping them into your preferred order within the widget areas.
Are widgets mobile-friendly in WordPress?
Many widgets and themes in WordPress are designed to be responsive, ensuring a seamless experience on both desktop and mobile devices. However, it’s advisable to preview and test your widgets to ensure they display correctly across different screen sizes.
Are there any SEO considerations when using widgets?
In general, widgets themselves don’t directly impact SEO. However, the content and links within widgets can influence SEO. Ensure that widget content aligns with your SEO strategy, and use relevant keywords where applicable.
Can I add widgets to specific pages or posts in WordPress?
By default, widgets are typically added to widget-ready areas that apply globally. However, some themes and plugins allow you to specify widget visibility on certain pages or posts, providing a targeted approach to widget placement.
Are there limits to the number of widgets I can add to my WordPress site?
There’s no strict limit to the number of widgets you can add. However, adding an excessive number may clutter your site and impact performance. Aim for a balance between functionality and a clean user interface.
Can I customize the appearance of widgets in WordPress?
Yes! Many widgets allow for customization. In the Customizer or Widget Management Screen, click on a widget to reveal its settings. Depending on the widget, you can often adjust colors, fonts, spacing, and other visual aspects.
What happens if I switch my WordPress theme? Do I lose my widgets?
If you change your WordPress theme, your widgets might not transfer smoothly to the new design. To prevent any problems, it is best to check and adjust your widgets to match the new theme.
How do I troubleshoot if a widget is not displaying correctly on my site?
To fix a widget display issue on your site, begin by investigating plugin or theme conflicts. Disable plugins individually to find the cause. Confirm that your theme allows widgets, and if the problem persists, review the widget settings for any errors.
5 Conclusion
Adding widgets to your WordPress website is an excellent way to enhance its functionality and personalize its look.
With the step-by-step guide outlined in this blog post, you should now feel confident in adding and managing widgets on your WordPress site.
Keep in mind that widgets offer a versatile display of content, such as showcasing recent posts, contact forms, or social media feeds.
By strategically placing widgets throughout your website, you can boost user engagement, drive conversions, and make your site more informative and visually appealing.
If you found this post helpful, please share your feedback by Tweeting @rankmathseo.
