HTML link code lets you turn elements on your website—like text and images—into clickable hyperlinks.
These hyperlinks help users navigate the web.
And when you use them correctly for internal links—links from one page on your site to another page on your site—they can provide SEO benefits, too.
This guide shows you how to code a variety of HTML links. And how to style your links with simple CSS.
Let’s get started.
What Is a Hyperlink?
A hyperlink, often called a link, is a reference linking one resource to another. It includes a clickable element like a word, phrase, image, or icon.
Clicking a hyperlink initiates an action. Like taking users to a different webpage. Or launching a phone call.
And coding your own hyperlinks is easy. As long as you understand the syntax of an anchor element (also known as an <a> tag).
Anchor Element Syntax
Anchor elements have four components:
- An opening tag: This is the start of the anchor element and signifies the beginning of the link element
- Tag attributes + attribute values: Within the opening tag, you can include different attributes. Attributes provide extra information, like how the link should behave or where it should take users. (We’ll dive into different attributes later on.)
- Anchor text or other content: This is the content users click
- A closing tag: This signifies the end of the link element
Let’s tie all four points together with a simple example. The below example uses an href attribute. It specifies the destination of the link—in this case, Semrush’s homepage.
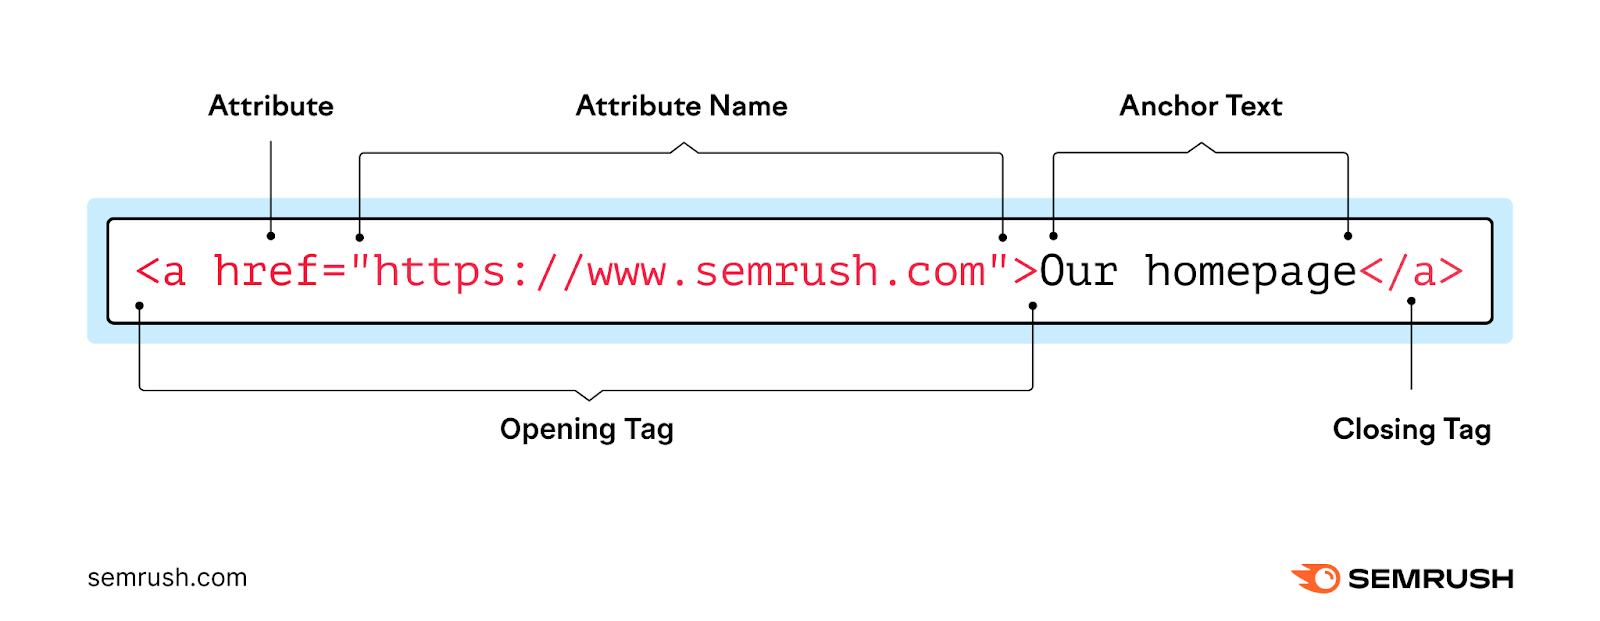
The destination can also be a specific place on a webpage or a downloadable document.
Note: You can use one or more attributes in your anchor elements.
How to Code a Link in HTML
Let’s walk through how to code a simple link to your website’s homepage in HTML.
First, start with your anchor tag:
<a> </a>
Next, add your homepage’s URL using the href attribute:
<a href="https://www.yourhomepage.com"> </a>
Now, add the anchor text people will click to go to your link:
<a href="https://www.homepage.com>Visit our homepage</a>
Your anchor text should be descriptive. So users will know where they’ll end up when they click your link.
Search engines also use anchor text to understand the page you’re linking to. So good anchor text can improve your SEO.
Take the below anchor text of “newsletter best practice” from ConvertKit. Readers and search engines know that if they visit the link, they’ll end up on a page about newsletter best practices.

Something non-descriptive like “click here” doesn’t give enough context. Making it confusing to people and search engines.
Semrush’s Site Audit tool can check your website for links with non-descriptive anchor text.
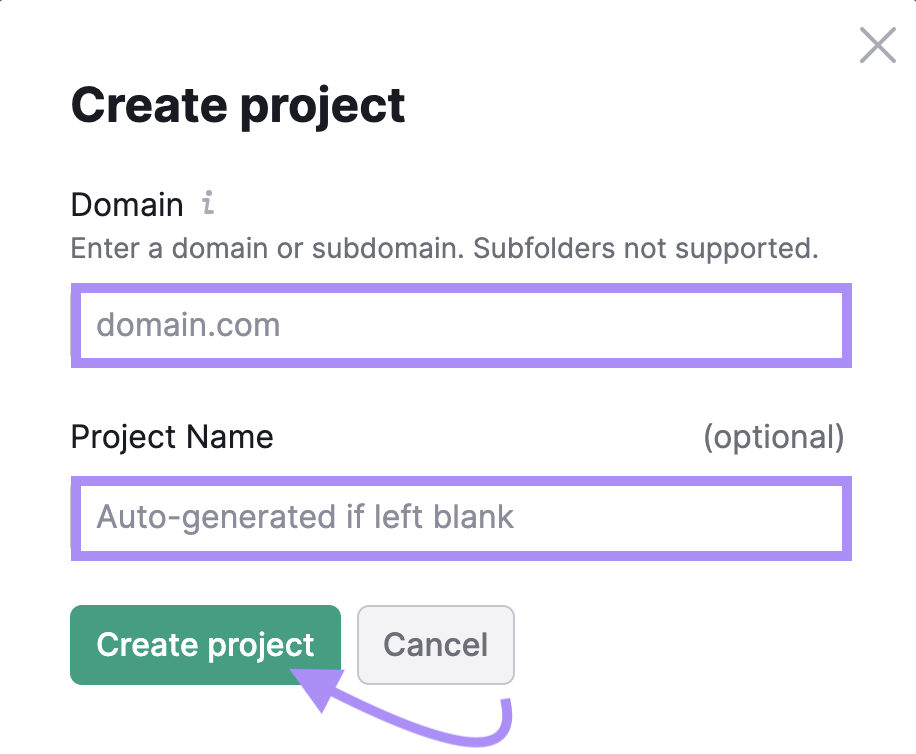
First, set up your site audit by clicking the “+ Create project” button.

Enter your domain and give your project a name. Then click “Create project.”
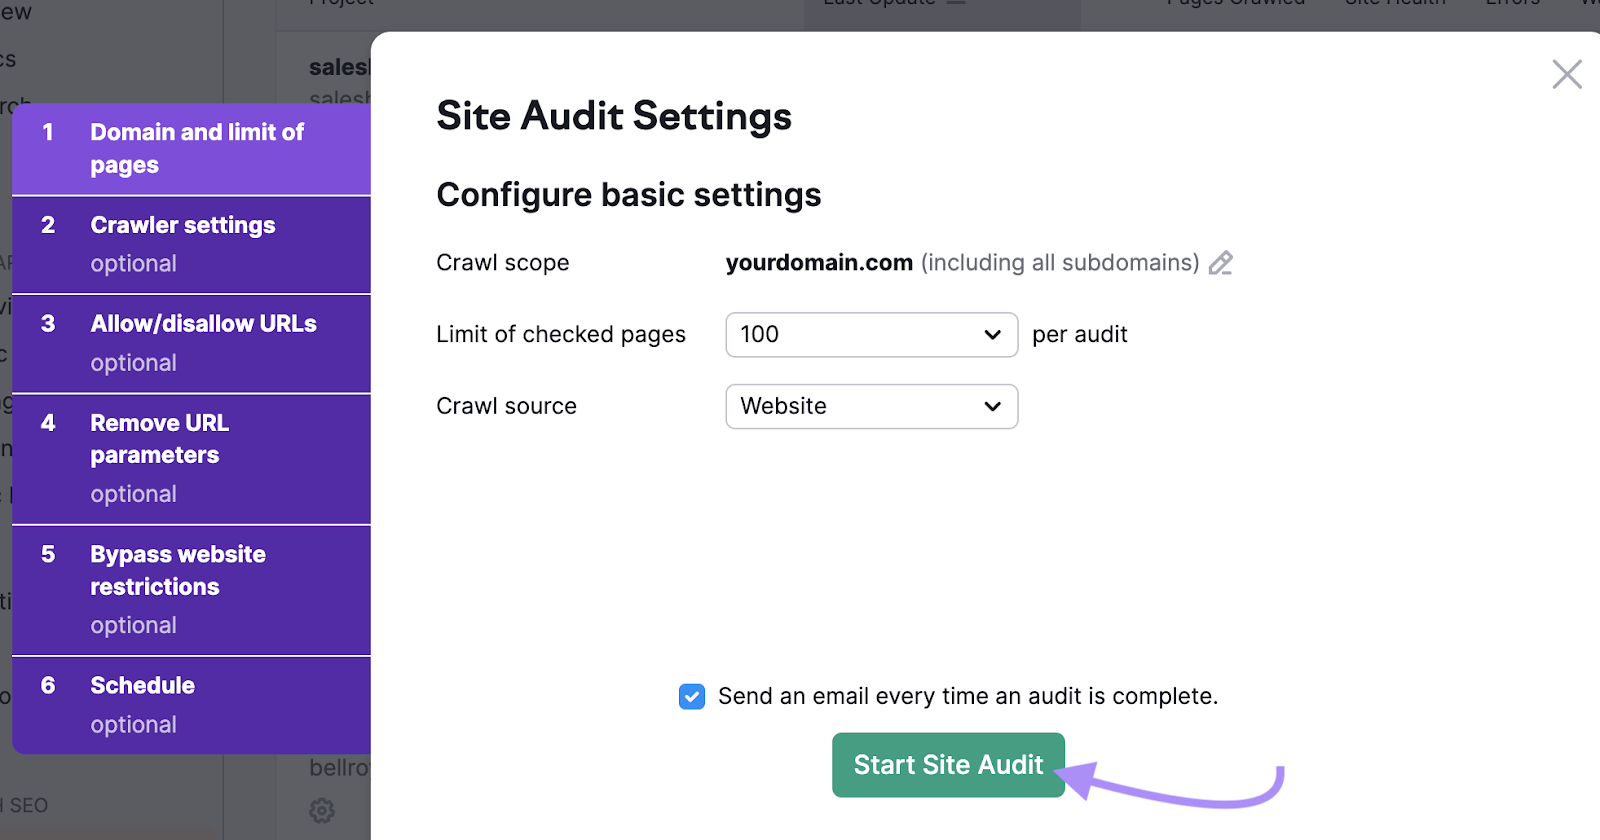
Next, configure your settings. This Site Audit configuration guide gives you a detailed walkthrough if you need help.
Then, click “Issues” and search “descriptive.” This shows a report for links with non-descriptive anchor text:
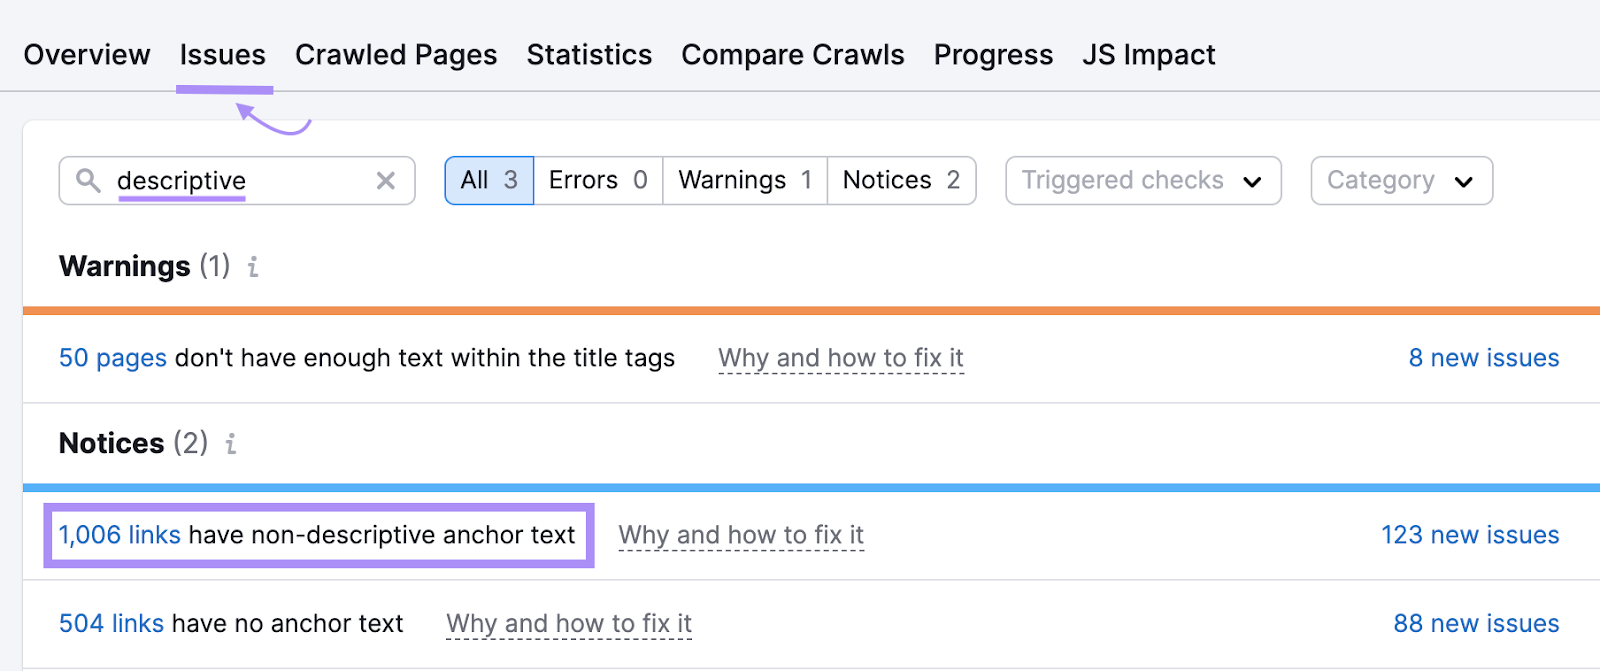
Click the links to review a list of non-descriptive links and links with no anchor text.
Then, update the anchor text of the links listed to help users and search engines better understand what the linked pages are about.
Now that you know how to code a basic link, let’s dive into additional attributes and values you can add to your HTML link code.
You can make media like images or GIFs clickable by adding a source to your anchor tag:
<a href="https://www.example.com"><img src="https://www.example.com/filename.jpg" alt="a description of the media"></a>
Here, you include a link to the media (an image in this case) instead of anchor text.
In the above code:
- src stands for “source” and specifies the location/URL of your media
- alt contains the alt text—descriptive text used by screen readers and displayed when an image doesn’t load—if using an image as a link (below)
2. Linking to Specific Page Sections (Anchor Links)
Anchor links—also called jump links—take users to a specific place on the page with this code:
<a href="https://www.example.com/blog/#seo-tips">SEO tips</a>
They help readers navigate the page better to find what they need (like a table of contents).
To start, label the anchor—the place the link will take the reader—by giving it an ID in the opening tag. Like this:
<h2 id="seo-tips">
You can assign an ID to any HTML element. In the example above, we assigned it to an <h2> heading tag.
Now, test the ID to make sure it works. Add the ID to the end of your URL with a hash like this:

Paste the link in your browser’s address bar. Press enter to ensure it directs you to the assigned ID location on the page.
If it works, you can add the link to the href attribute.
3. Opening Links in New Windows/Tabs
You can choose whether your links open in the same window or a new tab with the target attribute.
For the same window, use the target=”_self” attribute value like this:
<a href="https://www.example.com" target="_self">Anchor text</a>
Links open in the same window by default. So, using “_self” isn’t necessary. But it can help you clarify the intent of specific hyperlinks.
To open links in a new tab, replace “_self” with “_blank”:
<a href="https://www.example.com" target="_blank">Anchor text</a>
It’s usually best for links to open in the same tab for accessibility reasons.
4. Linking to Email Addresses
Adding the mailto value opens your user’s email provider when they click your link:
<a href="mailto:mail@semrush.com">Email Us</a>
For example, link to your support email so customers can easily submit their questions.

Just make sure your anchor text indicates an email application will open from clicking the link. Something like “Email us” or “Send an email” conveys the message clearly.
This way, users won’t be caught off guard when an unexpected application opens.
5. Linking to Phone Numbers
Initiate a Call
Linking a phone number initiates a call. You can link to a phone number using the tel value:
<a href="tel:+1-123-456-7890">Call Us</a>
Initiate a Text Message
You can also initiate a text message by using the “sms” value:
<a href="sms:123-456-7890">Send SMS</a>
As with the email attribute, make sure the user knows a phone call or text message will initiate when clicked.
6. Creating Download Links
The HTML code for creating downloads is similar to linking to a URL and looks like this:
<a href="https://www.example.com/path/to/file.pdf" download>Download the PDF (175kB) now</a>
When users click the link, their device will automatically download the file.
When choosing which files to use for your links, keep a few things in mind:
- Include the file type in the anchor text so users know what they’re downloading
- Use file types that are widely supported so users don’t need additional software to open them
- Mention the file size so you user can determine if they have enough space for the file
7. Linking with Accessibility Attributes
The aria-label attribute lets you describe links to screen readers. Like this:
<a href="https://www.example.com" aria-label="Read more about building a brand">Read more</a>
It’s useful when the anchor text isn’t descriptive.
For example, let’s say you display snippets of content and include a “read more” link:

With the “aria-label” you can add more context behind the “read more” link.
This way, people who use screen readers will know what the link is for.
8. Linking with Title Attributes
The title attribute shows text when users hover over a link:

And you get this text by adding in the title attribute:
<a href="https://www.example.com" title="Read more about this topic by clicking this link">Anchor text</a>
Use it to give additional context to your links.
For example, tell users where they’ll end up if they click the link. In this example, the title text could say something like, “click this link for an in-depth guide on this topic at www.example.com.”
9. Adding Relationships to Your Links
Adding a relationship to your links helps search engines and browsers understand the connection between the linked document and the current one.
For example, if you collaborated with another business, you’d add the rel=”sponsored” attribute value to your anchor element, like this:
<a href="https://www.example.com" rel="sponsored">Anchor text</a>
This tells search engines that the link is part of an advertising/sponsorship collaboration.
Here are some other common relationship attributes:
- nofollow: Instructs search engines to ignore the link for search ranking purposes. Use when you’re linking to content that you don’t necessarily endorse or when you want to prevent search engines from passing link equity to the linked page.
- noopener: A security measure that prevents the opened page from accessing information from the original page. Use when you use the target=”_blank” attribute value. It helps protect your site from potential security vulnerabilities.
- noreferrer: Stops browsers from sending the original page’s address as a referrer. Use when you don’t want the linked page to track referral traffic from your site.
Styling and Designing Links with CSS
With CSS, you can style your links to match your brand by changing their colors and design.
CSS stands for cascading style sheets. It’s a stylesheet language that tells web browsers how to display web documents written in markup languages like HTML.
We’ll discuss two ways to edit the CSS:
- Inline CSS
- An external CSS file
Inline CSS
Inline CSS lets you add styling right into the HTML code for a single element.
Just add a style attribute. Like this:
<a href="https://www.example.com" style="color: red;">Anchor text</a>
In this code, we use “style” to add color.
You can change the color using:
- Color keywords (like red)
- HEX codes
- RGB and RGBA values
- HSL values
If you want to remove the hyperlink’s underline, you can use the “text-decoration:none;” property. Like this:
<a href="https://www.example.com" style="color: red; text-decoration: none;">Anchor text</a>
Inline CSS works when you need to make one hyperlink look different than the rest.
For example, say your links are all green. But you have a downloadable file, and you want the link to be orange. For that, use inline CSS.
External CSS File
An external CSS file lets you set global styles.
In your external CSS file, add this code:
a {
color: red; /* Change this to your desired color */
text-decoration: none; /*Remove this line to keep the link’s underline */
}
As with inline CSS, you can use color keywords, HEX codes, RGB and RGBA values, or HSL values to set your links’ color.
Check Your Hyperlinks with Site Audit
To give users a great experience, make sure your hyperlinks work at all times.
This way, users won’t hit dead ends and can find what they need.
Use Semrush’s Site Audit tool to check your website for broken links.
Click “Issues” and search “broken.”
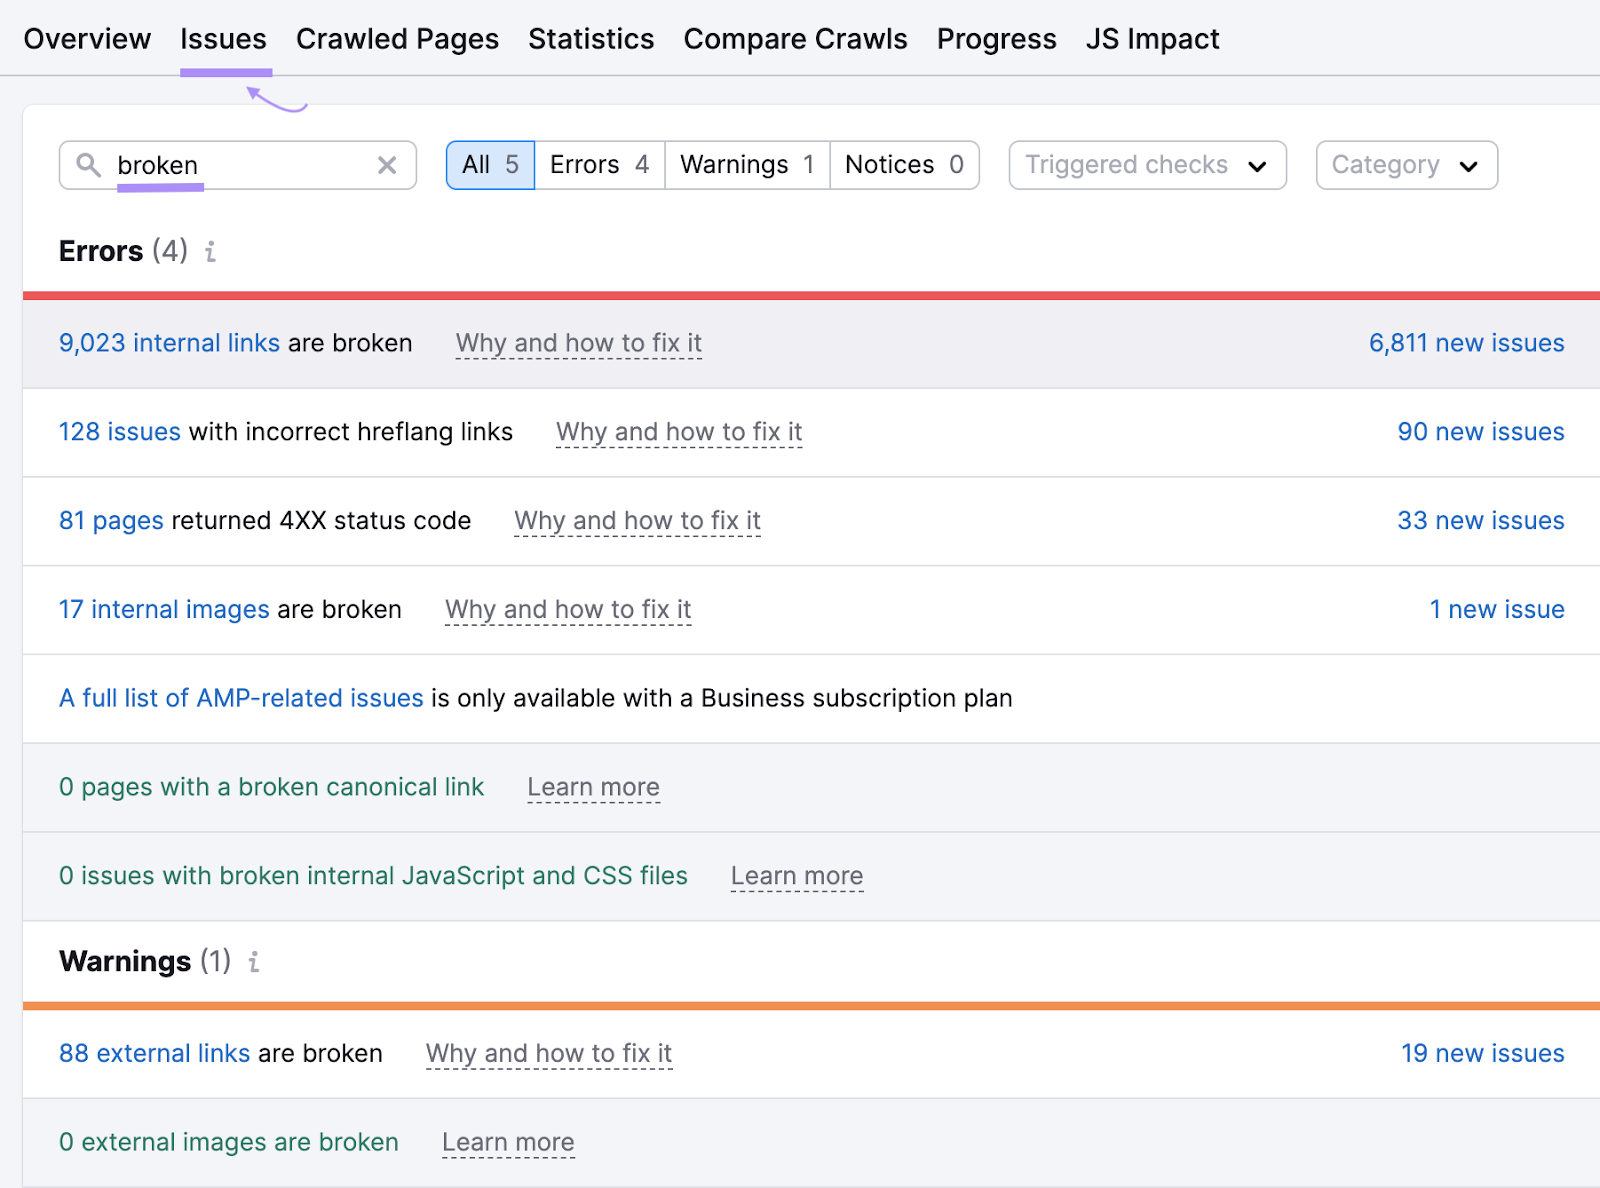
This shows you which links need your attention. Fix them so users can navigate your site—and click links to external sites—with ease.
Try Site Audit for free today.
Source link : Semrush.com
