What Is Image SEO?
Image SEO is the process of optimizing images on your website so that your pages and images may rank more prominently in unpaid search engine results. And therefore drive more traffic to your site.
Common image SEO tactics include:
- Resizing and compressing images
- Giving images descriptive file names
- Adding alternative text (alt text) to images
SEO image optimization works because it makes it easier for search engines like Google to find and understand your images. This means they’re more likely to show your images (and the pages they’re on) for relevant search queries.
Optimized images also load faster. And help get the information they need. These are both things that Google values when ranking search results.
They’re things that your visitors will appreciate, too.
Where Can Images Appear in Search?
One of the main benefits of image SEO is that it helps your images appear in search engine results pages (SERPs). And therefore attract valuable clicks from users.
Many users go straight to Google Images. To get results like these:
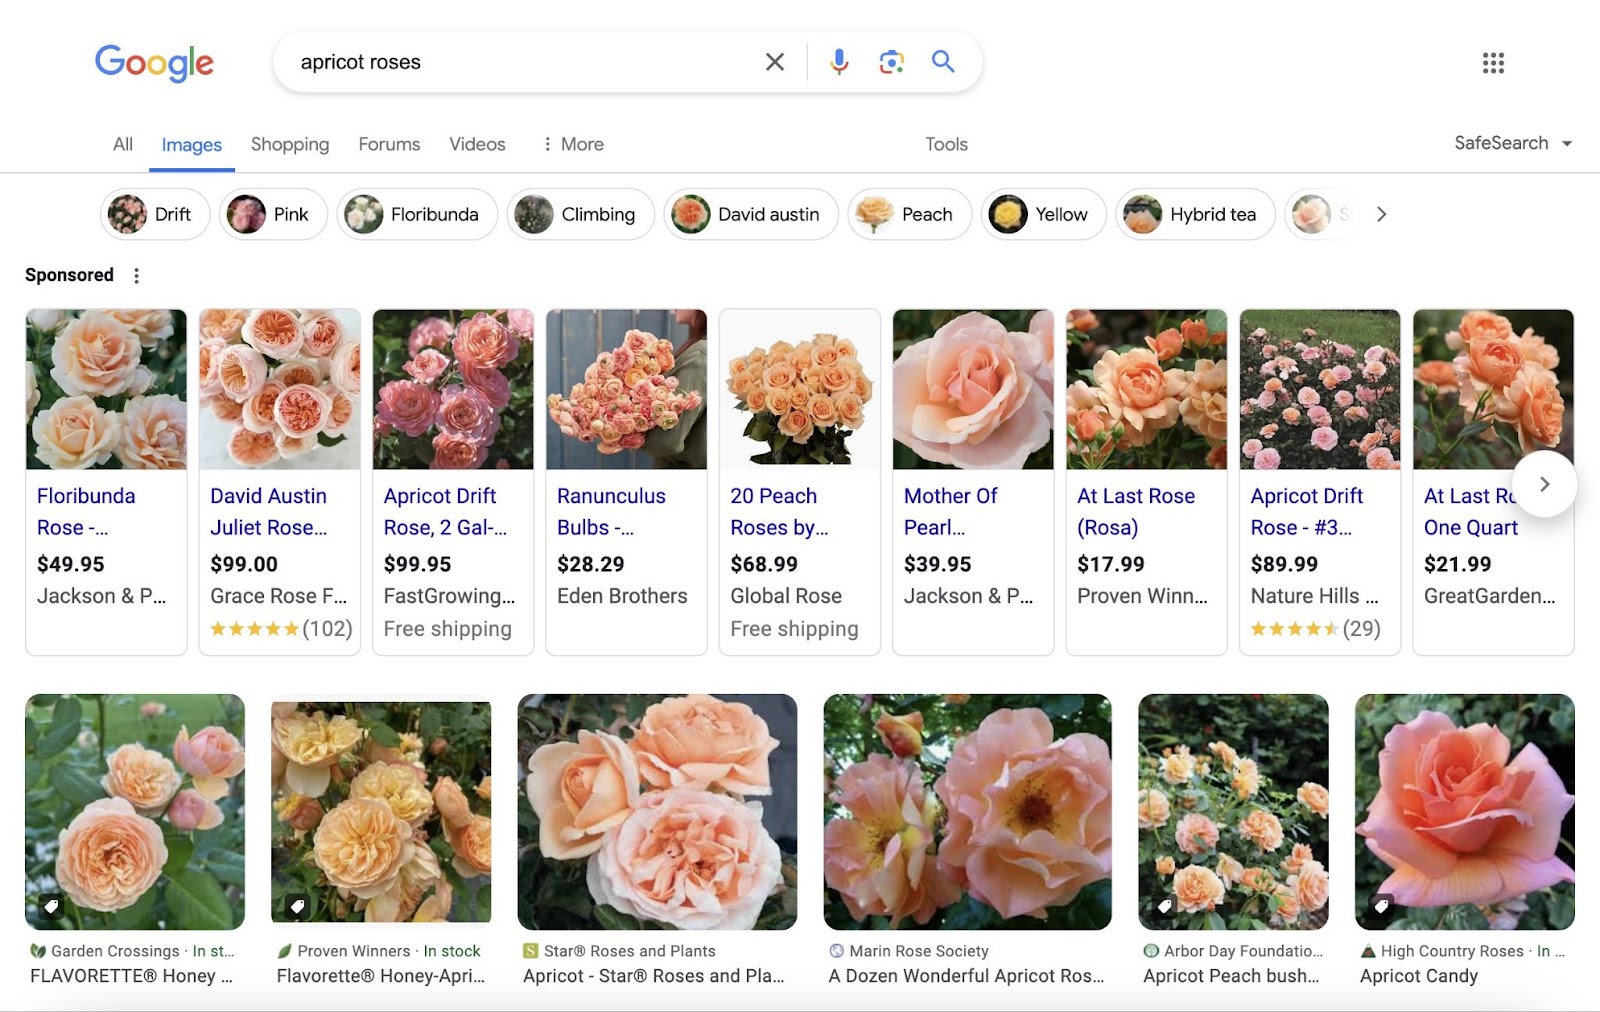
There are billions of searches on Google Lens every month, too. This is an app that lets people perform visual searches—i.e., search using their camera or an image.
And it gives results like this:
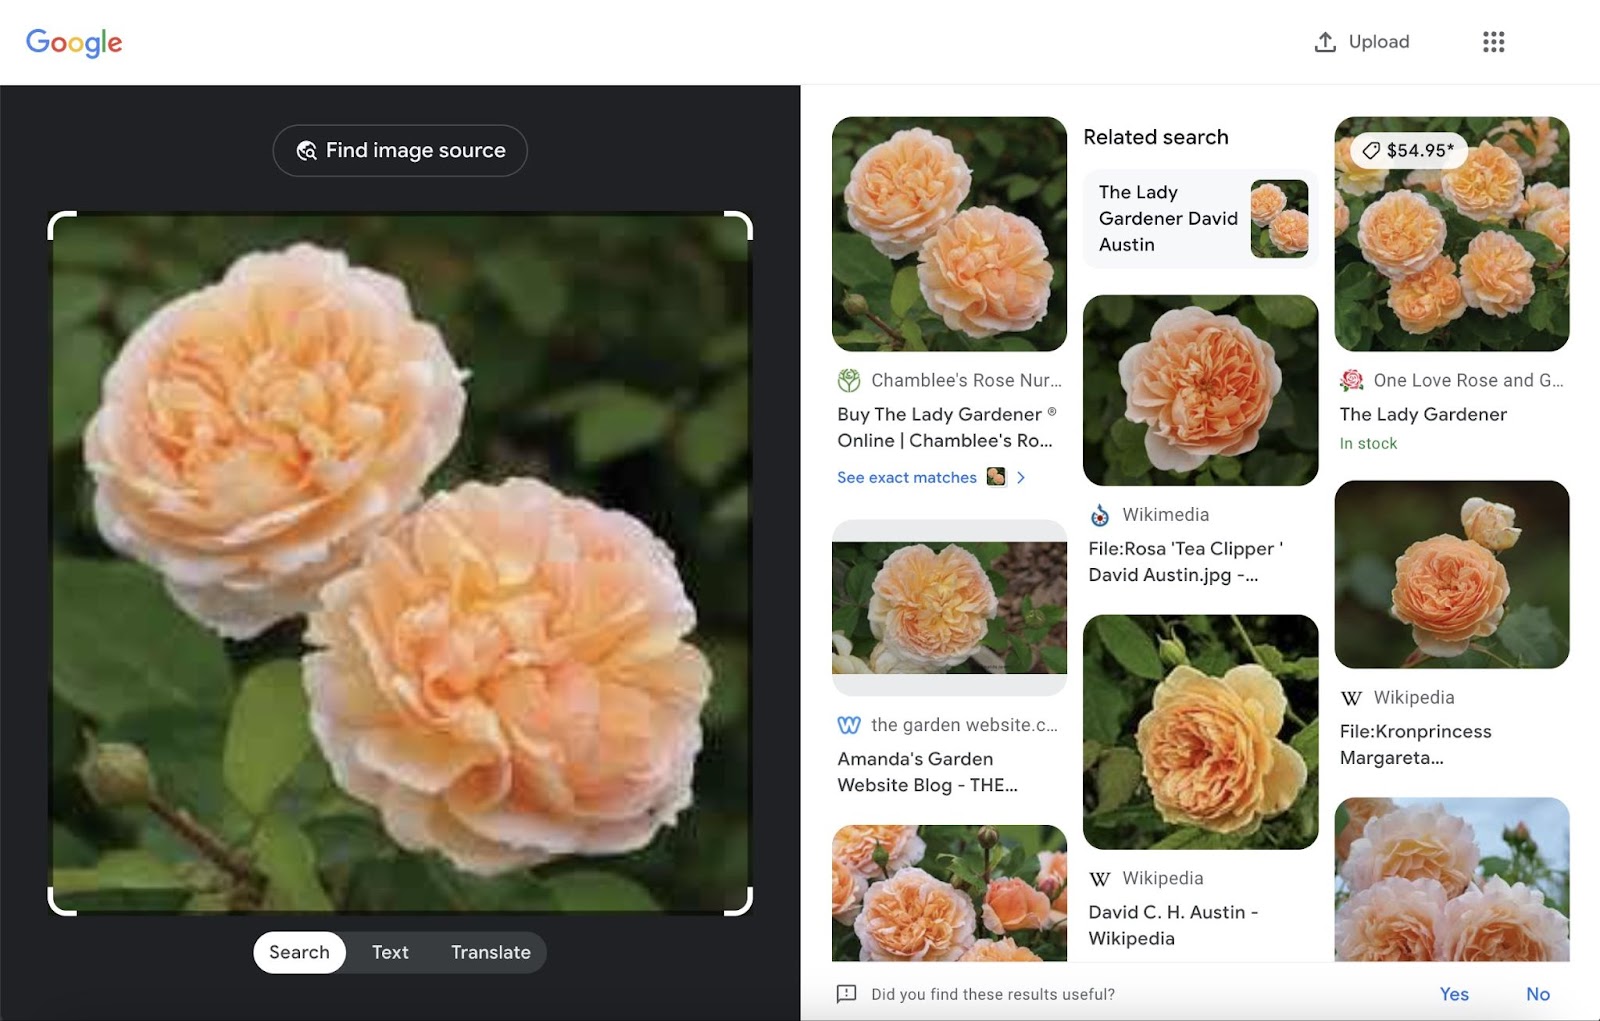
Plus, Google regularly displays images in standard results.
For example: On April 29, 2024, the Semrush Sensor showed that 55.62% of standard SERPs in the U.S. included an image pack.
Like this one:
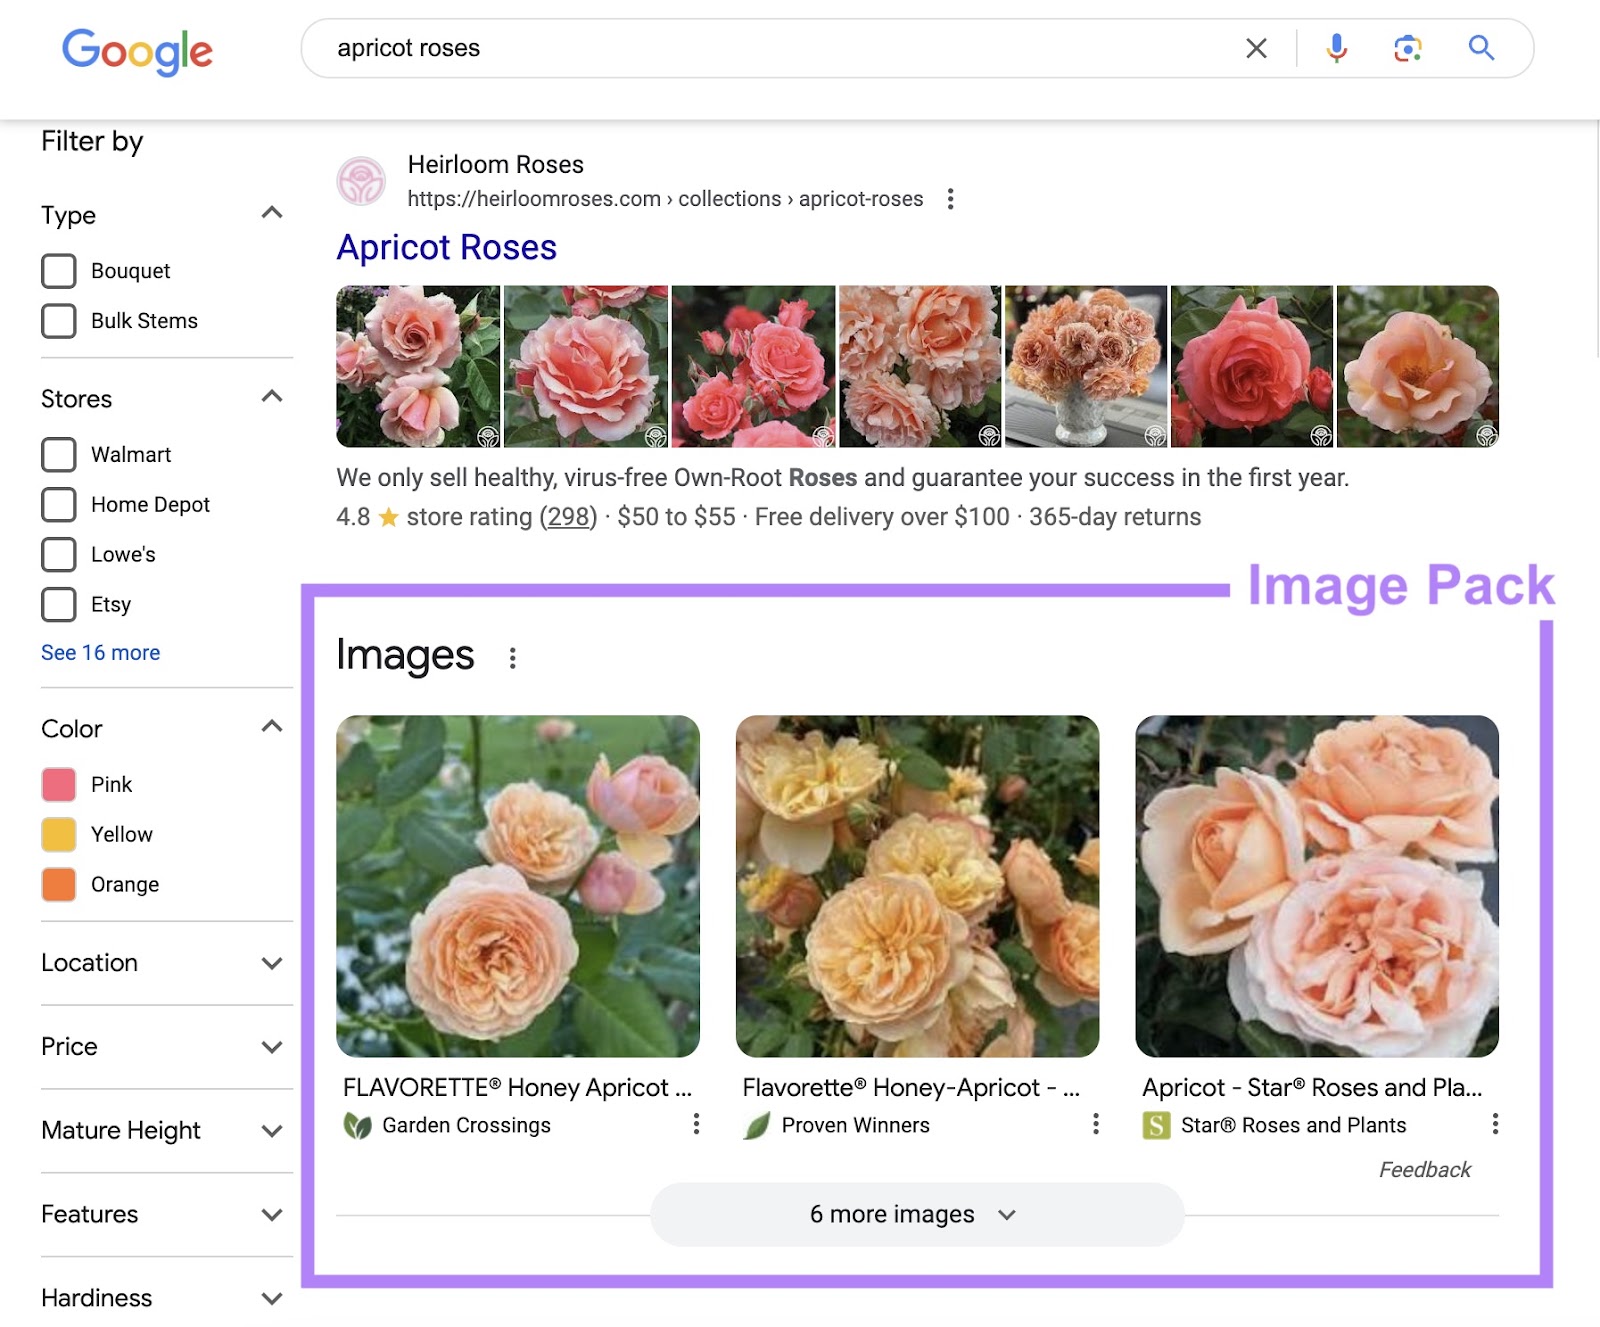
Image results are great for drawing users’ attention and clicks.
But remember that doing SEO for images can help with your other rankings, too.
How to Optimize Images for SEO
Apply these image SEO best practices to make your website more search engine friendly. And enhance the user experience.
1. Find or Create Useful Images
The first step in SEO image optimization is selecting or creating an image that supports your goals.
For example:
- Photos can showcase products and break up chunks of text
- Graphic designs can convey abstract ideas
- Charts and graphs can display complex data
- Icons can improve website navigation and usability
- Logos can strengthen your brand identity
- Screenshots can provide clear instructions and examples
Try to create your own images rather than using stock imagery. That way, you deliver unique value to users and give Google more reason to rank you.
If you do use images created by others, make sure you have the necessary permissions. Otherwise, you may be breaking copyright law.
2. Choose the Right Image Formats
You can save or convert image files into many different formats.
SVG is usually the best choice for icons and logos. Because SVGs can be resized without any loss of quality. And manipulated with JavaScript or CSS (website coding languages).
WebP is one of the best formats for other kinds of images. Because:
- It’s supported by major search engines, internet browsers, and social media sites (although it’s not supported by some older browsers/systems)
- It generally creates smaller (and therefore faster-loading) files than other formats
- It supports transparency and animation
- It uses lossy and lossless compression (which help ensure a good balance between file size and image quality)
However, SVG and WebP images can be harder to create and manage.
The best alternatives are:
- JPEG for standard images
- PNG for images with transparency, text, or lots of detail
- GIF for simple animations
3. Give Your Images Descriptive File Names
Google uses image file names to better understand what images depict. So, it’s best practice to give your images descriptive (yet concise) file names.
For example:
✅ apple-iphone-15-pink-side-view.jpg
❌ apple-iphone-15-latest-model-vibrant-pink-color-side-angle-view-showcasing-camera-lens-and-buttons-2024-release.jpg
❌ IMG00353.jpg
If you use the same image in translated versions of your content, make sure to update the file name accordingly.
For example, you might use the file name iphone-apple-15-rosa-vista-lateral.jpg on your Spanish domain.
4. Add Descriptive Alt Text
Alt text is a written description of an image that’s stored in a webpage’s code.
Specifically, it’s sorted in the alt attribute of the image tag. Like this:
<img src="image-file-example.jpg" alt="Alt text goes here">
Alt text is mainly used for accessibility: text-to-speech tools can read this description aloud so that visually impaired users know what’s conveyed by the image.
And it appears when a page doesn’t load properly or load slowly.
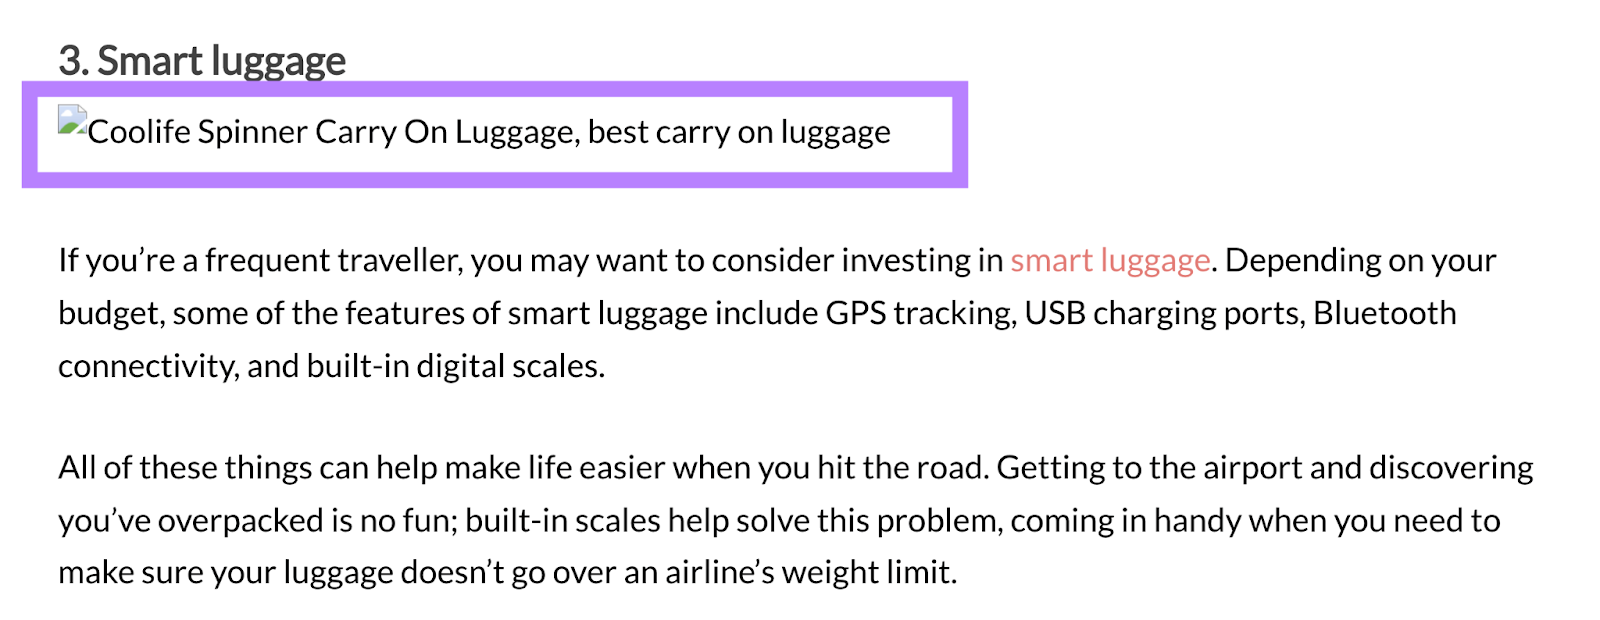
But, alt text is also useful for image search engine optimization. Because search engines use alt text to better understand what an image depicts.
Here are some alt text best practices:
- Only write alt text for functional images—not decorative images. This ensures a less disruptive experience for people using assistive technologies.
- Describe aspects of the image that are important in context. For example, if you use the same chart to demonstrate different points, use different alt text for each instance to clearly explain your point.
- Stick to a maximum length of 125 characters. Some assistive technologies stop reading alt text at this point.
- If there’s something that all your readers need to know, put it in the body content or the image caption—not the alt text. So it’s accessible to everyone.
- Avoid using redundant phrases like “image of” or “photo of.” It’s already apparent that alt text refers to an image.
You can check whether your images are missing alt text with Semrush’s Site Audit tool.
Open the tool and follow the prompts to start your audit.
Then, go to the “Issues” report and search for “alt attribute” in the search bar. To find the “# images don’t have alt attributes” warning.
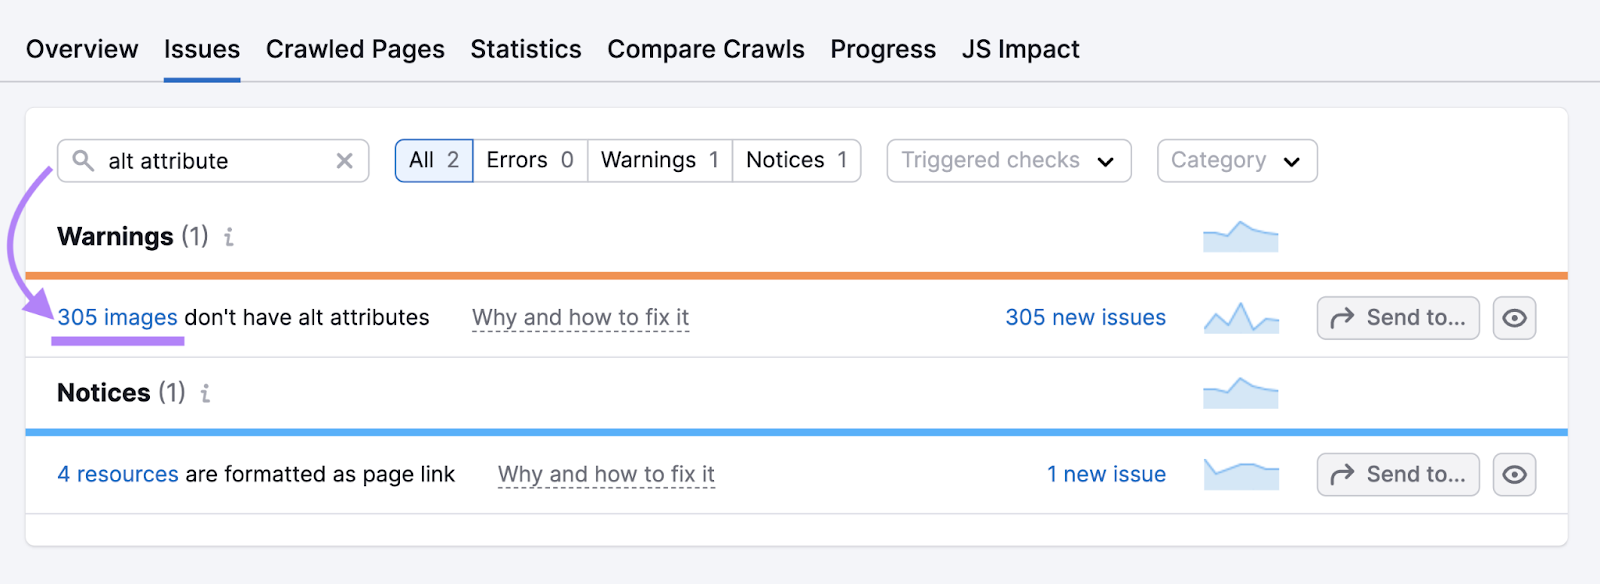
Click “# images” to see the affected images.
If you don’t want to add alt text to an image because it’s decorative, click the eye icon to hide the result.
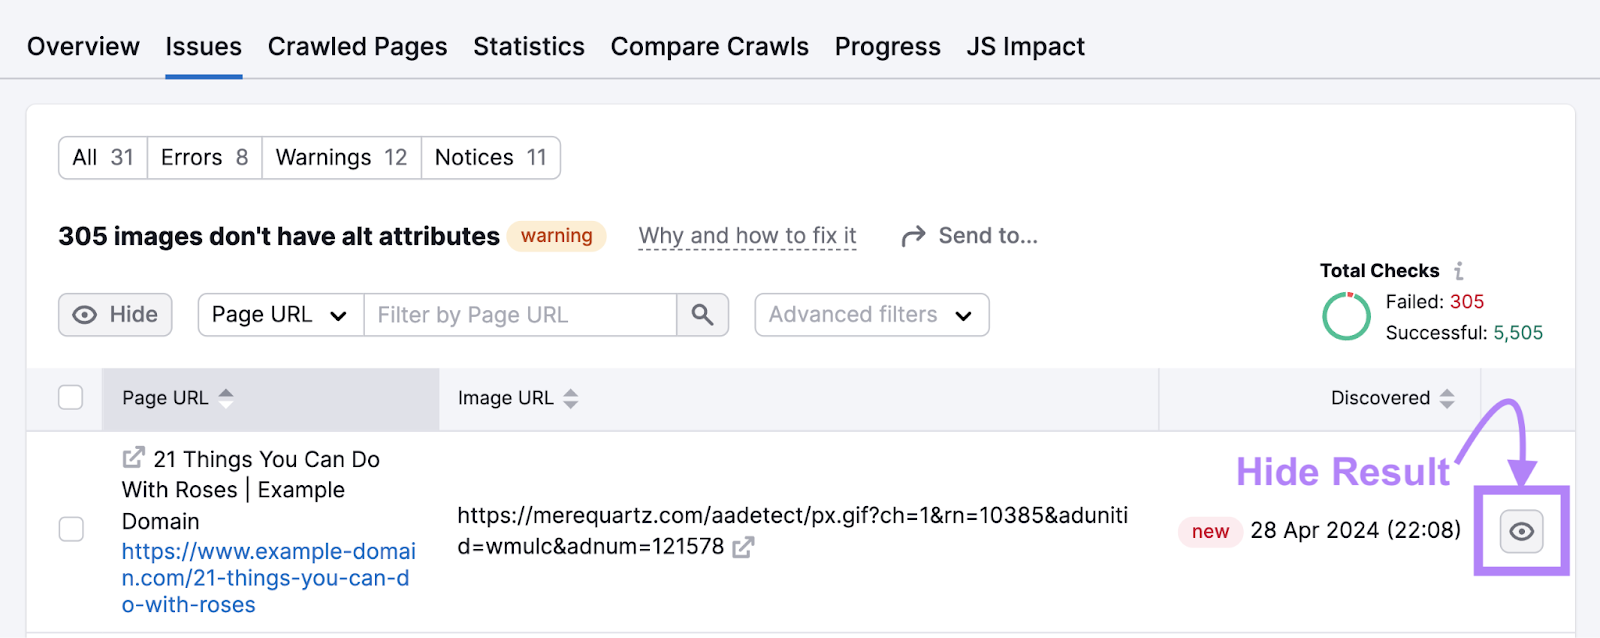
Otherwise, go to your website and add the image alt text. (The right way to do this depends on your website’s setup. Speak to a developer if you need help.)
You can then rerun your site audit to check everything’s working properly.
5. Resize Images
Resizing images to smaller dimensions helps reduce loading times. And it doesn’t have to affect image quality.
Generally, website images don’t need to be any wider than 2,500 pixels.
But the maximum size required for a particular image depends on:
- The container’s maximum width: If your image is placed in a container (an element used to manage layouts in web design), it shouldn’t to be any larger than the container’s maximum size
- The image’s purpose: For example, you may need large product photos so that users can zoom into the details and see them clearly—but thumbnails can be much smaller
- Your audience’s devices: Use Google Analytics 4 to see what screen resolutions your visitors use—that way, you know what sizes you need to cater to
Image editing and creation tools (like Photoshop) usually make it easy to resize images.
But you may be able to use a website plugin that automatically adjusts the images you upload (e.g., Resize Image After Upload for WordPress).
6. Compress Images
Various tools and plugins allow you to compress images—i.e., reduce image file sizes while maintaining the desired level of image quality.
Like this:
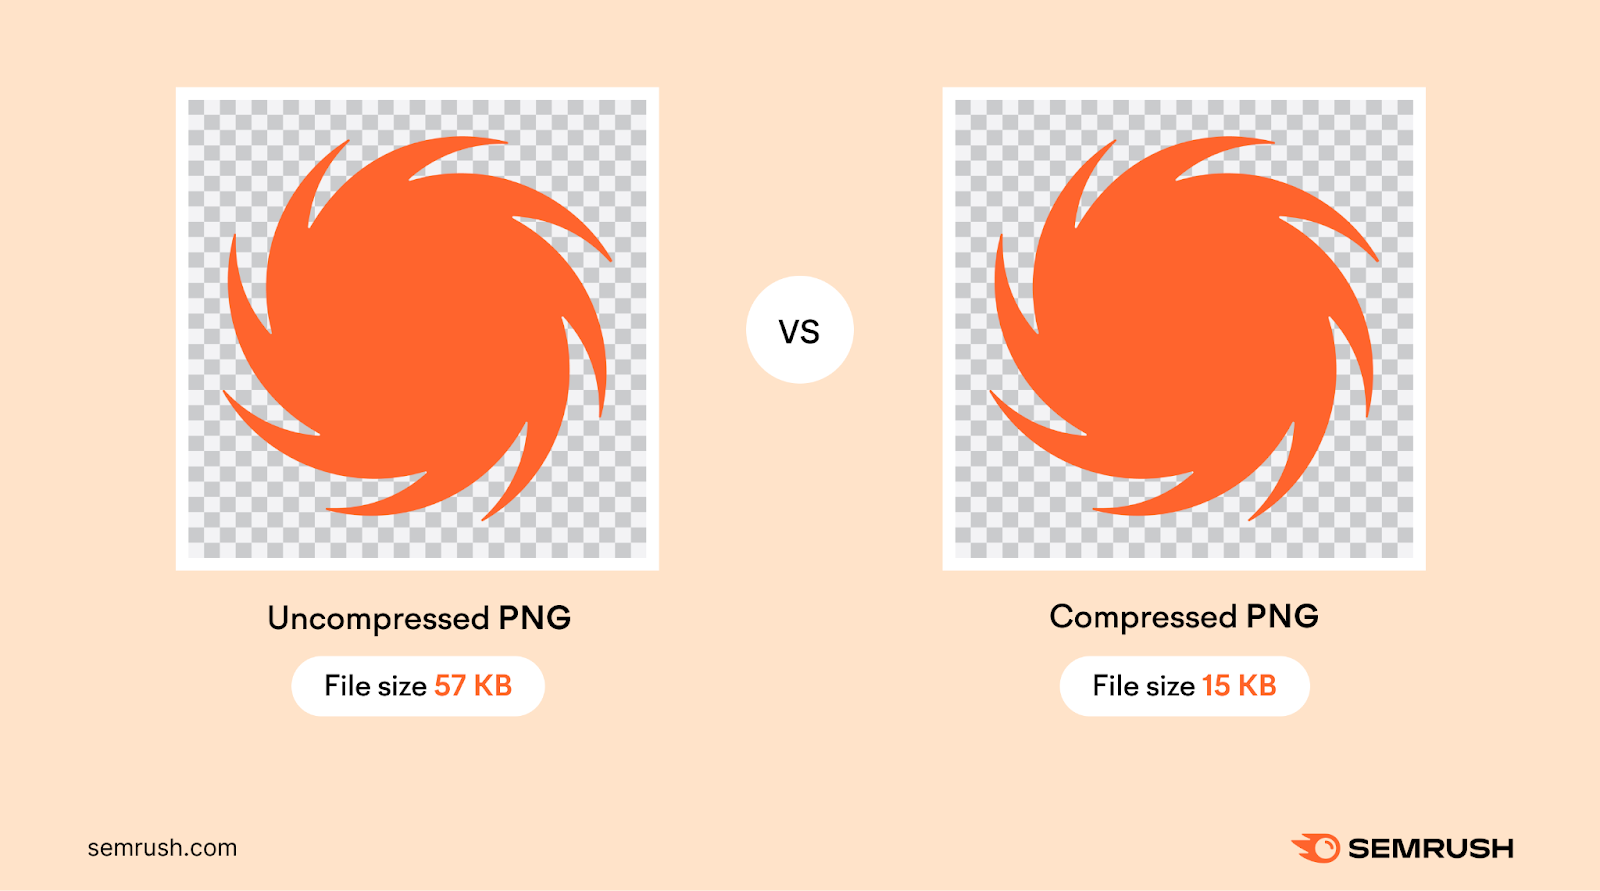
Some of the most popular options include TinyPNG, Squoosh, and GIMP.
Whatever tool you choose, you’ll need to configure various settings to achieve the desired result:
|
Setting |
Description |
Guideline setting |
|
Lossy vs. lossless |
Lossy compression reduces file size by removing “non-essential” image data. Lossless compression reduces file size without affecting quality but generally saves less space. |
Lossy |
|
Quality factor |
For lossy compression, you can usually choose a quality factor from 0 to 100. The higher the number, the higher the quality and the larger the file size. |
75-85 |
|
Resolution |
This is usually expressed in pixels per inch (PPI) or dots per inch (DPI). The higher the number, the higher the quality and the larger the file size. |
72dpi |
7. Use Responsive Image Scaling
Responsive image scaling means that website images automatically adjust based on the size of the user’s viewport (the part of the screen that shows the webpage).
It helps ensure a great user experience on every kind of device. Because it prevents images from being too hard to see (e.g., too big on mobile or too small on desktop).
So, responsive image scaling minimizes loading times, because images aren’t any larger than they need to be. And that’s the main reason it’s good for image SEO.
You can see responsive image scaling in action here:
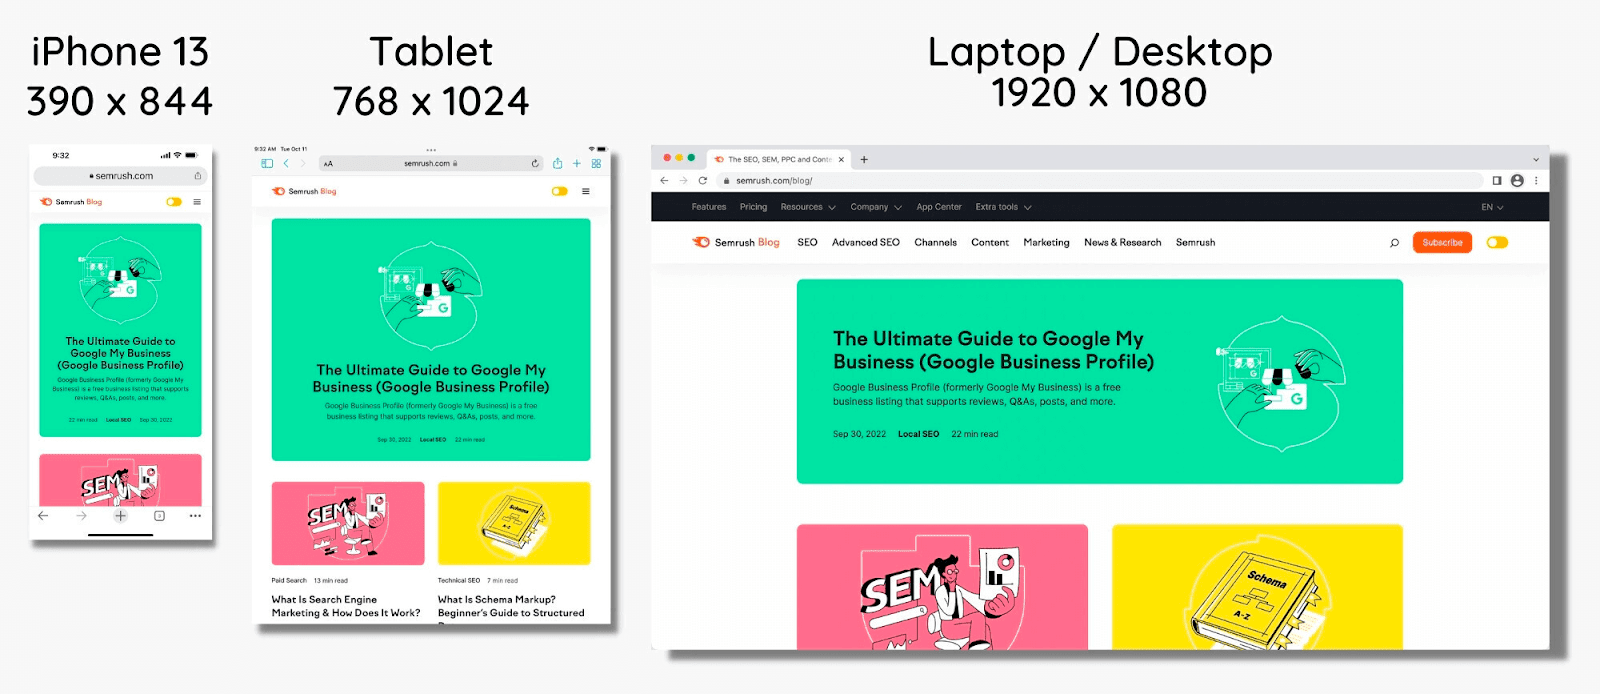
You make images responsive by using CSS.
Some website builders (like Wix) use responsive image scaling by default. If not, you’ll need to find a suitable plugin or get help from a web developer.
8. Implement Lazy Loading
Lazy loading ensures content isn’t loaded until it’s shown in the user’s viewport.
This means that the initial load time is only affected by content above the fold (in the part of the page that the user sees before scrolling). And is therefore faster.
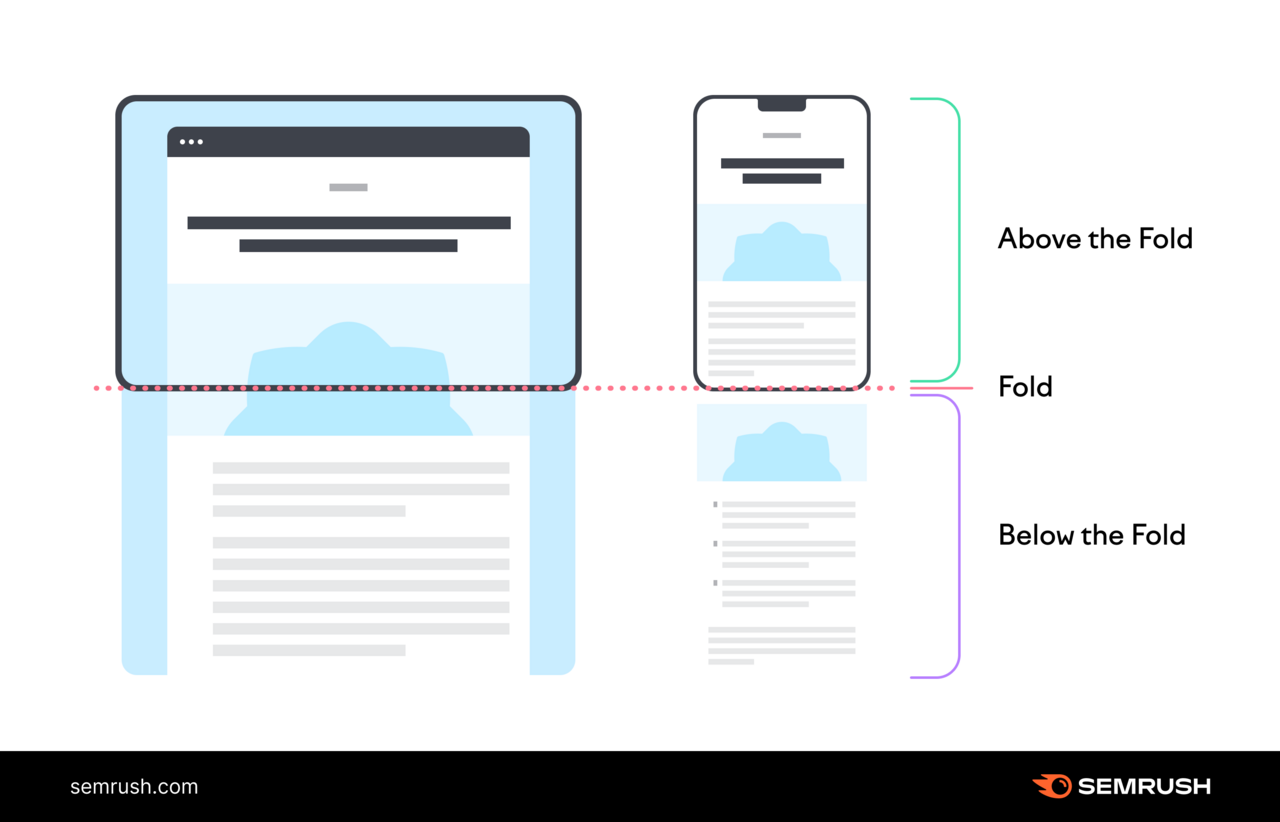
The easiest way to implement lazy loading is to add the loading=”lazy” attribute to image tags.
Like this:
<img src="image-file-example.jpg" loading="lazy" alt="Alt text goes here">
Only do this to images that appear below the fold on every device type. Otherwise, you’ll make your page slower rather than faster.
9. Create an Image Sitemap
An image sitemap is an XML sitemap made especially for images.
In other words, it’s a specially formatted file that lists images you want search engines to crawl and index (i.e., find and add to the database of possible search results).
Creating an image sitemap helps ensure that search engine bots don’t miss any important images when they’re crawling your site.
Google recommends that you structure your image sitemap like this:
<?xml version="1.0" encoding="UTF-8"?>
<urlset xmlns="http://www.sitemaps.org/schemas/sitemap/0.9"
        xmlns:image="http://www.google.com/schemas/sitemap-image/1.1">
    <url>
        <loc>[URL for a webpage on your website]</loc>
        <image:image>
            <image:loc>[URL for an image on this webpage]</image:loc>
        </image:image>
       <image:image>
            <image:loc>[URL for another image on this webpage]</image:loc>
        </image:image>
    </url>
    <url>
        <loc>[URL for another webpage on your website]</loc>
        <image:image>
            <image:loc>[URL for an image on this webpage]</image:loc>
        </image:image>
    </url>
</urlset>
There are many sitemap generator tools available to help you.
After creating your image sitemap, use Semrush’s Site Audit tool to check for any issues.
Just head to the “Issues” report and search “sitemap.”
You’ll immediately see whether you have errors, warnings, or notices to address.
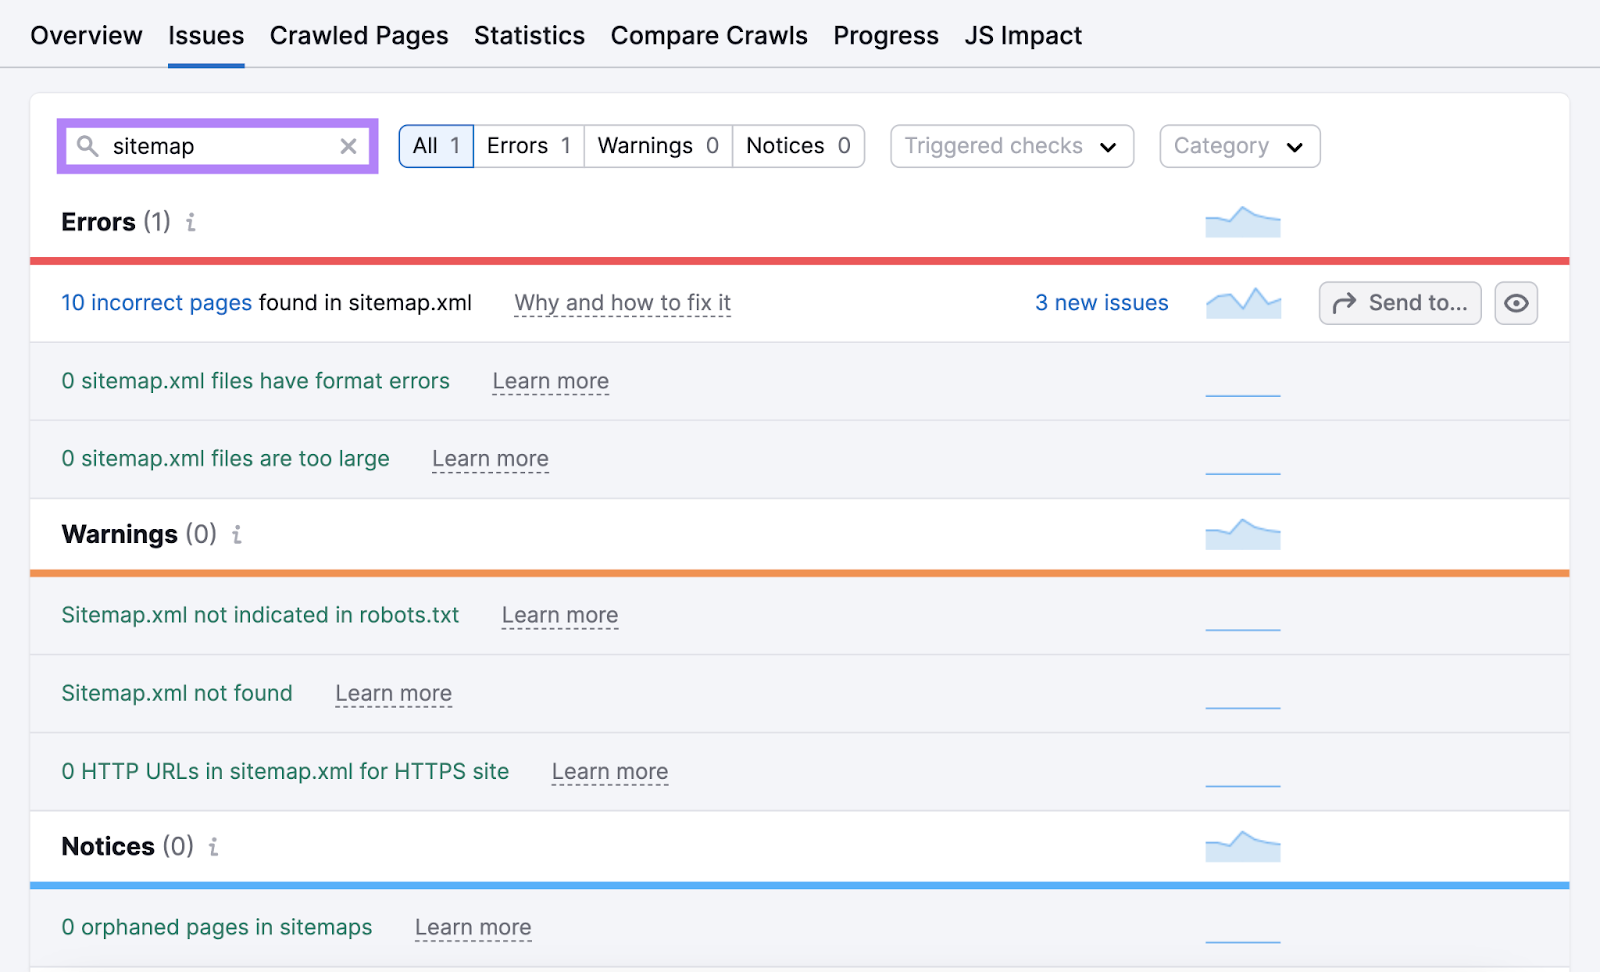
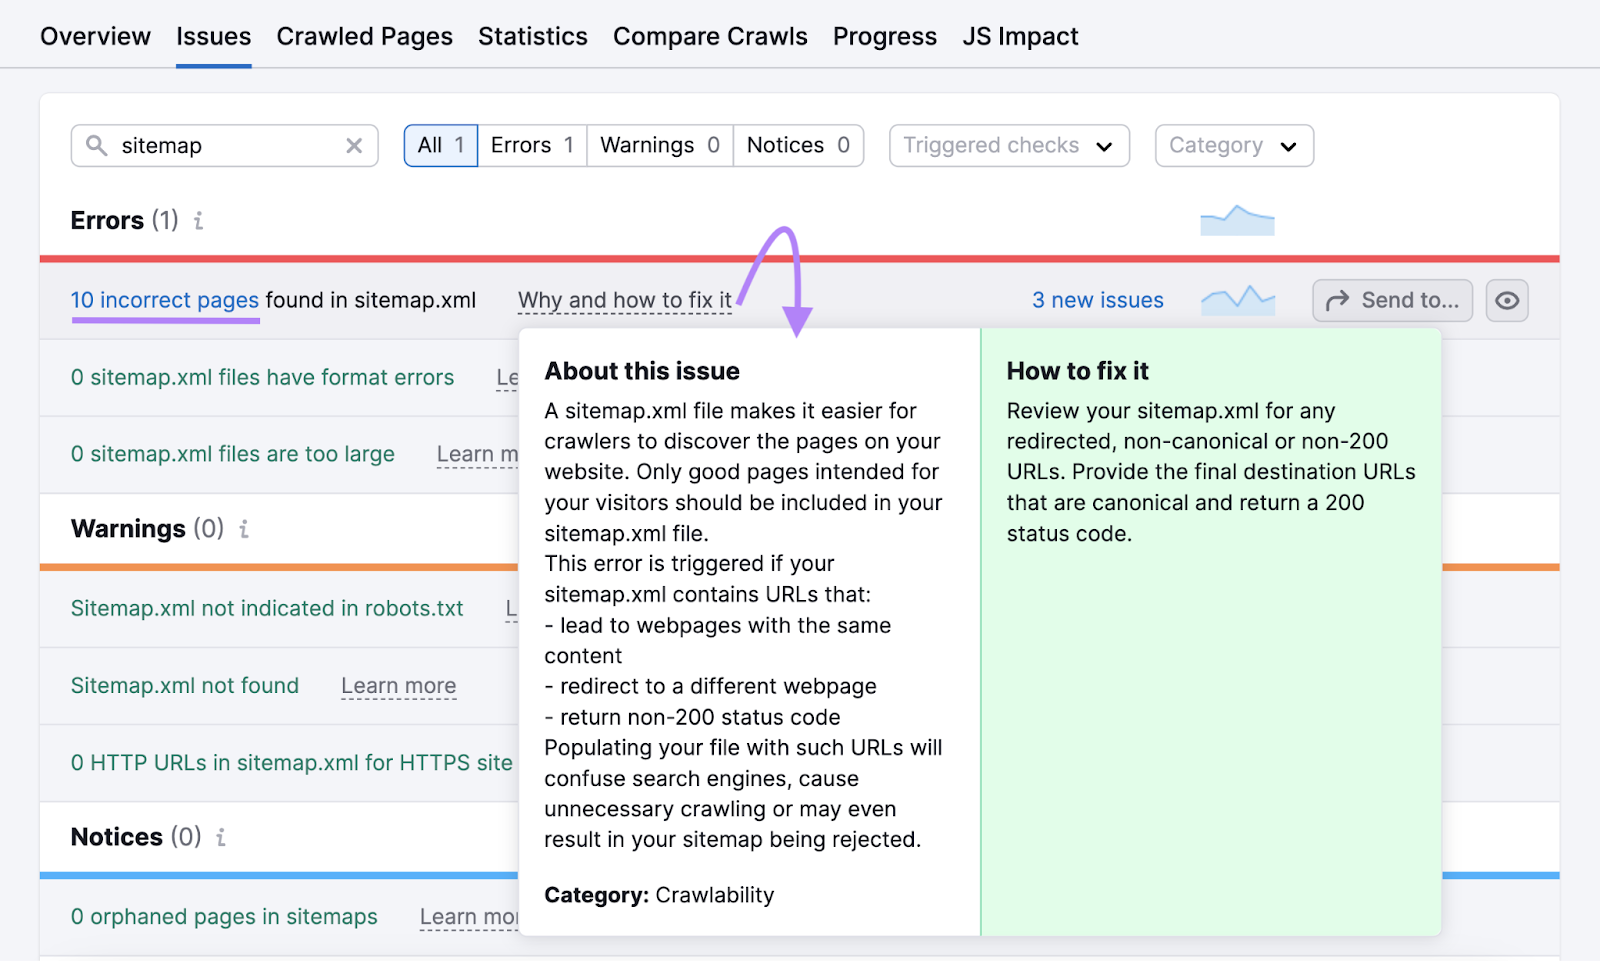
Click “Why and how to fix it” for more information about any issue.
And click the blue link to see a detailed report.
10. Use a Content Delivery Network
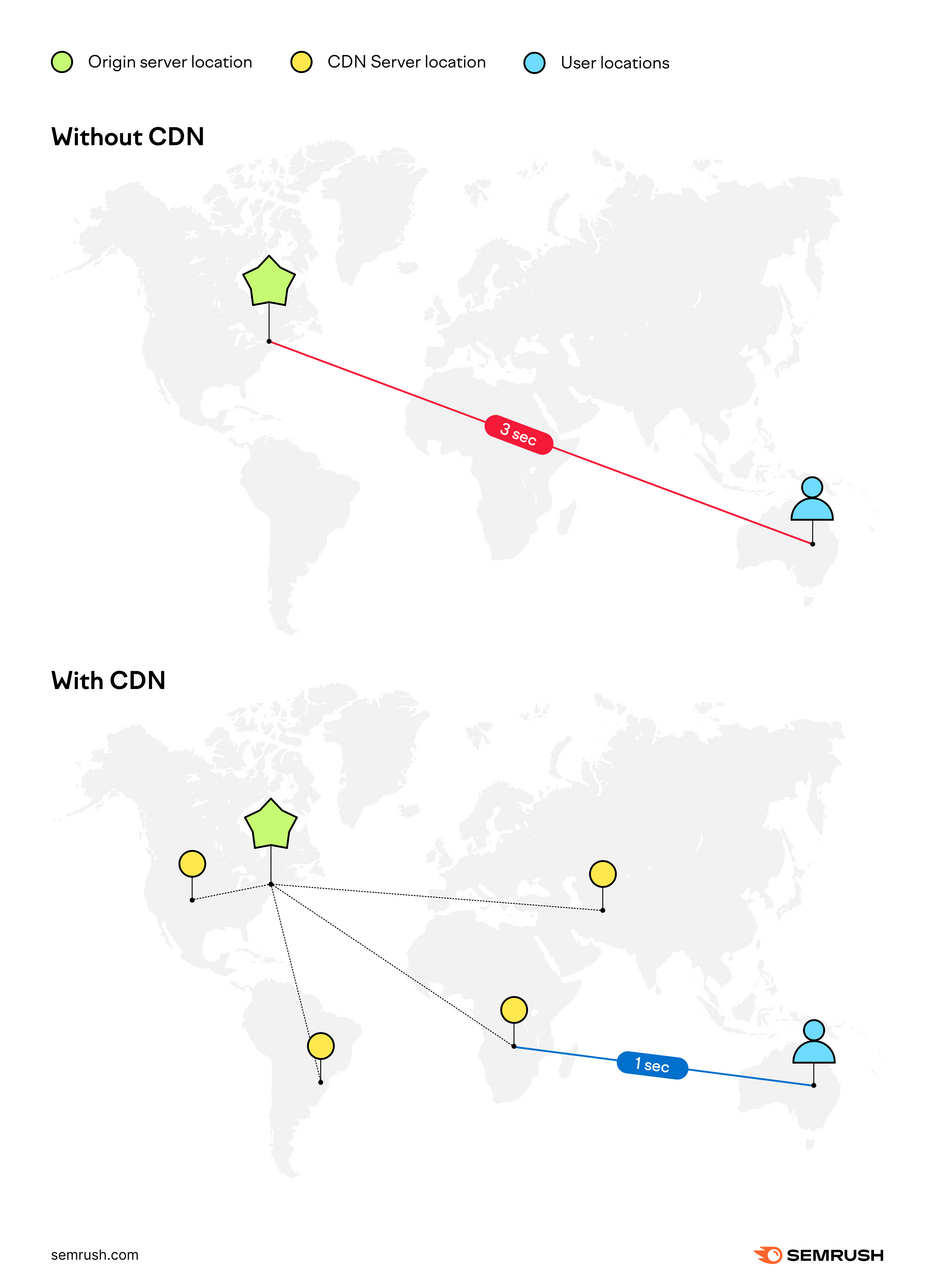
A content delivery network (CDN) allows you to host your images on multiple servers around the world.
This improves load speeds because data travels from each user’s “closest” server. Rather than traveling from your origin server every time.
Closeness is determined not necessarily by physical geography, but by whichever server can transfer data more quickly and reliably.
As this image illustrates:
To implement a CDN for your images, you need to:
- Choose a CDN provider (e.g., Cloudflare or Amazon CloudFront)
- Integrate the CDN with your website (e.g., via plugin)
- Upload your images to the CDN
- Update your DNS record so that image requests go through the CDN
- Modify your website HTML (and your image sitemap) to reference the new image URLs
You will need the help of a web developer.
11. Enable Browser Caching
Browser caching is when a visitor’s browser stores certain files (such as images) for a specified amount of time. So that they can load more quickly if they’re requested again.
Let’s say a new user visits your homepage:
- If your site logo is cached for 365 days, it’ll load more quickly when the user clicks through to another page on your site. And/or revisits your website in the following year.
- If your site logo isn’t cached, the browser will need to redownload the image on every occasion. This consumes more bandwidth and increases the number of requests the server must handle.
Generally, images can be cached for a long time because they’re rarely updated.
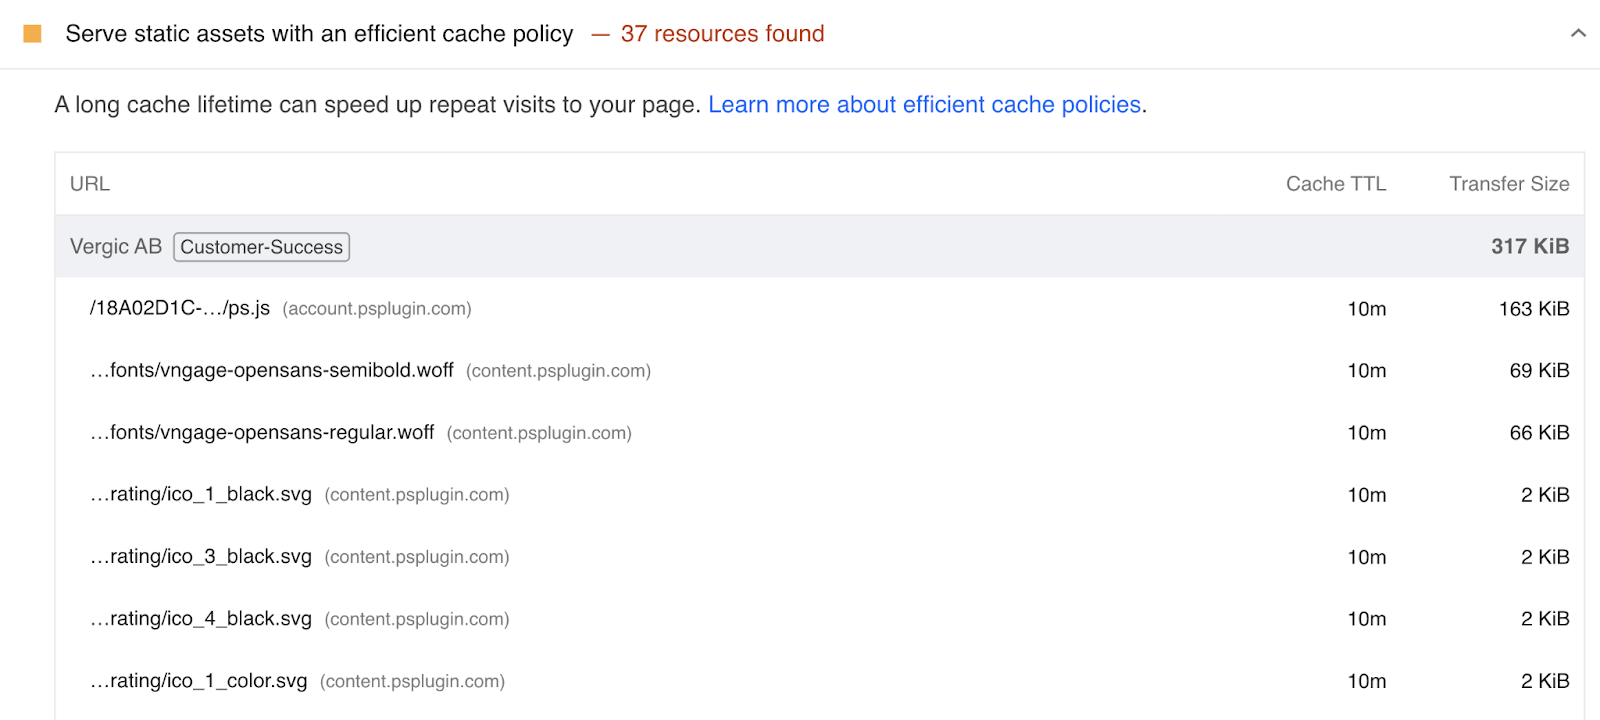
You can use Google Lighthouse to see whether images on your site are cached for a suitable duration.
After installing the Chrome extension, choose the Lighthouse Viewer option to analyze a particular webpage.
12. Apply On-page SEO Best Practices
On-page SEO is the process of optimizing a page to rank higher in search results. And it can help the images on your page perform better, too.
First, write a descriptive title tag.
Google looks at this title to better understand what your page is about. And it influences the title links that appear alongside your search results.
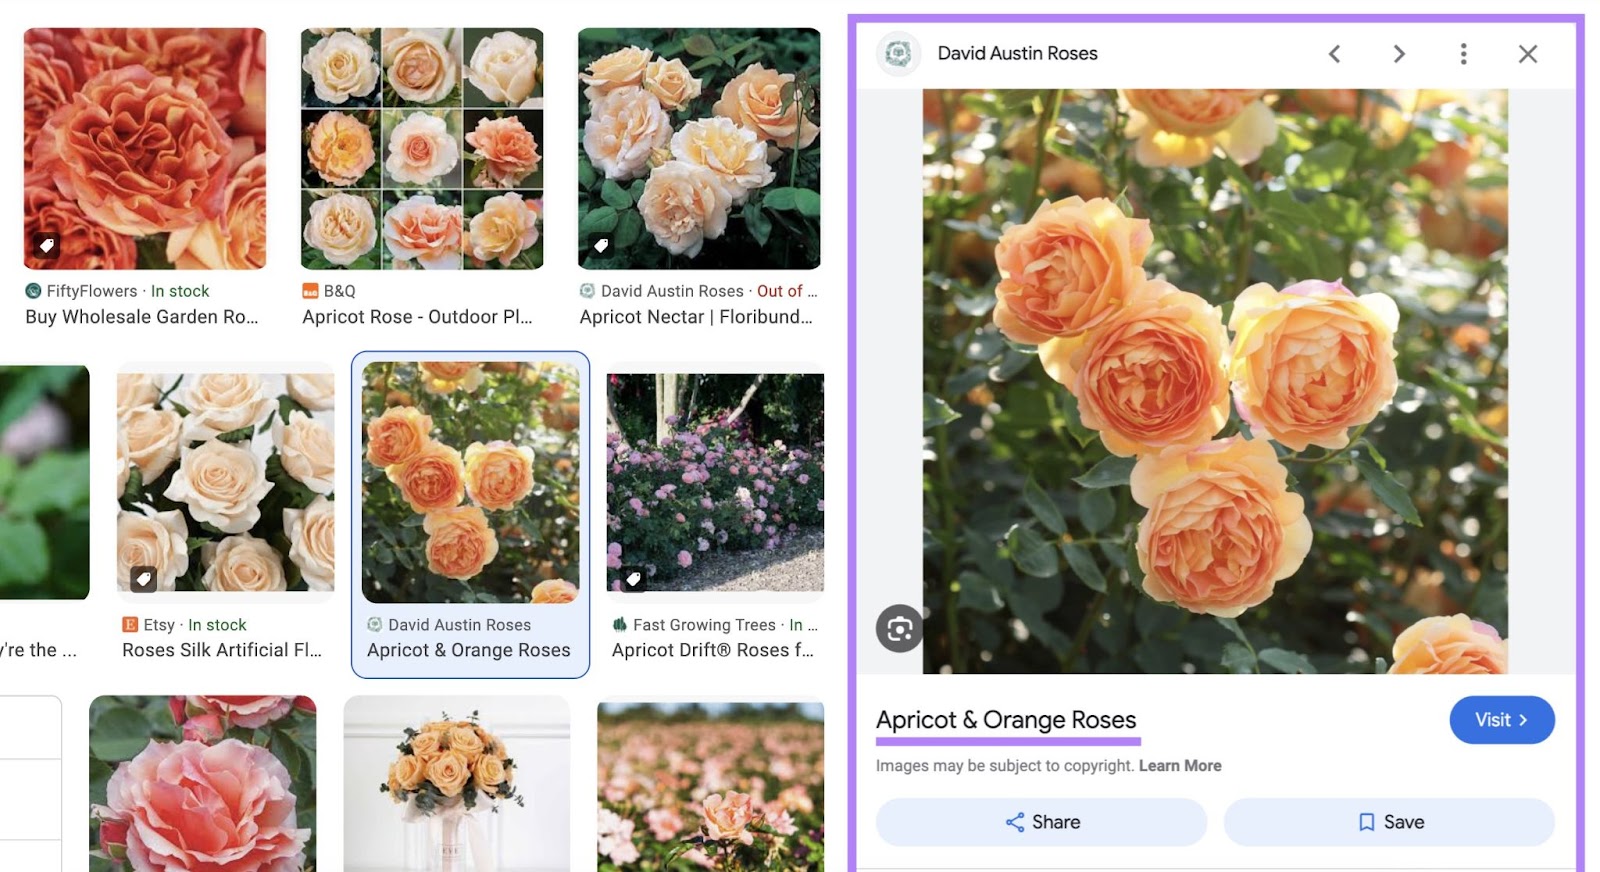
For example, David Austin Roses uses the title tag “Apricot & Orange Roses” for one of its pages.
And this title appears alongside one of the corresponding image results:
Write an effective meta description, too.
This is the page summary that can appear in search results. Like this:
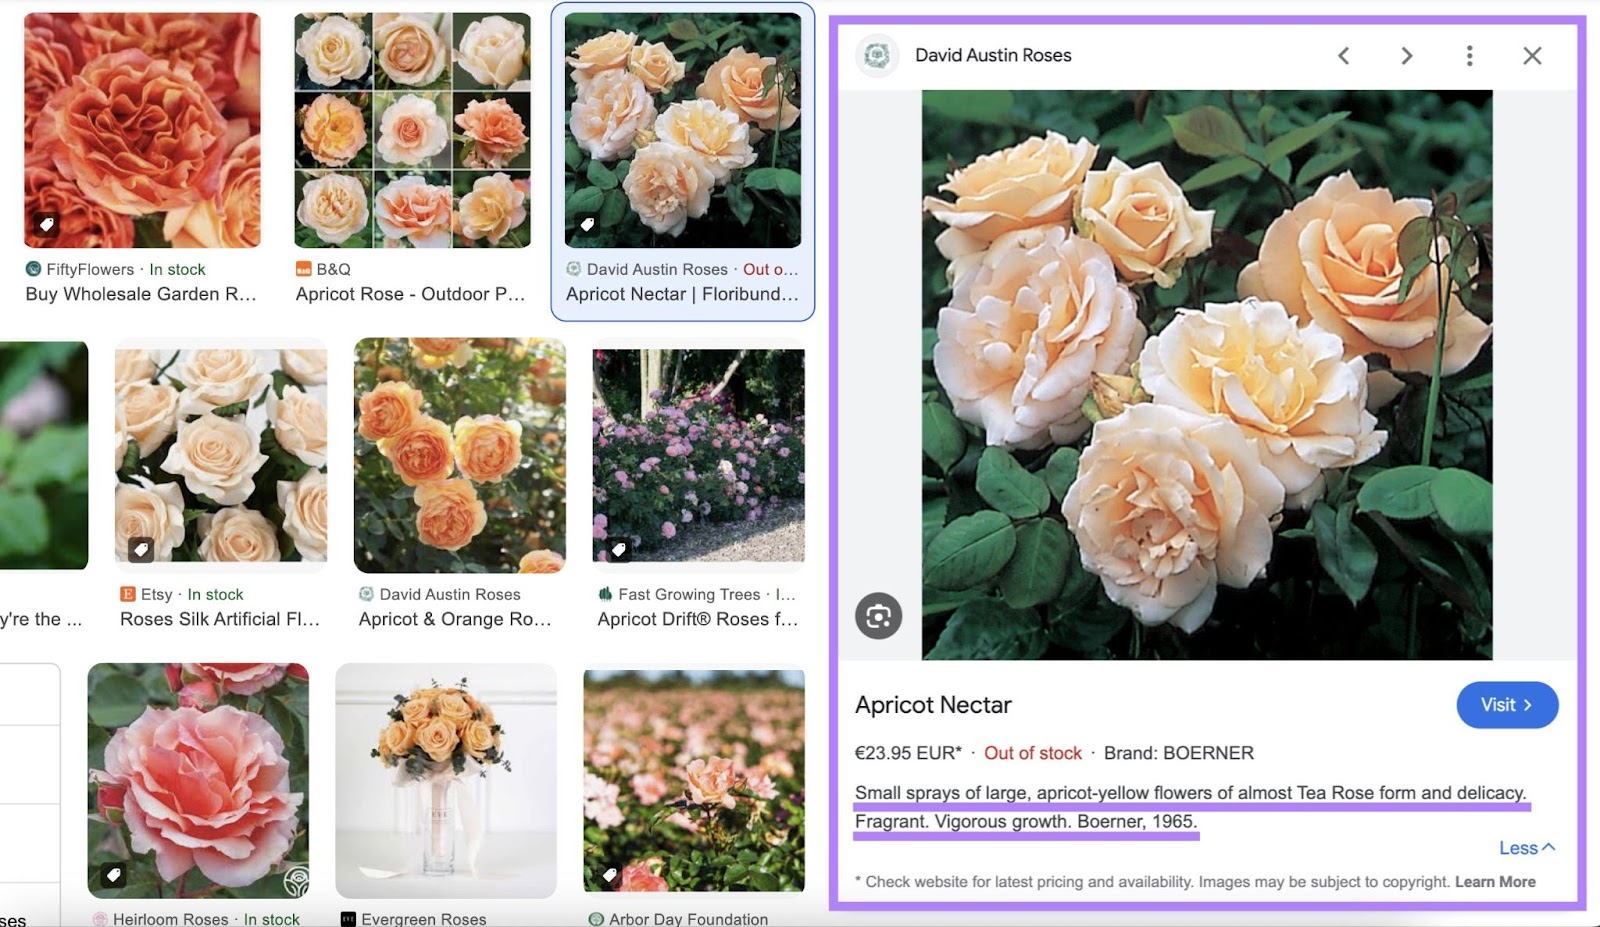
To reduce the risk of your text being cut off, it’s a good idea to write 50-60 characters for titles and around 105 characters for meta descriptions.
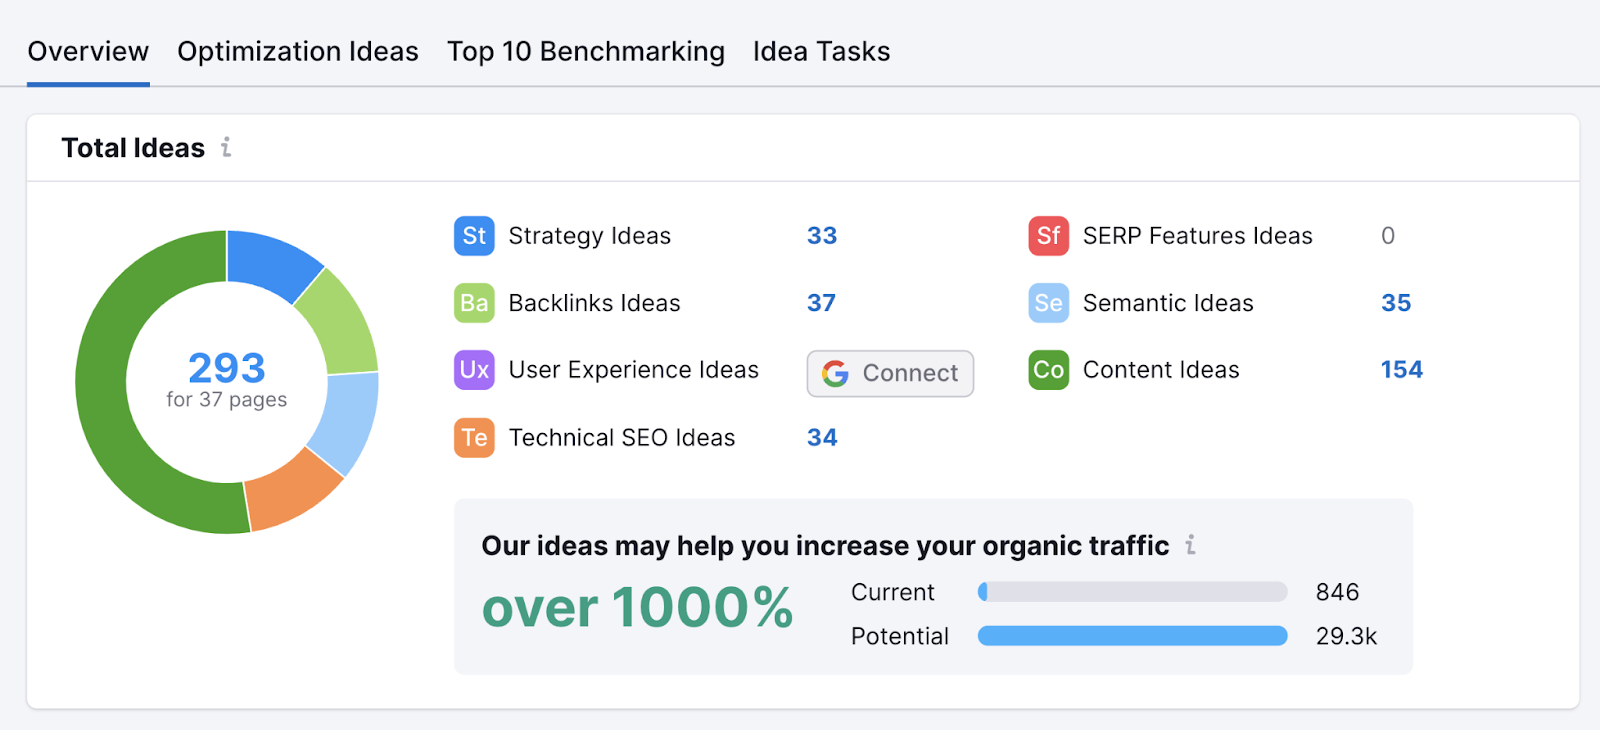
For more optimization ideas, use Semrush’s On Page SEO Checker.
It provides bespoke recommendations based on best practices and analysis of competing content.
13. Add Structured Data
Adding structured data (also known as schema markup) to your site increases the chance of securing rich snippets—search results with attention-grabbing extra elements, such as images.
For example, Cooking Classy uses schema markup to help Google identify the main image, reviews, prep time, and ingredients for its funfetti cake recipe.
And this helps it secure rich results like this one:
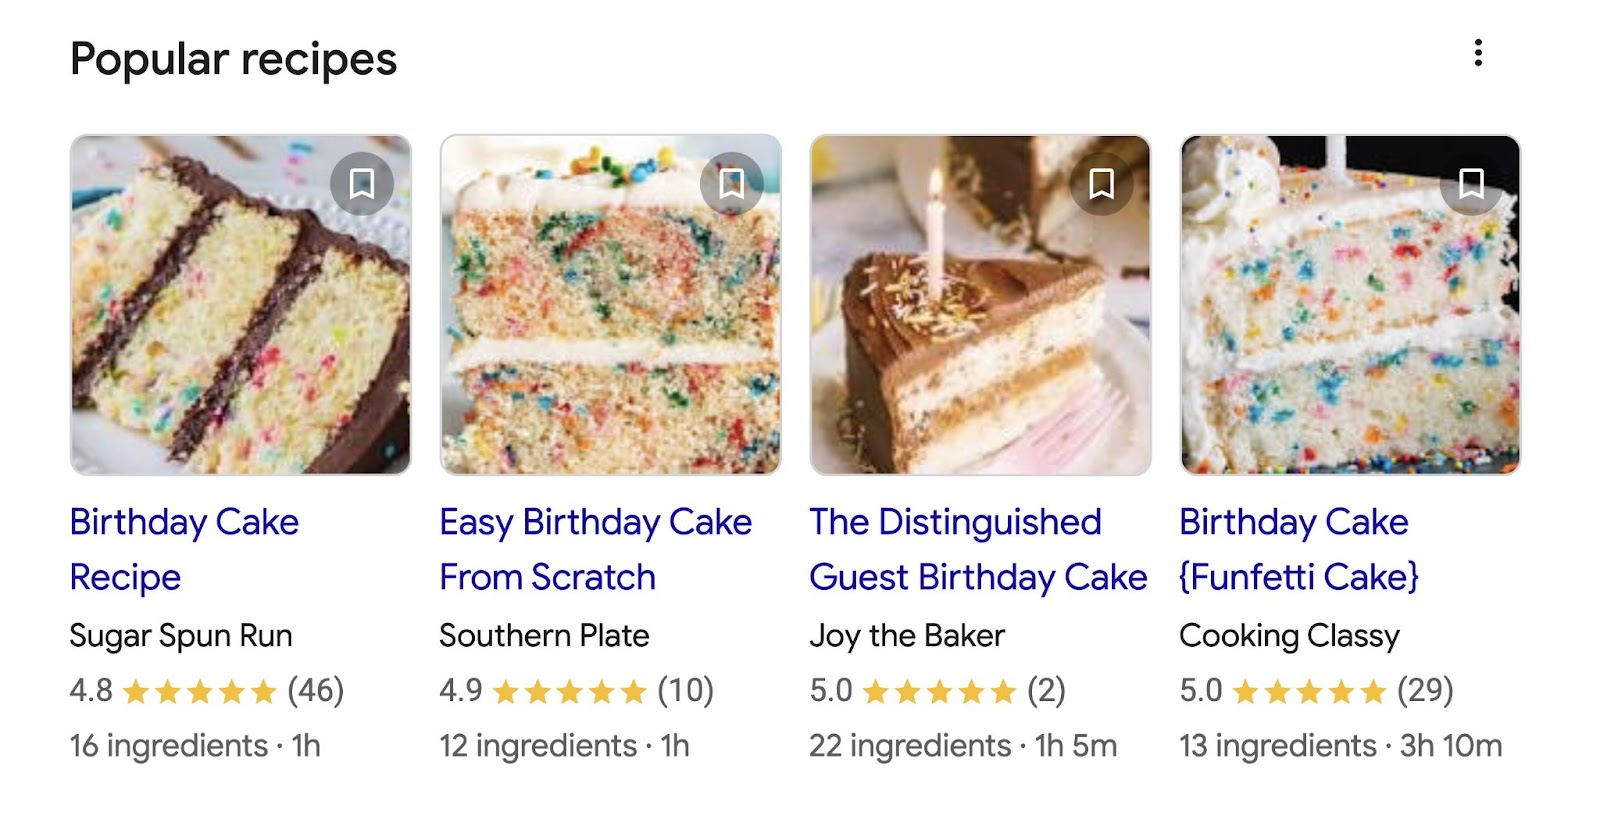
You can use schema to specify images for articles, events, organizations, and more.
There’s also an ImageObject schema that allows you to provide extra details about an image (e.g., the name of the creator and a link to the image license).
These details may show in Google Image results. Like this:
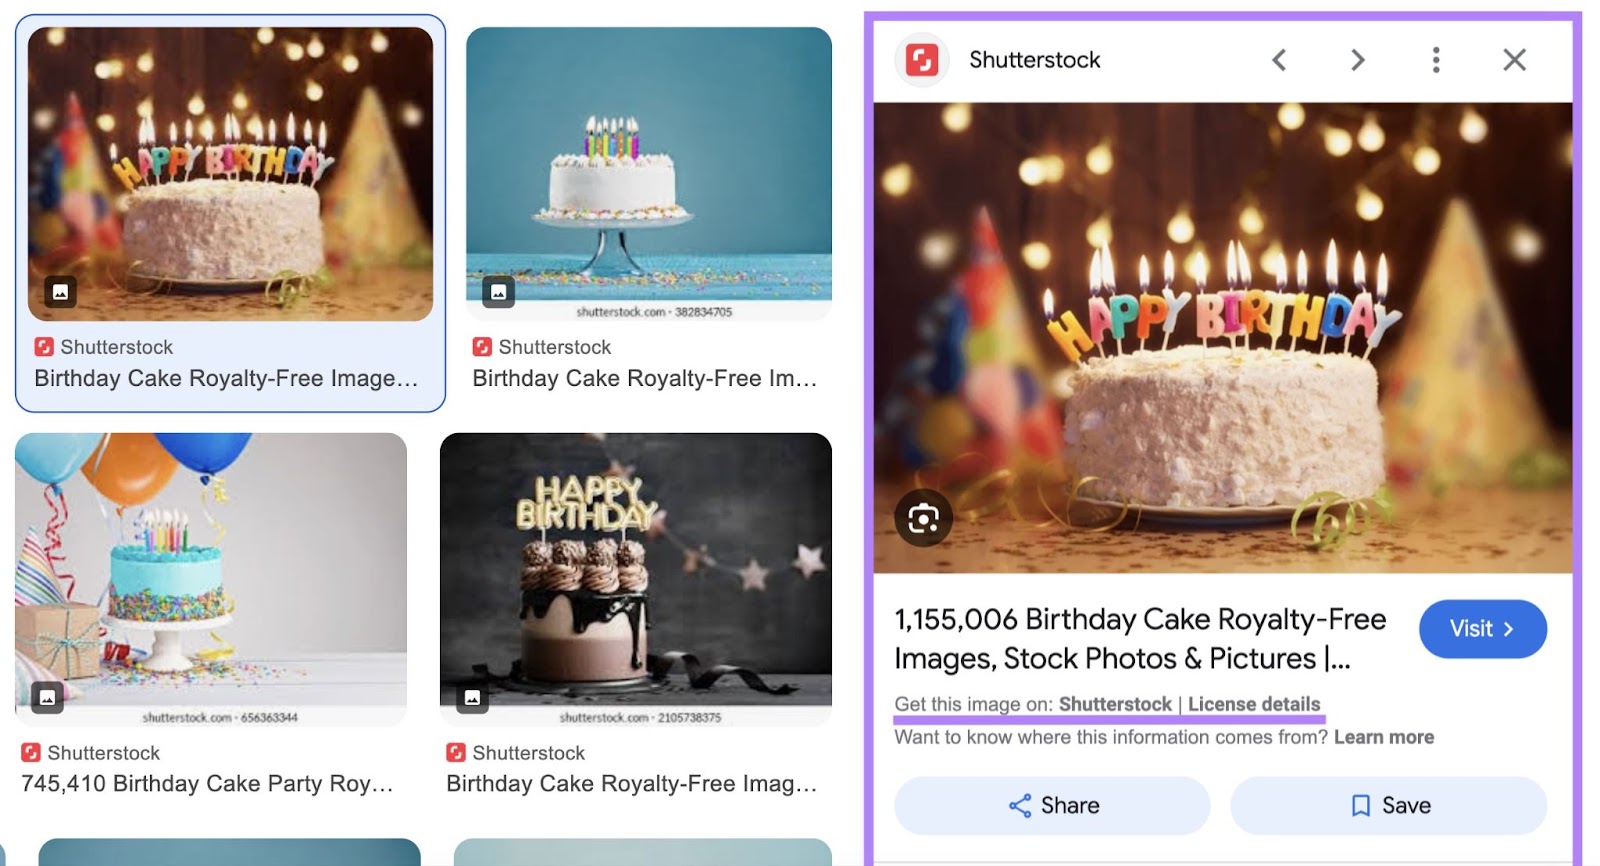
Visit Google’s guide for details about each schema type.
After implementing the schema, use Semrush’s Site Audit tool to check it’s working correctly.
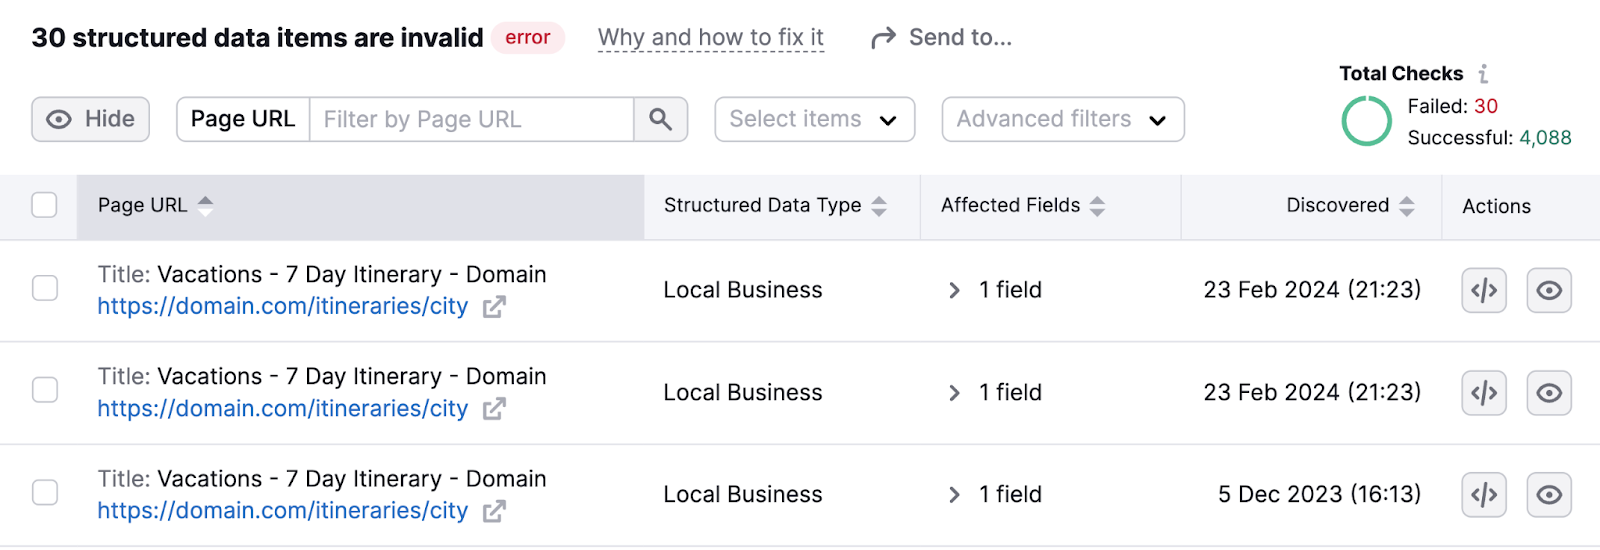
If you find the “# structured data items are invalid” error, click through to the report.
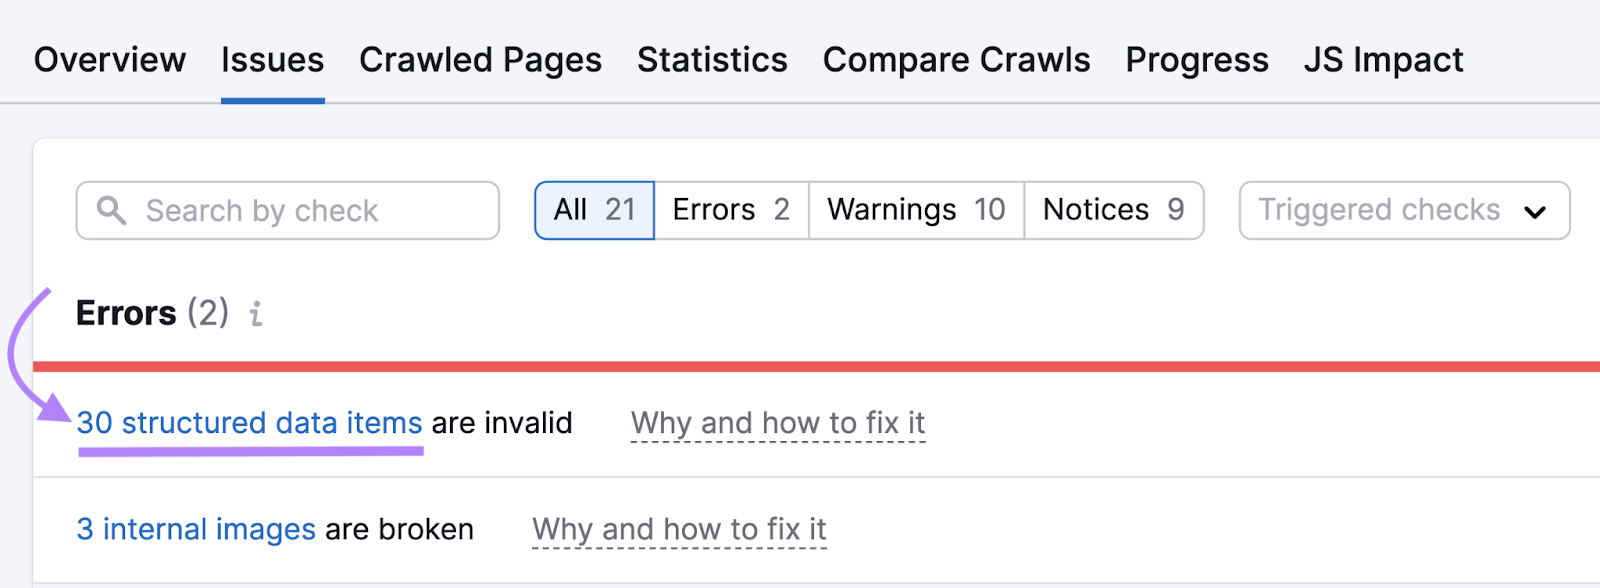
You can then see affected URLs and fields. And take corrective action.
14. Optimize Your Open Graph Meta Tags
You can use Open Graph meta tags to ensure your pages are previewed optimally when shared on various platforms, such as social media sites.
There are four required properties for every page:
- og:title specifies the title that should appear in the preview
- og: type specifies the type of object (e.g., “article”)
- og:image specifies the URL of the image for the preview
- og:url specifies the URL of the page
You can also add many other kinds of tags.
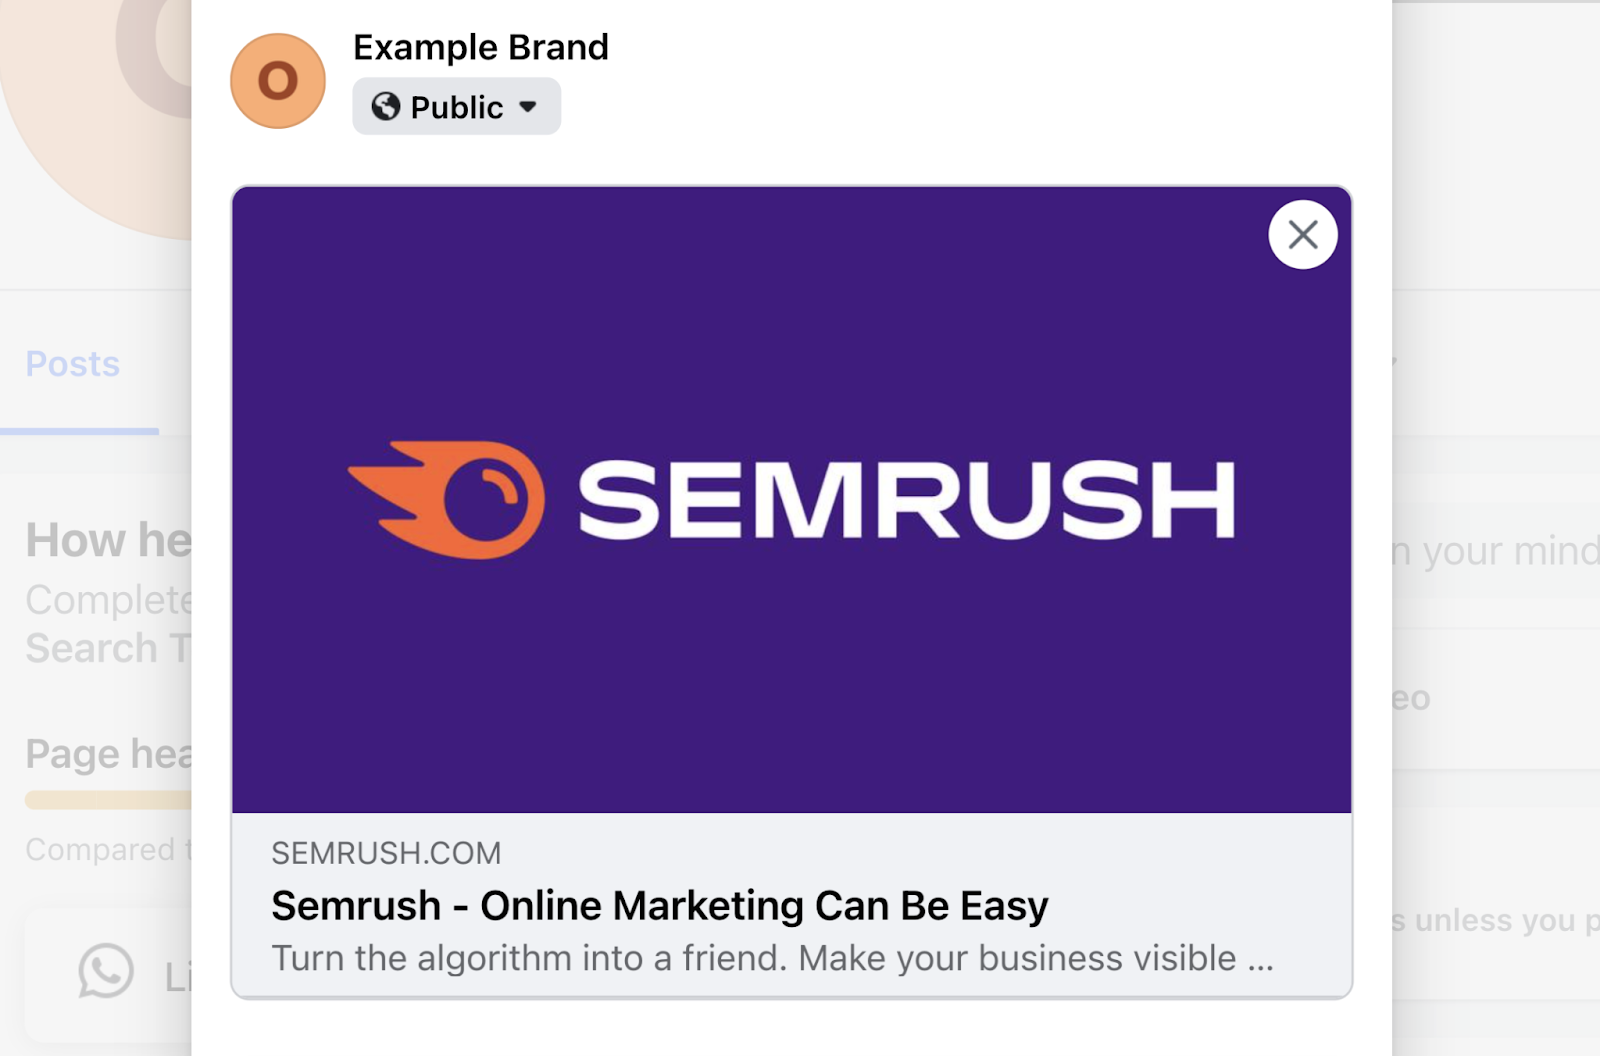
For example, Semrush’s homepage uses these Open Graph tags:
<meta property="og:url" content="https://semrush.com/">
<meta property="og:type" content="website">
<meta property="og:title" content="Semrush - Online Marketing Can Be Easy">
<meta property="og:description" content="Turn the algorithm into a friend. Make your business visible online with 55+ tools for SEO, PPC, content, social media, competitive research, and more.">
<meta property="og:image" content="https://static.semrush.com/wt-static/semrush-com.png">
<meta property="og:image:width"" content="1366">
<meta property="og:image:height"" content="768">
And here’s what it looks like when you share the link on Facebook:
If your website builder doesn’t allow you to customize open graph meta tags, you may be able to use a plugin like Yoast SEO instead.
Speak to a developer if you need help.
How to Check Your Site’s Images
You can check images and SEO issues on your site with Semrush’s Site Audit tool.
After setting up your project, go to the “Issues” tab. And search for “image.”
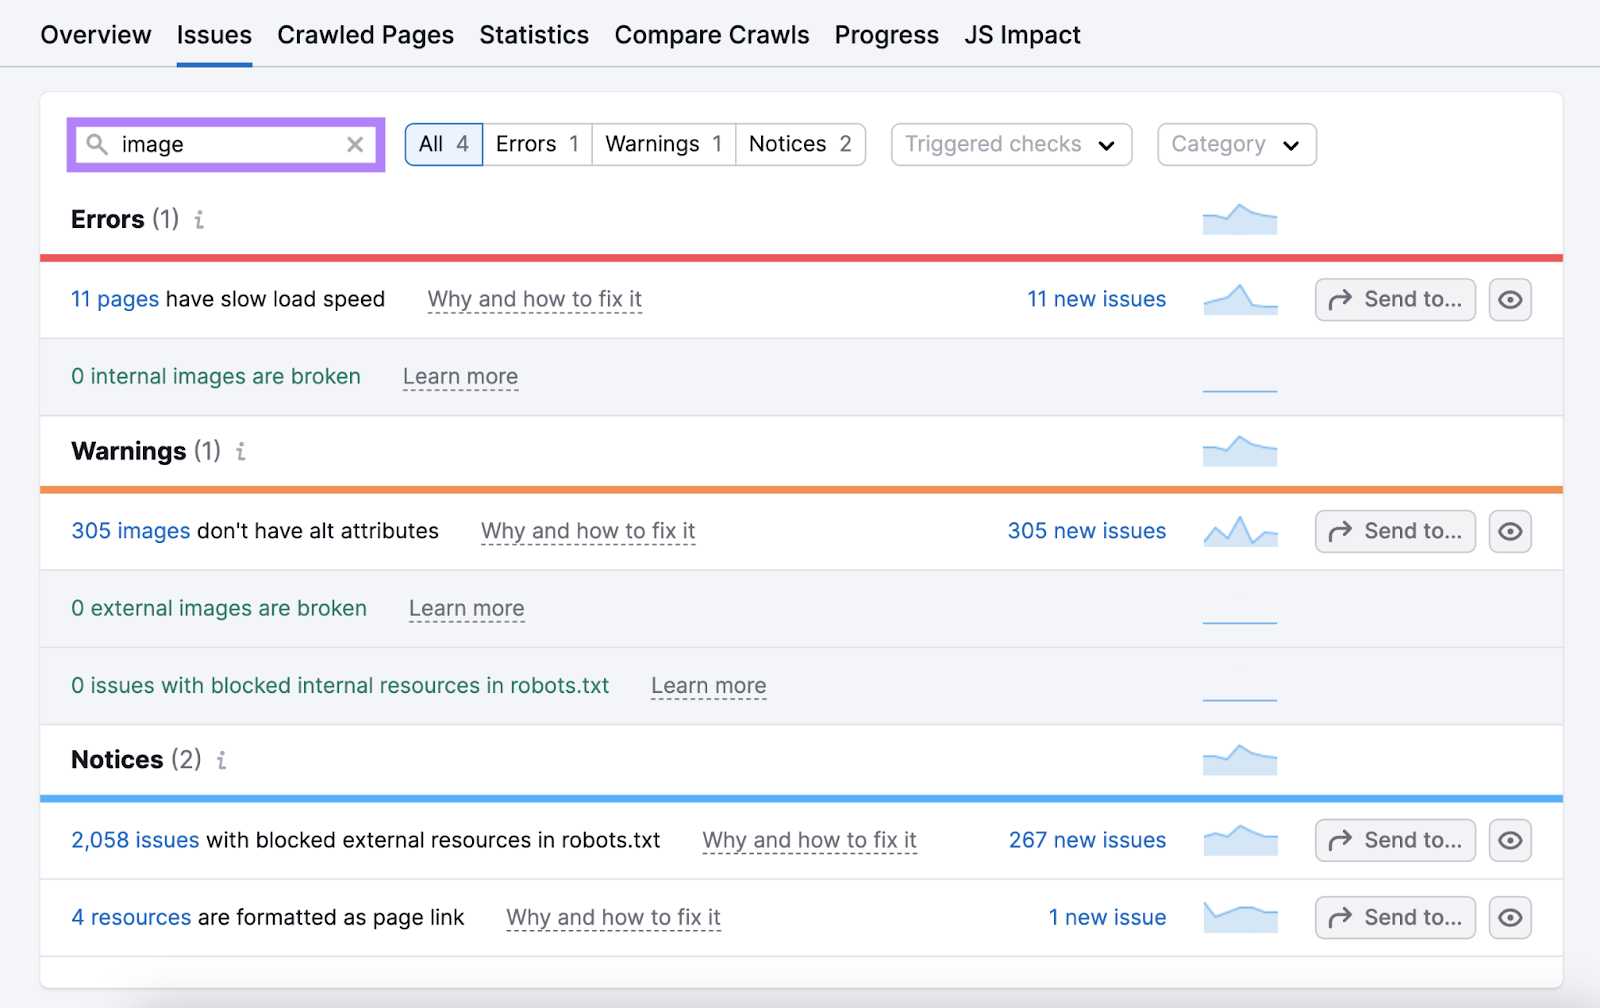
You’ll see the results of seven checks:
- # internal images are broken: Images linked on your site and hosted on your domain that aren’t working—perhaps because the file was deleted
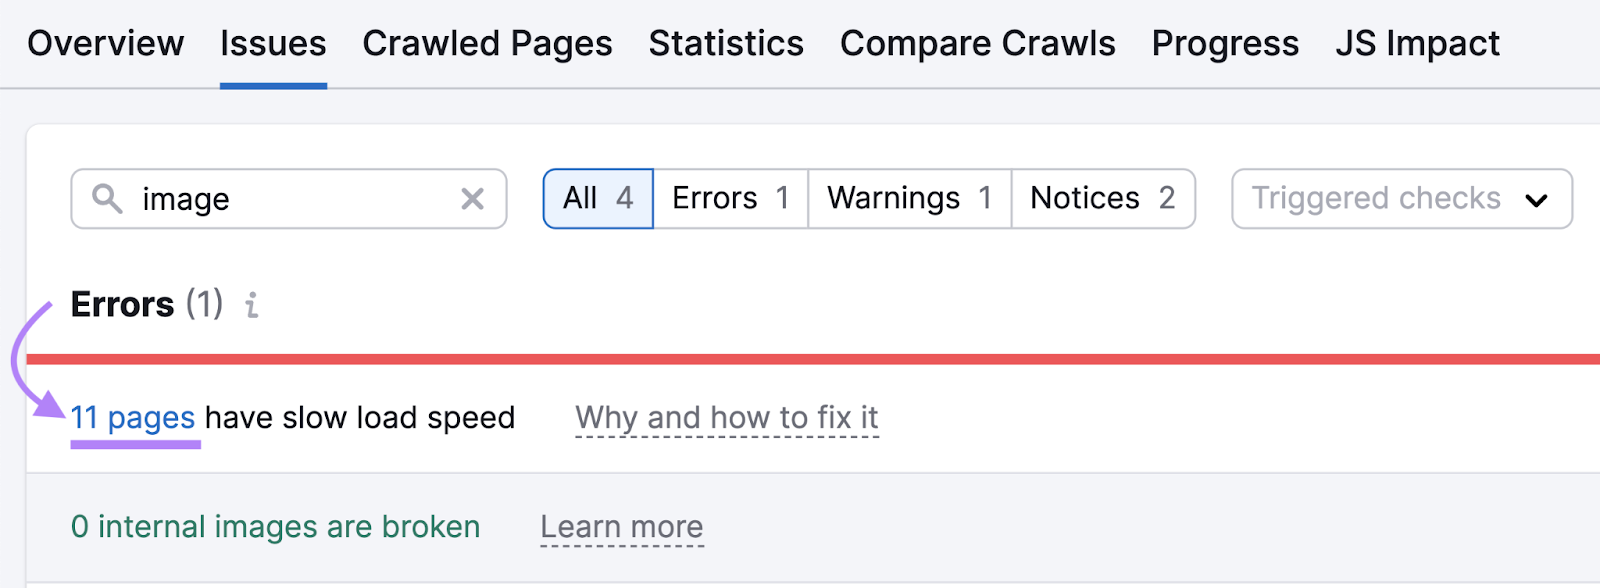
- # pages have slow load speed: Slow-loading pages, where poorly optimized images could be a contributing factor
- # external images are broken: Images linked on your site and hosted by an external domain (e.g., a CDN) that aren’t working—perhaps because of a URL typo
- # images don’t have alt attributes: Instances where image tags don’t contain any alt text
- # issues with blocked internal resources in robots.txt: Resources (such as images) on your domain that are blocked via your robots.txt file and therefore inaccessible to search engines
- # resources are formatted as page link: Instances where a href links contain URLs of resources (e.g., images) rather than webpages—generally, another tag should be used
- # issues with blocked external resources in robots.txt: Resources (such as images) on another domain that are blocked via the site’s robots.txt file and therefore inaccessible to search engines
If you have any “Errors,” click the blue link to learn more.
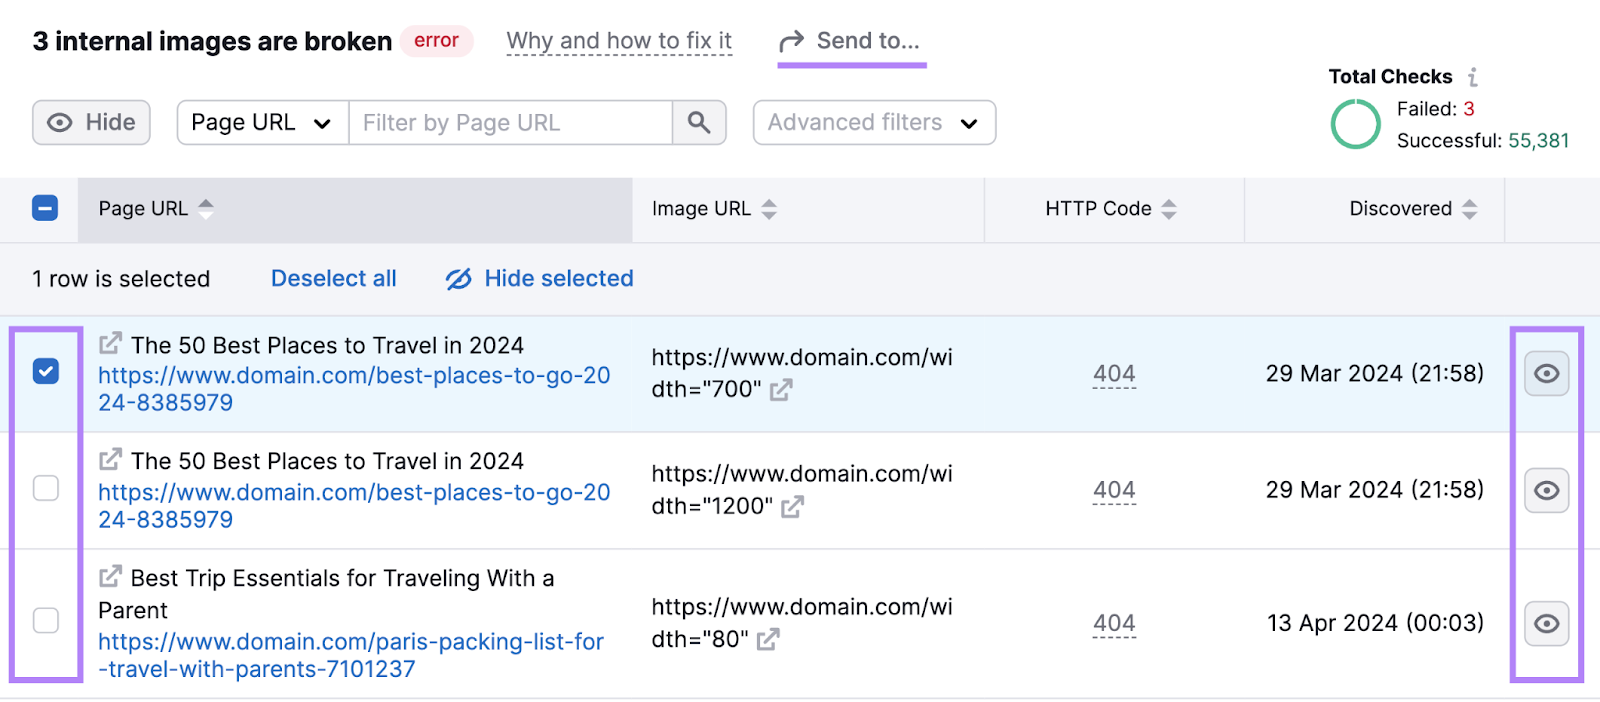
For example, below is a report about broken internal images.
Use the eye icon to hide any issues that don’t need fixing.
Then, use the check boxes and “Send to…” button to create tasks in the Semrush CRM, Trello, or Zapier.
After addressing any image SEO “Errors,” move onto “Warnings” and then “Notices.”
Check out any other issues that the tool has flagged, too. They’re all things that could negatively impact your SEO performance.
Source link : Semrush.com
