When creating and testing websites or applications, mimicking real-life network situations is really important. Chrome DevTools offers a strong way to mimic various network conditions. It helps developers and testers imitate different networks and check how well their applications work in different situations. This guide will take you through the steps of simulating networks using Chrome DevTools, giving you a better idea of how well your application performs.
Step 1: Open Chrome DevTools
To start, open Google Chrome and access Developer Tools by right-clicking on your webpage and selecting “Inspect,” or by using shortcuts (Ctrl + Shift + I for Windows/Linux, or Cmd + Opt + I for Mac).

Step 2: Navigate to the Network Tab
Once DevTools is open, navigate to the “Network” tab. This tab provides detailed insights into your webpage’s network activity, including requests, responses, and timing.

Step 3: Choose a Network Condition
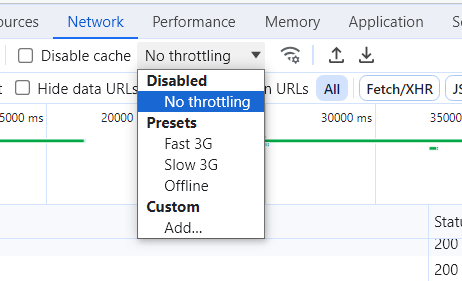
In the top toolbar of the “Network” tab, you’ll find a dropdown menu with various network conditions. By default, it is set to “No throttling,” indicating normal network conditions. Click on this dropdown to reveal a list of pre-configured network conditions like “Online,” “Fast 3G,” “Slow 3G,” and more.

Step 4: Select or Customize Network Conditions
- Pre-configured Conditions: Choose from the pre-configured network conditions like “Fast 3G” to simulate a faster network or “Offline” to simulate no network connectivity.
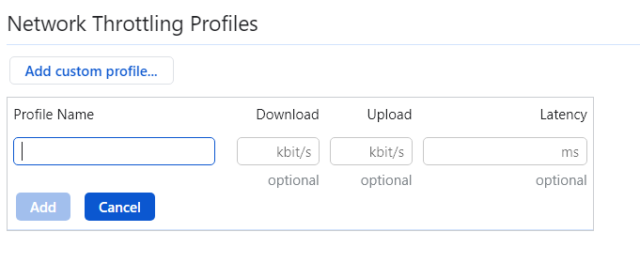
- Custom Conditions: Click on “Add…” at the bottom of the dropdown to create custom network conditions. Here, you can set specific values for download/upload speeds, and latency, and even simulate offline conditions.

Customizing Network Conditions
- Download Speed: Change the download speed to imitate various network speeds. For instance, you can set a low download speed to mirror a slow network or a high speed to replicate a fast and reliable connection.
- Upload Speed: Like adjusting the download speed, you can also modify the upload speed. This helps test how your application manages situations when users need to upload data. This is especially important for apps that involve file uploads or sharing real-time data
- Latency: Create latency to imitate the delay in sending data across the network. This is crucial for checking how responsive your application is, especially in scenarios with high network delays.
- Offline Conditions: Toggle the offline checkbox to simulate a scenario where the user has no network connectivity. This is invaluable for testing how your application behaves when there is a complete loss of network connection.
Advantages of Custom Network Conditions
- Precision Testing: Custom conditions enable precise testing by replicating the exact network situations your users might face. This is especially helpful when creating apps for specific regions or user groups.
- Testing Extreme Cases: Test unusual but significant scenarios. For instance, simulate situations where users have intermittent connectivity to ensure your application works smoothly in such rare cases.
- Network Error Evaluation: Assess how well your application deals with network errors. By simulating offline conditions or high latency, you can confirm that error messages are clear and guide users properly
Real-World Use Cases for Custom Conditions
- Emerging Markets: If your app targets users in emerging markets with less dependable networks, custom conditions help tailor tests to reflect the prevalent network situations in those regions.
- High-Traffic Situations: Simulate scenarios involving heavy traffic or network strain. This is vital to ensure your app remains responsive even during peak usage times.
- Intermittent Connectivity: Customize conditions for users experiencing connectivity lapses, mimicking instances where the network intermittently connects and disconnects.
Best Practices for Custom Conditions
- Thorough Testing: Leverage custom conditions for thorough testing under a variety of scenarios. Test with different combinations of download/upload speeds and latency to ensure comprehensive coverage.
- Automation Integration: Consider integrating the use of custom conditions into your automated testing suite. This allows you to perform consistent and repeatable tests, especially when testing is part of your continuous integration pipeline.
- User Feedback Validation: If your application has a user base, validate user feedback by testing under conditions that mimic reported network issues. This ensures that your testing aligns closely with real user experiences.
Step 5: Observe Network Throttling Effects
After selecting or customizing your network conditions, return to your webpage. You’ll see that the page loads according to the simulated network conditions you’ve chosen. Elements may take more time to load, and the way you interact with the page might be affected by the network speed and latency settings you’ve applied.
Step 6: Analyze Network Activity
Revisit the “Network” tab to examine detailed data about every network request your webpage makes under the simulated conditions. This allows you to observe how each resource is impacted by the network restrictions, aiding in identifying any potential performance issues or bottlenecks.
Step 7: Test Different Scenarios
Try out various network conditions to observe how your application responds in different situations. This is particularly helpful for web developers and testers to guarantee a smooth user experience across different network speeds.
Advantages of Network Simulation Using Chrome DevTools
- Realistic Testing Environments: Network simulation allows you to replicate real-world scenarios, helping you identify and address performance issues before deploying your application.
- Early Issue Detection: By simulating various network conditions during development, you can detect and resolve potential issues early in the development lifecycle.
- Improved User Experience: Testing under different network conditions ensures that your application is resilient and provides a consistent user experience, regardless of the user’s network speed.
Real-Time Usage and When to Utilize Network Simulation
- Mobile Application Testing: Simulating network conditions is crucial for testing mobile applications, where users might have varying levels of connectivity.
- Performance Optimization: Use network simulation to optimize your application for users with slower network speeds, ensuring a smooth experience for a broader audience.
- Global User Base: If your application is used globally, simulate network conditions to understand and address the performance challenges users might face in different regions.
When to Use Network Simulation
- During Development: Incorporate network simulation into your development process to catch performance issues early.
- Before Deployment: Test your application under different network conditions before deployment to ensure a reliable and consistent user experience.
Next Steps: Simulating Networks with Selenium and Java
In the next blog, we will explore the exciting realm of automating network simulation using Selenium and Java. This automation will allow you to incorporate network simulation into your automated testing suite, ensuring that your web applications are tested thoroughly under different network conditions. Stay tuned for an in-depth guide on seamlessly integrating network simulation into your Selenium tests!
