Postman Visualizer Magically Turns your API’s Iterating Data into Tables, Charts, and Graphs
The Postman Visualizer offers a configurable method of representing your request’s response visually. A request’s Visualize tab shows the response body in a graphical format like a bar chart, maps, etc., along with the Pretty, Raw, and Preview choices when it is added to the Tests for the request.
You can use visualizers to present your response data in ways that make sense. Instead of reading through raw response data, you can use visualizers to model and emphasize the information that is pertinent to your project. Other team members can comprehend your visualizations in the context of each request when you share a Postman Collection.
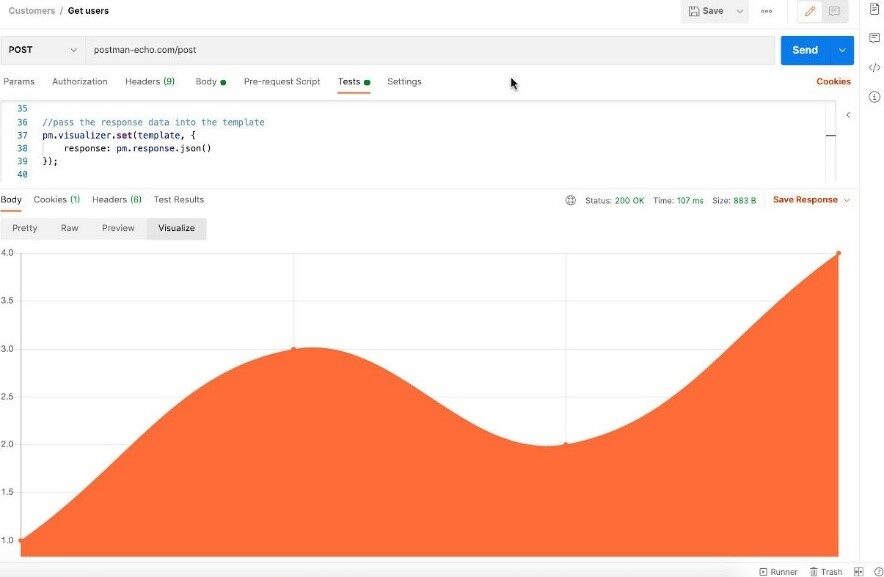
Visualizing Response Data:
Add code to the request’s Tests script to visualize your response data. When the request is processed, your visualizer code will be applied to the data via the pm.visualizer.set() method and displayed in the Visualize tab.
Adding Visualizer Code:
The first parameter of the pm.visualizer.set() method is a Handlebars template string. The data you want to utilize the template to display is the second argument. Continue reading to discover how to create a Handlebars template and send data to it.
What is Handlebars:
Handlebars is a simple templating language.
It uses a template and an input object to generate HTML or other text formats. Handlebars templates look like regular text with embedded Handlebars expressions.
A handlebars expression is a {{, some contents, followed by a }}. When the template is executed, these expressions are replaced with values from an input object.
Example:
If <p>{{firstname}} {{lastname}}</p> handlebar expression is applied to an input object
{
firstname: “Sam”,
lastname: “Thomas”
}
The expression will be replaced by the corresponding properties, which results in
<p> Sam Thomas </p>
To learn more about handlebars, please refer to the below URL:
Introduction | Handlebars (handlebarsjs.com)
Rendering HTML:
Open the following request in Postman to see a simple visualizer in action:
https://reqres.in/api/users?page=null
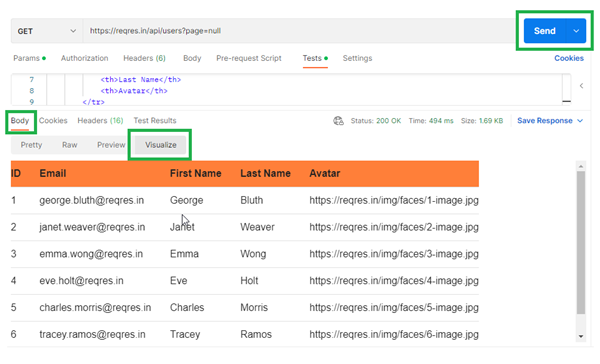
The sample request returns a list of id, email, first_name, last_name, and avatar with the JSON response body structure shown below:
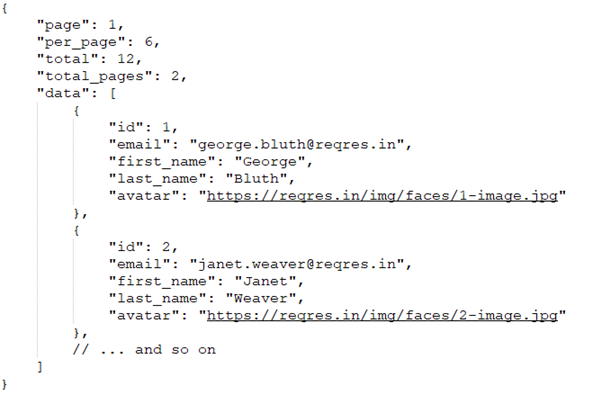
The visualizer code creates a Handlebars template to render a table displaying the id, email, first_name, last_name and avatar by looping over an array. Handlebars can do this with the {{#each}} tag. This script runs in the request Tests:
Code: (Table template)
var template = `
    <table bgcolor="#FFFFFF">
        <tr bgcolor="#ff7f39">
            <th>ID</th>
            <th>Email</th>
            <th>First Name</th>
            <th>Last Name</th>
            <th>Avatar</th>
        </tr>
         {{#each response.data}}
            <tr>
                <td>{{id}}</td>
                <td>{{email}}</td>
                <td>{{first_name}}</td>
                <td>{{last_name}}</td>
                <td>{{avatar}}</td>
            </tr>
        {{/each}}
    </table>
`;
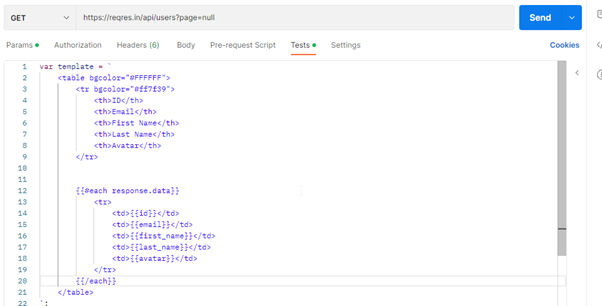
Data is given to the pm.visualizer.set() method will be used to replace the variable names inside the double curly braces in the template. The test script is finished by the code below, which applies the template:
Code: (Visualizer)
// Set visualizer

pm.visualizer.set(template, {

// Pass the response body parsed as JSON as `data`

response: pm.response.json()

});
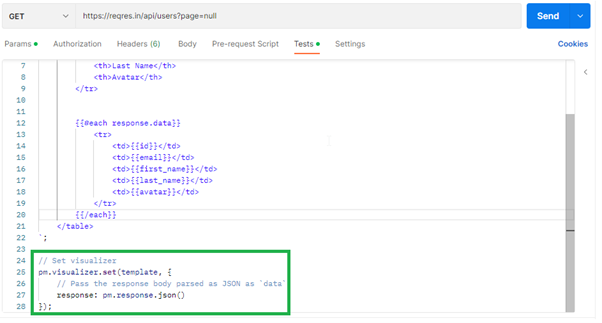
The template string created earlier is the template variable. The second given argument is an object with a response property defined; this is the variable that the template anticipates in the loop established by the {{#each response}} tag. The JSON response data from the request that has been parsed into an object is the value allocated to the response property.
Viewing Visualizations:
With Postman, send the request and choose the Visualize tab. Postman displays the table as HTML, much like a web browser would.
Visualizer API:
Visualizers are accessible through the Postman API. Three parameters are required by the pm.visualizer.set() function.
-
Layout (required):
An HTML template string for Handlebars is the first parameter.
-
Data (optional):
Data that you can bind to the template makes up the second argument. The template provides access to this object’s properties.
-
Options (optional):
An options object for Handlebars.compile() is the third argument. This lets you manage how Handlebars builds the template.
To render an HTML page in the visualizer’s sandbox, Postman uses the data you supply to pm.visualizer.set(). The rendered HTML page’s Visualize tab should be selected. Whatever JavaScript, CSS, and HTML that the template contains are included in the layout string, which is injected into the rendered page’s <body> tag.
Debugging Visualizers:
Right-clicking in the Visualize area of Postman and selecting Inspect visualization will allow you to troubleshoot a visualization. By doing so, the developer tools for the visualizer associated with the sandbox will be opened. It works similarly to how you would debug a web page.
“In Conclusion, by using the above methods, you can easily convert Iterable data in your API’s response into a table format. This enhances readability and provides a better presentation of data.”
This is all about Postman Visualizer. I hope you enjoyed reading this post and found it to be useful.
“Keep Coding”
