Introduction
AWS Glue is a fully managed ETL service from AWS which provides flexibility to work with both Snowflake tables and S3 files. AWS Glue Python shell allows to use additional python libraries (In our case, snowflake-connector-python) which helps in retrieval of data from snowflake and to run the queries directly in Snowflake with Snowflake virtual warehouse. Hence with python support, serverless nature and with usage of Snowflake resources, ETL was made simpler and powerful with AWS Glue and Snowflake.
Prerequisites
- Create an IAM role with IAM policy attached with necessary permissions to access snowflake.
- Create a storage integration in Snowflake that stores IAM details and Grant the IAM user permissions to access bucket objects.
- Create a Snowflake external stage that references the storage integration that was created.
https://docs.snowflake.com/en/user-guide/data-load-s3-config
- Create the necessary objects in Snowflake.
create database Loans;
create schema Fixed_loans;
Create or replace table EMI_Calculator(
Loan_ID number,
Loan_type string,
Tenure number,
Tenure_in_months number as (Tenure * 12),
Loan_Amount number,
Interest_rate number,
EMI number,
Total_payment number as (EMI * Tenure_in_months),
Total_interest_payable number as (Total_payment-Loan_Amount));
Let us illustrate with an example,
- Consider a simple ETL flow as below.
- The client application places the raw source file with loan details in the S3 bucket.
- EMI is calculated using python scripts and the data is loaded into Snowflake table which have some column expressions for simple calculations.
- Then the data is read from the snowflake table and exported into separate files for different loan types.
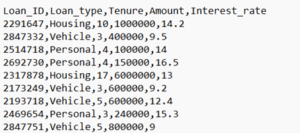
- Let us consider the below csv file as source for our example.

Create Python Shell in AWS Glue
- In the AWS Glue console, click on ETL jobs and under the Create job, Select Script editor and create a new glue job.

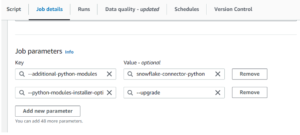
- Once Glue job created, Under Job details -> Add the below key and Value in Job Parameters under Advanced Properties.

- Then Import the required libraries, snowflake.connector (for Querying Snowflake tables) and boto3 (for handling S3 files).
import sys
import snowflake.connector
import boto3
import io
import pandas as pd
- Create a Snowflake connection, Snowflake cursor and S3 client. (For security purpose, Users can store the credentials in AWS secrets Manager instead of directly using the credentials in the code)
#Create snowflake connection
conn = snowflake.connector.connect(
    user=<user_name>,
    password=<user_password>,
    account=<account_identifier>,
    warehouse="wh_1",
    database="Loans",
    schema="Fixed_loans",
    role="sysadmin’)

#Create snowflake cursor
cur = conn.cursor()

#Create s3 client
s3_client = boto3.client("s3')
Case1: Importing a s3 file into Snowflake
- Get data from the raw source file using s3_client and read the data as a pandas dataframe.
#read the source file
obj = s3_client.get_object(Bucket = Bucket_name,Key = 'data_in/Loan_data.csv')
df = pd.read_csv(io.BytesIO(obj['Body'].read()),header=0)
- Using pandas and other python libraries, the necessary data transformations can be done. Here the EMI is calculated based on the loan details.
df['EMI'] = df['Amount'] * (df['Interest_rate']/1200) * pow((1+(df['Interest_rate']/1200)),(df['Tenure']*12)) /( pow((1+(df['Interest_rate']/1200)),(df['Tenure']*12)) -1 )
- Place the processed dataframe in s3 bucket in the recommended file format.
csv_buffer = io.StringIO()
df.to_csv(csv_buffer,index=False)
s3_client.put_object(Body=csv_buffer.getvalue(), Bucket = Bucket_name, Key = output_key)
- In our example, there are some additional virtual columns in the target table in snowflake. To load the data into correct columns, the processed file is queried using SELECT command and loaded into final table using COPY INTO command as below,
COPY INTO TABLE_NAME(COLUMNS) FROM (SELECT $1,$2,.. FROM @STAGE/FILE) FILE_FORMAT = ‘CSV_FF’
- The below codes will generate a SQL code in the above format.
#Assigning variables
Table_name="Loans.Fixed_loans.EMI_Calculator"
File_format="Loans.Fixed_loans.csv_ff"
stage="Loans.Fixed_loans.my_s3_stage"

#Column names were taken from Snowflake
cur.execute(f'DESCRIBE TABLE {Table_name}')
result = cur.fetchall()
result_df = pd.DataFrame(result,columns=[column[0] for column in cur.description])
new_df = result_df[result_df['kind']=='COLUMN']
column_list = list(new_df['name'])
col=",".join(column_list)

#generating the sequence like $1,$2,$3...
select_query_list =[]
for i in range(1,len(column_list)+1):
    select_query_list.append('$'+str(i))
select_query = ','.join(select_query_list)

#executing copy command
cur.execute(f"COPY INTO {Table_name}({col}) FROM (SELECT {select_query} FROM @{stage}/{output_key}) FILE_FORMAT = '{File_format}'")
- Once the Glue Job executed, We could see the data is loaded into Snowflake table as expected.

Case 2: Export data from Snowflake table to s3 file
- Let us consider a scenario to export a data in separate files for different Loan types.
- The query can be executed with the cursor and using fetchall(),fetchmany() and fetchone() functions, the required data can be exported to S3 bucket from snowflake as below.
for loan_type in ['Housing','Vehicle','Personal']:
    export_query = f"select * from Loans.Fixed_loans.EMI_Calculator where loan_type="{loan_type}""
    print(export_query)
    cur.execute(export_query)
    result = cur.fetchall()
    df = pd.DataFrame(result,columns=[column[0] for column in cur.description])
    csv_buffer = io.StringIO()
    df.to_csv(csv_buffer,index=False)
    output_key = f'data_out/result/{loan_type}.csv'
    s3_client.put_object(Body=csv_buffer.getvalue(), Bucket = Bucket_name, Key = output_key)
- Alternative way of exporting the files will be usage of snowflake unloading features, COPY INTO with required FILE_FORMAT.
- Snowflake supports data unloading in three formats. i.e. delimited, JSON or Parquet.
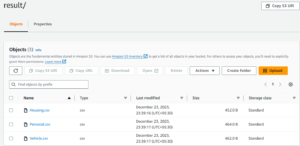
- The below screenshot shows the exported file for the above query.

Recommendations
- Create a workflow with triggers to run the jobs in any order either parallel or sequential. The Trigger can be created as On-demand or be scheduled using CRON expressions based up on the requirement.
- Increase the Data processing units to 1DPU to handle large datasets.
Conclusion
The Client can consider using this method if they use S3 bucket for data storage. As it will provide more flexibility for using boto3 functions along with other python libraries and Snowflake features in the same ETL flow. Also using AWS Glue for ETL brings us the possibility to use other AWS services like SNS, KMS and more for wide applications and additional security options.
