This post is an overview of a composable Sitecore Send offering – an email marketing automation solution with no code campaign automation.
Sitecore Send is an intelligent marketing automation platform with thousands of global customers that offers personalized customer experiences through email campaigns, workflows, and web personalization. It aims to be a global leader in the market automation space, with accolades for usability and customer satisfaction.
Sitecore Send serves thousands of customers in over 60 countries, including high-profile organizations like Hewlett Packard, Forbes, and NASA. It offers AI-powered customer engagement at scale, real-time segmentation, and personalized experiences. It caters to various industries and departments, from marketing and e-commerce to sales and tech organizations.
If you migrate from Sitecore XP to XM Cloud and miss out on marketing capabilities, including Marketing Automation, then Sitecore Send provides a valid solution to go with XM Cloud. Without having Forms, EXM and MA, XM Cloud solutions can gain it all from the seamless integration with Sitecore Send. Its marketing automation features include workflow creation, email campaigns, and AI-driven recommendations.
Sitecore Send provides features specifically designed for agencies and partners, such as a personal client management hub and customization options.

“Unwrapped” menu structure of Sitecore Send
But let’s delve into it progressively, starting with the core principles.
Email List
Mailing lists are the core principles of Sitecore Send. This is the first point your new contact lands out into the system and all the further operations are performed either against an email list or a segment which itself is extracted from a mailing list by certain criteria.
You can manually create an email list or bulk import lists from a text file or Excel/CSV (with a limit of 40 MB per file), of course, can have an unlimited number of email lists. Additionally, you can export from Google Contacts or Salesforce using corresponding plugins. Other than that, you may rely on the Sitecore Send API to import desired contacts from wherever you may only imagine. I am showing that slightly below this article.
Within each email list, you can search, filter, manage, etc., however, the most valuable thing you can do is segment the list further down for more granular targets to email.
Sitecore Send offers the capability to incorporate segments within your email lists, enabling the precise targeting of campaigns toward distinct audiences. By leveraging data derived from custom fields and user interactions amassed through prior campaigns, you can construct segments that delineate your audience. This includes factors like whether list members have engaged with past campaigns by opening them, as well as the nature and frequency of their clicks. These segments serve as filters for refining your email list, thereby empowering you to furnish subscribers with specific content that aligns with their interests.
How one makes segments?
- the product comes with built-in segmentation criteria for you to rely on
- you may leverage segment templates (such as
email ends with,purchased product,opt-in verified, etc.) - or go from scratch – define the rules, use fields or properties to be used for segmentation criteria, add more rules, verify the amount in the segment, etc.
Tags serve as another axis for segmentation. Once your email list is established, you have the option to apply tags to individuals within the list. These tags serve to categorize members, facilitating purposeful grouping based on business relevance or internal requirements. This tagging process also streamlines the search and filtration of email list members, enhancing overall management.
Tags could be either manual or automatic
- manual, also known as member tags are those manually applied to either a member or a list
- automated tags are data-driven and come from audience discovery features if you have one enabled.
If want to reuse some of your segments, it would make sense to save a segment into a template. Also, you can copy a segment into a different mailing list or export it into Excel/CSV file.
Privacy Regulations (such as GDPR) apply certain restrictions on how you manage and store mailing lists. Luckily, within Sitecore Send, the Opt-in settings play a pivotal role by allowing you to define the precise protocol for including a subscriber in your email list. This protocol is contingent upon whether explicit confirmed consent is sought.
Sitecore Send provides multiple avenues for removing contacts from your email list, each method facilitating the unsubscription process. Through these distinct procedures, you have the ability to either unsubscribe recipients from a particular mailing list or opt for a comprehensive unsubscription from all mailing lists. Similarly to importing contacts into your mailing list, you can use the same methods for unsubscribing: text, Excel/CSV, Salesforce and Google Contacts plugins, or even by copy-pasting contacts.
Growing the Audience
Typically there are two ways to grow your audience – by using Subscription Forms and by implementing Landing Pages.
Subscription Forms
A subscription form is like a special form on your website where visitors can sign up to receive your newsletters and emails. It helps you gather more people for your email list, learn more about them, and make them more interested in what you send. With Sitecore Send, you can make these forms look good and be simple for people to fill out. It also provides options for displaying forms based on visitor behavior and integrates with ReCaptcha and mailing lists.
The typical routine for growing the audience using the forms is: a visitor upon submitting the form becomes a contact in an email list. Later mailing list gets broken down into more specific segments so that we can target a campaign precisely matching each segment.
However, Subscription Forms have some minor drawbacks or things that would be nice to have been implemented but is not yet there:
- lack of drag-and-drop functionality and customization options for fields.
- no API support or ability to create custom submit events.
- form editor is simple and the styling options are limited.
- it could be at least as powerful as Campaigns and Landing Pages are
There are six types of forms available with Sitecore Send:

- Popup: a traditional pop-up window for a specified duration… form is displayed when someone visits the page, after a set amount of time that you specify. You can also opt for Show form when someone leaves a page or form is displayed when someone is about to leave the page.
- Inline: integrates form into the website or landing page content. It is usually embedded within a webpage and appears as a simple box or button for visitors to click to access the form.
- Floating bar: creates a bar fixed to the top or bottom of your page. It is helpful as stays visible when visitors scroll down the page, so that this form can catch attention without being too intrusive.
- Floating box: a fixed form at the bottom right or left. Visitors can click the box and submit information to subscribe to a newsletter or receive updates.
- Fullscreen: takes up the whole screen of a website or webpage. Typically it appears as an overlay on top of the website content and often includes a CTA and a form where visitors can enter their email and the rest of the information.
- Promo pop-up: another helpful form of a pop-up
When defining the form, you may set up conditional rules for showing the form, and can also define is all the conditions must be met or just any of them. You may leverage the below:
- Url Path
- Cookie
- Country of visit
- Device Type
- Operating System
Editing your form is an awesome process! The subscription form editor allows you to add or edit the layout and items of your subscription form. There are four sections in the editor: the top menu, the left pane, the editing area, and the right pane for defining more specific properties. In some way, it reminds me Pages interface editing experience with XM Cloud.
Sitecore Send comes with prebuilt templates for subscription forms. When creating a form, you will be shown the template library, so that you can edit the design of a prebuilt template. Once complete you can either save it or save it as a template – for future re-use.
Preview Mode allows you to see the subscription form as it looks on mobile devices, tablets, or desktops, which is pretty helpful to see the result of your changes as you progress.
Code Mode allows you to obtain a read-only view of the HTML code of your subscription form. You can download the JSON file of your subscription form so that you can source control that code to share with other team members to make edits. Later, you can also import a JSON file back into the editor.
History Mode helps to access and restore saved versions of your subscription form design as drafts are automatically saved every 30 seconds upon the design changes. Also, saving your designs manually when you want to is also an option.
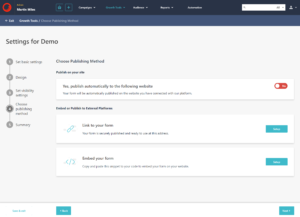
Once ready, you can publish that form either on your own website or embed or publish to external Platforms:
Landing Pages
Landing Pages predictably serve to land your visitors upon clicking a link or a button within a campaign. Frequently, it incorporates a subscription form for visitors to input their details. This transforms visitors into leads and receivers of email marketing campaigns.
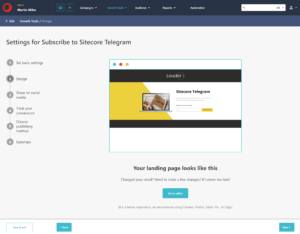
Landing Pages function has similarities with the form in the way they function, also the way you deal with the visual editor is very consistent across the whole application. You can select from the various available landing page templates or you can design your own using the landing page editor.
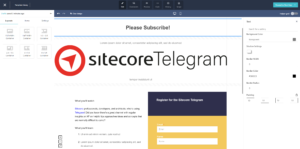
With an ever-growing number of Landing Pages, you may simplify navigation by filtering either by label or status by choosing one from a drop-down menu. There are three statuses so far: Incomplete, Published, Unpublished.
Can I integrate a landing page into my site? Yes! And that’s in my opinion one of the powerful features of Sitecore Send, still remaining a no-code solution. You can modify both the URL and path to make it easy to remember or adjust to your brand. When choosing a publishing method, there will be a domain drop-down menu, select one of the available landing page domain names – the landing page will be published in the chosen domain. This becomes possible because Send allows setting CNAME records for different providers, mostly typically at a subdomain level.
In that manner, alternations are also possible to the Path field, simply enter your preferred landing page URL path.
Tracking conversions informs you about the number of people submitting forms or clicking CTAs on a landing page. There are options for using Google Analytics or Facebook Pixel Code if those are configured for your site.
Campaigns

Campaigns are effectively a form of an electronic newsletter that you send to your recipients to achieve a specific outcome. You can use this for email marketing, service updates, sales confirmations, or whatever else you might desire.
You create a campaign from email lists or segments and choose between modifying the pre-created template or doing it on your own from scratch with either HTML or custom text. Similarly to other Sitecore Send interfaces, Campaigns Editor has a visual editor with drag-and-drop capabilities, mobile view, and styling customization options.
A notable feature is personalization within RTE: there are tokens to be replaced such as first name, last name, etc., but it also can be any property of your contact from a list/segment, including custom ones. Also, make sure you edit an unsubscribe link, otherwise, it will be added automatically anyway, so you better adjust its styles to match the rest of your email. Once done, you may test the email to ensure it looks nice and all the tokens got replaced.
Here are the different campaign types you can create in Sitecore Send:
- Regular campaign – use this type if you want to send a crafted email message to your target audience. For example, when you want to send newsletters, promotional offers, or product updates. and send it to one or multiple email lists.
- RSS campaign – gets updated content from an RSS feed. For example, you can connect your campaign directly to the content of your RSS. Every time a new publication appears in the RSS feed, an email is triggered automatically..
- Repeatable HTML – automatically gets new content from a designated website resource. This campaign is triggered when updates occur.
- A/B testing – lets you test two different versions of the same campaign on part of your mailing list and then automatically send the version that performed better to the rest of the recipients on your list. A/B campaigns help you test the subject line, campaign content, and/or campaign senders.
- Automation campaign – use this type, for example, when you want to send a campaign through an automation workflow, based on a specific trigger or condition.
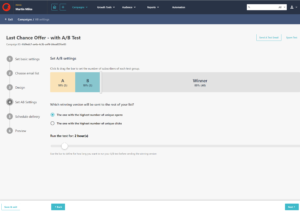
Setting a campaign with A/B Test
Automation
Sitecore Send lets you automate your communication with customers by identifying specific situations that trigger the sending of an email message. These automated emails can be created from scratch or created using automation recipes. Good examples of it could be sending a welcome email message or following up on an abandoned card with an email.
Send simplifies automation creation with preconfigured templates or recipes that serve as starting points for your automation designs. Instead of creating automation from scratch, you can select a specific recipe that aligns with your marketing goals and quickly edit it to fit your needs.
Similar to templates, with Marketing Automation you can choose a recipe that suits your business requirements and modify it by editing, adding, or deleting steps as required.
The key concept here is a trigger, an event that activates the automation. There are different types of triggers for you to choose.
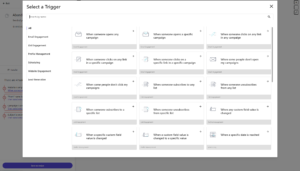
Automation Editor allows you to visually see and edit the flow, with all its conditional actions and drag-and-drop support. You can split flow to 50%/50% similarly as with A/B testing.
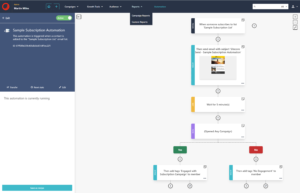
When creating your own automation from scratch, you start by defining what triggers your automation and then add the steps and conditional actions that you want it to perform. Upon completion, you can save it as a recipe for reuse.
Reporting
Reporting helps you onboard and monitor your campaign and revenues, and track your email recipients. It has a series of campaign reports, where you can track your campaign performance and elements such as link clicks and recipient activity. You can also work with custom reports from widgets as you want them to be, to track exactly what you want using the available widgets.
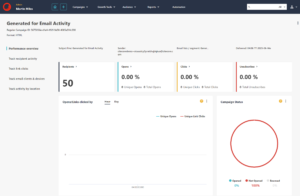
You can get reports for:
- email lists
- forms
- landing pages
- automation
- campaigns
I’d say the last one is the most important as provides the full statistics about your campaigns.
Integrations
I would split integrations into two groups: inbound, where we obtain visitors’ contacts into our system, and outbound where the outcomes produced within Sitecore Send are integrated with external systems (such as subscription forms and landing pages, as I wrote above). Below I am going to talk about the first group – importing the contacts.
There are numerous ways of doing so:
- If you have a Google or Salesforce account, you can use the plugins to import your contacts to Sitecore Send.
- Mailchimp users can import campaigns, senders, and mailing lists.
- With Sitecore Connect, you can also connect Sitecore Send with other non-Sitecore apps to create automation for transferring data between them and Sitecore Send
- As a normal workflow, you receive contacts from your embedded forms
The last resort that universally works with everything is using Sitecore Send API. You will need an API Key in order to call the API to add subscribers to a mailing list, as well as the ID of this list. With this approach, you can include custom fields passed as a collection of string values, in order to extend your contacts. Once done, you’ll be able to segment or personalize against these custom fields.
What about integrating other Sitecore products with Sitecore Send?
CDP
By using the Audience Sync feature in CDP you can export a segment, for example on a regular basis (daily).
You need to set it up as a batch webhook as this option lets you provide a URL for calling a webhook, which will be a URL of the Sitecore Send API endpoint.
Personalize
Unlike CPD which operates in a scheduled manner, Personalize operates in real-time using full stack triggered experience, triggered by an event in Personalize. When the Experience event happens it triggers a webhook that sends the data taken for example from Decision Model to the Sitecore Send API
XM/XP Platforms
One of the potential use cases is to create a custom submit action of Sitecore Forms to send captured contact data to Sitecore Send API, including custom fields. For XP there is another option would be exporting contacts from xDB.
Audience Discovery
Audience Discovery comes as an advanced AI-powered e-commerce feature of Sitecore Send. This capability leverages the power of artificial intelligence and machine learning to recognize the behavior and preferences of your intended audience. This empowers you to elevate your email marketing strategies by tailoring content to individual tastes. To utilize audience discovery, you need to activate it within your Sitecore Send account. Once activated, you gain the ability to effortlessly monitor and classify your website visitors according to their interactions on your site.
At a high level, it works in the following way: Sitecore send tracker pushes events to send. It can be anything like pages or product views, adding to cart events, purchases, etc. Then Audience Discovery comes into play, based on info tracked, it leverages AI segments by tagging users in mailing lists.
Conclusion
Without any doubt, Sitecore Send comes is a valuable marketing offering of the Sitecore Composable family. With that level of integration, it gives marketers the power to gain and target the audience, convert it into customers, and retain it by using the power of Marketing Automation tools. Notably, all that could be performed with no code at all!
