Want your Squarespace website to rank higher in search engine results?
In this guide, we share Squarespace search engine optimization (SEO) tips that can help you get to the top of the search engine results pages (SERPs).
The Importance of Squarespace SEO
Squarespace makes it easy for anyone to create a website. But if you want people to find your website, it’s important to learn the basics of how to do SEO in Squarespace.
SEO for Squarespace can help you:
- Improve brand awareness: If your website ranks higher in search engine results, more people will learn about your brand, regardless of whether they end up visiting your website or not
- Attract more traffic: You’ll get more visitors to your website. And more chances to turn visitors into customers.
- Generate sales: Organic search traffic is among the highest-converting traffic sources out there, so you’re bound to get more sales by optimizing your website for search engines
7 Squarespace SEO Tips for Higher Rankings
Ready to learn how to improve SEO on Squarespace? Follow these tips:
1. Start with Keyword Research
Keyword research is about understanding how your target audience uses search engines.
The goal is to find out which keywords your ideal customers are likely to search. So you can include them in your website content.
When a website has a high-quality, useful webpage related to a searcher’s query, and the search engine can see the specific keywords used in the search on your site, it increases the chance that the search engine will suggest your webpage when someone searches for your targeted keywords.
But how do you find keywords to target?
The first thing you can do is a little brainstorming.
Think about the topics your website covers and that your potential customers would be interested in. Try to imagine what they would type into Google or other search engines to learn about those topics.
For example, if you are a gym owner, some keywords you might want to research include “best gyms in [your city],” “how to choose a gym,” “gym workouts for beginners,” and so on.
Google’s auto-suggestions can help you get more keyword ideas. Simply type in the beginning of a word or phrase related to your business. And Google will provide you with suggestions for related search queries.
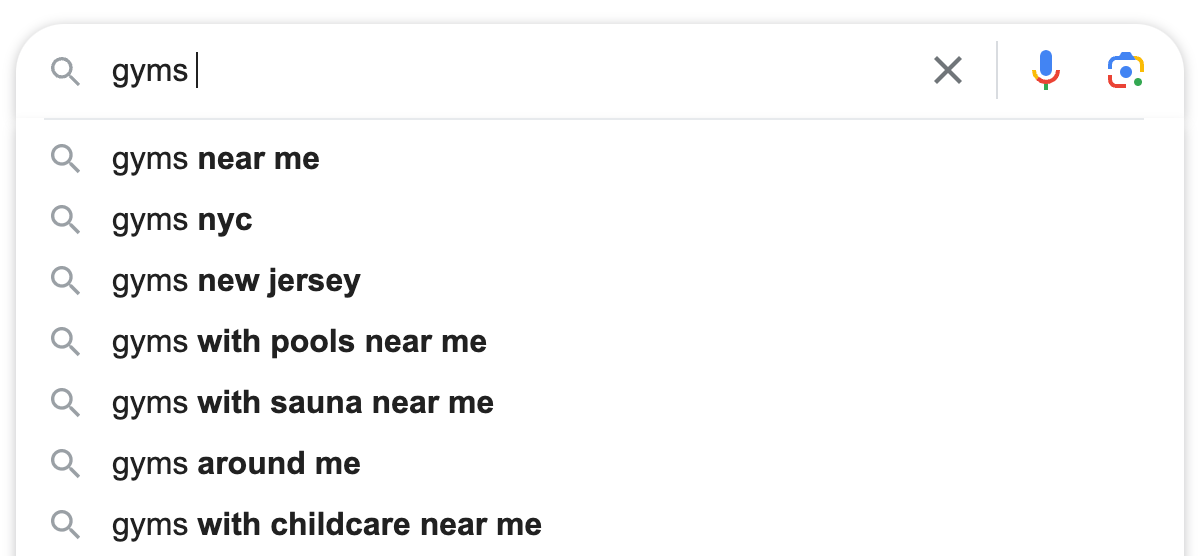
Try out different keywords and phrases. Note all the relevant suggestions Google gives you.
This is a good start, but it’s also a fairly manual and time-consuming process. To speed things up, you can use the Semrush Keyword Magic Tool.
All you need to do is type in a single keyword. The tool will generate thousands of related keyword ideas.
Here’s how to get started:
Type a broad, basic keyword into the Keyword Magic Tool. Select your intended audience’s location in the drop-down. Then hit the “Search” button.

The tool will generate a list of keyword ideas.
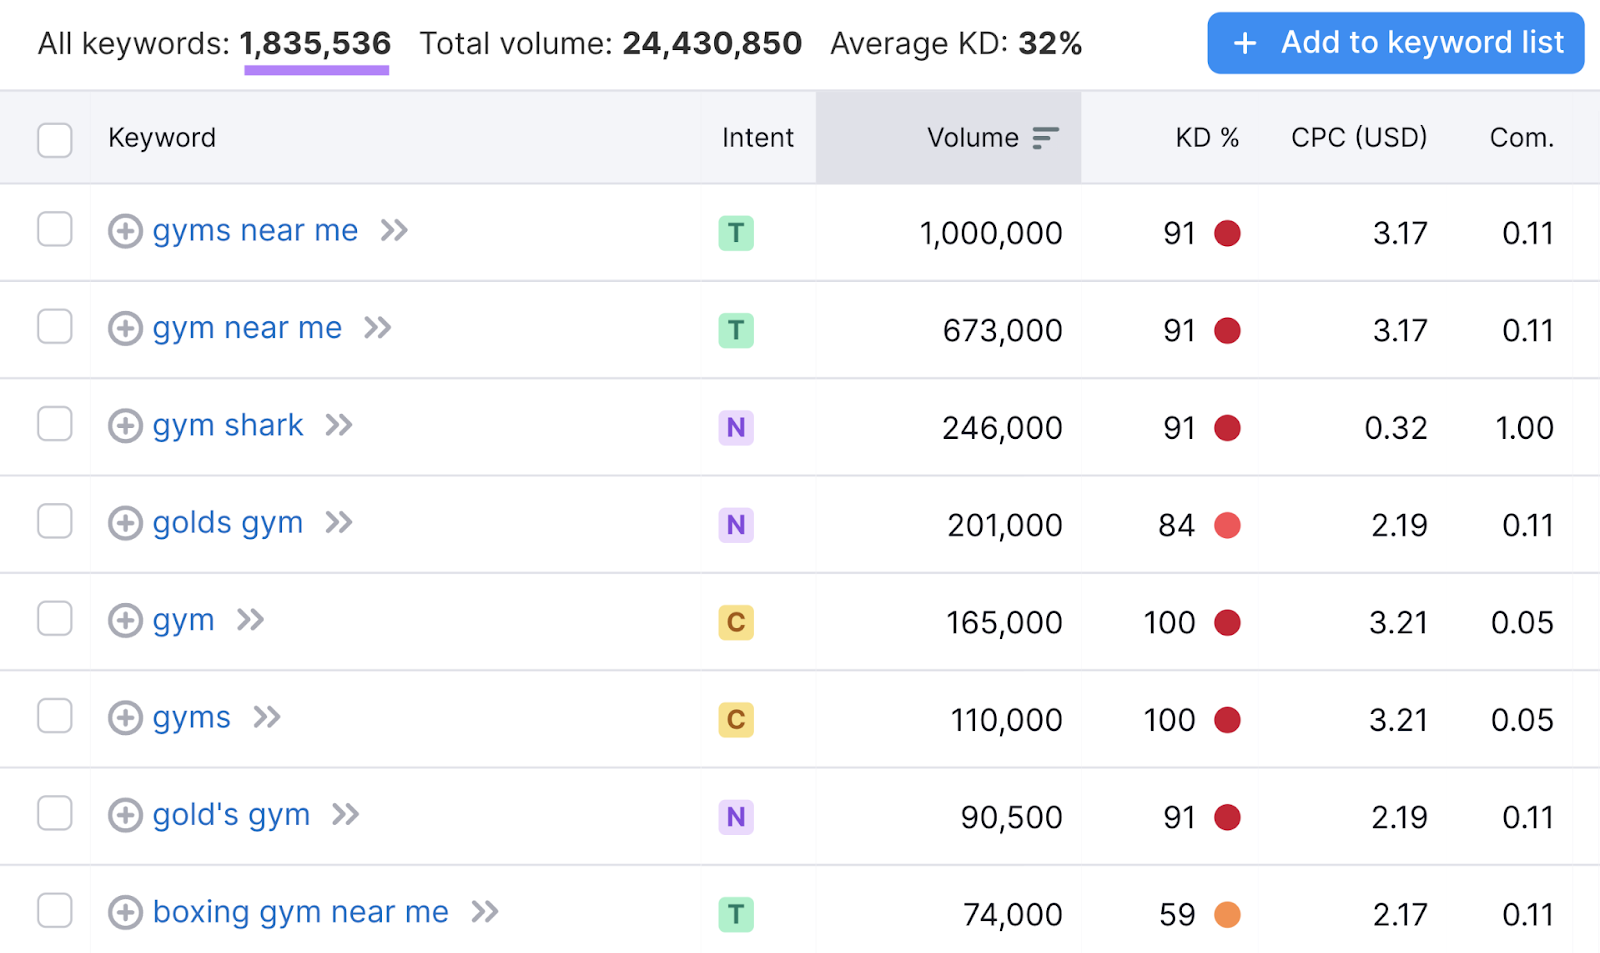
You can filter the list in a number of ways:
- Search volume: The estimated average number of times a specific keyword was searched each month over the past 12 months
- Keyword difficulty: A measure of how difficult it is to rank a keyword within the top 10 results on the SERP
- Search intent: Whether the keyword suggests informational, navigational, commercial, or transactional search intent
- Cost-per-click (CPC): How much an ad click costs, on average, for ads targeting the keyword with Google Ads
Let’s say you wanted to attract people who are researching different gyms. Or may be ready to sign up for a gym membership.
Since your website is quite new, and you don’t have a big budget to spend on link building, you’d like to target keywords with a lower keyword difficulty (but that still have decent monthly search volume).
Here’s how to get a list of keywords that fit your criteria:
Click on the “Intent” drop-down, check the “Commercial” and “Transactional” options, and hit “Apply.”
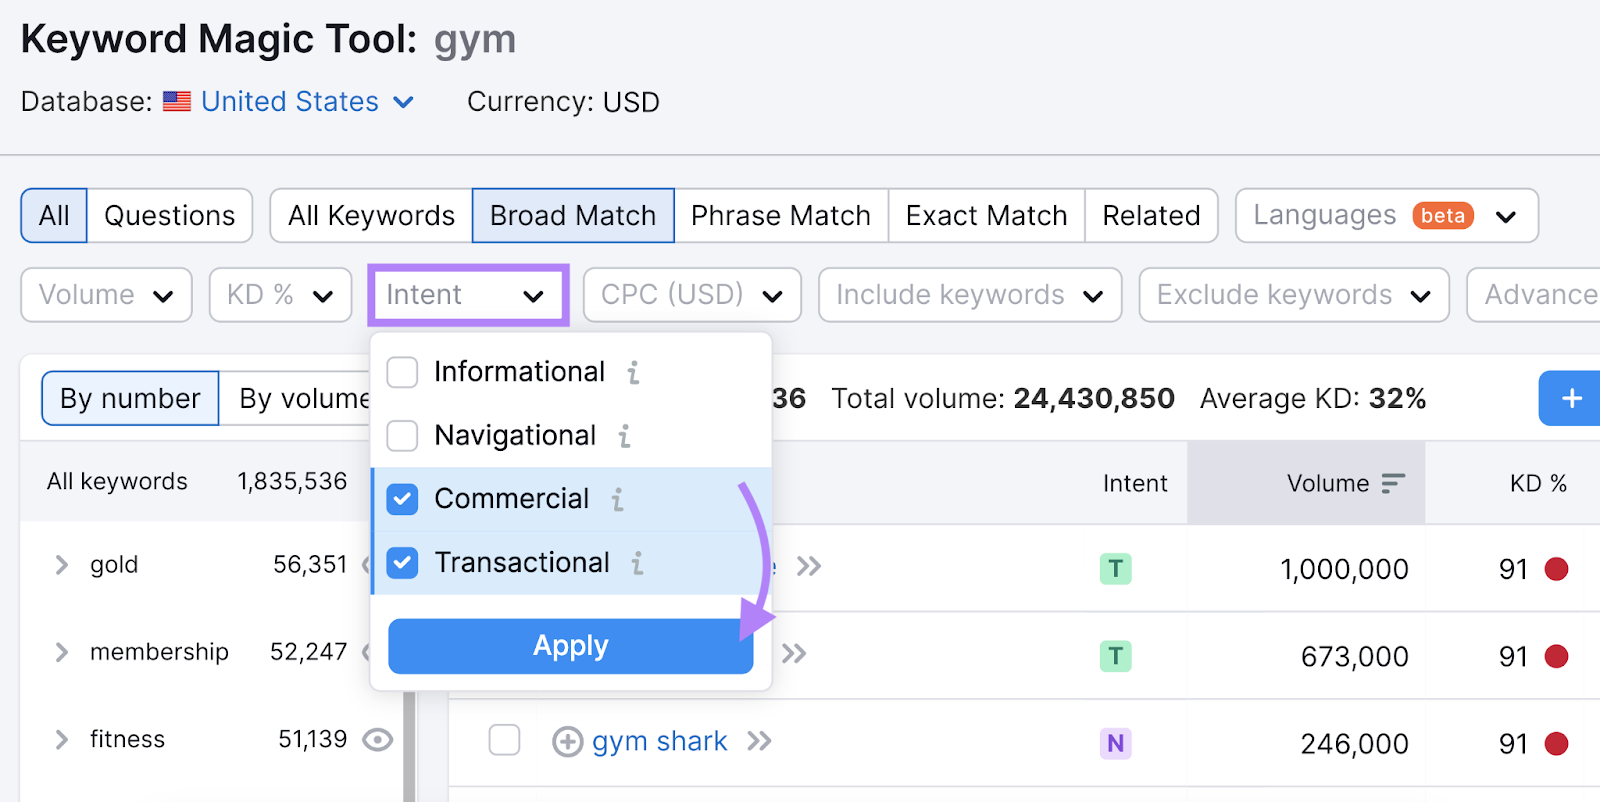
This will ensure you only see keywords for which there’s a good chance searchers are ready to spend money.
Next, you want to make sure those keywords have enough monthly search volume that it’s worth your time to create content targeting those keywords.
Click on the “Volume” drop-down and type in “100” in the “From” field under “Custom range.” Hit “Apply.”
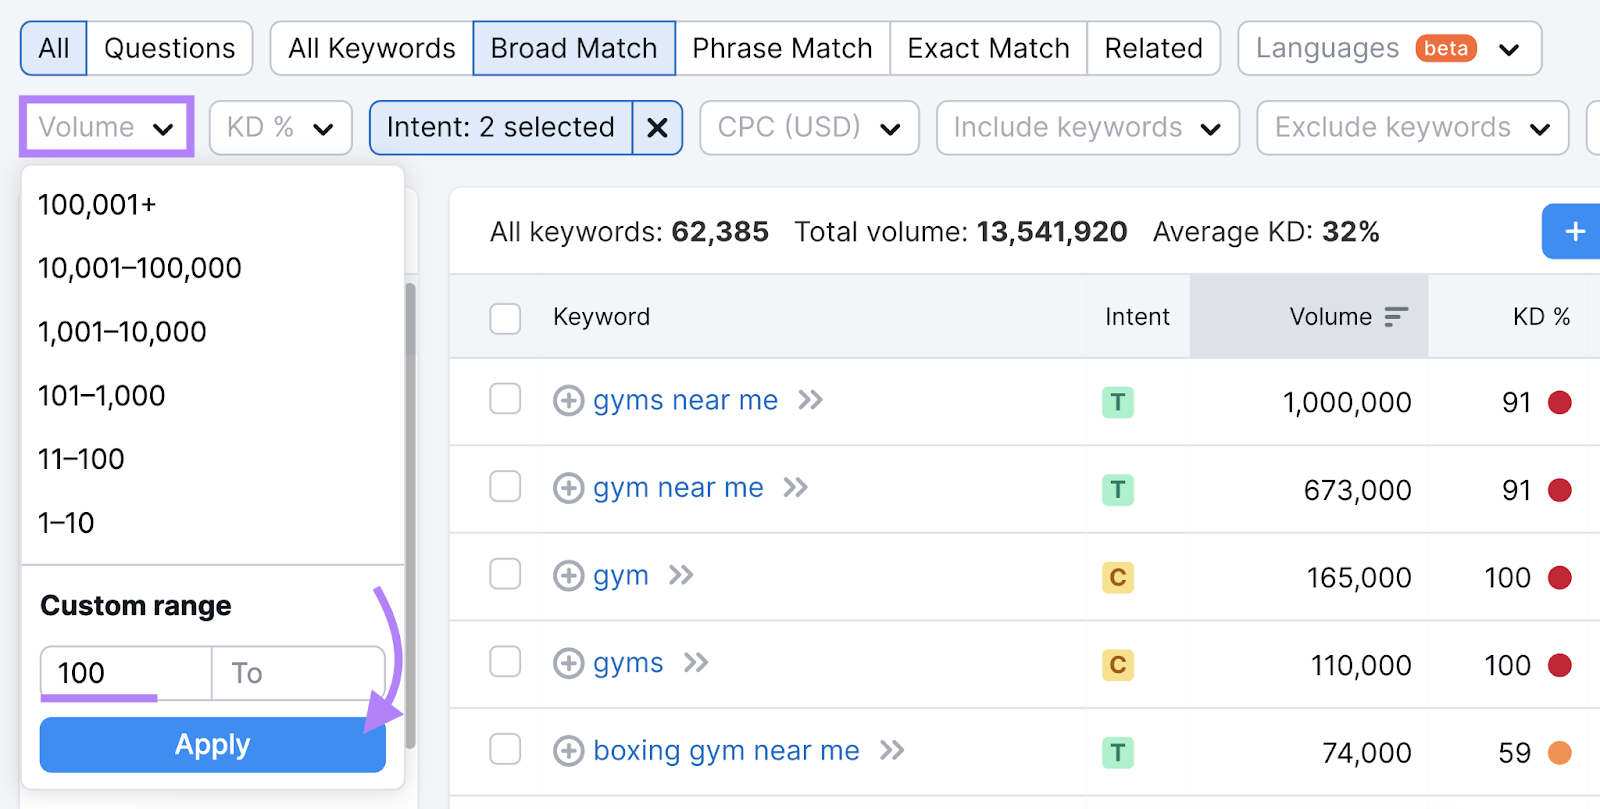
This will filter the list to only show keywords with at least 100 average monthly searches over the last 12 months.
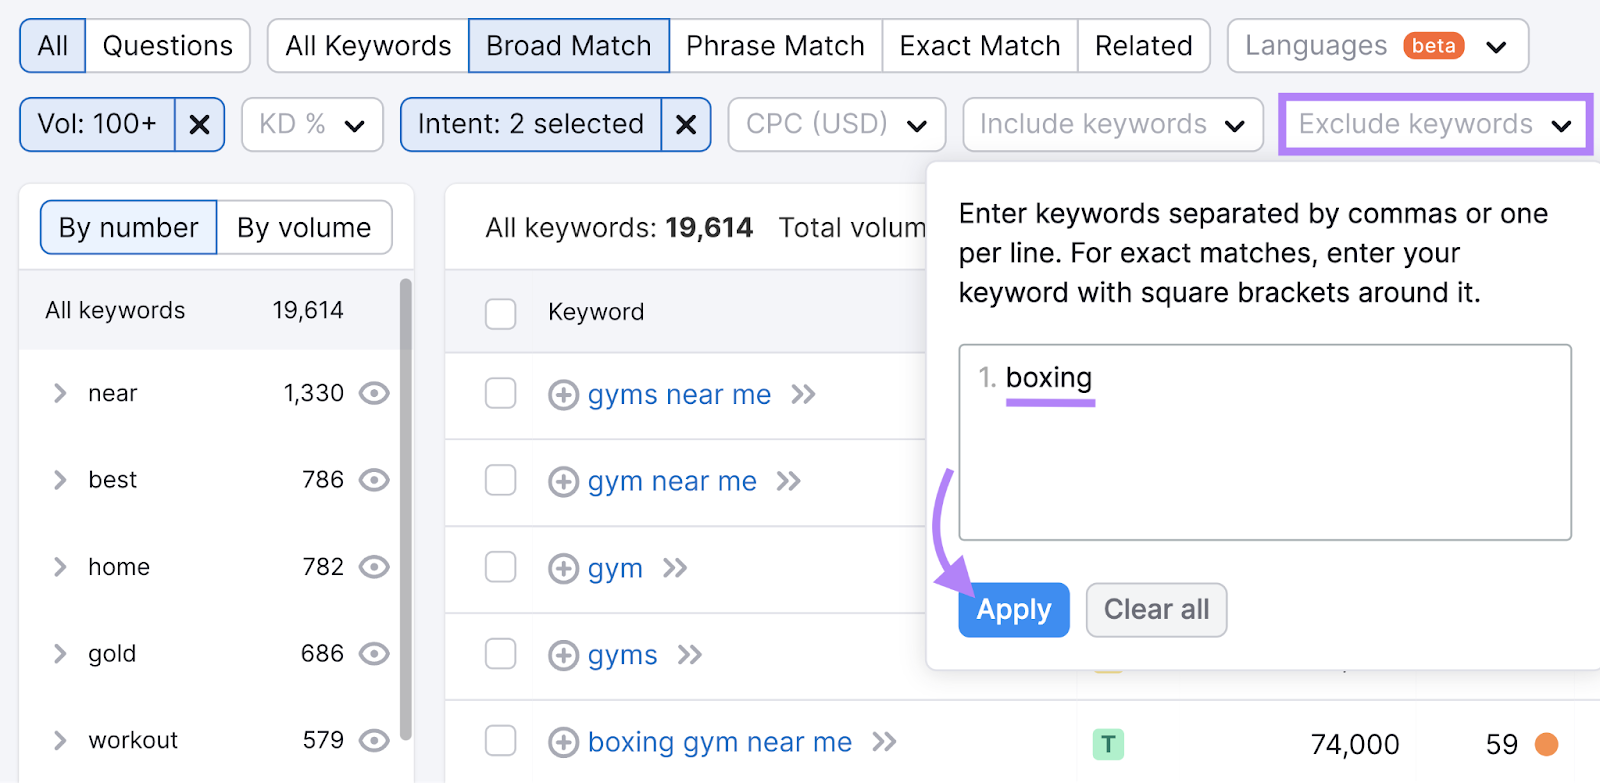
If there are any keywords you’d like to exclude (e.g., “boxing” for “boxing gym”), you can do so by clicking on the “Exclude keywords” drop-down and typing in the keywords you don’t want on the list.
Once you’ve added all the keywords you’d like to exclude, hit the “Apply” button.
The last thing you need to do is to make sure the list only includes keywords with a low keyword difficulty.
Click on the “KD%” drop-down and set a custom range of 0 to 49%. Hit “Apply.”
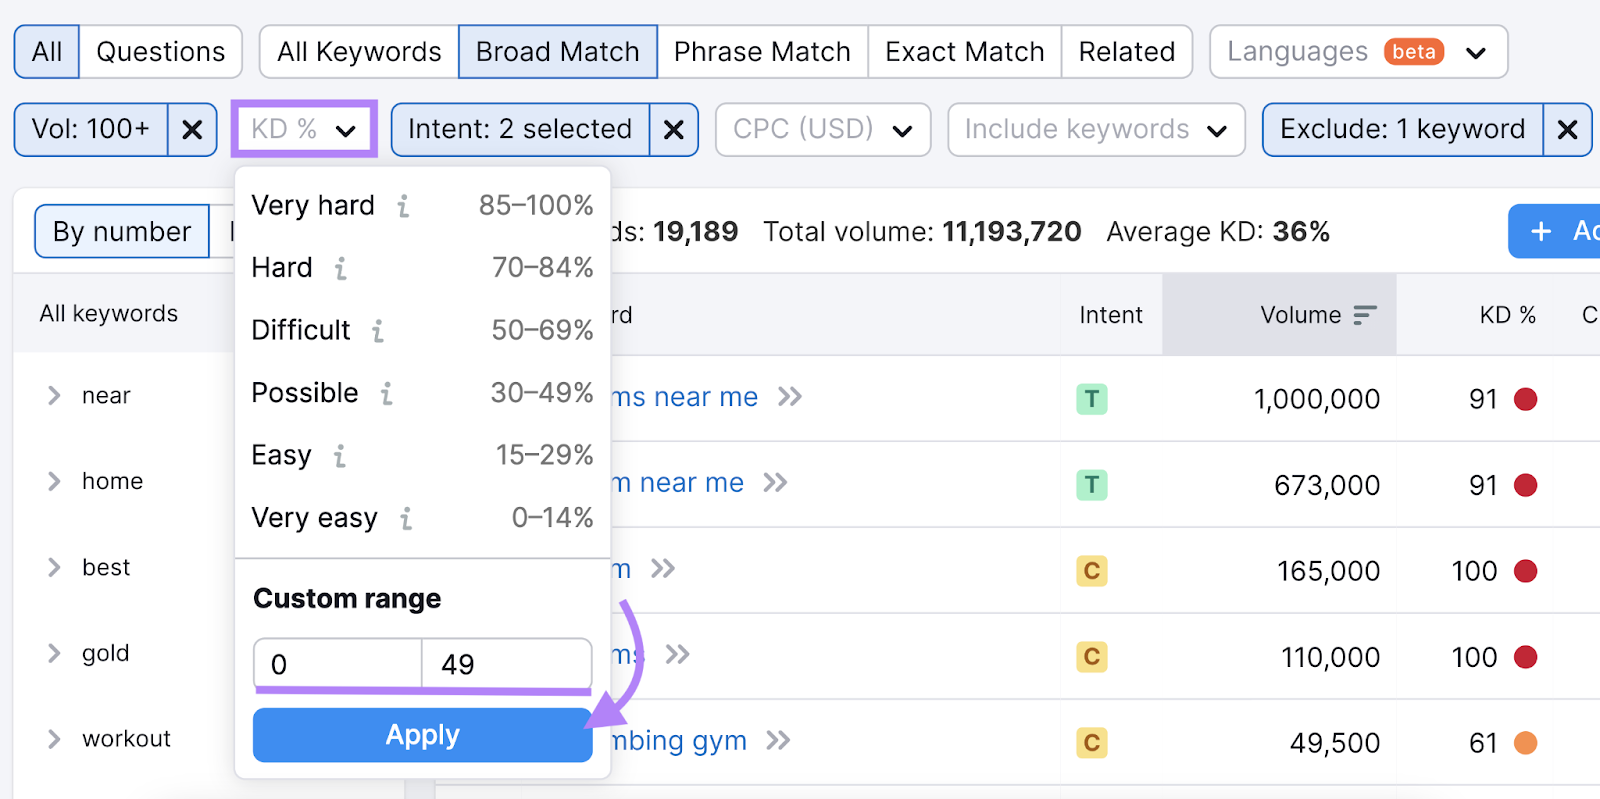
This will show you all the keywords the tool considers very easy, easy, or possible to rank for.
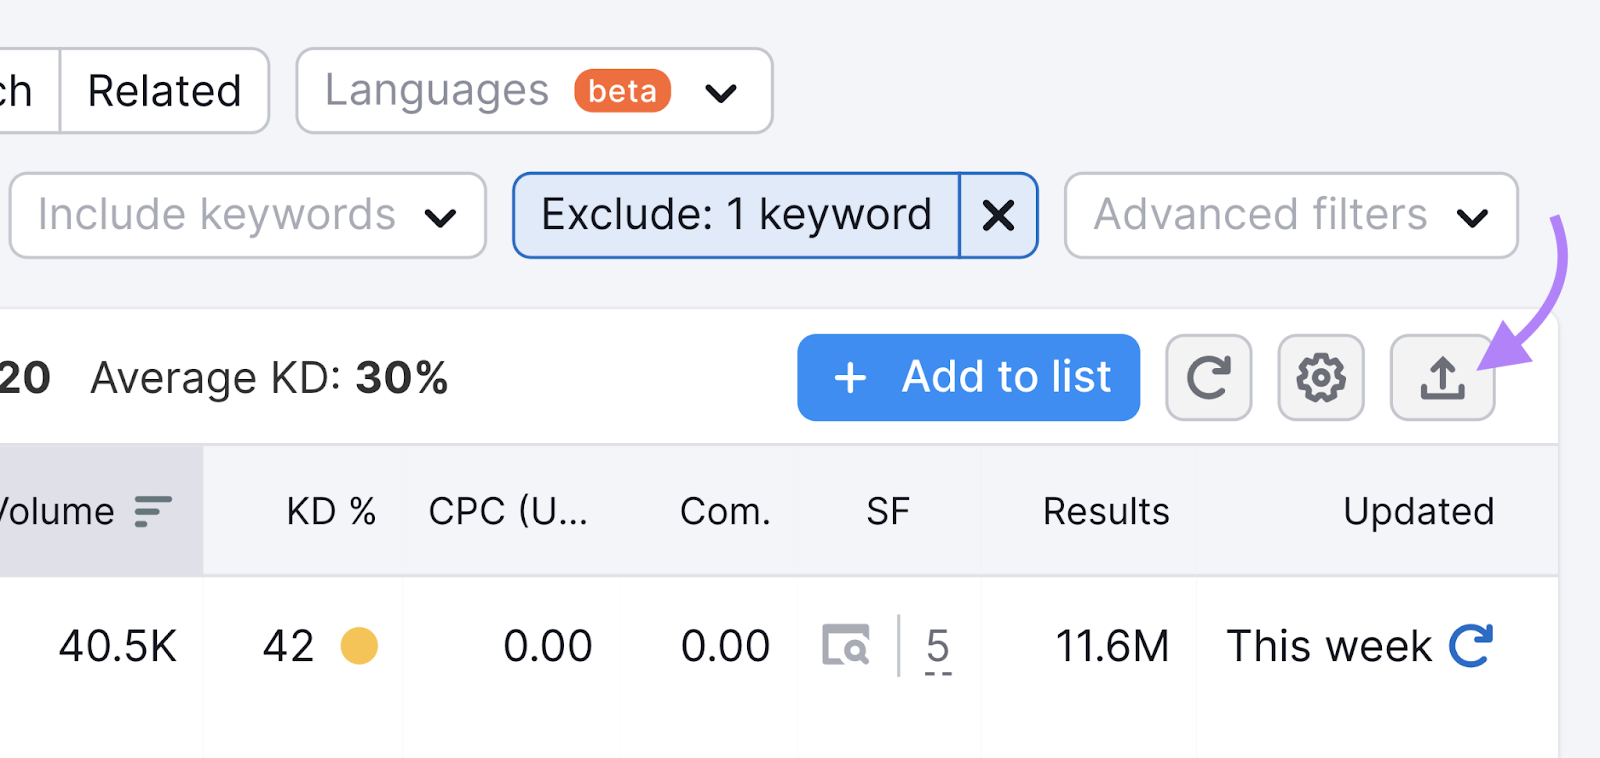
At this point, there are a couple of things you can do. You can export the entire keyword list to an Excel or CSV file by clicking on the export icon. Or you can export just a few keywords by clicking on the checkbox next to those words first.
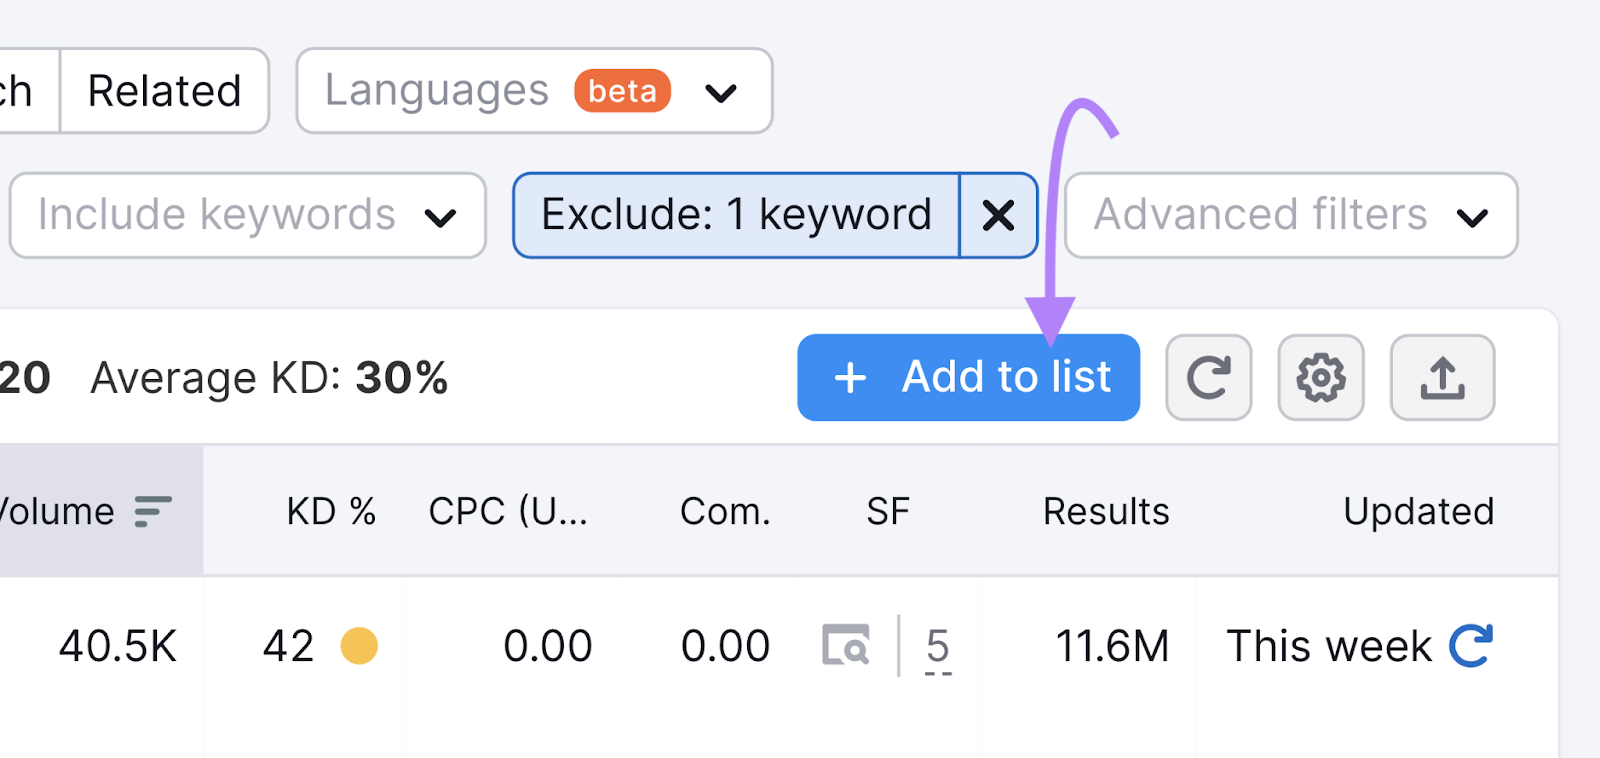
Or you can add the keywords to a keyword list in Semrush. To do this, simply select the keywords you’d like to add, then click the “+ Add to list” button. You’ll need to select an existing keyword list to add to or create a new one.
Now that you have a list of keywords, it’s time to create content that targets them.
2. Create Relevant and Helpful Content
Creating relevant and helpful content will help your website rank for your target keywords.
You might be wondering what relevant, helpful content looks like. Google shares a few guidelines that can help you here. They state that content should:
- Be created primarily for people, not search engines
- Provide original information based on research, reporting, or analysis
- Cover a topic comprehensively
- Provide substantial additional value compared to other pages already present in search engine results
It’s also important that you show Google that your content can be trusted. A few ways to do this include:
- Backing up any claims you make with citations and references to reputable sources, studies, and research
- Having an expert on the topic write the content
- Having an expert or a team of experts review and verify the accuracy of the content
3. Optimize Page Titles
Creating great content isn’t enough to rank high in search engine results. You also need to make that content easy for search engines to recognize.
The first step is to optimize your page titles.
The page title is shown as a part of the preview snippet for your page in search results. It looks like this:

It’s important to get the title of your page right since it shows both searchers and search engines what your page is about. Google has confirmed that it uses page titles when ranking content for its search engine algorithm.
So, how do you optimize your page titles? It’s actually fairly simple to do.
Your page titles should:
- Be under 60 characters: Keep your page titles under 60 characters to avoid having Google truncate them in the SERP
- Provide an accurate representation of your page’s content: Use the page title to make it clear what your page is about—don’t try to deceive users or Google
- Include your target keyword: Add your target keyword to the page title if you can do so in a natural way without forcing it in. If it’s a bad fit contextually or grammatically, it’s OK to leave it out. It’s more important that the description be informative and accurate.
You should also make sure every page on your website has a title. If your page is missing a title tag, or has one that’s vague, irrelevant, or suboptimal in some other way, Google will generate one for you. And it might not be the best one.
You can use the Site Audit tool from Semrush to check your website for pages with missing titles.
Start by entering your domain and clicking the “Start Audit” button.

The tool lets you customize a number of settings, including how many pages to check, which pages to exclude, which user agent to use for the web crawl part of the audit, and more.
In this case, you can simply keep the default settings and hit the “Start Site Audit” button.
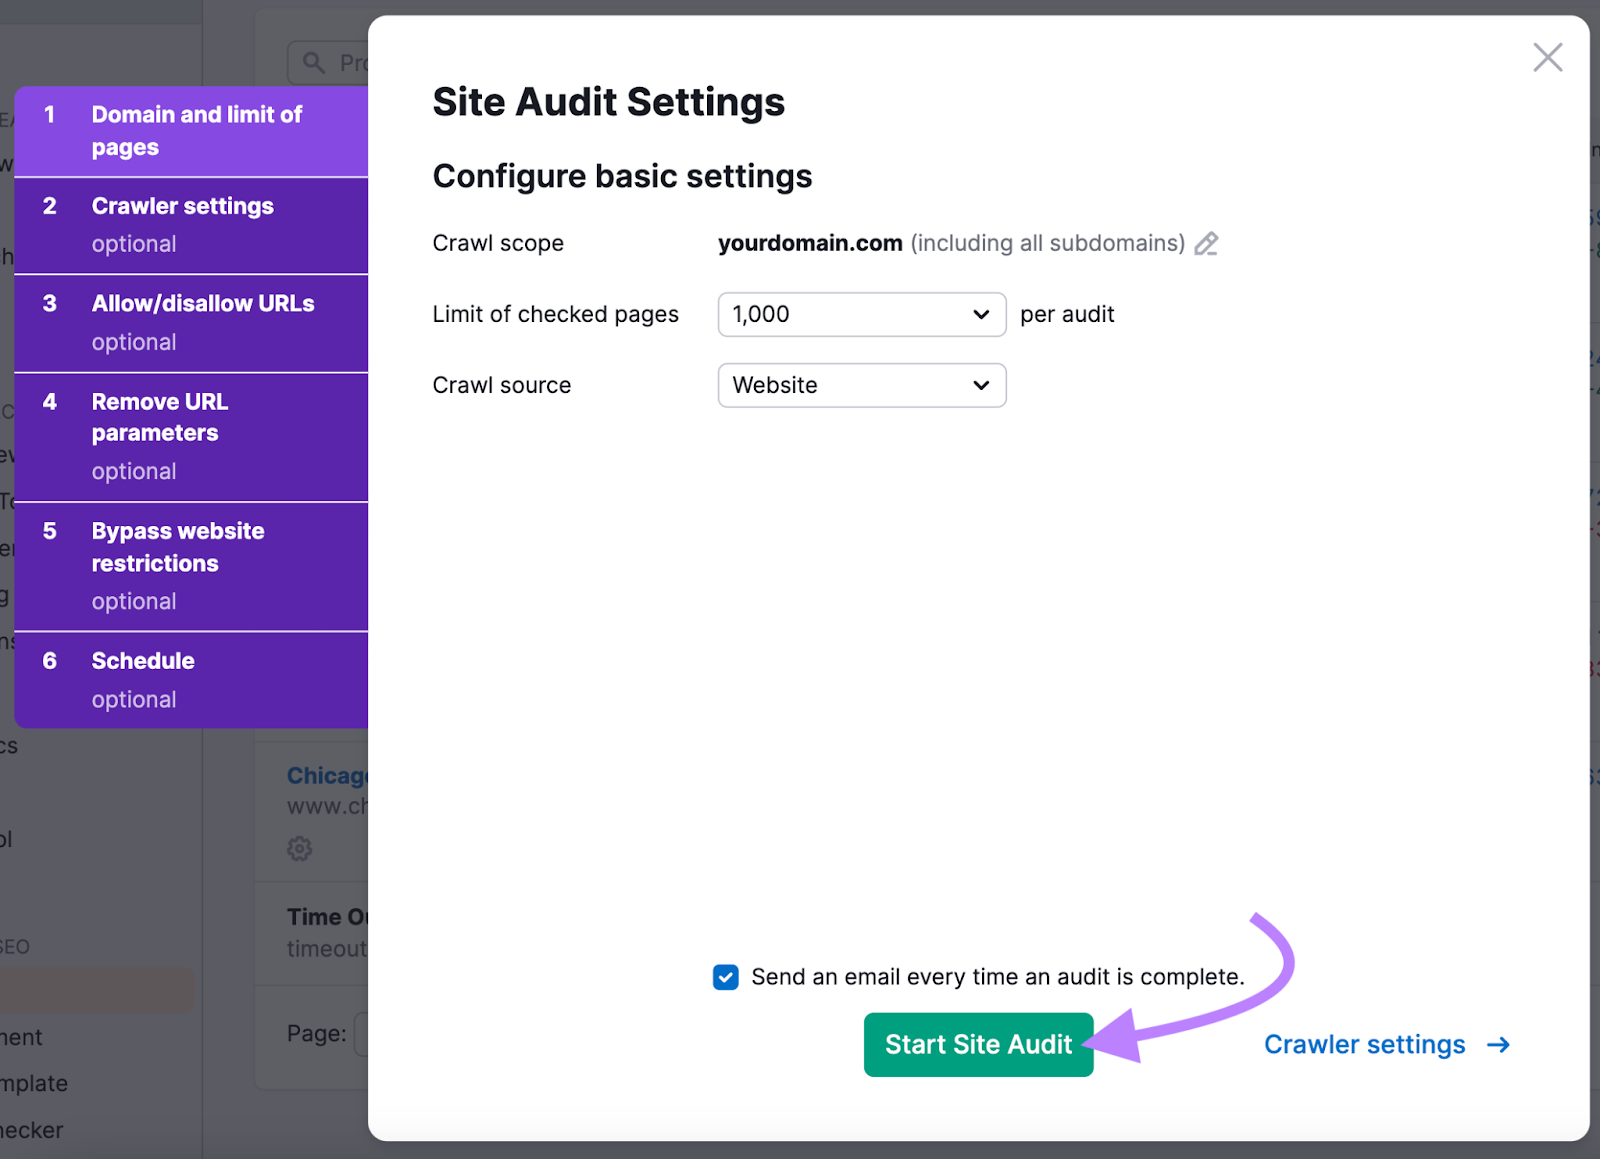
The tool will audit your website and present you with a detailed report outlining any issues it discovered.
To see which of your pages have missing titles, navigate to the “Issues” tab. Type in “title” in the search bar to filter the list of issues to only show those related to page titles.
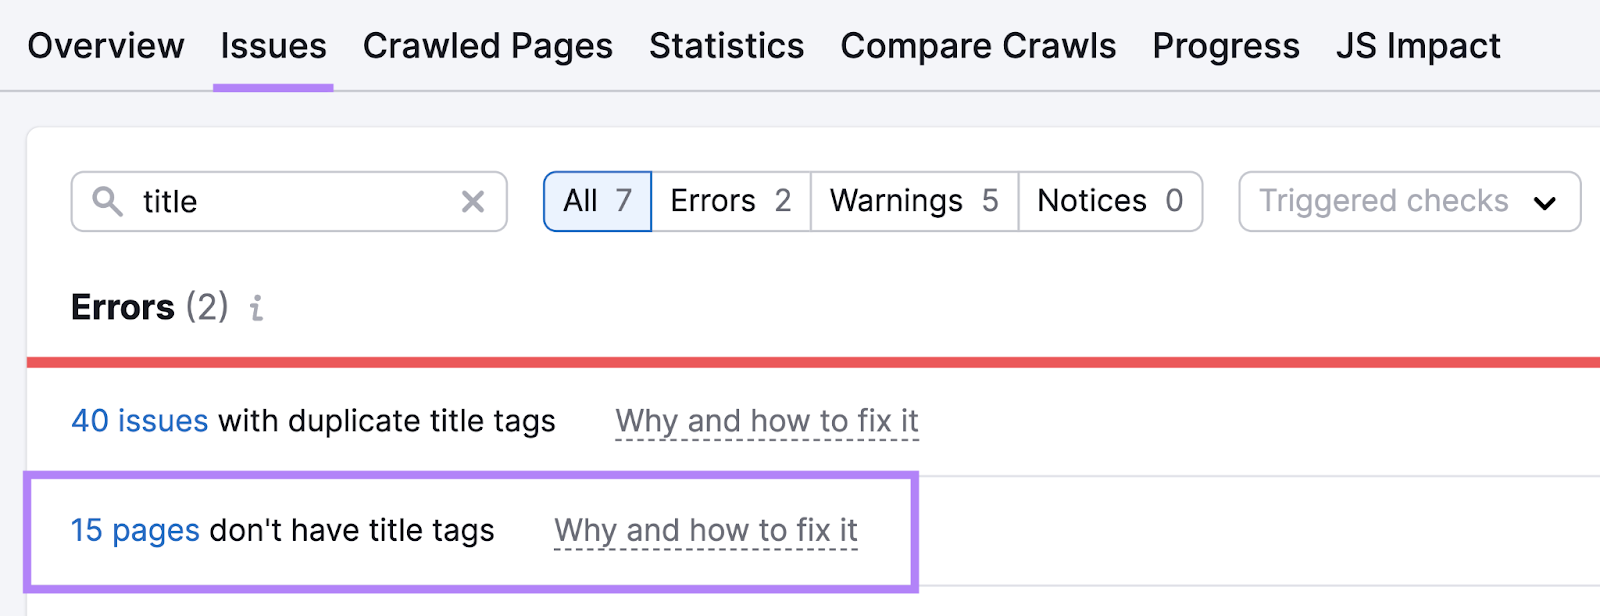
Click on the linked part of the text (shown above) to see the list of pages that are missing title tags.
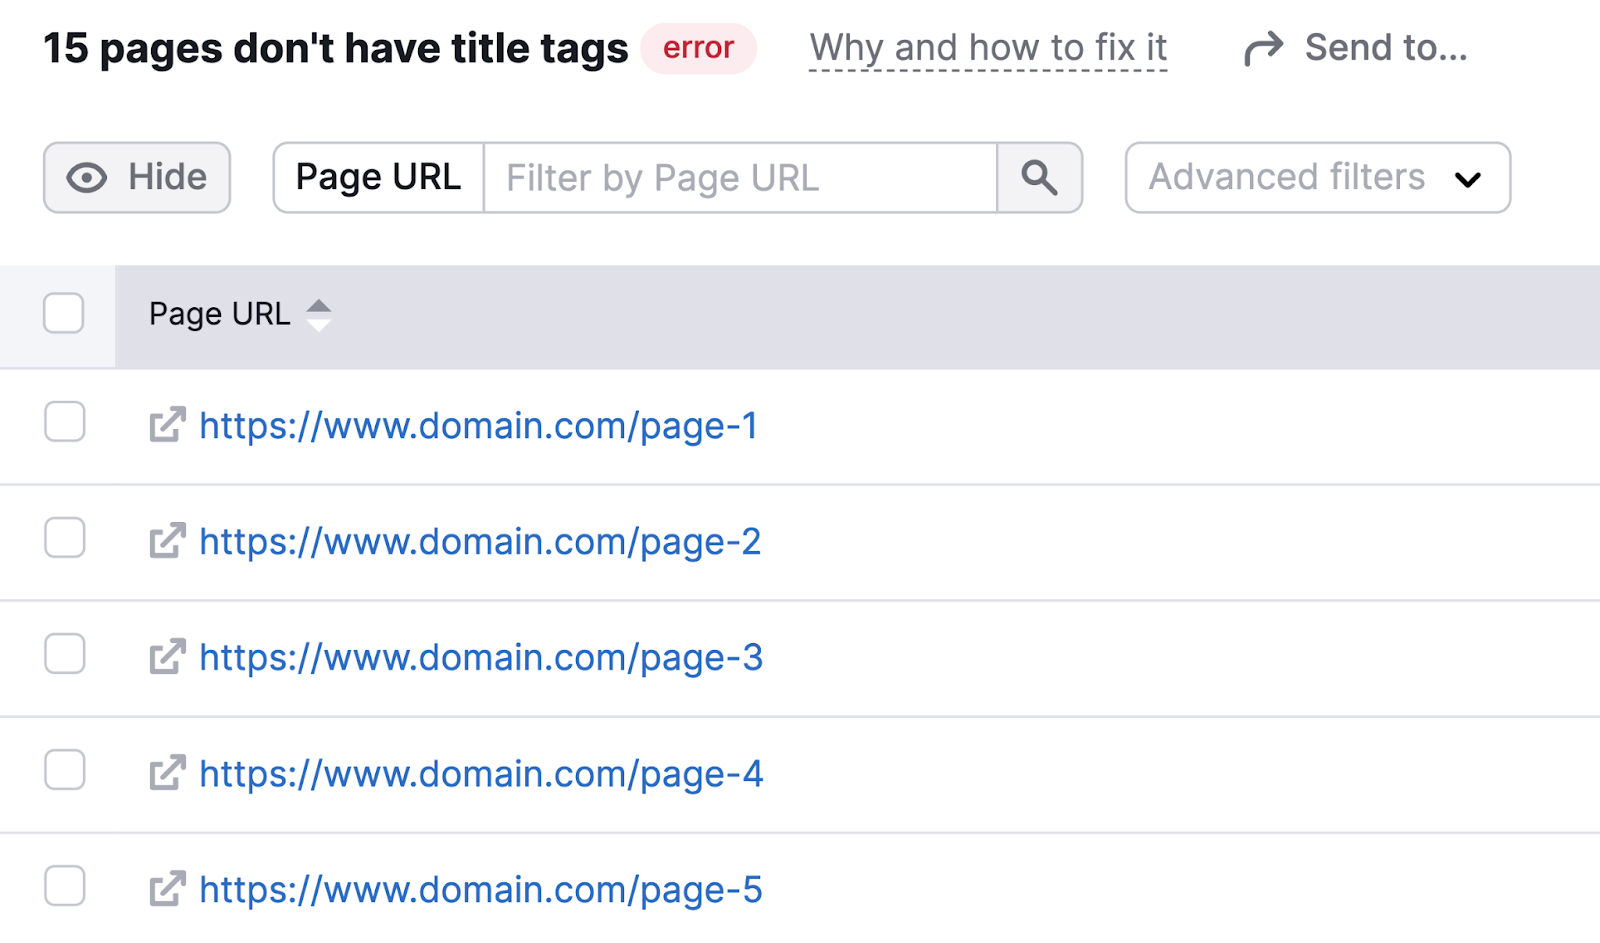
You’ll need to go into Squarespace and add title tags for each of the pages shown in the list.
Here’s how to add a title tag in Squarespace:
Go to www.squarespace.com. Click the “LOG IN” button in the upper-right corner and sign in to your account.

From the dashboard, click the website you’d like to edit.
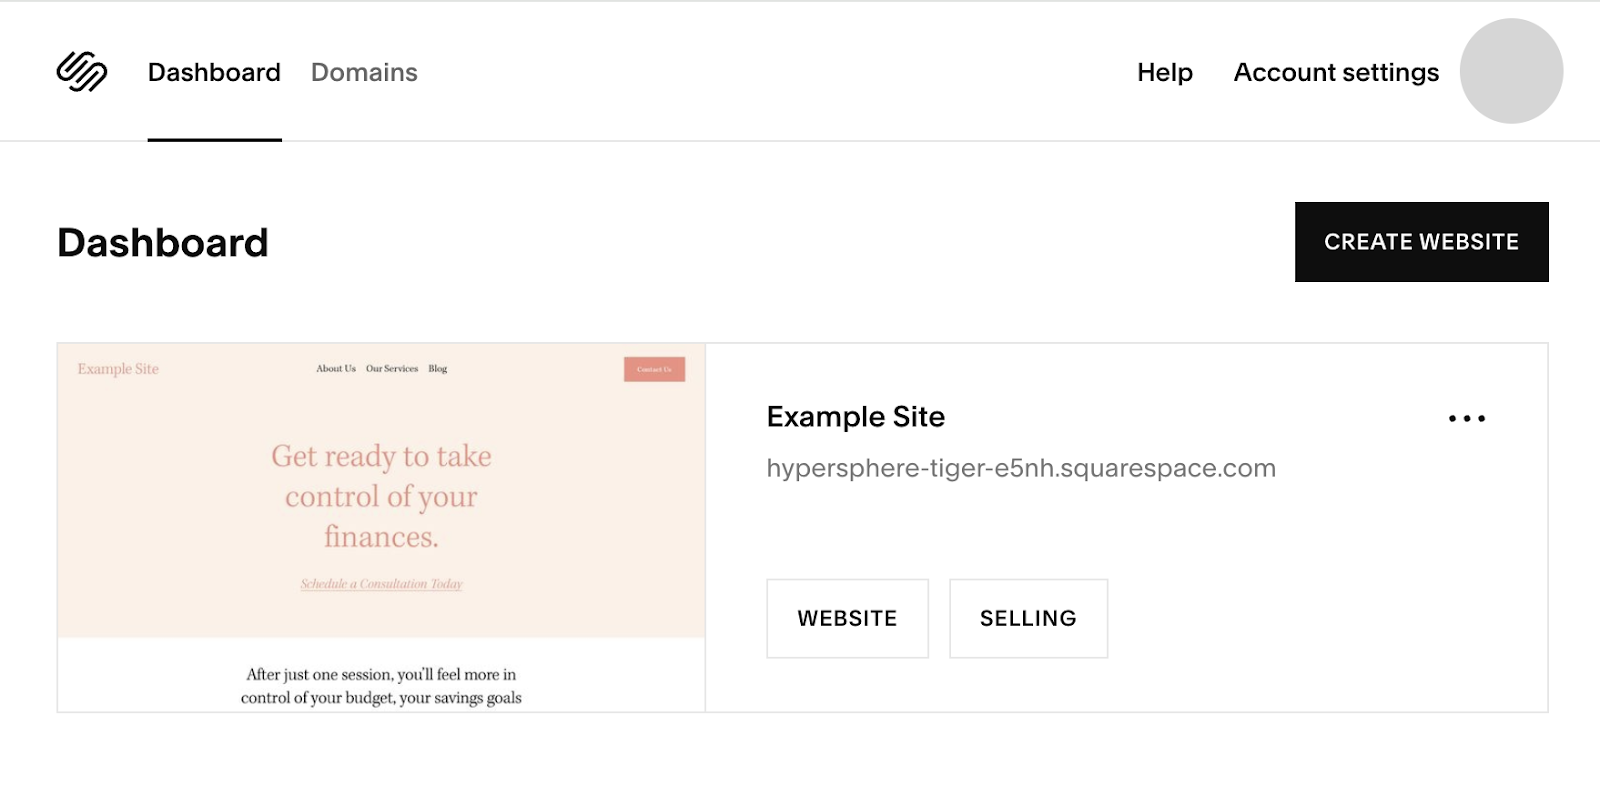
Click on “Website” in the left-hand menu.
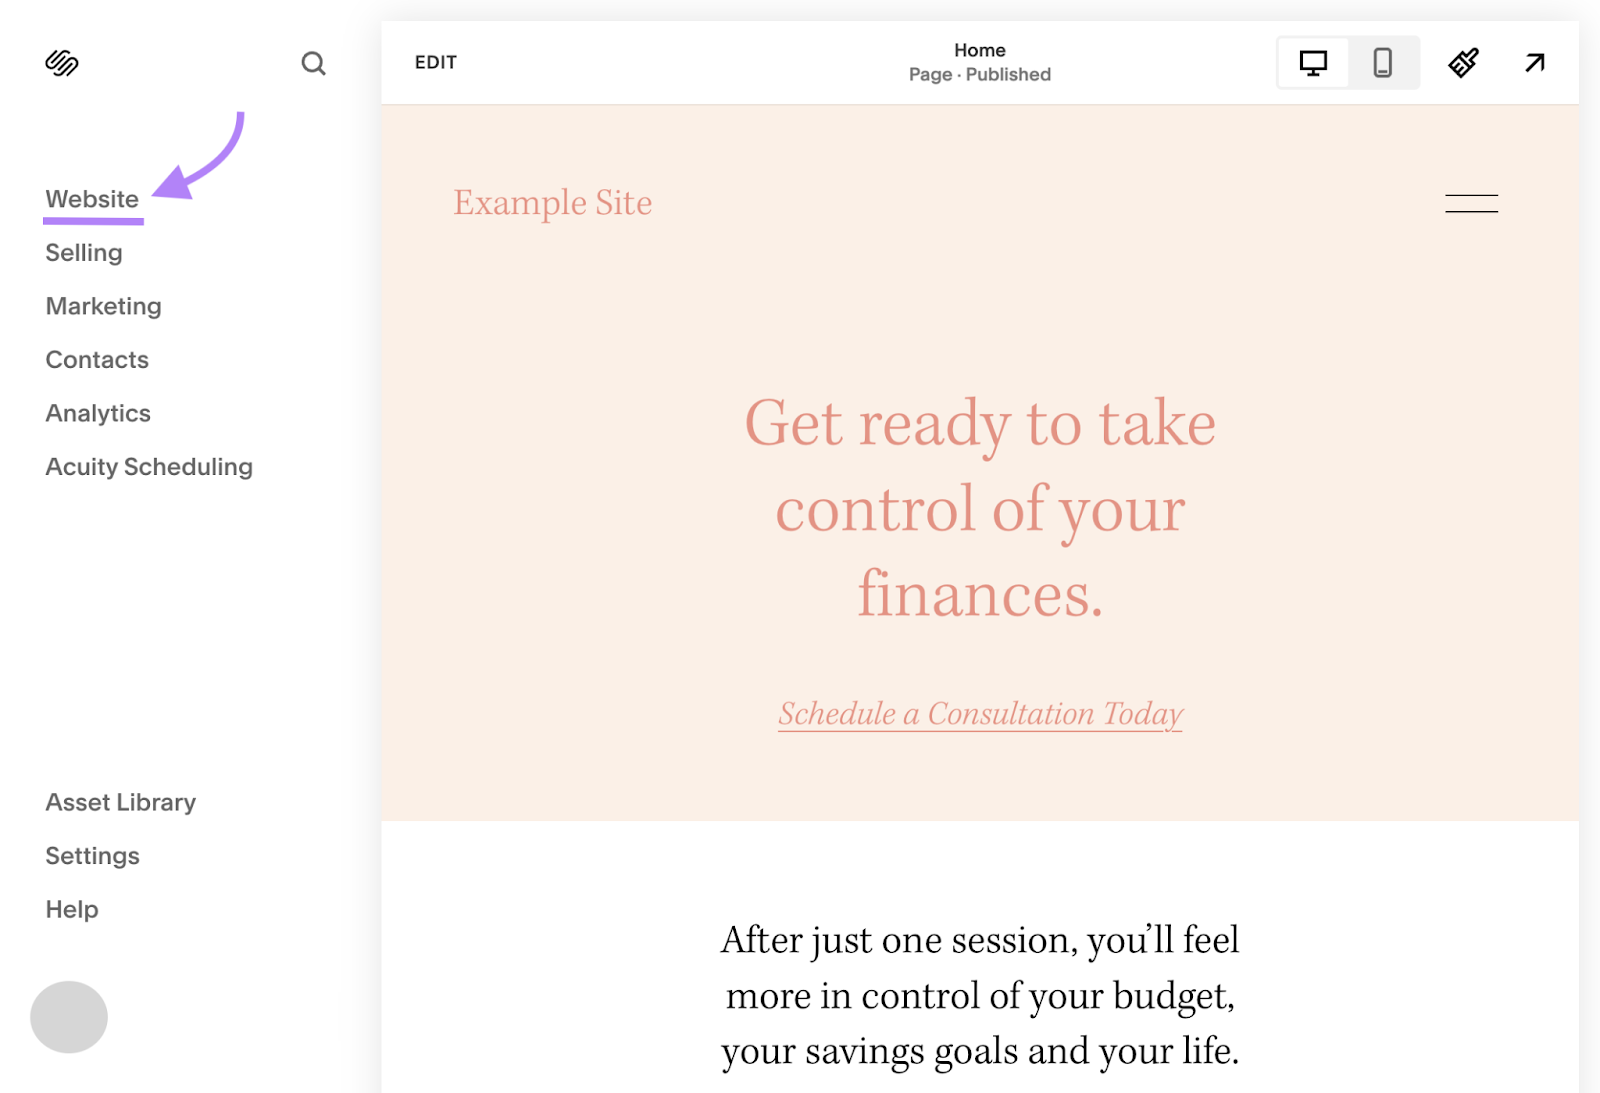
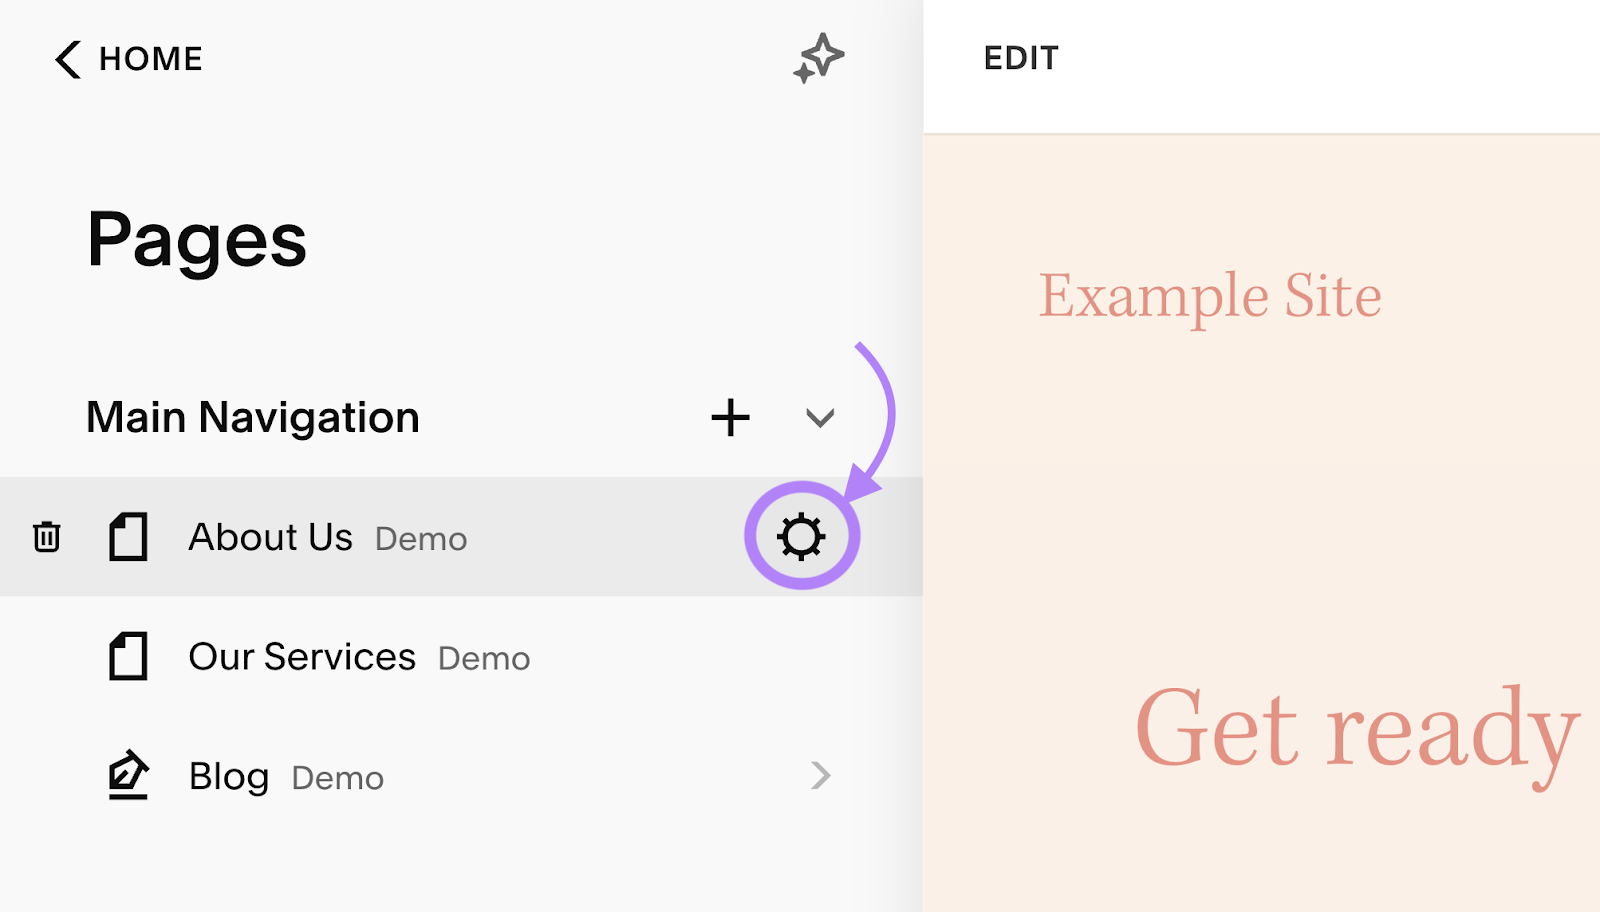
Next, find the page with the missing title tag in the list of pages and click the cog icon next to its name.
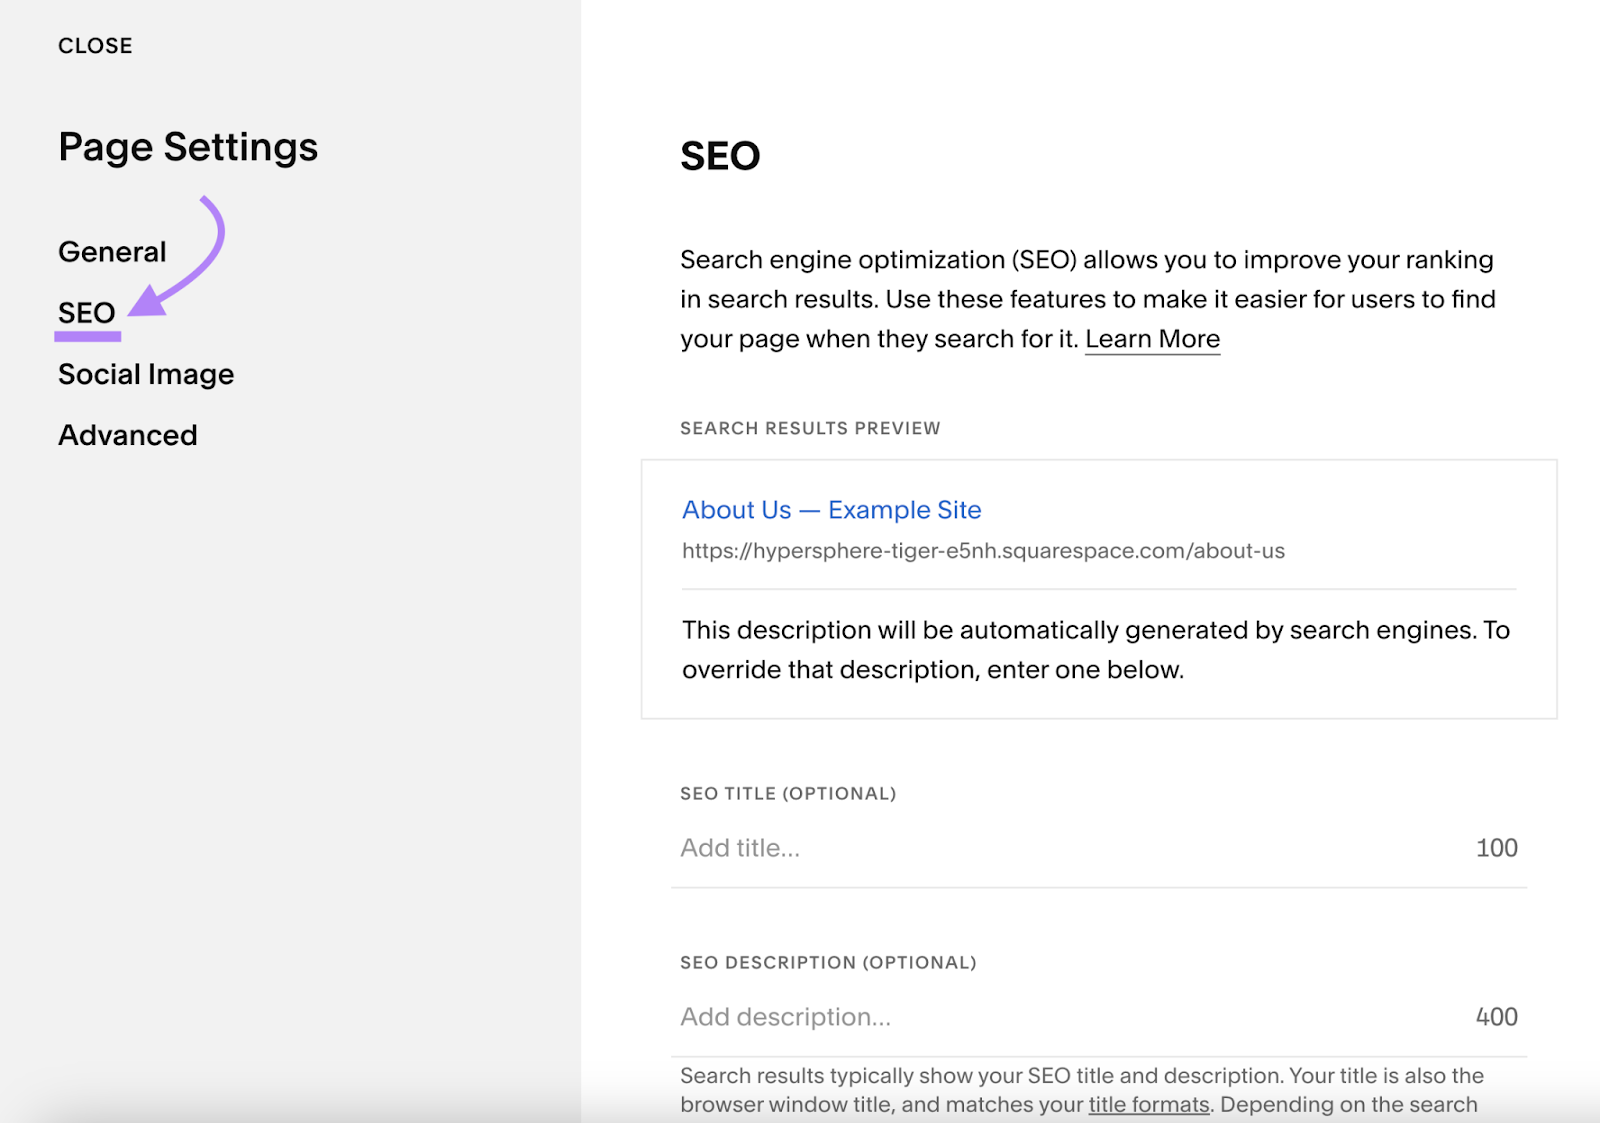
Navigate to the “SEO” section in the window that pops up.
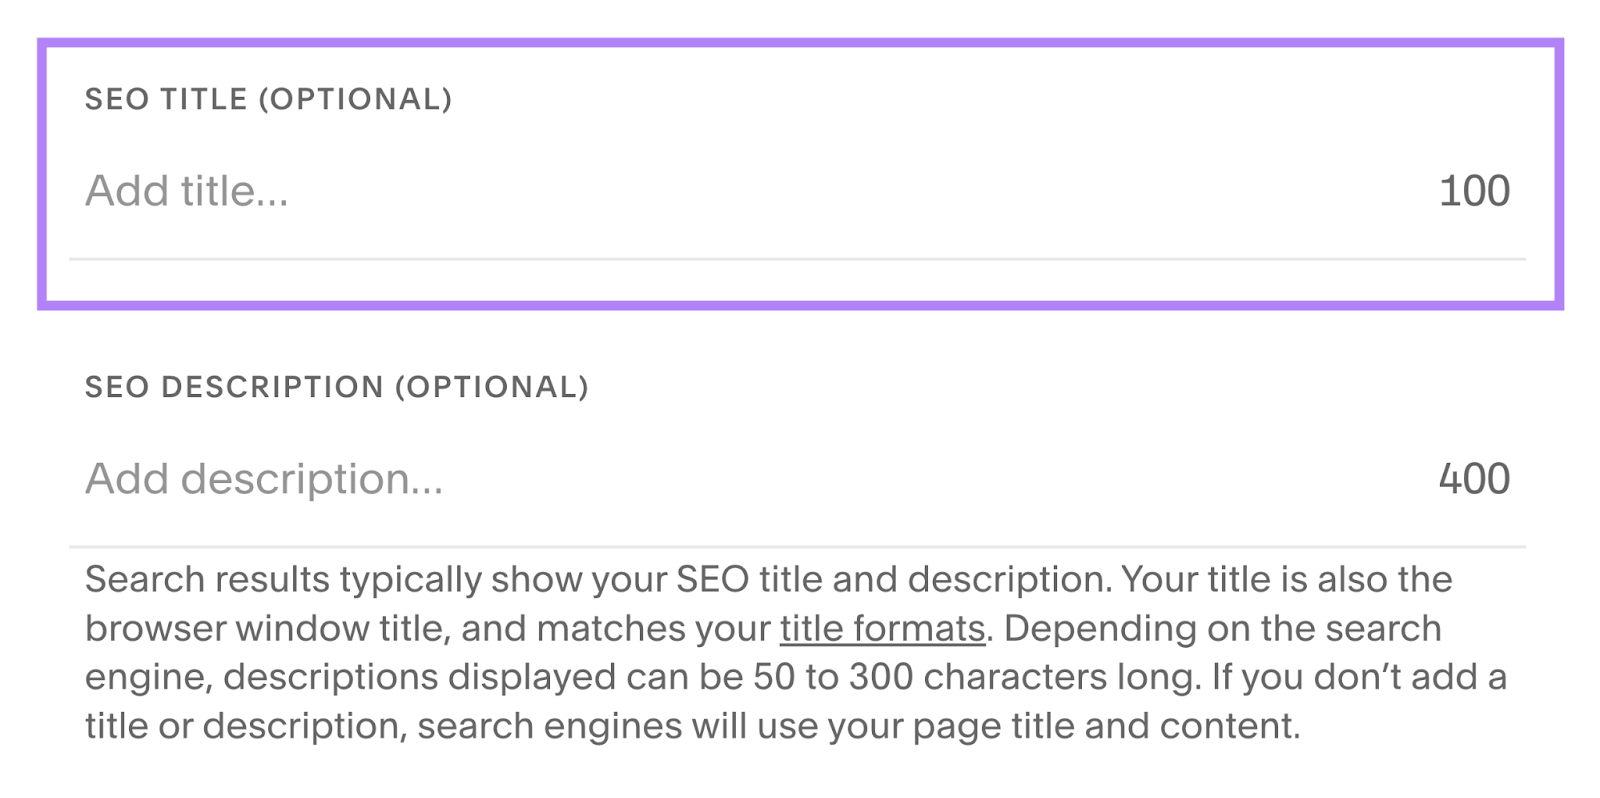
Type in a descriptive page title into the “SEO Title (Optional)” field.
Repeat this process for all your pages with missing titles.
4. Add Meta Descriptions
The meta description is a short summary of a webpage that is sometimes displayed as a part of that page’s preview snippet in search engine results.
When a meta description shows up in search results, it can look like this:

While the meta description doesn’t have an impact on a page’s ranking, it can help searchers understand what your page is about. By making the content of the page clear, the meta description can help you drive more clicks to your page from the SERPs.
So, make sure every page on your website has a meta description that clearly describes what the page is about.
As with page titles, if you don’t add a meta description or the meta description you create is too deemed suboptimal in some way, Google will generate one for you automatically. And the one it generates might not be the best.
You can use Site Audit to find pages on your website with missing meta descriptions. After auditing your website with the tool, visit the “Issues” tab and search for “meta description” using the search bar.
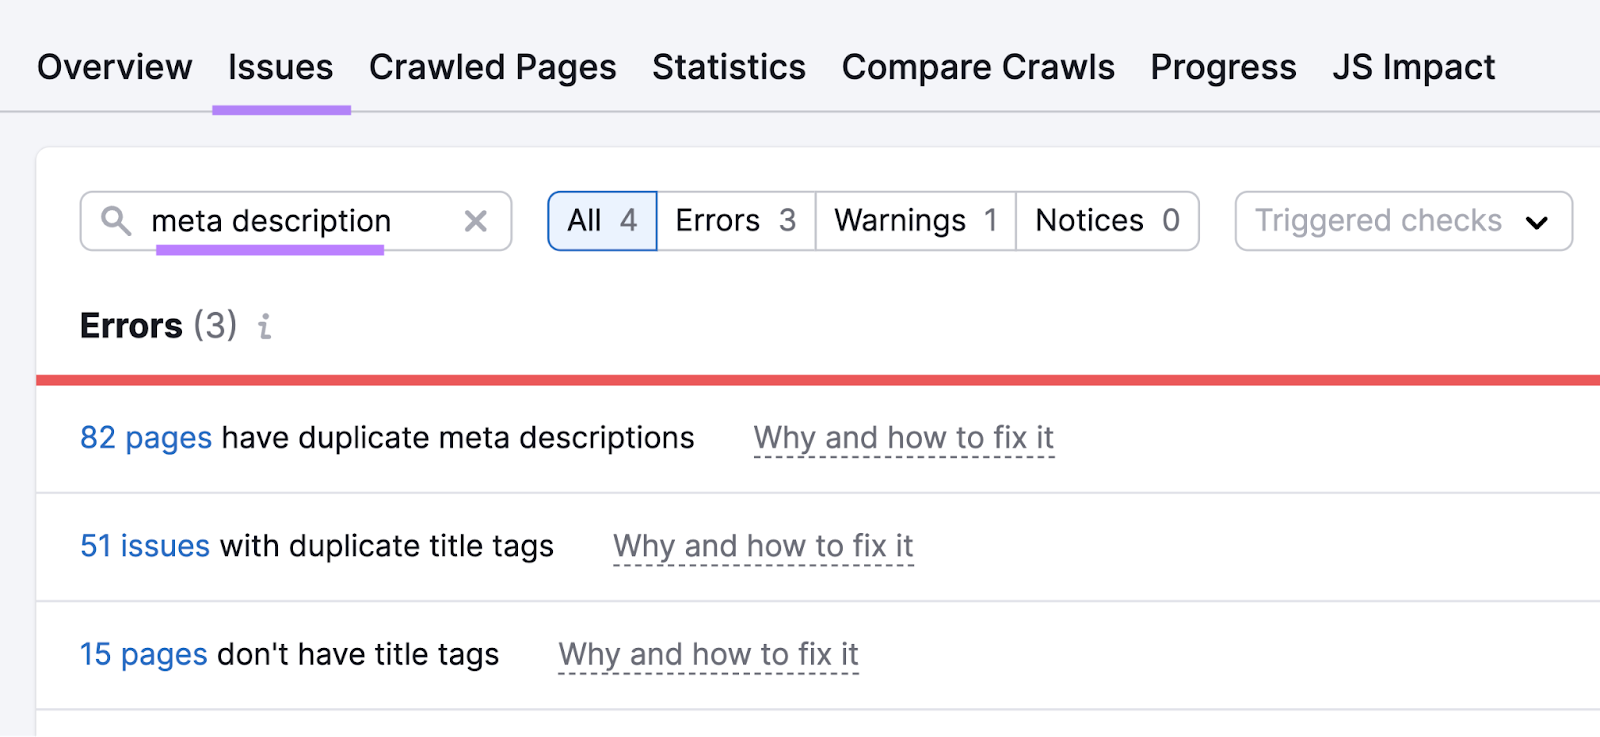
If your website has any pages with missing meta descriptions, you’ll see an issue like the one highlighted below.

Simply click on the linked text to see a list of all the pages that don’t have meta descriptions.
To address this, you’ll need to go into Squarespace and add a meta description for each page.
To add a meta description to a page in Squarespace, click on the cog icon next to a page’s name.
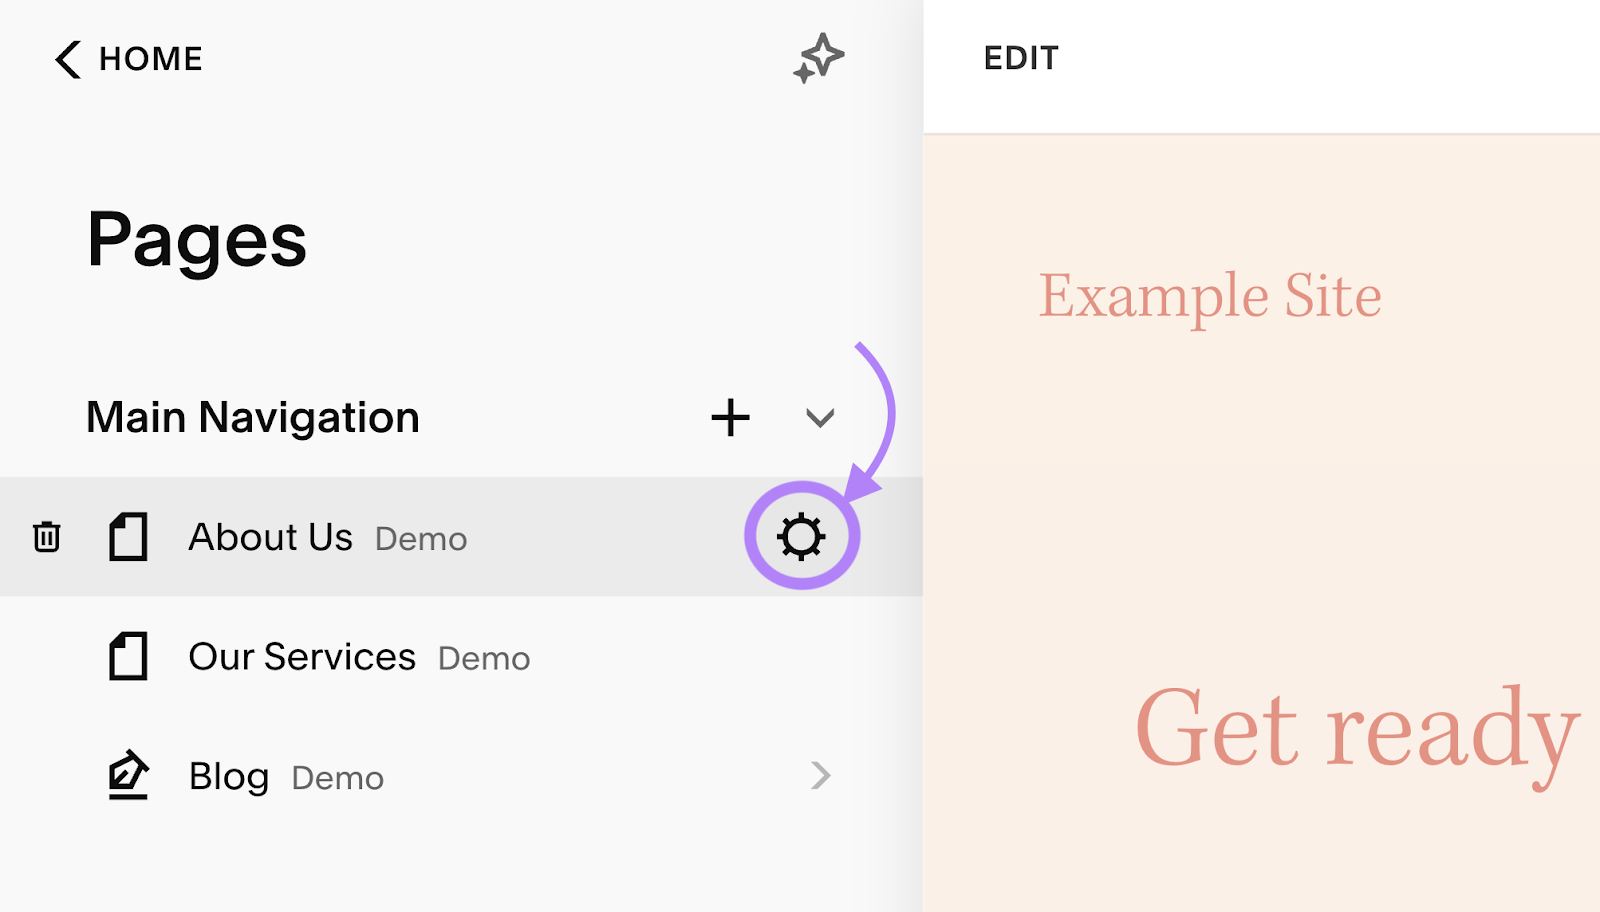
In the pop-up window, click on the “SEO” menu item on the left.
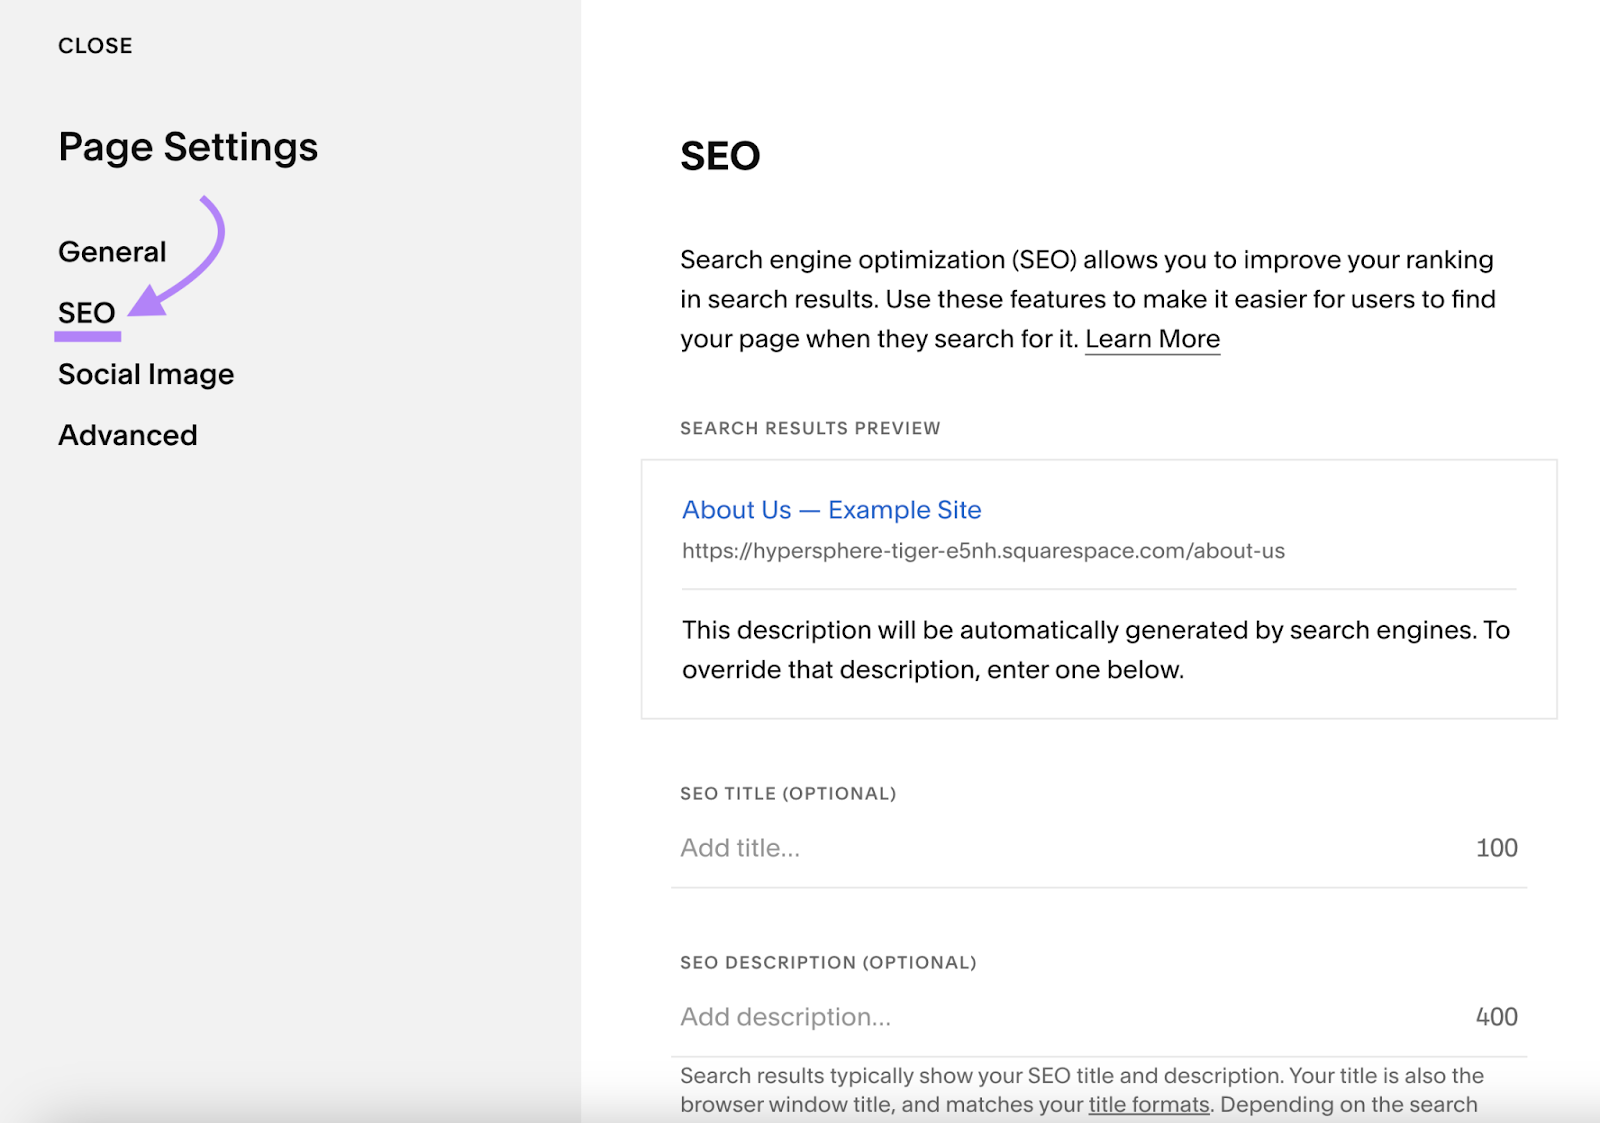
Finally, type in your meta description in the “SEO DESCRIPTION (OPTIONAL)” field.
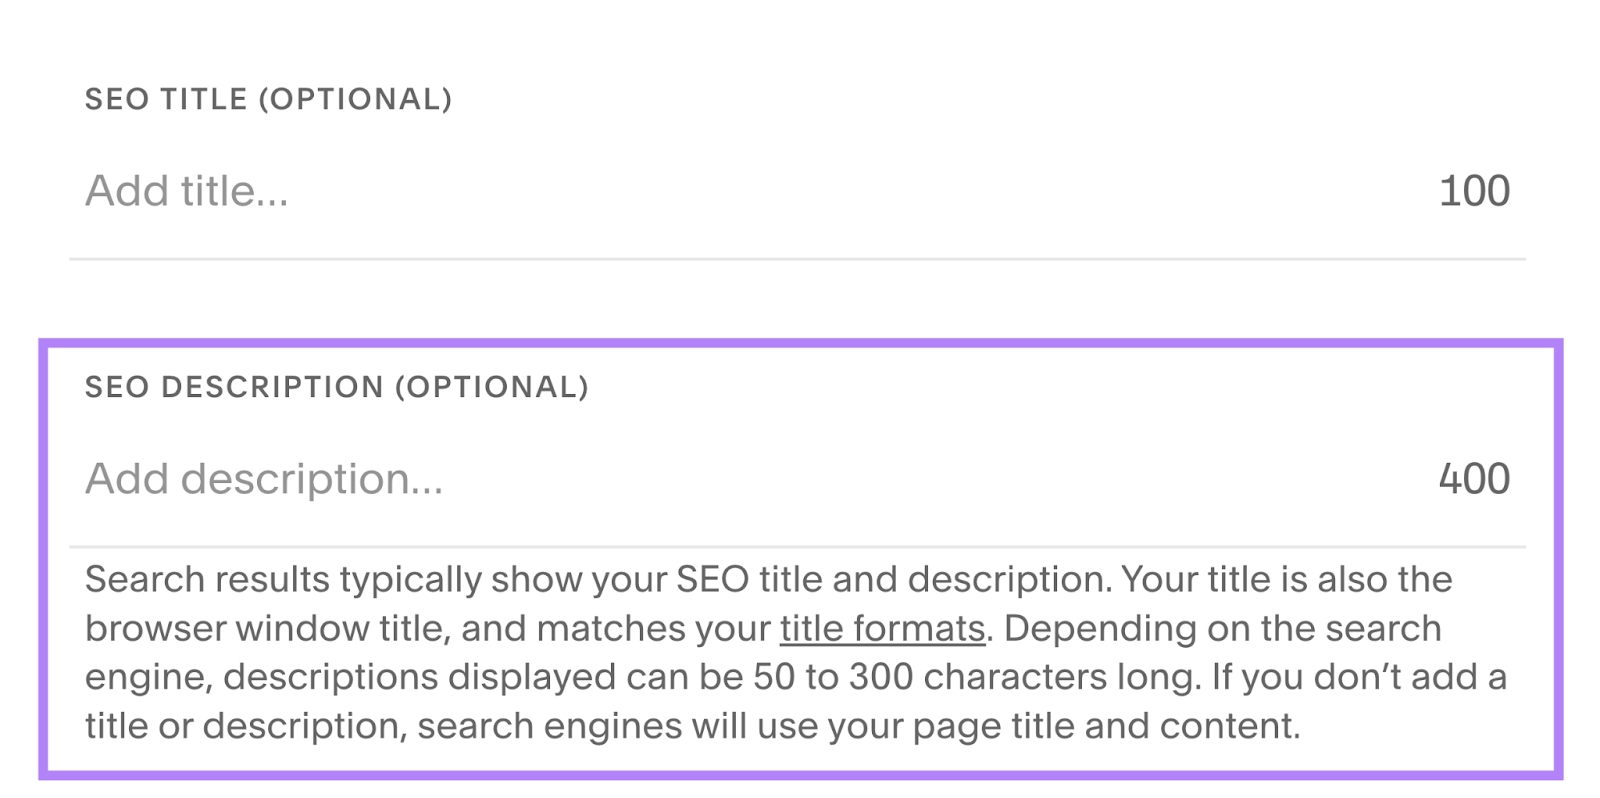
Try to keep the meta description under 120 characters or 680 pixels to avoid having Google truncate it.
5. Add Alt Tags to Images
An image alt tag (or alt text) is a written description of an image. Since search engines still can’t “see” images, an alt tag serves to help them understand what an image is about.
Alt tags are also used by screen readers—software that helps people with visual impairments use computers and smartphones.
As you can tell, alt tags are important for helping both search engines and people understand the images on your website. That’s why Google recommends you add alt tags for all images used.
You can check your website for missing alt tags by using Site Audit. Simply search for “alt attribute” from the “Issues” tab of the Site Audit report.
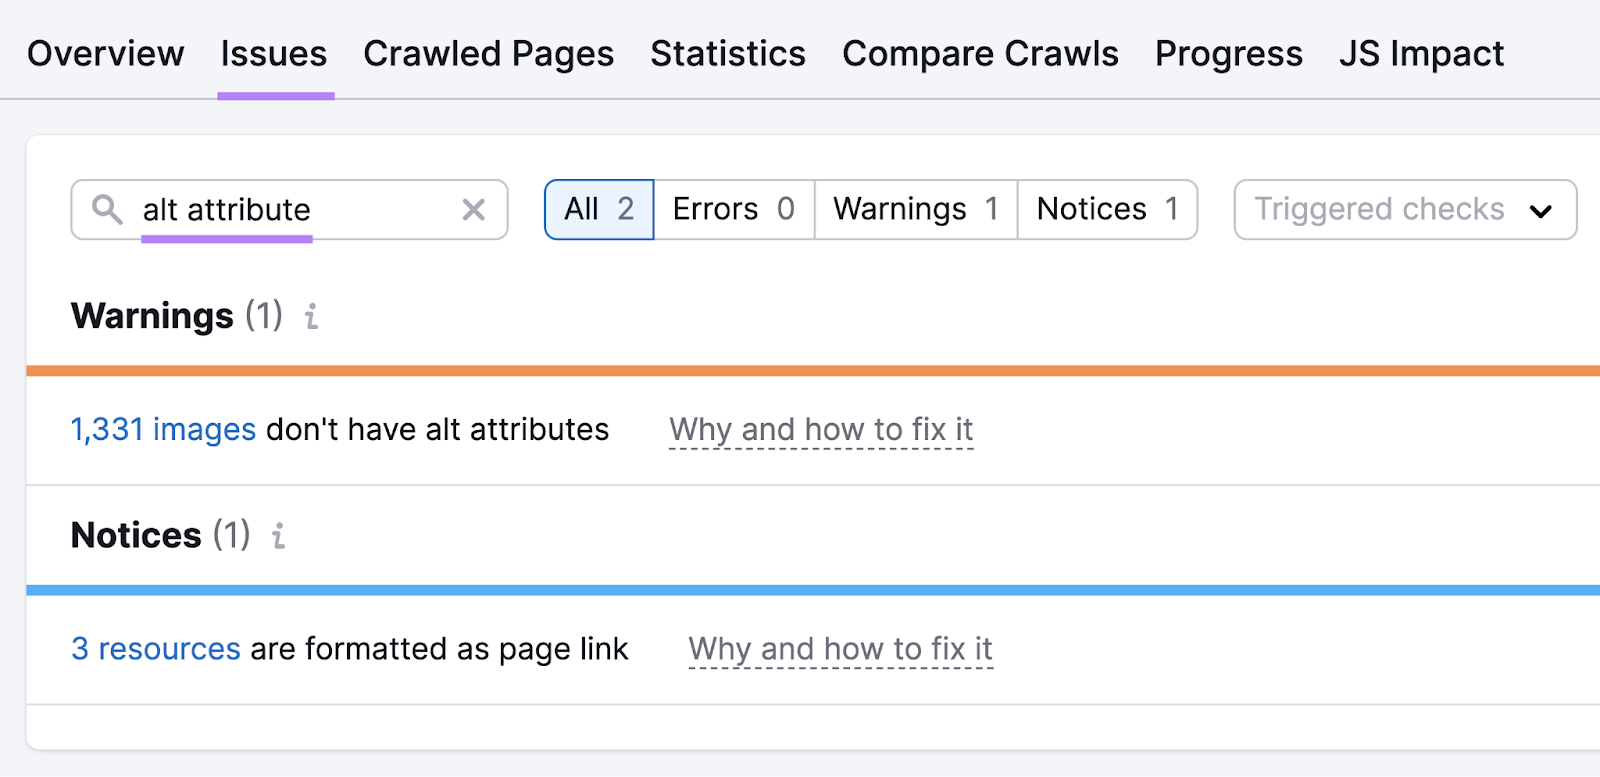
Click the linked text to see a list of all the images with missing alt tags and their associated pages.
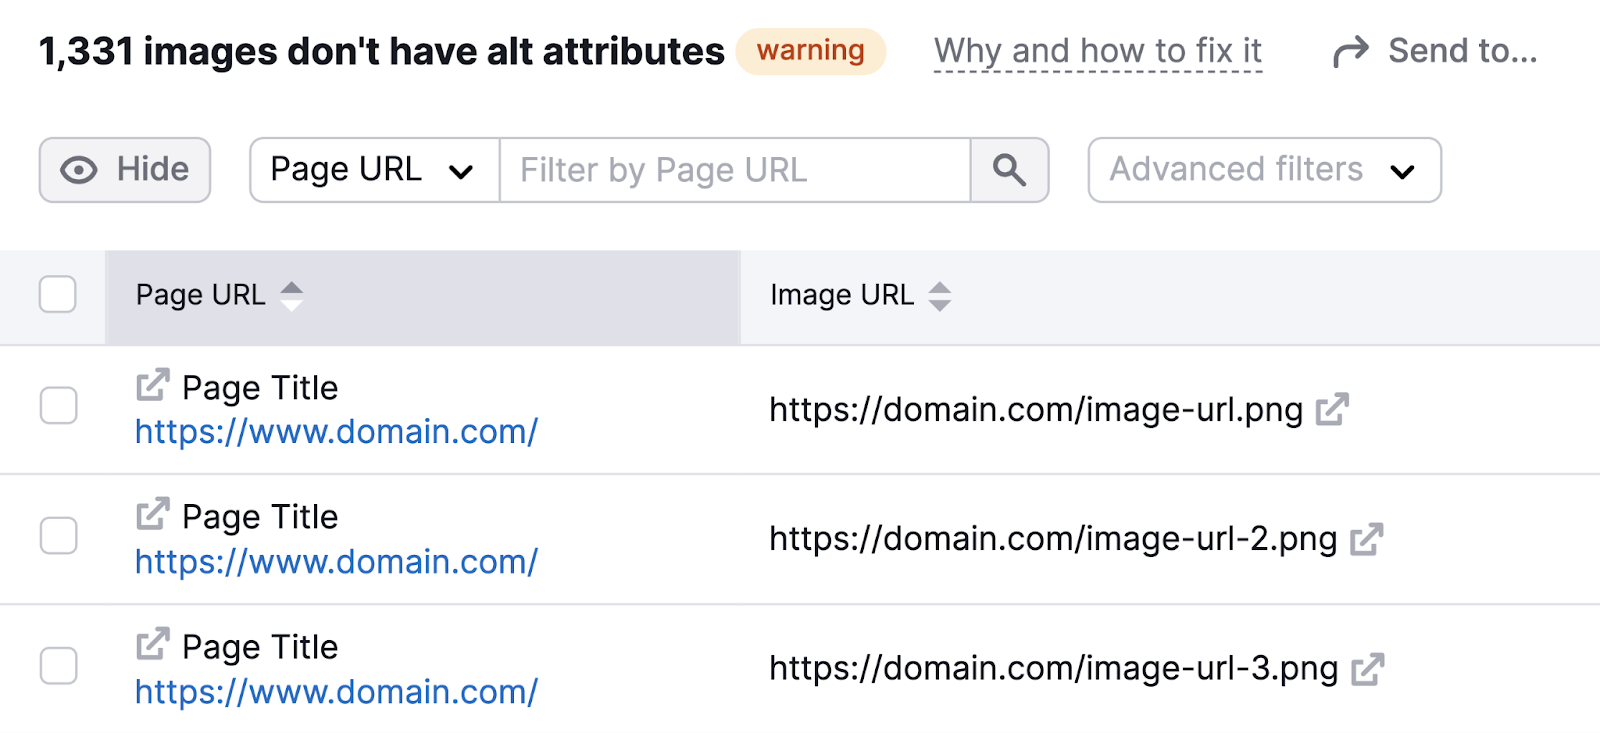
Next, go into Squarespace and add alt tags for each of the images listed.
To add an alt tag to an image in Squarespace, first locate the image in the page editor. Click on the image and then click the pencil icon to open a menu.
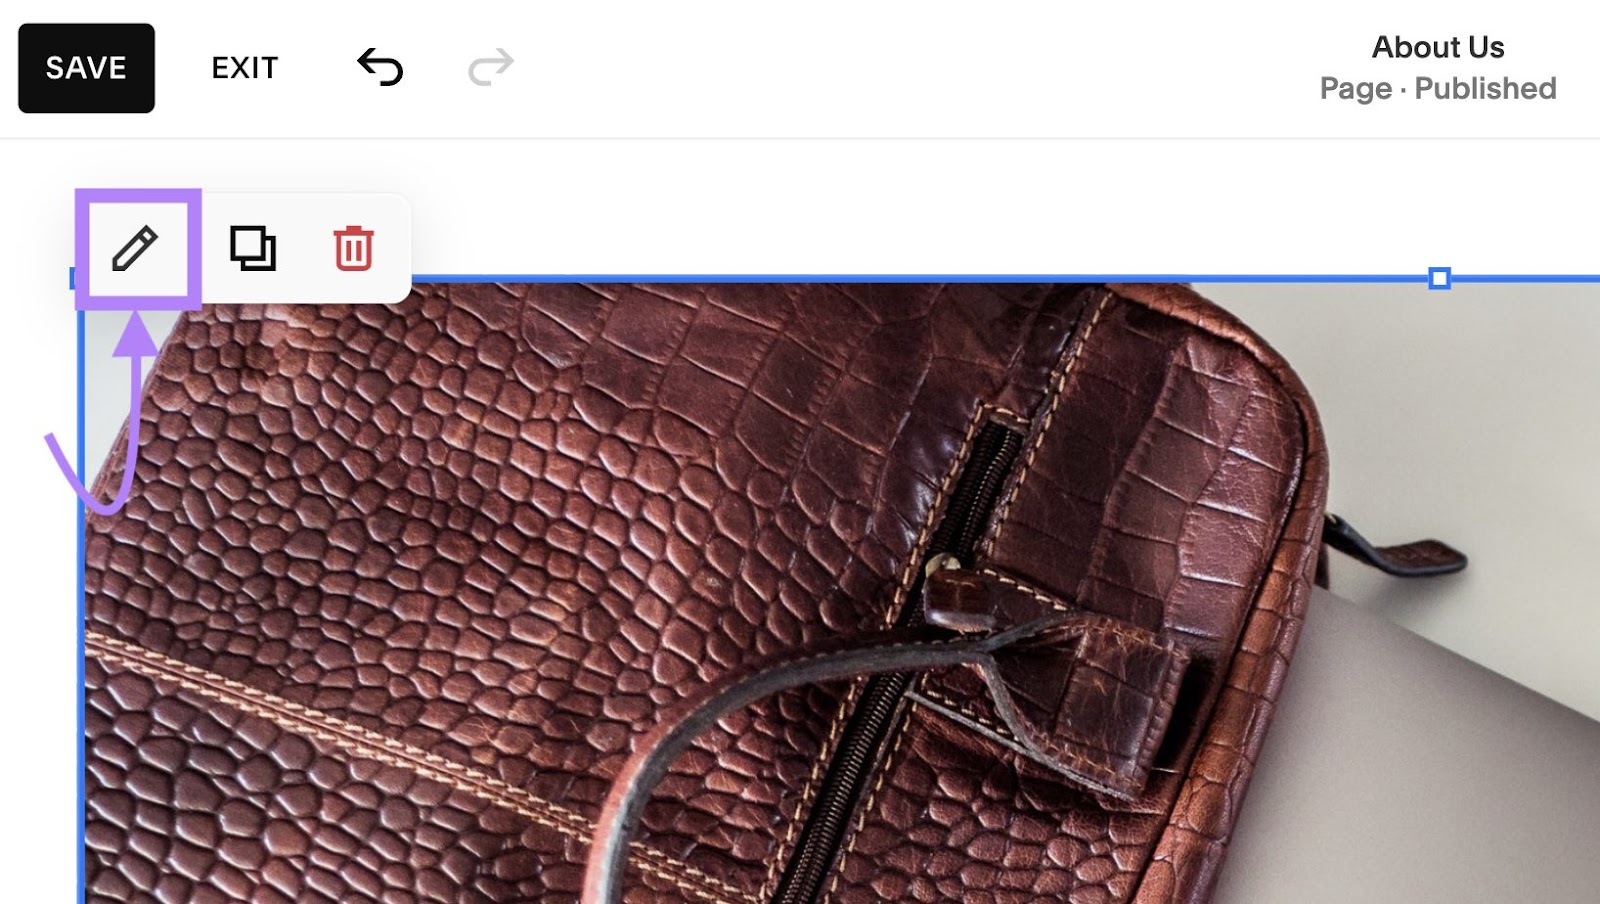
Scroll down to the “Image alt text” section in the window that pops up. Enter a description of the image. For example, “Modern leather laptop bag with multiple compartments for organized and stylish travel.”

That’s it. Now, repeat the process for all the images with missing alt tags.
6. Add Internal Links
Internal links are hyperlinks that point to different pages on your website. They’re important for two main reasons:
- They allow Google to understand your website structure
- They help users navigate your website more easily
Each page on your website should link to other relevant pages on your site. But the focus of your internal linking strategy should be on your website’s most important pages.
In most cases, this is going to include your homepage and your product or service pages. You should strive to link to these pages frequently from your other pages—but only where it makes sense to do so. (Don’t try to force internal links in.)
Most of your internal links should be contextual—in other words, included within the content of the page where it makes sense based on the context.
For example, in your About page, you might describe your inspiration for starting your business and explain that it’s the reason you’re passionate about the services you offer today. And link the word “services” to a page that describes your professional offerings.
They should also use relevant anchor text (the clickable text part of a link) that lets readers and search engines know what the linked page is about.
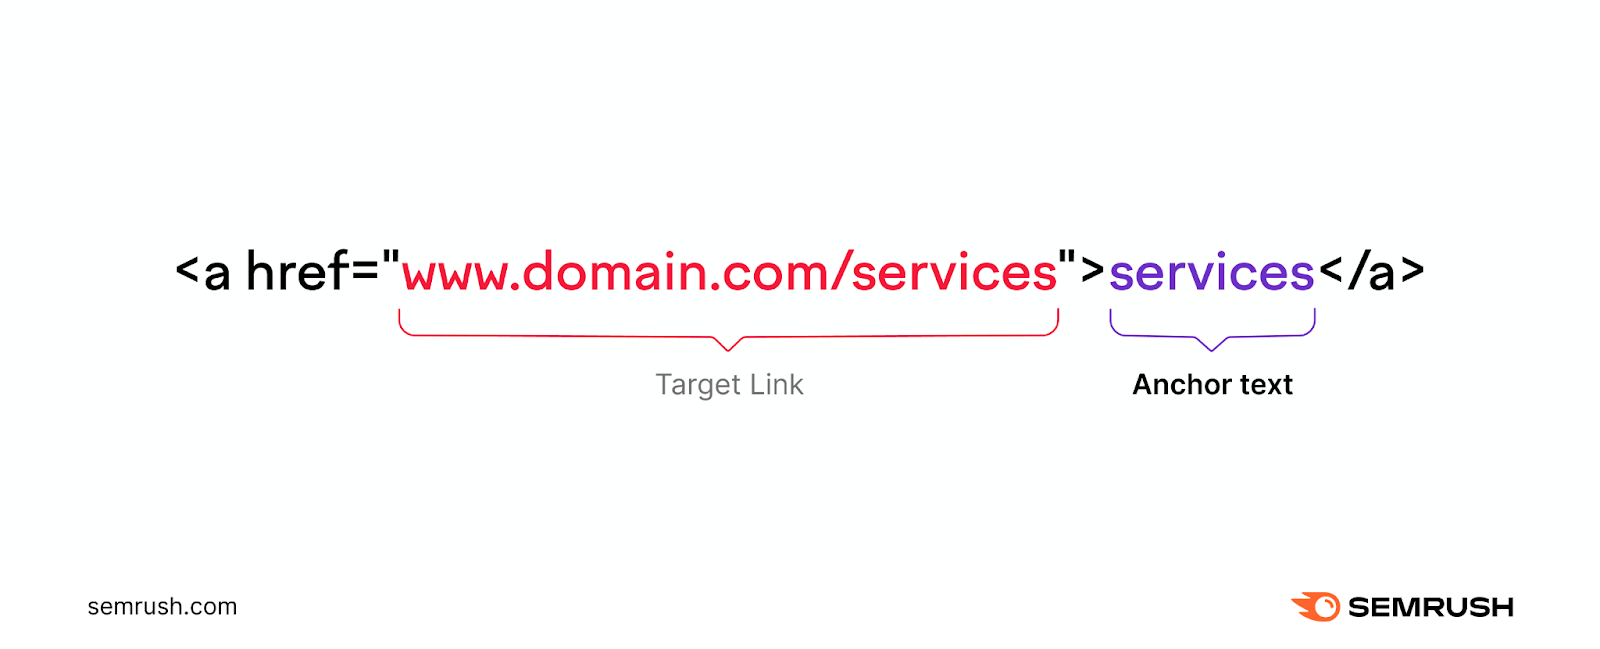
To add an internal link in Squarespace, simply highlight a piece of text in the page editor and click on the link icon.
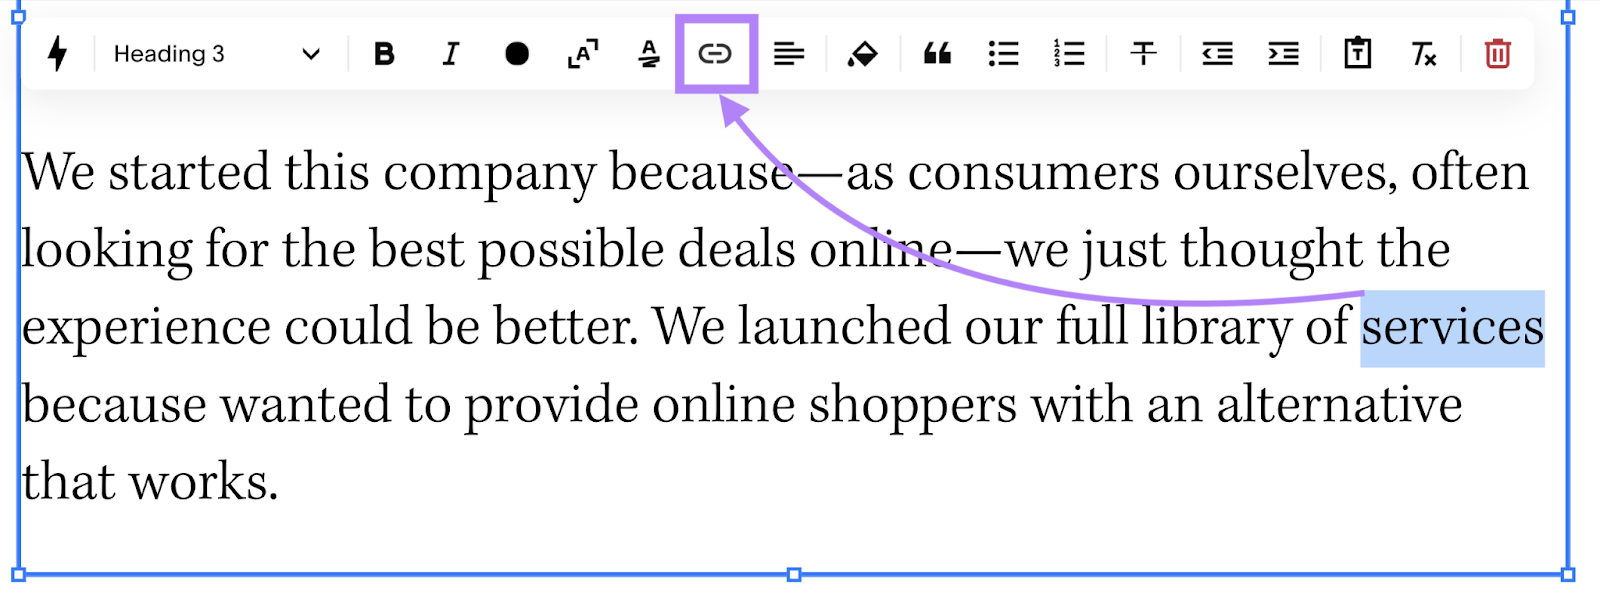
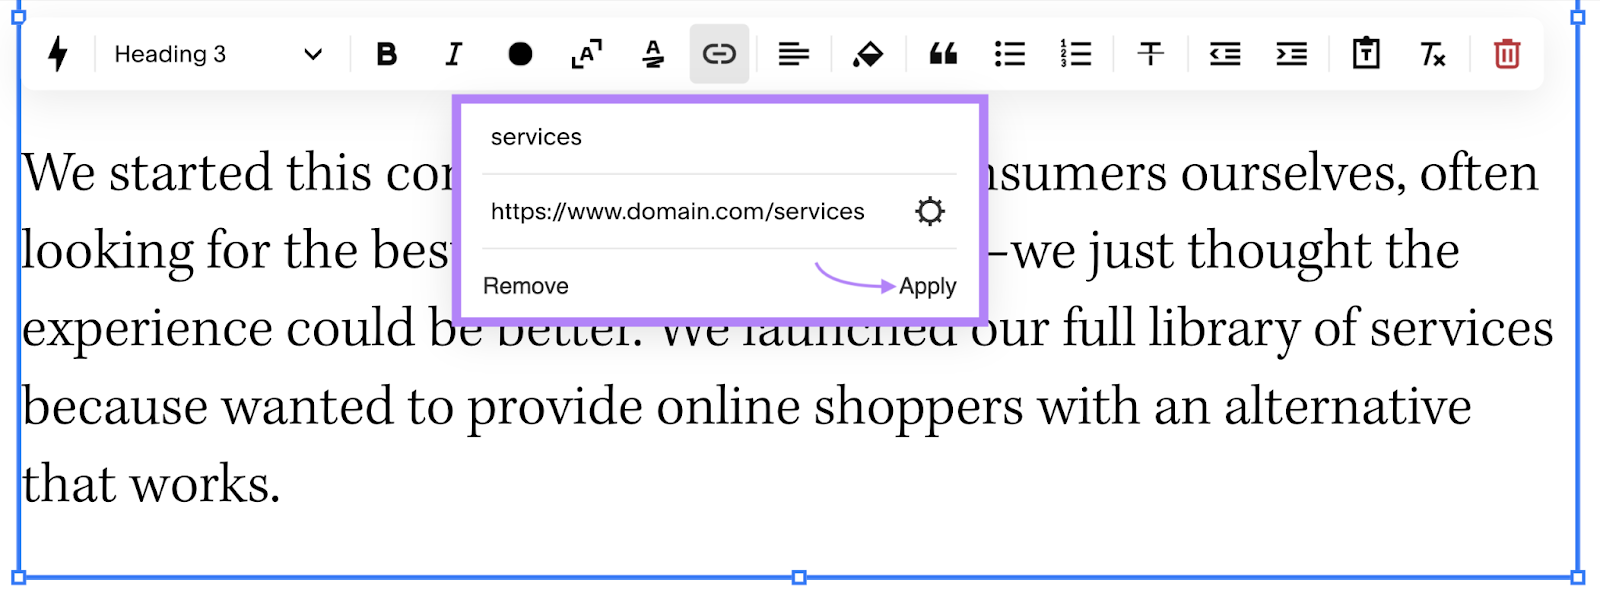
Then, add the URL of the page you’d like to link to and click “Apply.”
7. Fix Broken Links
Having a lot of broken links (links that lead to pages that no longer exist) on your website leads to a bad user experience. And we know Google wants to prioritize sites that provide a good user experience.
So, you’ll want to ensure you don’t have any broken links on your Squarespace website.
Don’t worry—you don’t have to check every page on your website for broken links manually. You can use Site Audit to uncover broken internal and external links on your website.
After analyzing your website with the tool, simply visit the “Issues” tab and type in “broken” into the search bar.
You’ll see a list of issues related to broken links on your website.
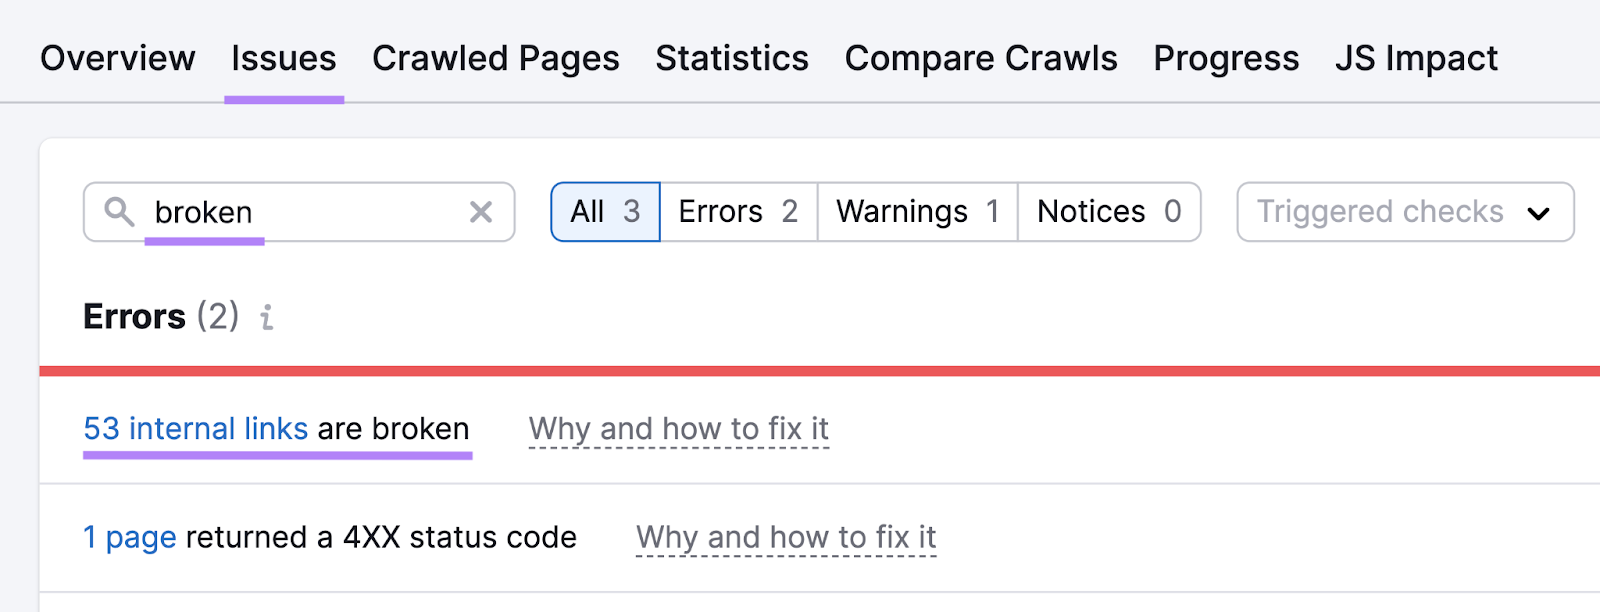
You can click on the linked part of each issue to see the list of affected pages and links.
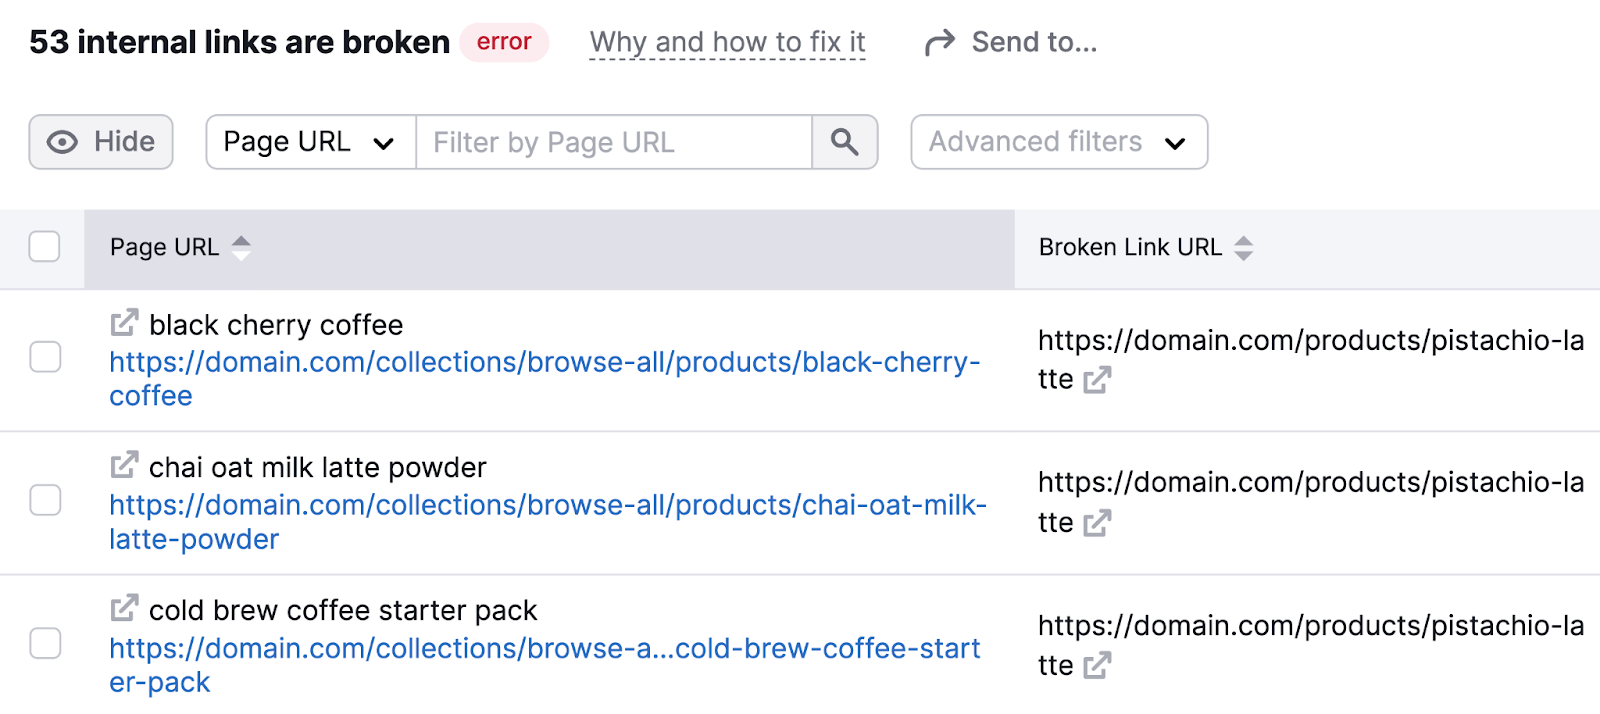
You’ll need to go through all of the pages in Squarespace and either replace or remove the broken links.
Improve Your Squarespace SEO
You may be wondering: Is Squarespace good for SEO?
Squarespace and SEO are no strangers—it’s a decent web builder in terms of SEO. But there are still a few things you can do to improve your chances of ranking your Squarespace website higher in search engine results.
Start by auditing your website with the Semrush Site Audit tool. Then, go through and fix the issues the tool uncovers to give your website a good shot at reaching the tops of the SERPs.
Source link : Semrush.com
