WordPress is by far the most popular CMS (content management system) in the world.
It’s free. It’s open-source. And, above all: It’s SEO-friendly.
However, simply using WordPress won’t make your website rank No. 1 on Google. You still need to follow SEO best practices and—of course—provide real value to your visitors.
Below, we give you 28 steps that will make your WordPress SEO on point.
Note: All these steps apply to self-hosted WordPress sites (WordPress.org), not the hosted WordPress.com page builder.
Let’s get started…
1. Choose a Quality Hosting Provider
Your hosting affects many things related to SEO—especially site speed, uptime, and security. So give it some thought before starting a website.
If you already have a web hosting service and you’re not quite happy with it, you can always change it. Most quality hosting providers will be more than happy to help you migrate your website from their competitor.
Here are some things to consider when picking a hosting provider:
- High uptime: Downtime happens to the best hosting providers. But if your website is unavailable too often, it hurts your reputation and business.
- WordPress friendliness: The hosting should be compatible with WordPress websites. Most quality providers offer some kind of plan tailored to WordPress needs.
- Free SSL: A free SSL certificate is a must-have hosting feature because it enables the secure HTTPS encryption of your website.
- Location of a server: For example,if you primarily target US customers, you want the server to be located in the US so that the website loads faster for them.
- Quality support: Helpful and responsive support makes everything easier.
If you have no idea where to start, you can pick one of the hosting providers WordPress recommends:
Alternatively, check out our guide to finding a web hosting service.
2. Use an SEO-Friendly WordPress Theme
When you first install WordPress, you will almost certainly see the platform’s default “Twenty Twenty-Something” theme. However, you’ll probably want to explore different themes to personalize your site.
And you’ll want to make sure the theme you choose is lightweight and loads fast. Because when it comes to SEO, website performance is critically important.
Thousands of free themes are available in the official WordPress theme library (as well as many more premium ones).
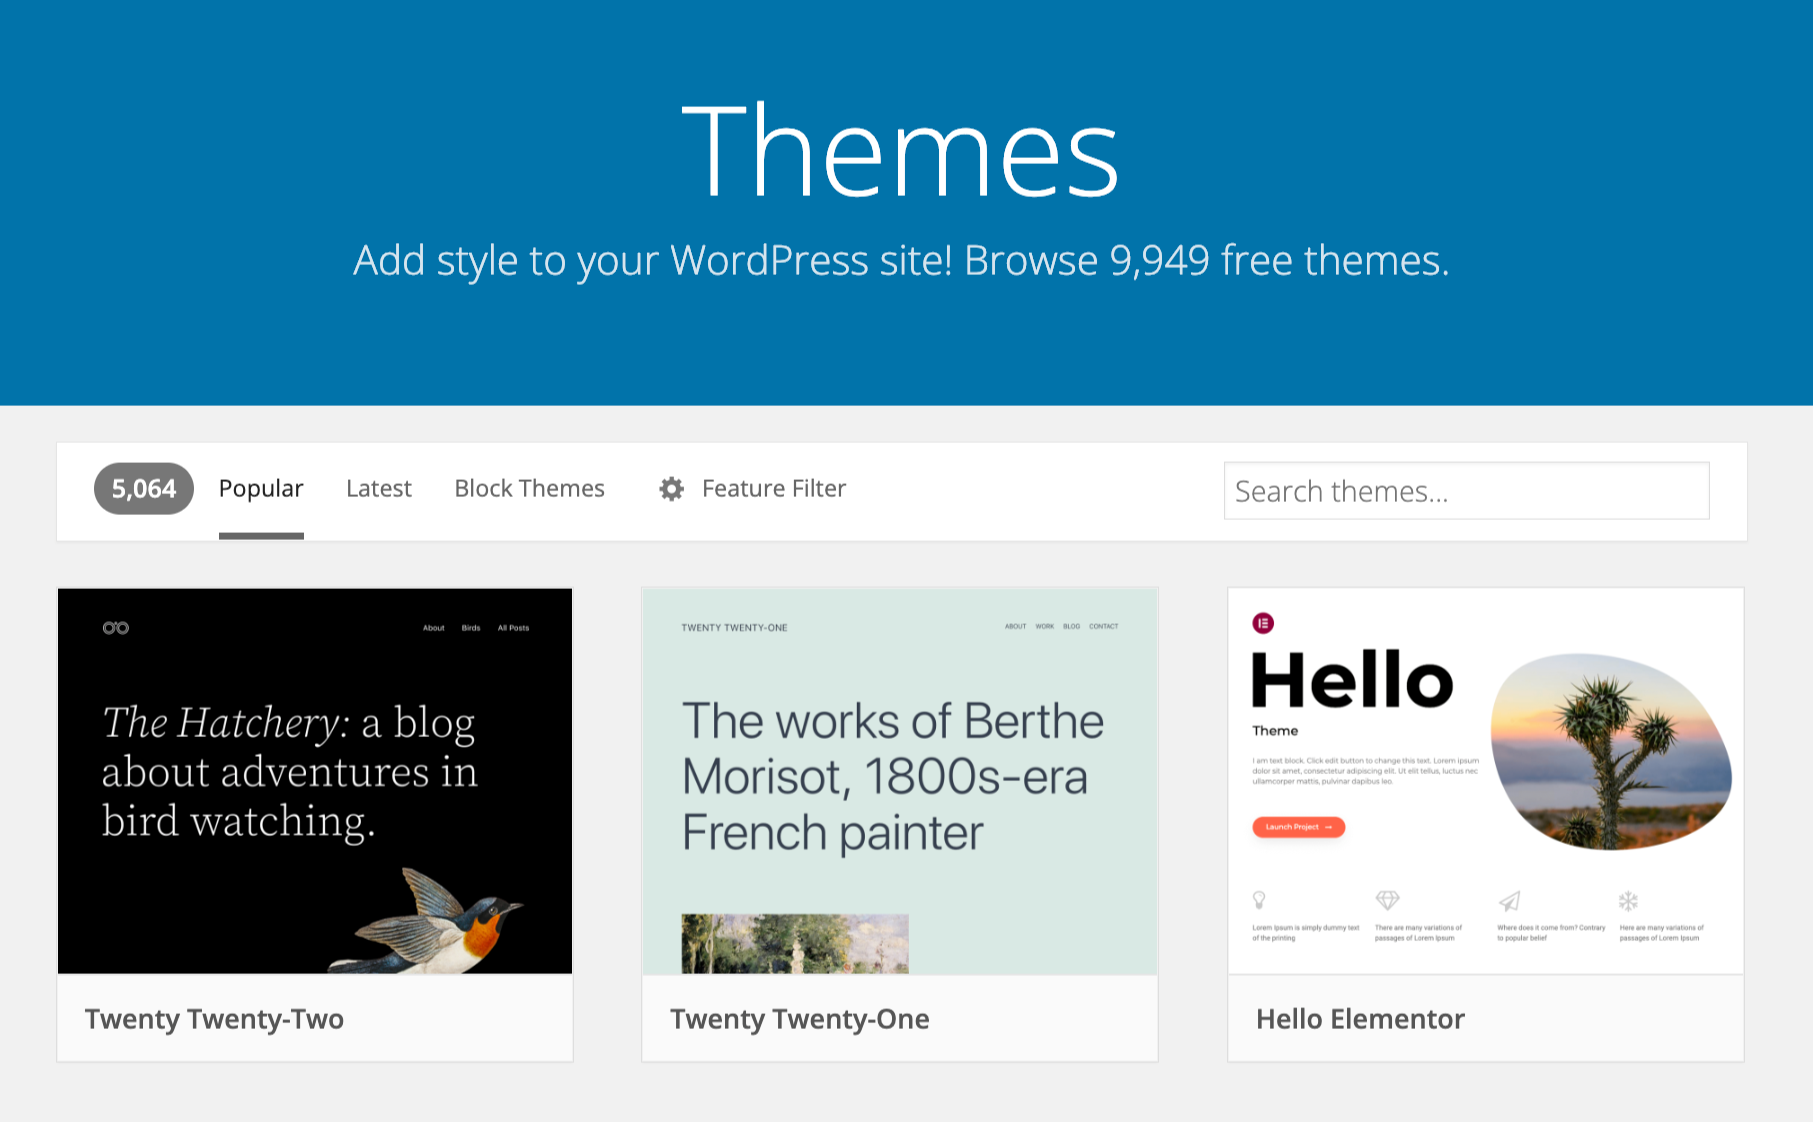
You can either look for themes that performed best in independent tests (like Fastest WordPress Themes by Kinsta) or test the theme yourself:
- Just find the theme demo site (It can usually be found on its official website.)
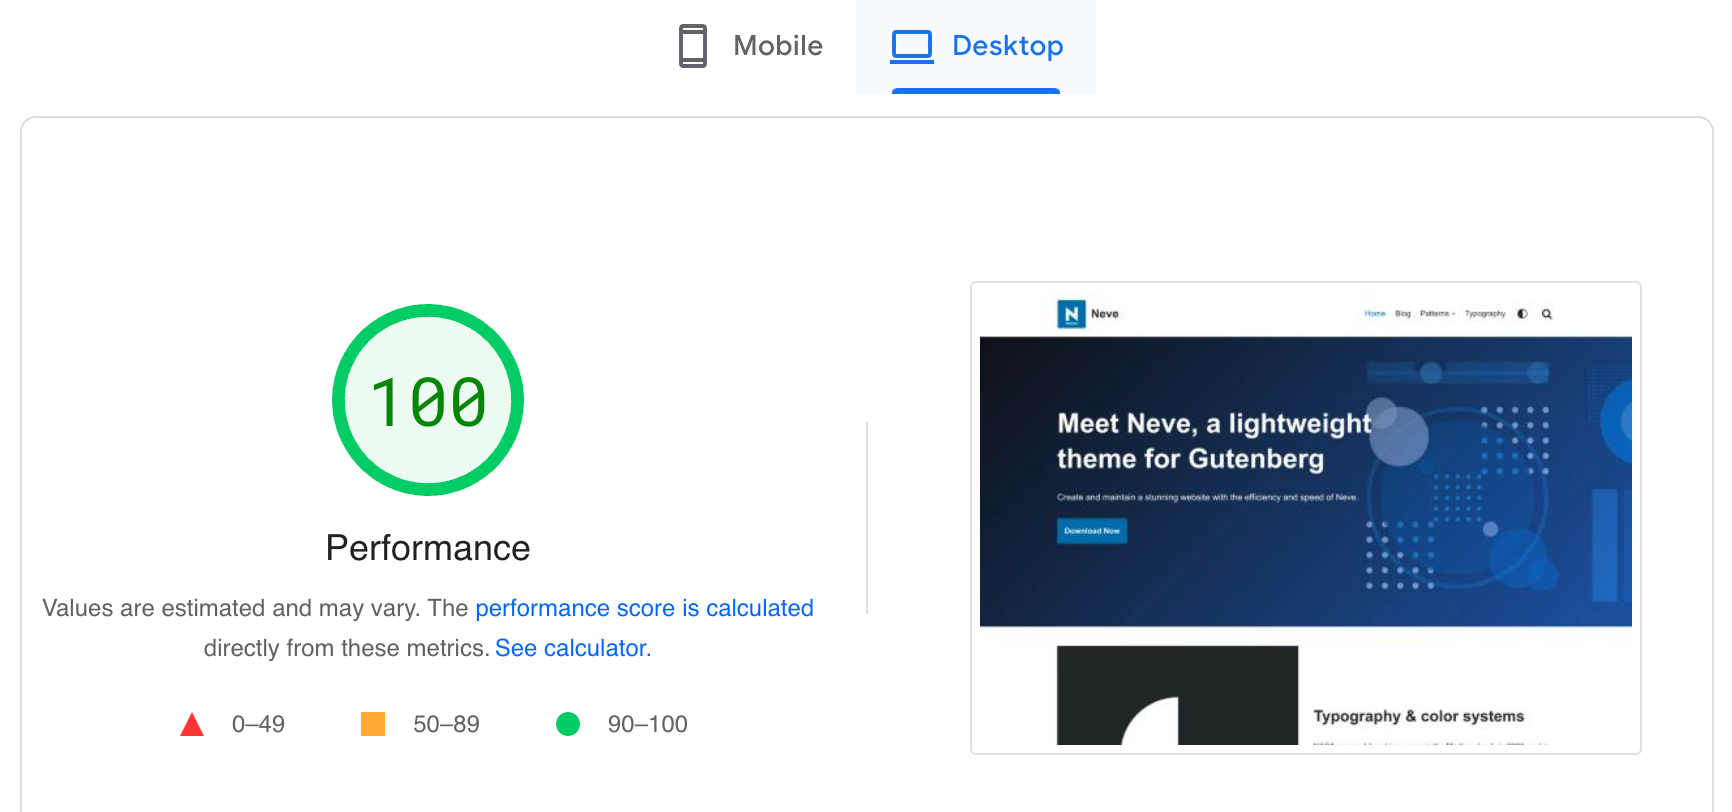
- Paste the URL into Google PageSpeed Insights and run the tool
If the Performance results look something like this (i.e., it scores 90 or higher), you know you’ve found a lightweight theme:
Note: Although WordPress has its own built-in editor called Gutenberg, many WordPress users prefer third-party page builders (like Elementor, Beaver Builder, Divi, etc.). They offer many great features, but they also affect the performance of your website. Keep that in mind when choosing one.
3. Make Sure Your Website Is Indexable
Having an indexable site means Google is able to index it and display it in its search results.
You need to check your site’s visibility settings under Settings > Reading.
Here, you will see a checkbox right next to the “Search engine visibility” section at the bottom of the page:
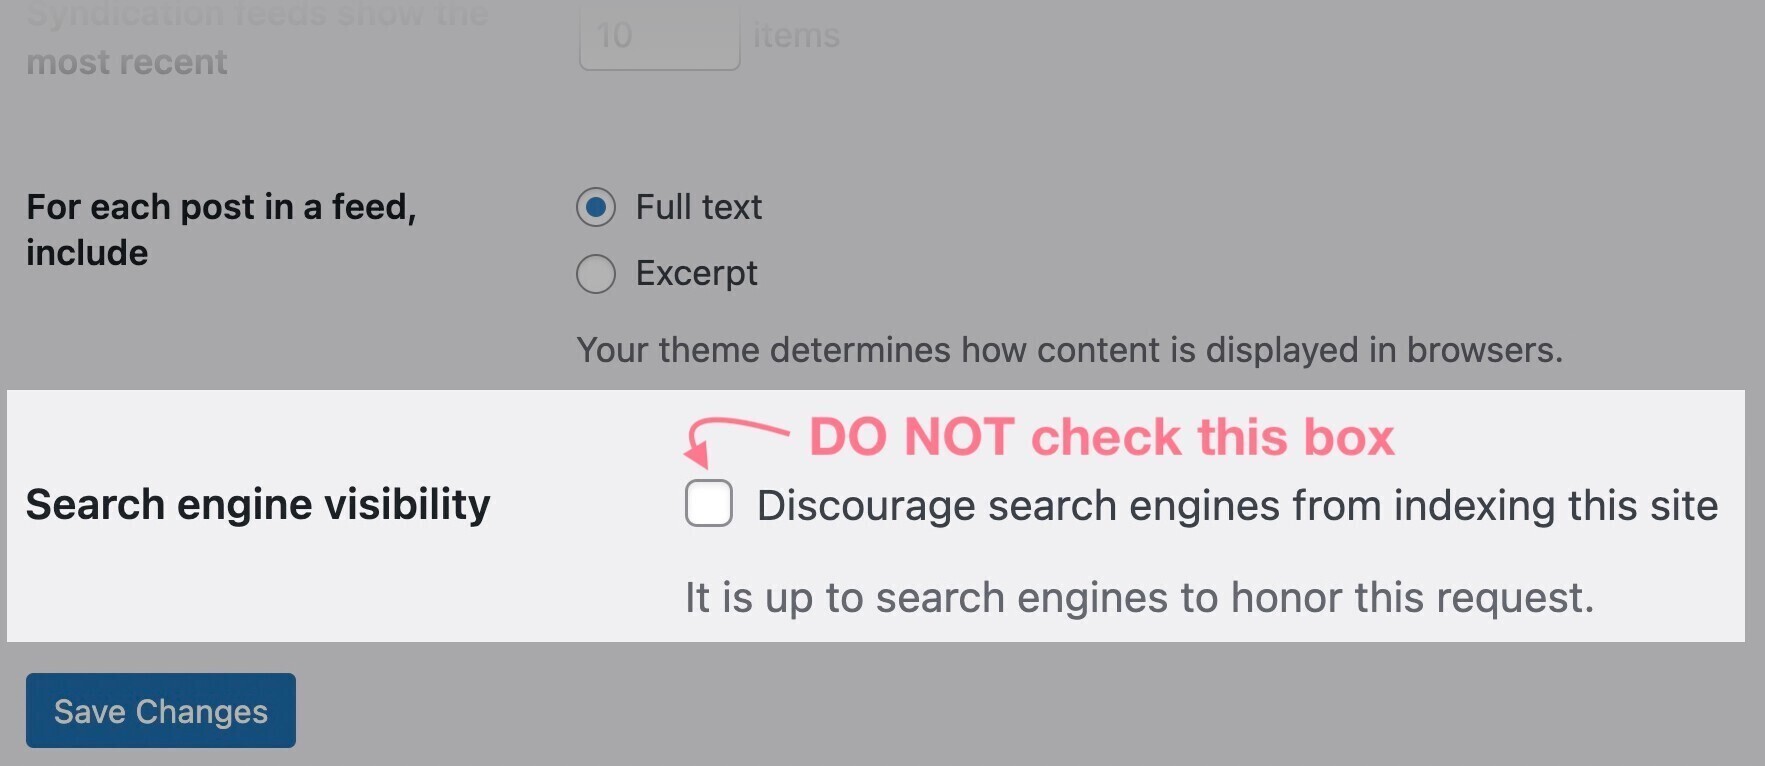
The box should not be checked by default. But developers commonly use it to discourage search engines from indexing the website while it’s under development.
If your website is live and ready to be ranked on Google, the box should be unchecked.
Note: You may check the box if your website is still in development; just don’t forget to uncheck it later.
4. Set Up an SSL Certificate
Using a secure HTTPS connection is an absolute must. It is a confirmed ranking factor—so it can help your site rank better on Google.
And you surely don’t want your website to appear as “Not Secure” in the web browser:
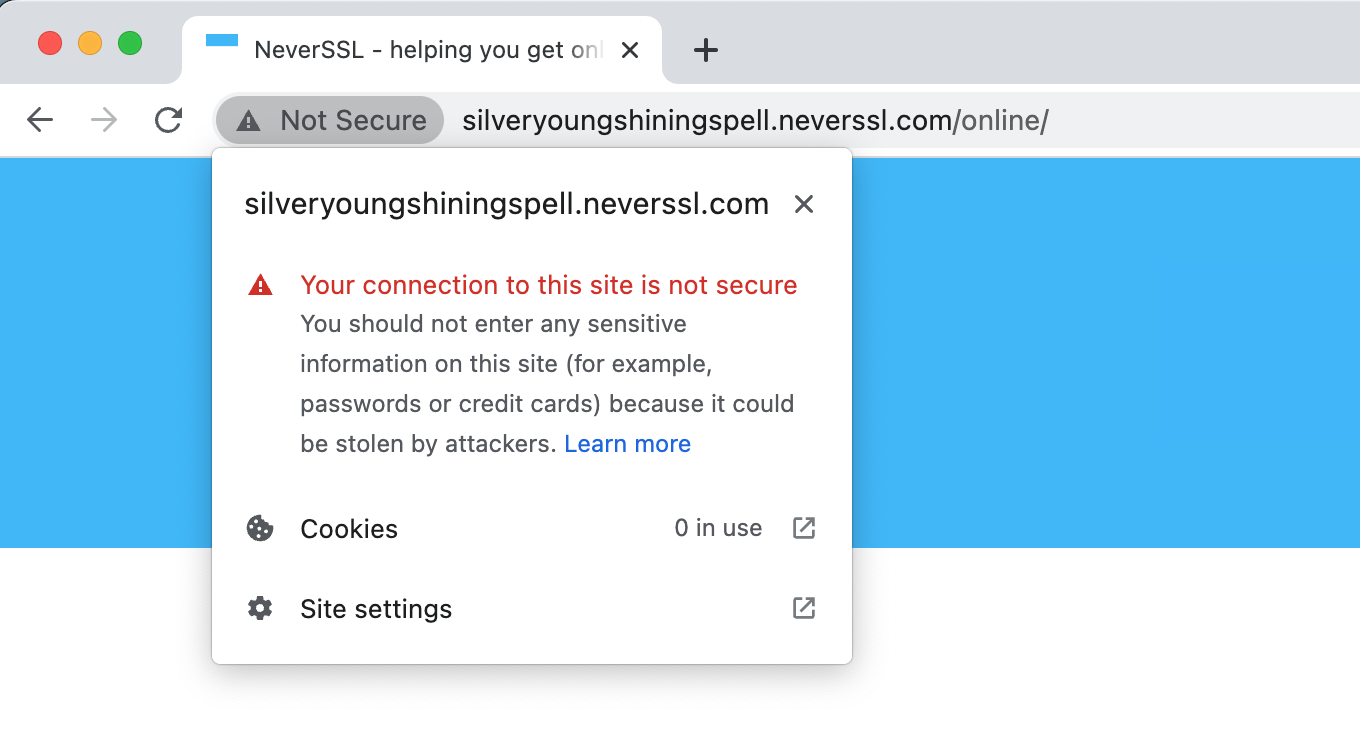
To secure your website’s connection, you need to encrypt it with an SSL (Secure Sockets Layer) certificate. This ensures that data passing through your site is securely encrypted.
Don’t worry. It’s easier than it sounds:
- Go to your hosting provider’s admin panel. (You’ll need to log in to your hosting administration first.)
- Look for “Security”or “SSL certificate” settings. If you can’t find it, just Google “[name of your host] ssl certificate settings”. Most WordPress hosting providers offer a free SSL certificate called Let’s Encrypt.
- Select and install the certificate.
Here’s what the setup looks like in the SiteGround web hosting admin panel:
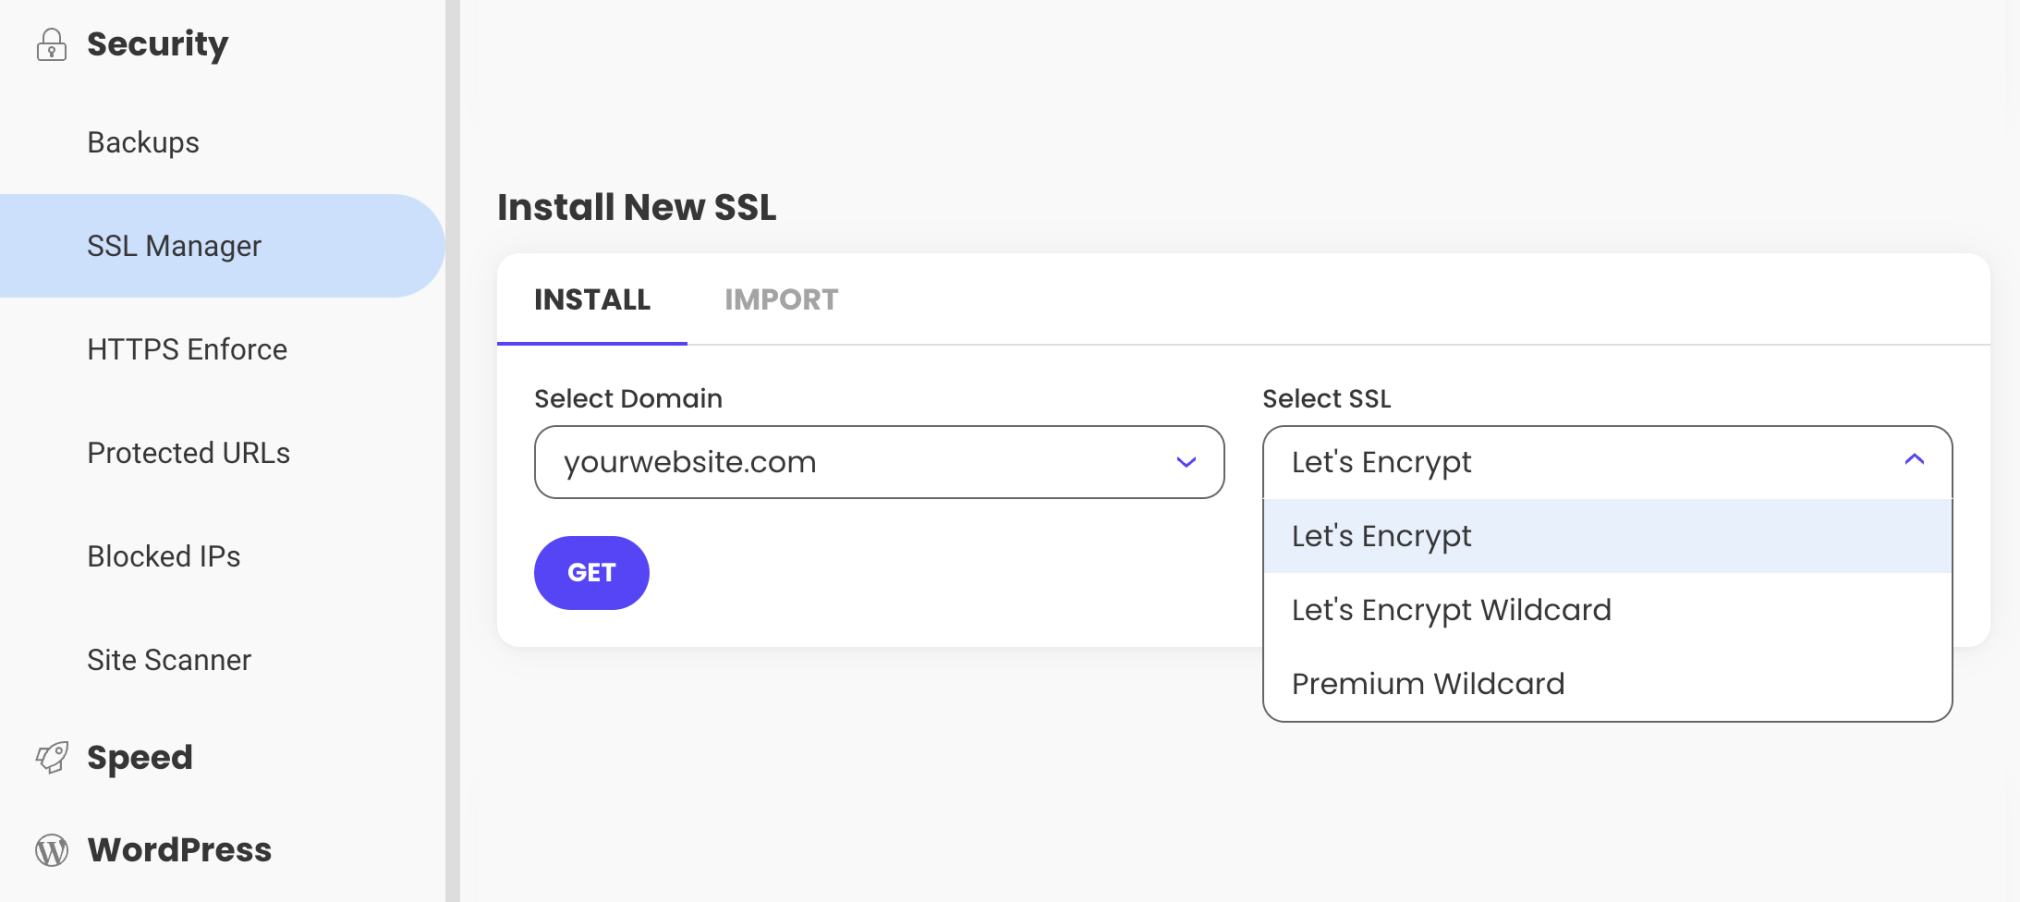
To ensure the SSL certificate is recognized and used correctly on your WordPress website, you can install the Really Simple SSL plugin.
In your WordPress control panel, click “Plugins” in the left menu. Then, click “Add new” and search for “really simple ssl.” When you find Really Simple SSL, click the “Install Now” button.
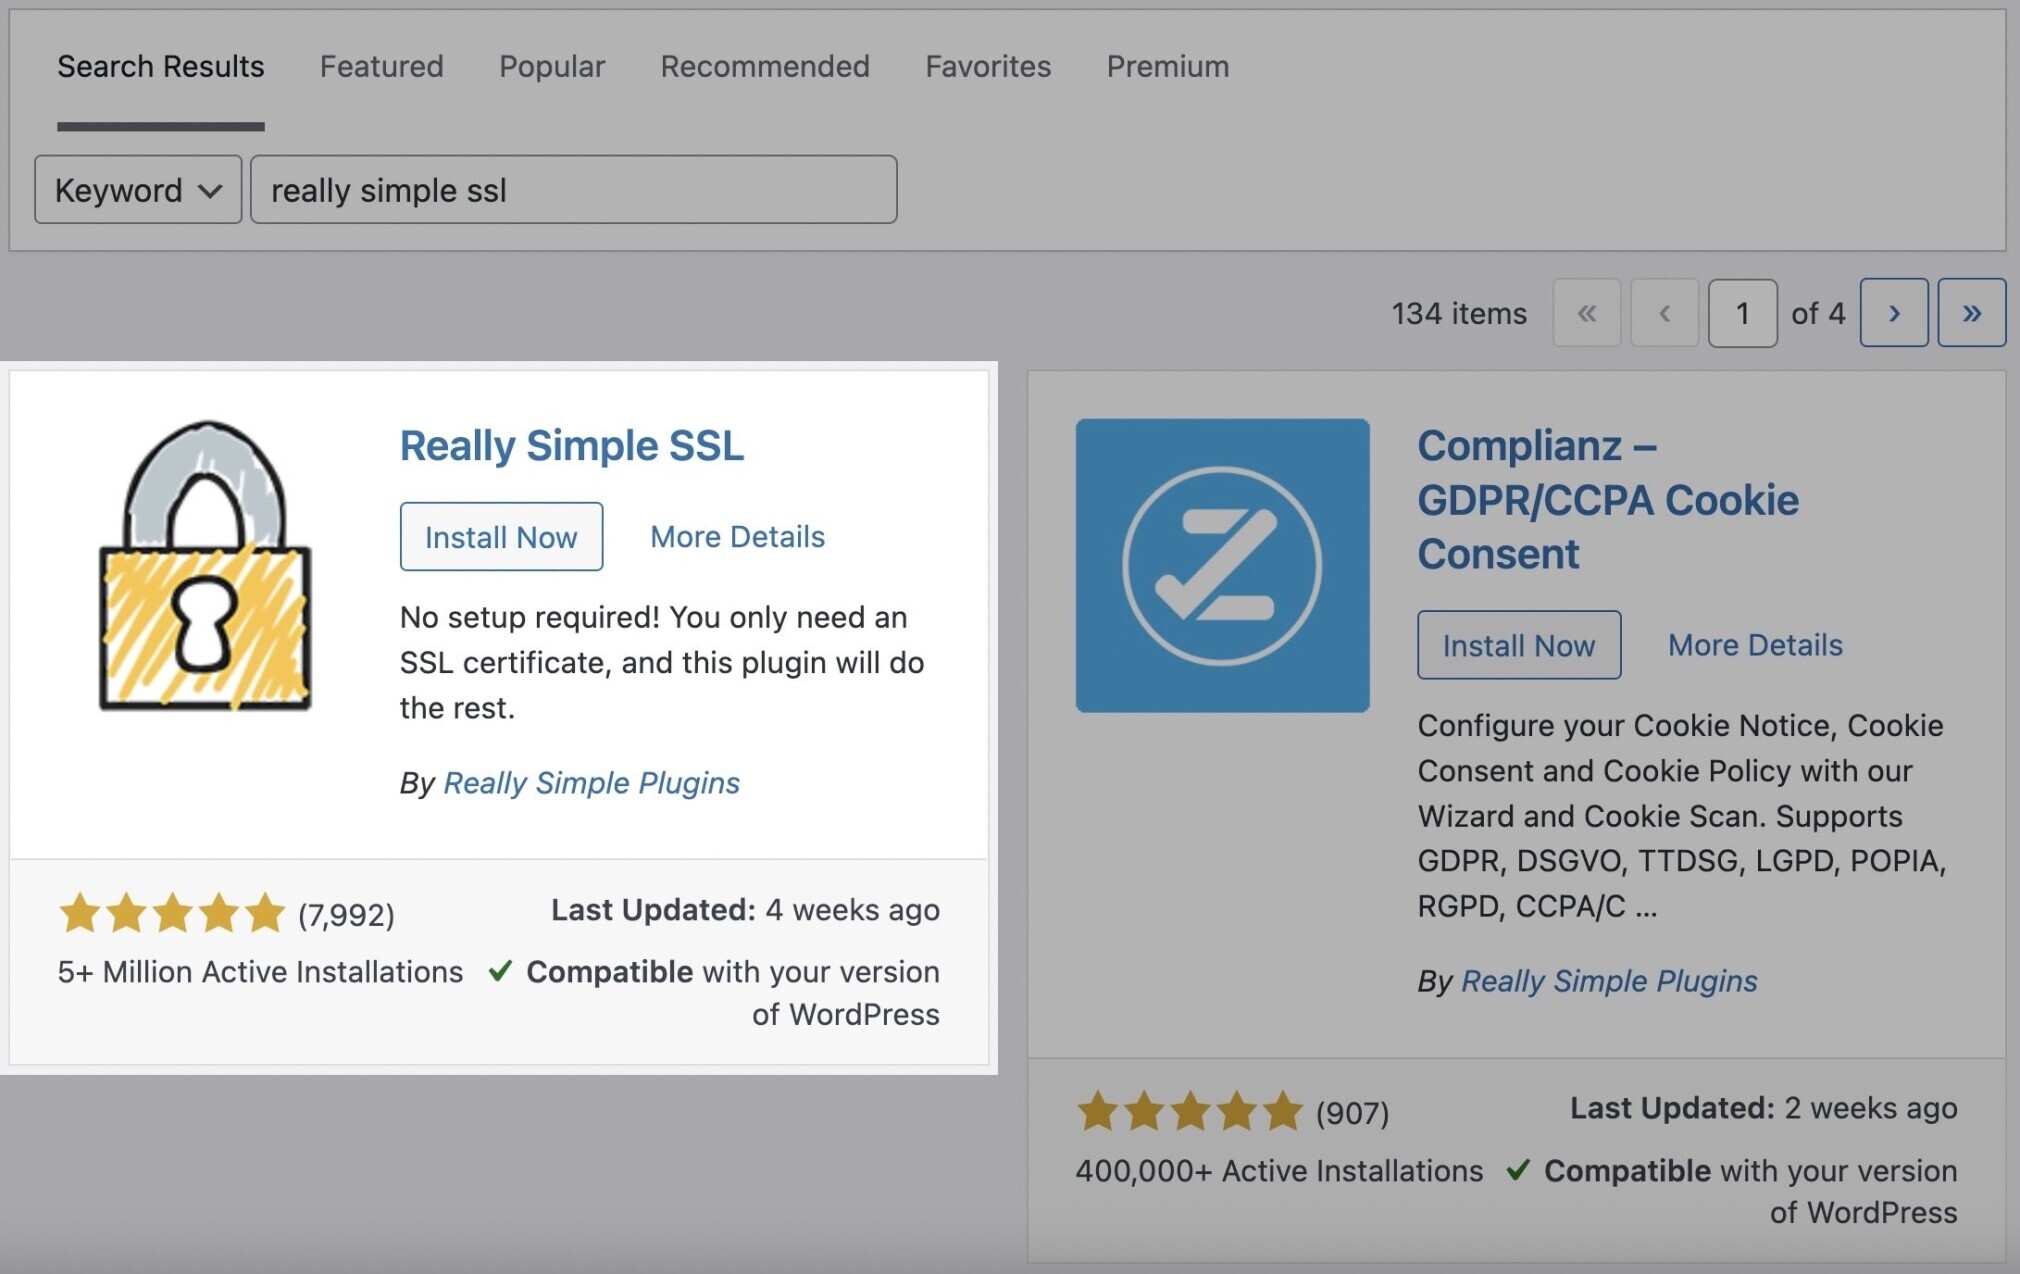
Then hit the “Activate” button and follow the plugin’s instructions for the basic settings.
Warning: If your website has been up and running without an SSL certificate for a while, you may need a developer’s help to ensure everything is set up correctly.
Congratulations! Your site is encrypted now.
5. Pick Your Preferred Site Address Format
Next, you should pick what web address format you want to use.
In other words:
Do you want your URL to be https://www.yourdomain.com? Or do you prefer the non-www https://yourdomain.com format?
Here are a few notes on this topic:
- Google takes www and non-www versions as two separate URLs. You need to pick one to prevent issues with duplicate content.
- There are minimal SEO implications of using either format (as long as you stick to only one version).
- Historically, all URLs included www. Today, many websites drop it. But it is really up to your preference.
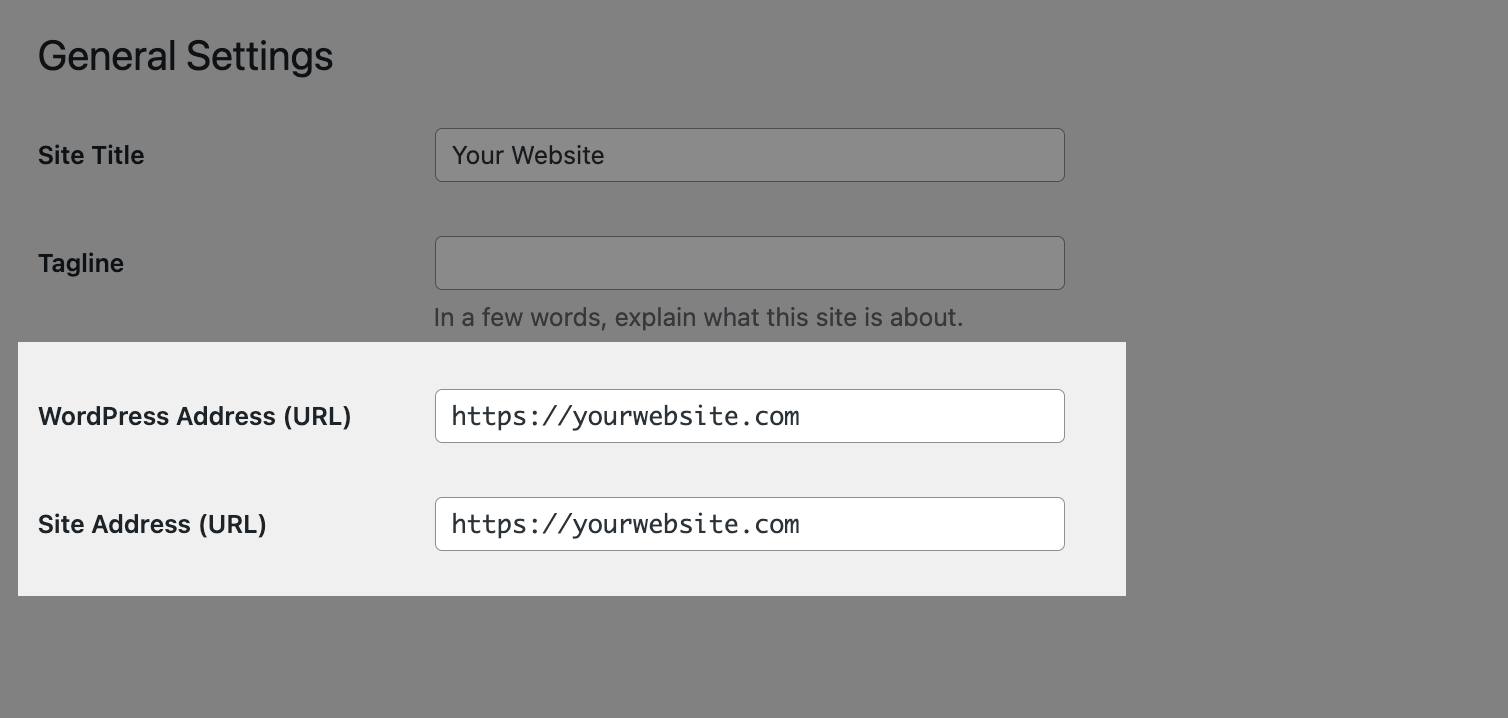
In the left menu, go to Settings > General and type in your preferred format in both the “WordPress Address” and “Site Address” fields:
6. Enable SEO-Friendly Permalinks
Creating more descriptive permalinks can help search engines and human users understand your pages better.
For example, the URL of this post—https://semrush.com/blog/wordpress-seo—clearly indicates that this page is about WordPress SEO. If someone would only see the URL, they would still know what to expect.
By default, WordPress uses a “plain” URL structure that looks something like this: https://sermush.com/blog/?p=7255
Which is not exactly the best solution …
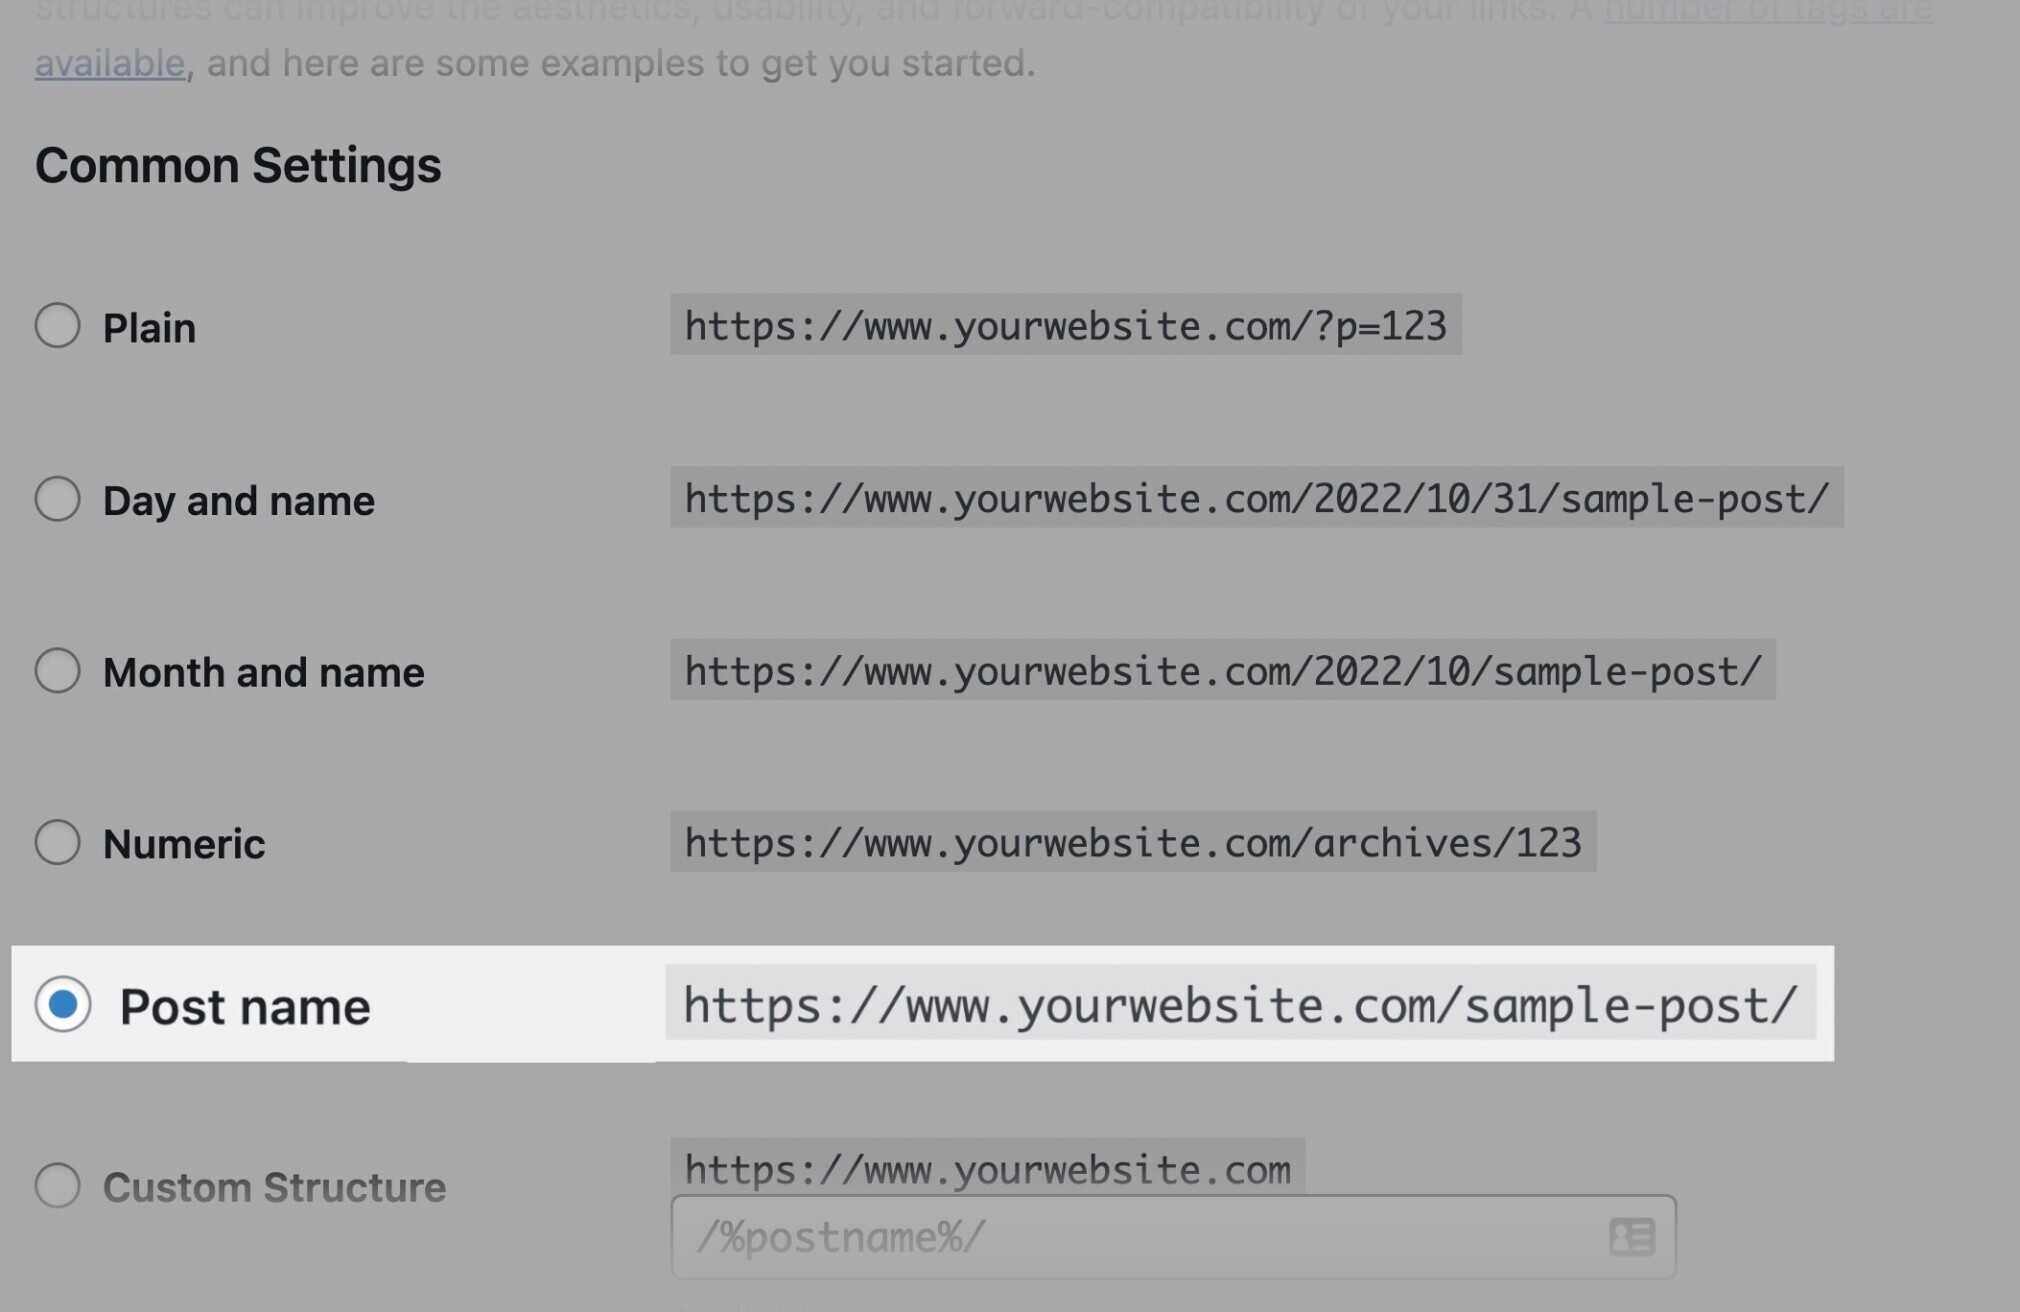
The best permalink format to pick in WordPress settings is the “Post name” structure. It means WordPress will use the title of the post to create the URL.
(And you can edit the URL in the post editor to make it even shorter and easier to read.)
Go to Settings > Permalinks and select “Post name.”
Note: If you’re changing the permalink structure on an established website, be aware of possible issues—mainly 404 (Page Not Found) errors. To avoid these, you’ll have to use redirects for all the old URLs.
7. Install and Configure a WordPress SEO Plugin
A WordPress SEO plugin can make it easier for you to configure some basic SEO settings and follow best practices.
Three of the most popular free WordPress SEO plugins are:
Note: For the purposes of this guide, we will use Yoast SEO. (It has the most installations and a cool Semrush integration.)
Installing Yoast SEO
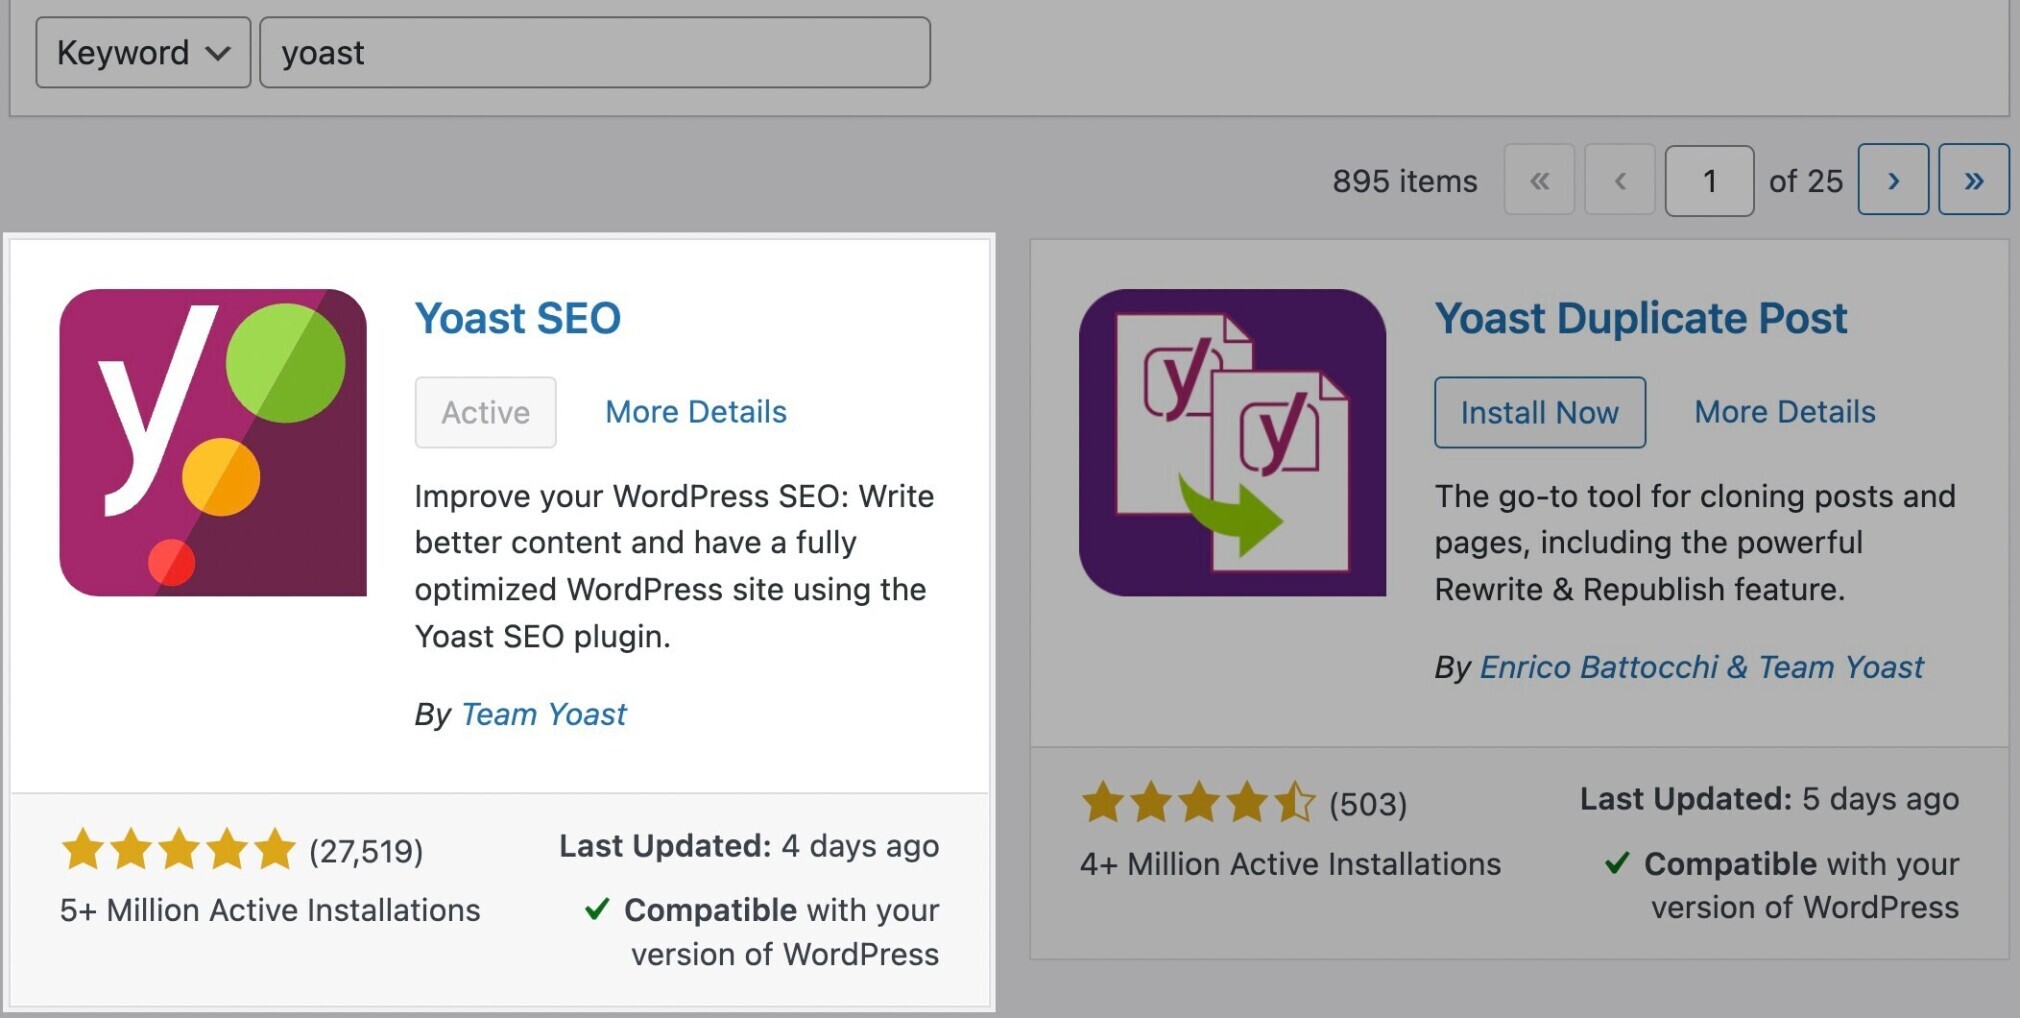
To install Yoast SEO, go to your WordPress control panel. Then, click on “Plugins” in the left menu and the “Add new” button.
Search for “yoast seo” and click the “Install Now” button when you find it. Then, click “Activate.”
Configuring Yoast SEO
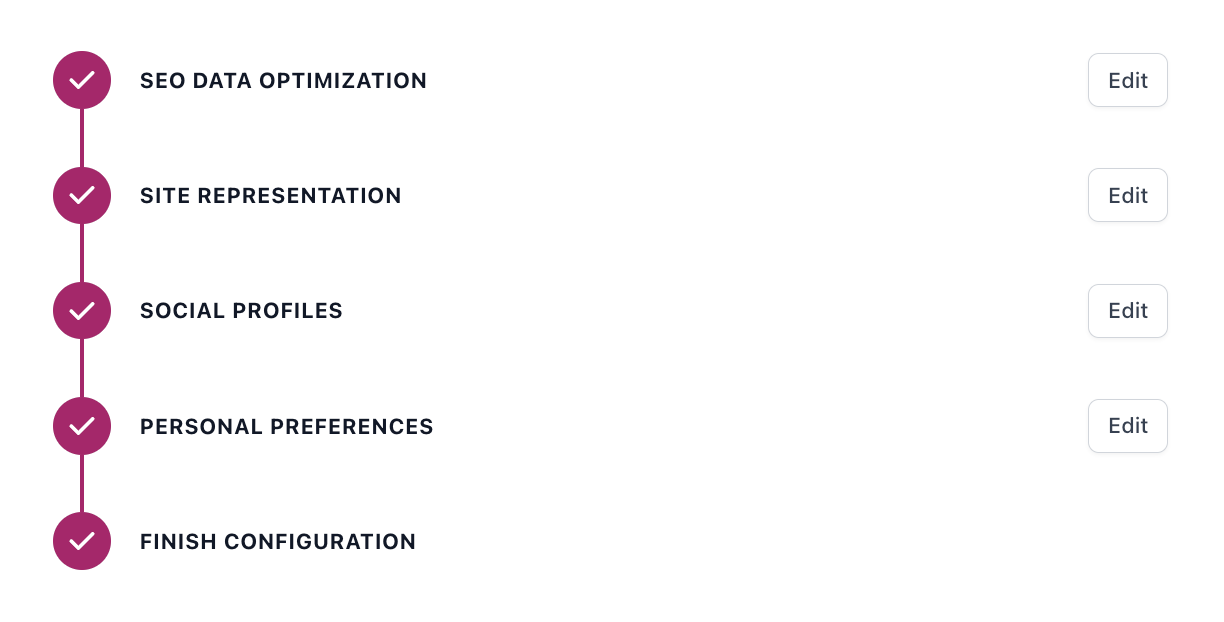
After the activation, the plugin will prompt you to go through the “First-time configuration.”
During this process, you’ll:
- Run Yoast’s SEO data optimization function
- Provide basic information about your website
- Connect your social profiles
Besides these, it is also a good idea to go to Yoast SEO > Search Appearance > Title Separator to choose what symbol will be used as your title tag separator.
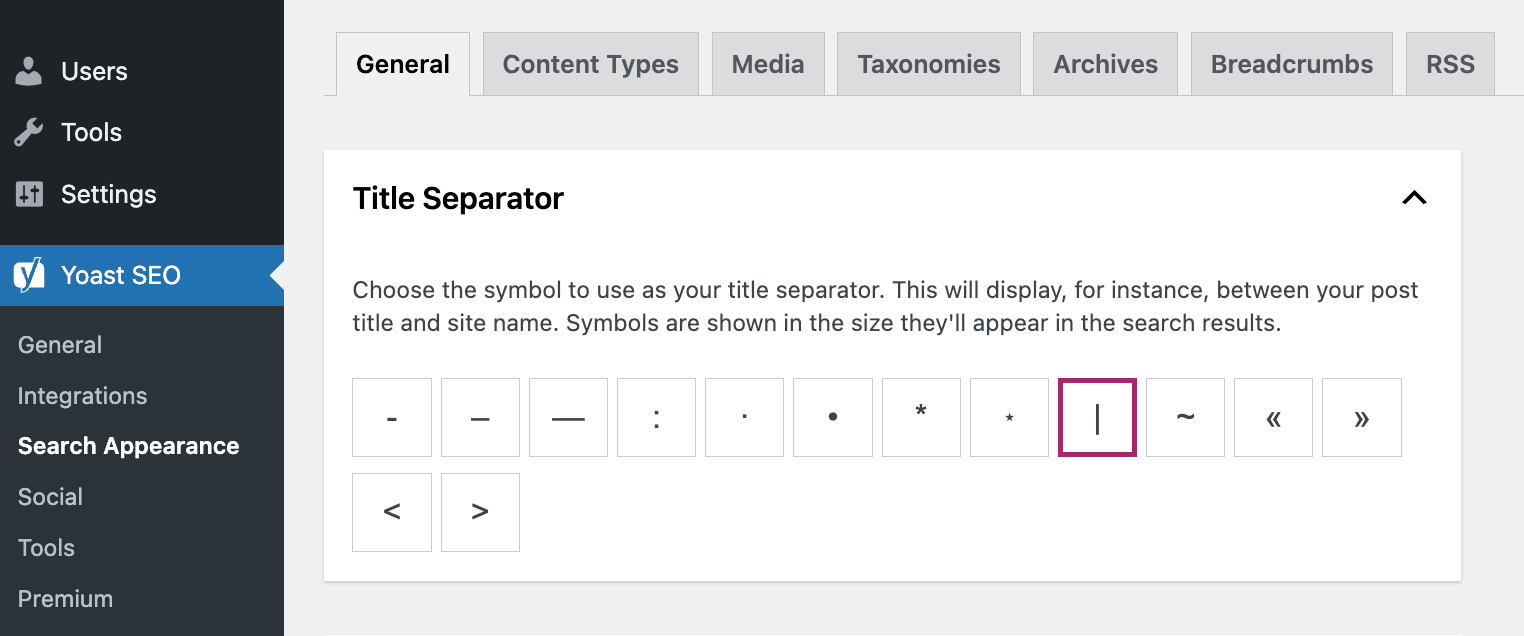
Here’s what a title separator looks like in the search results:

We will go through other SEO settings available in Yoast SEO in some of the following steps.
8. Submit Your Sitemap to Google Search Console
An XML sitemap is a simple file that lists all your pages in a format search engine crawlers can read easily.
It helps search engines discover your new pages. It also provides important information (such as when the page was last updated).
WordPress creates a sitemap automatically. You’ll find it at the following URL:
https://www.yoursite.com/wp-sitemap.xml
However, if you’re using Yoast SEO, it will create a slightly advanced version of an XML sitemap and turn off the default one. All you need to do is to submit the sitemap URL to Google Search Console (GSC).
Note: Google will usually discover your site on its own. But submitting your XML sitemap to Google Search Console can speed up the process. And it might help Google better understand your site.
Finding the Sitemap URL in Yoast
Go to Yoast SEO in the left menu and click “General.” Then, click on the “Features” tab and scroll down to XML sitemaps.
The sitemap should be enabled by default (the toggle button should be “On”). If it’s not, enable it.

Click the little question mark symbol, then the “See the XML sitemap.” link. Your sitemap will open in a new tab.
It will look something like this:
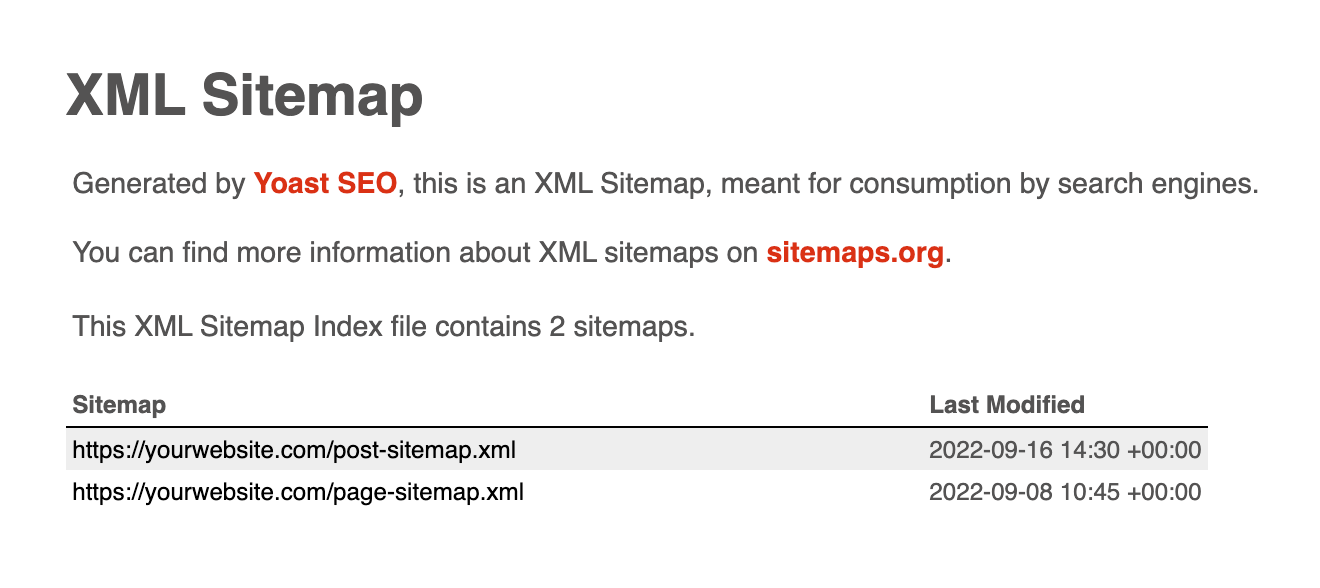
Copy the URL and head to Google Search Console.
Submitting the Sitemap URL to Google Search Console
Log in to your Google Search Console account and click “Sitemaps” in the left menu.
You’ll find a simple form where you can paste the URL of your sitemap:
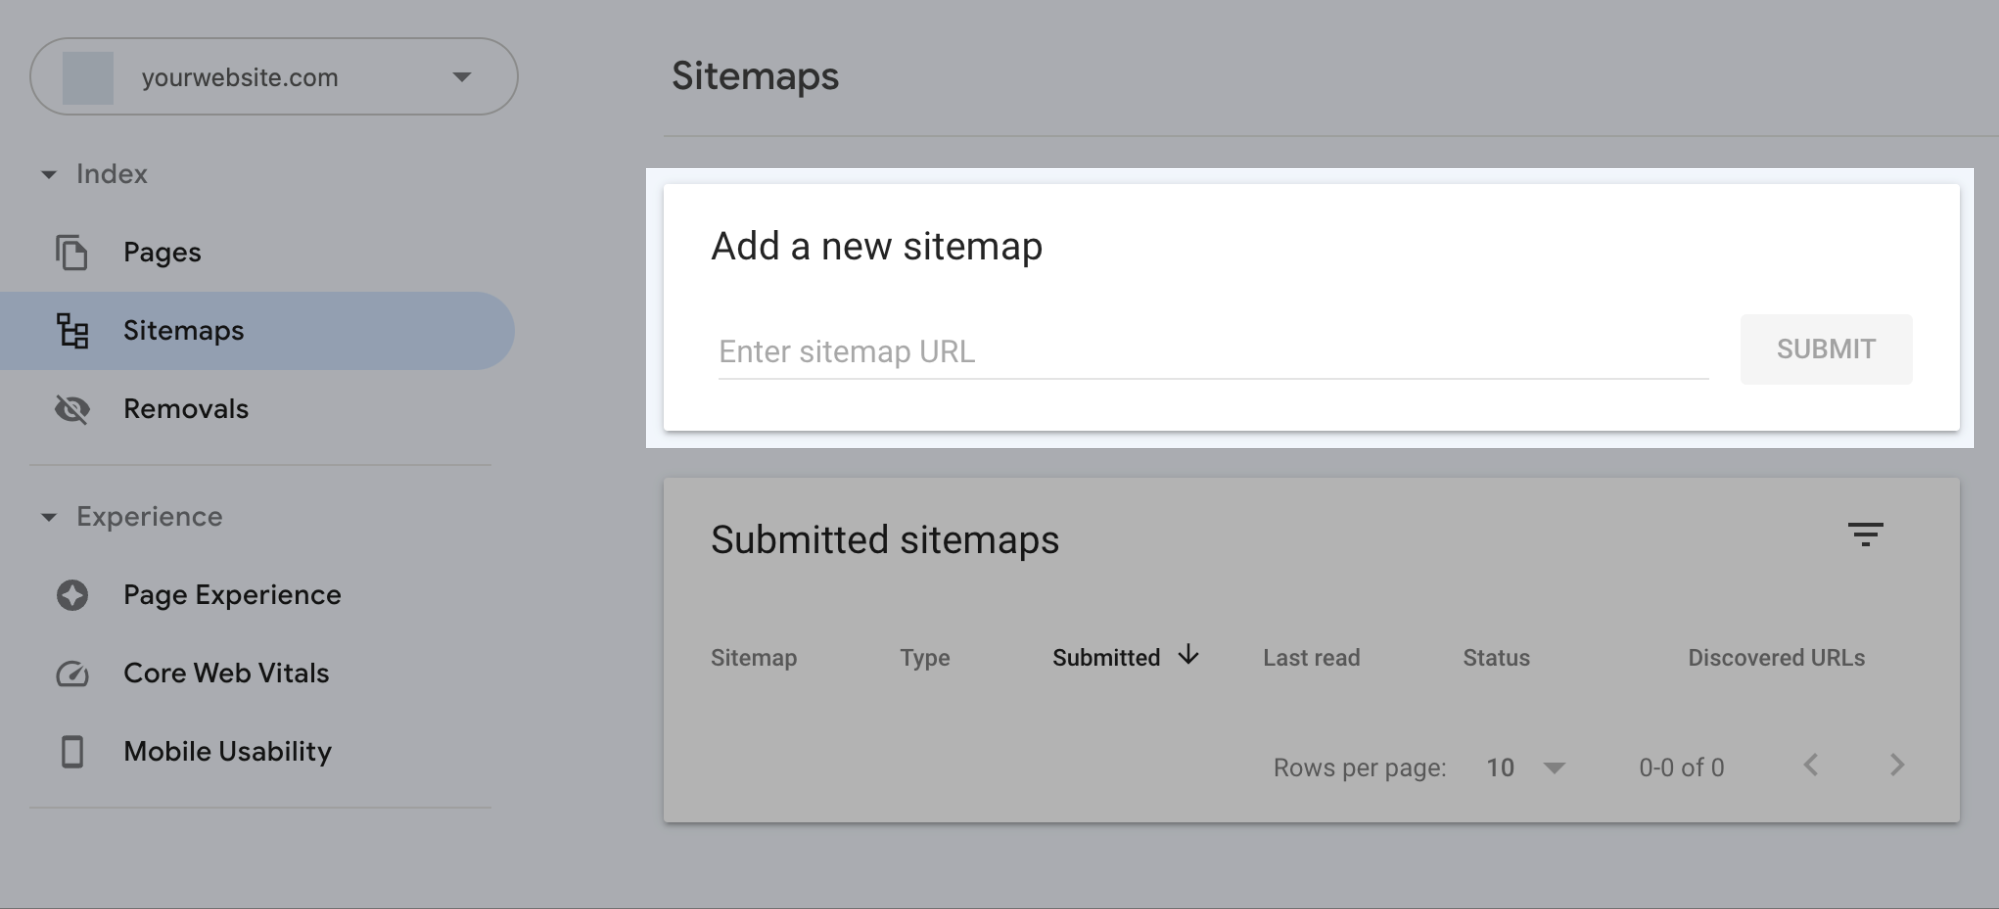
Hit “Submit” and you’re all done!
Side note: If you don’t have a GSC account yet, you can follow this simple guide by Kinsta that will show you how to verify your site. Also, make sure to check out our definitive guide to Google Search Console for more tips and tricks.
9. Noindex Unimportant Pages
WordPress uses many different page taxonomies and archive pages.
For example, it creates archive pages for every month when posts were published. An archive page with posts from September 2022 will have its own URL:
https://yourwebsite.com/2022/09/
These pages offer little value to the user. And you typically don’t want them to be indexed and get traffic from Google.
You should always ask: Would users want this page to appear in search results?
If the answer is no, you can use Yoast to prevent Google from indexing these pages. In technical terms, this is called setting the page to “noindex.”
Here’s how to noindex pages using Yoast:
In Yoast SEO, click on “Search Appearance.”Then, there are “noindex” settings under each of the “Content Types,” “Taxonomies,” and “Archives”tabs.

Under each category, you’ll be asked whether you want a type of content to be indexed on Google.
Like this:
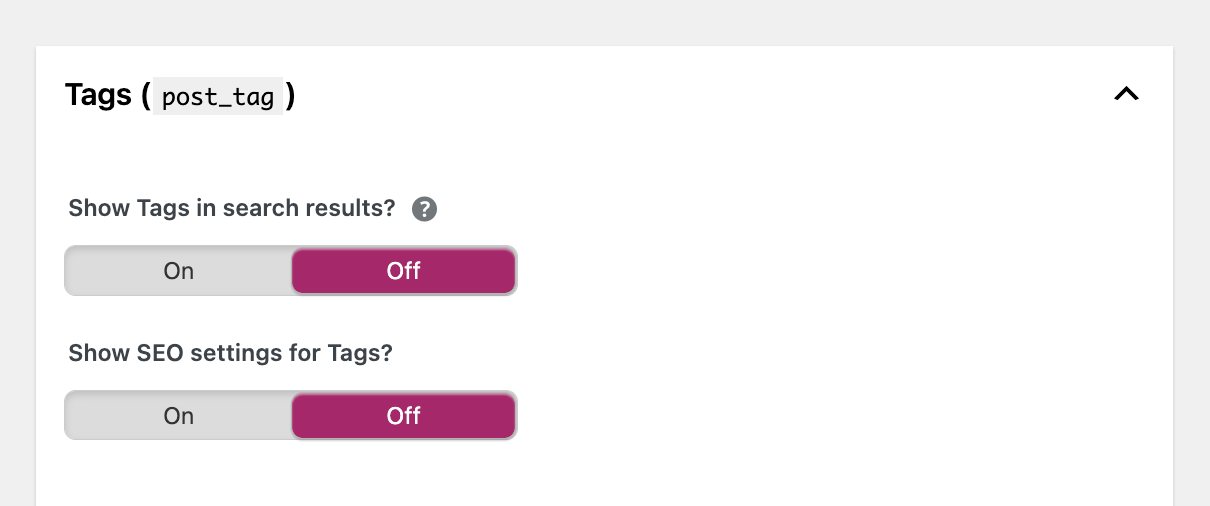
To noindex all content in a category, simply select “Off” on the toggle button.
Let’s go through all the types one by one:
Content Types
- Posts: Definitely index these. You want your posts to appear in search engine results.
- Pages: Definitely index these. You want your pages to appear in search engine results.
- Templates: These are usually created by page builders. Noindex them.
Taxonomies
- Category pages: These are usually useful for users, especially for bigger blogs and ecommerce sites. (See Step 13 to make the most out of them.)
- Tag pages: These are usually low-value pages. Noindex them.
- Format-based archives: These are rarely used, low-value pages. Turn off the usage of these archives completely, or noindex them.
Archives
- Author archives: These can be useful for multi-author blogs. Otherwise, turn off the usage of these archives completely, or noindex them.
- **** archives: Turn off the usage of these archives completely. Or noindex them.
Tip: If you have any doubts, check out this great video by Sagapixel on noindexing taxonomies and archives in WordPress.
10. Plan the Architecture of Your Site
If you’re doing WordPress SEO right, you’ll have a simple site architecture with a clear hierarchy of pages.
A good site architecture makes your website easier for search engines to crawl. And for visitors to navigate.
To achieve this, plan ahead. You can simply use a pen and paper. Or a Google Sheet. We **** using a mind mapping platform like MindMeister for this.
Just create a free account and select the “Org Chart” template (as it provides a good visual representation of a website structure):
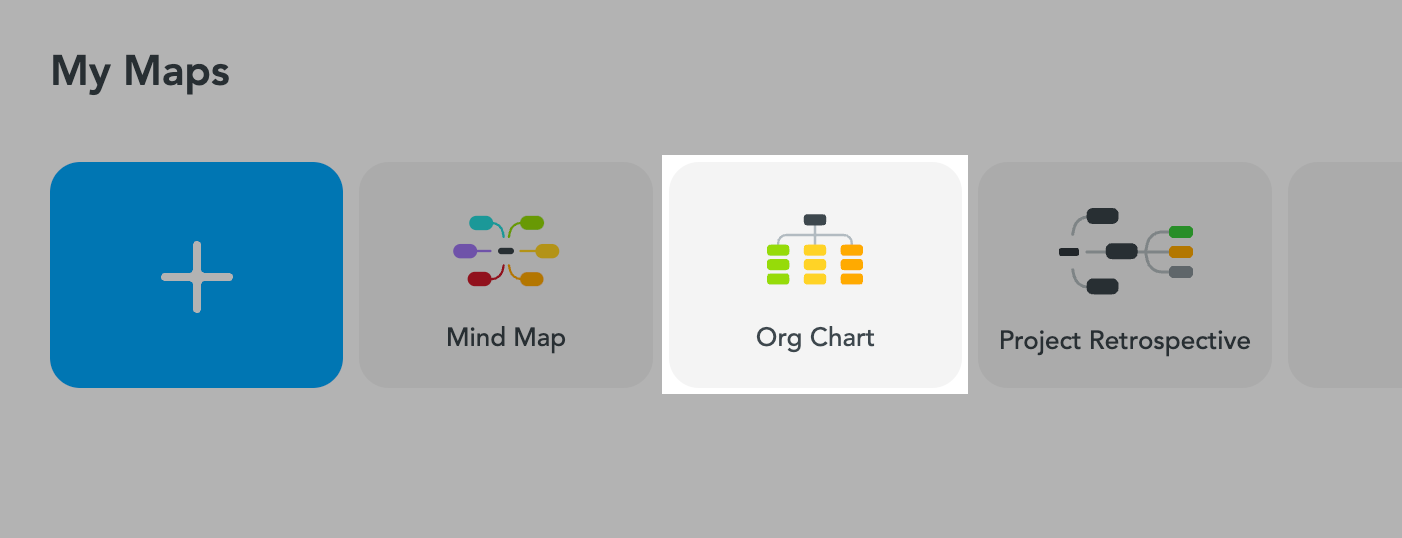
Then, you can start planning your website’s architecture by writing down and nesting all the pages and categories the website might have.
A simple website architecture may look something like this:
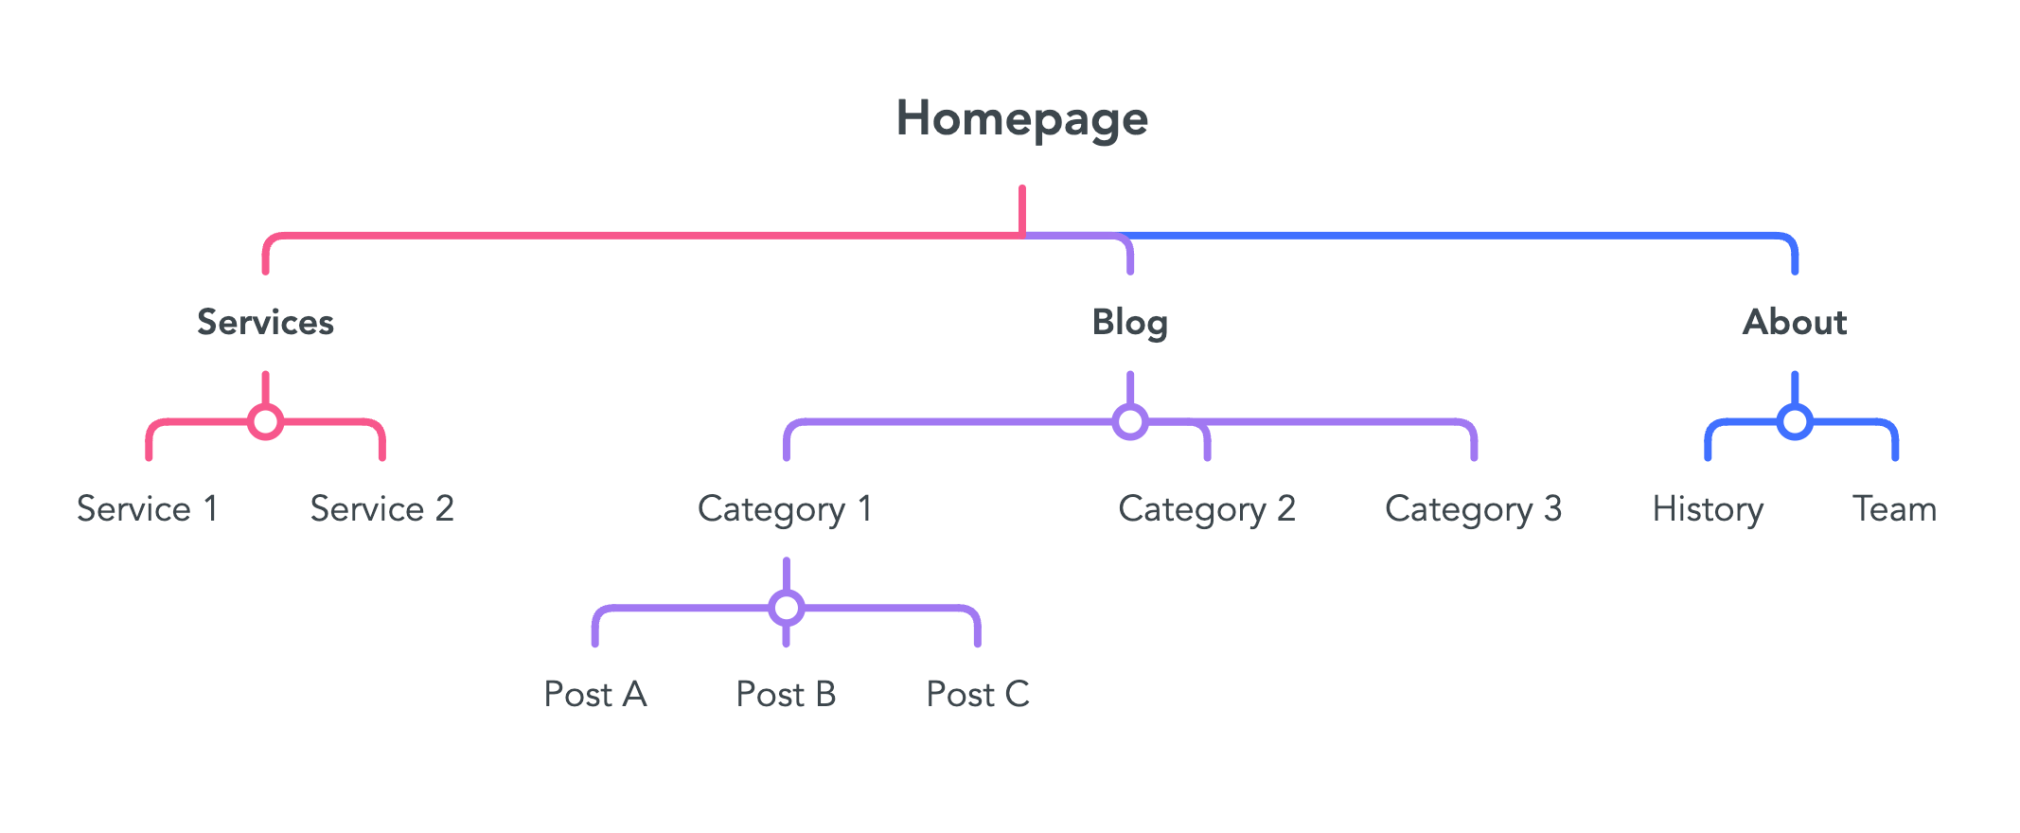
Your pages should be easy to reach in as few clicks as possible. A good rule to follow is that no page or post should require more than three clicks to reach from the homepage.
WordPress Pages vs. Posts
By default, WordPress comes with two different types of content: posts and pages.
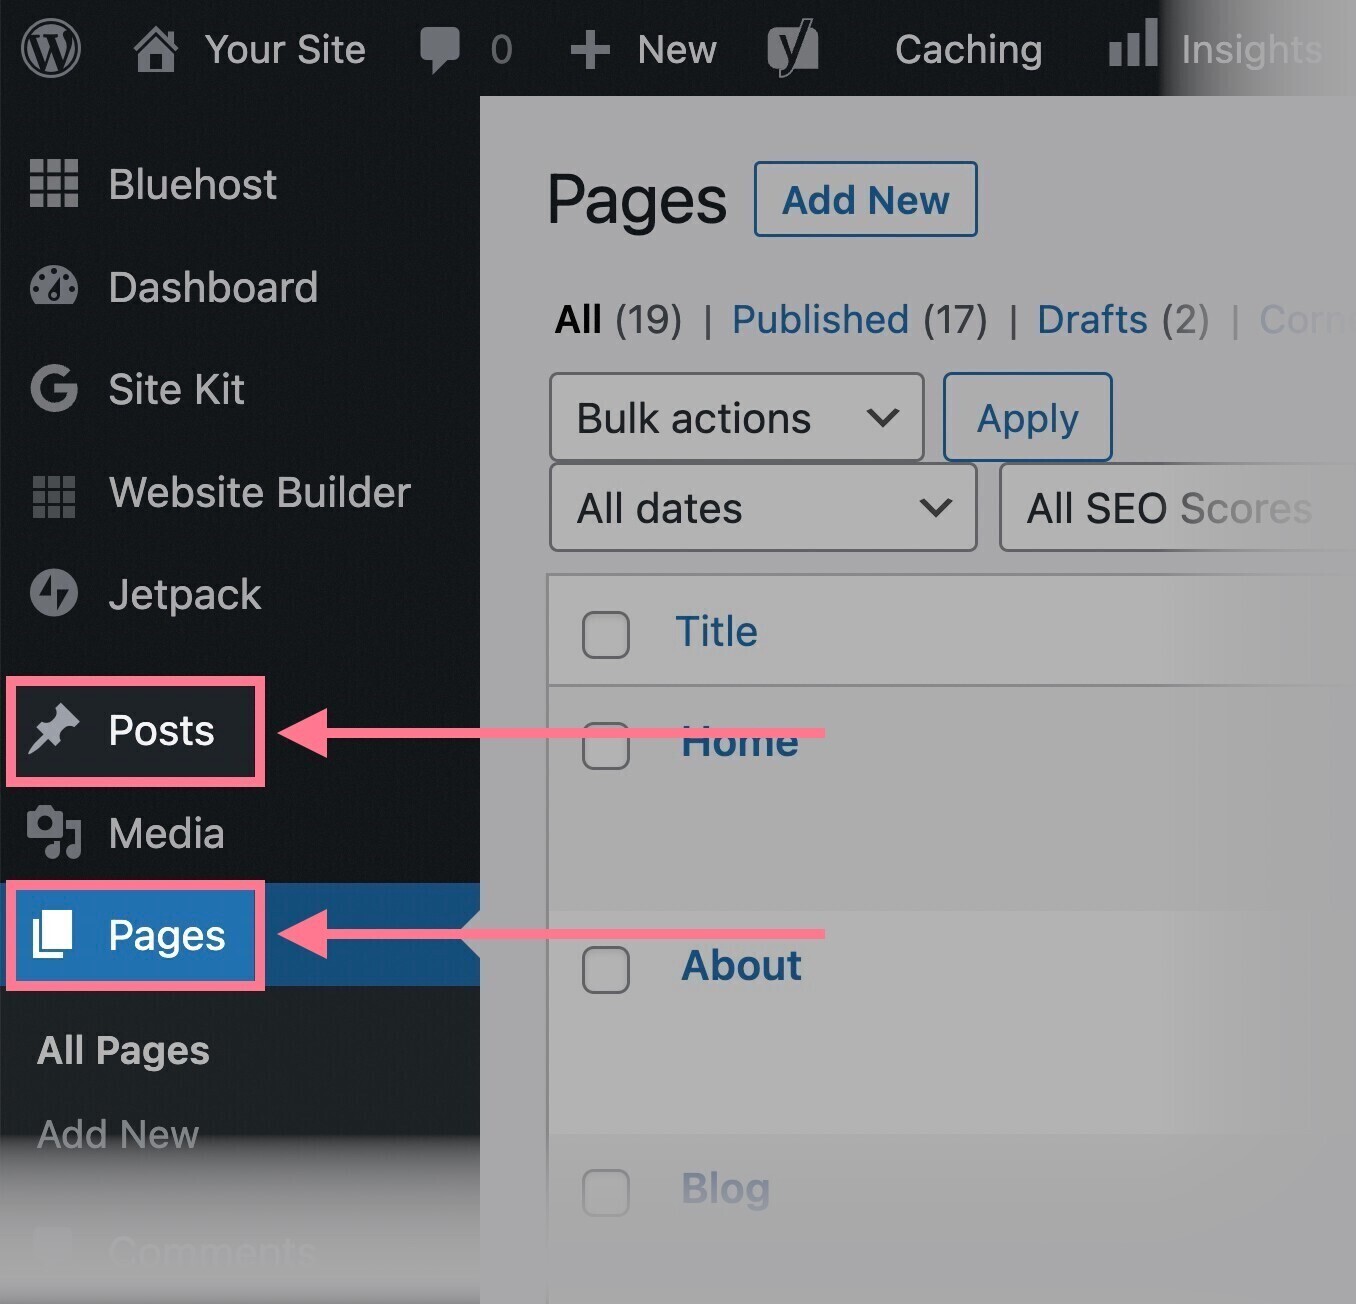
Use the Pages format for static pages that do not need to be categorized and might not have an author.
The typical examples would be an “About” page, a “Privacy Policy” page, or landing pages.
The Posts format is for blog posts—pages that are organized with categories and typically show the author and published ****. On the website, the posts are shown in reverse chronological order (the most recent posts are at the top).
In WordPress, you can select whether your homepage will be an index of your latest posts or a static page. Just go to Settings > Reading and pick one of the two options:

If you select the static homepage option, you get to select the page that will be used as your homepage. As well as the page where your posts will be shown.

Avoiding Keyword Cannibalization
Having a mapped-out site architecture has another benefit. Ithelps youavoid keyword cannibalization—a common issue that means your pages compete with each other in Google results.
As John Mueller from Google stated in a Reddit AMA:
“If you have a bunch of pages with roughly the same content, it’s going to compete with each other… Personally, I prefer fewer, stronger pages over lots of weaker ones—don’t water your site’s value down.”
So, how do you keep your pages from competing with each other?
- Assign a target keywordto every page of your website.
- Make sure each page has a unique target keyword.
Note: We’ll talk about how to find the right keywords in Step 15.
To find existing cannibalization issues, you can open the “Cannibalization” tab in Semrush’s Position Tracking tool and look for affected pages.
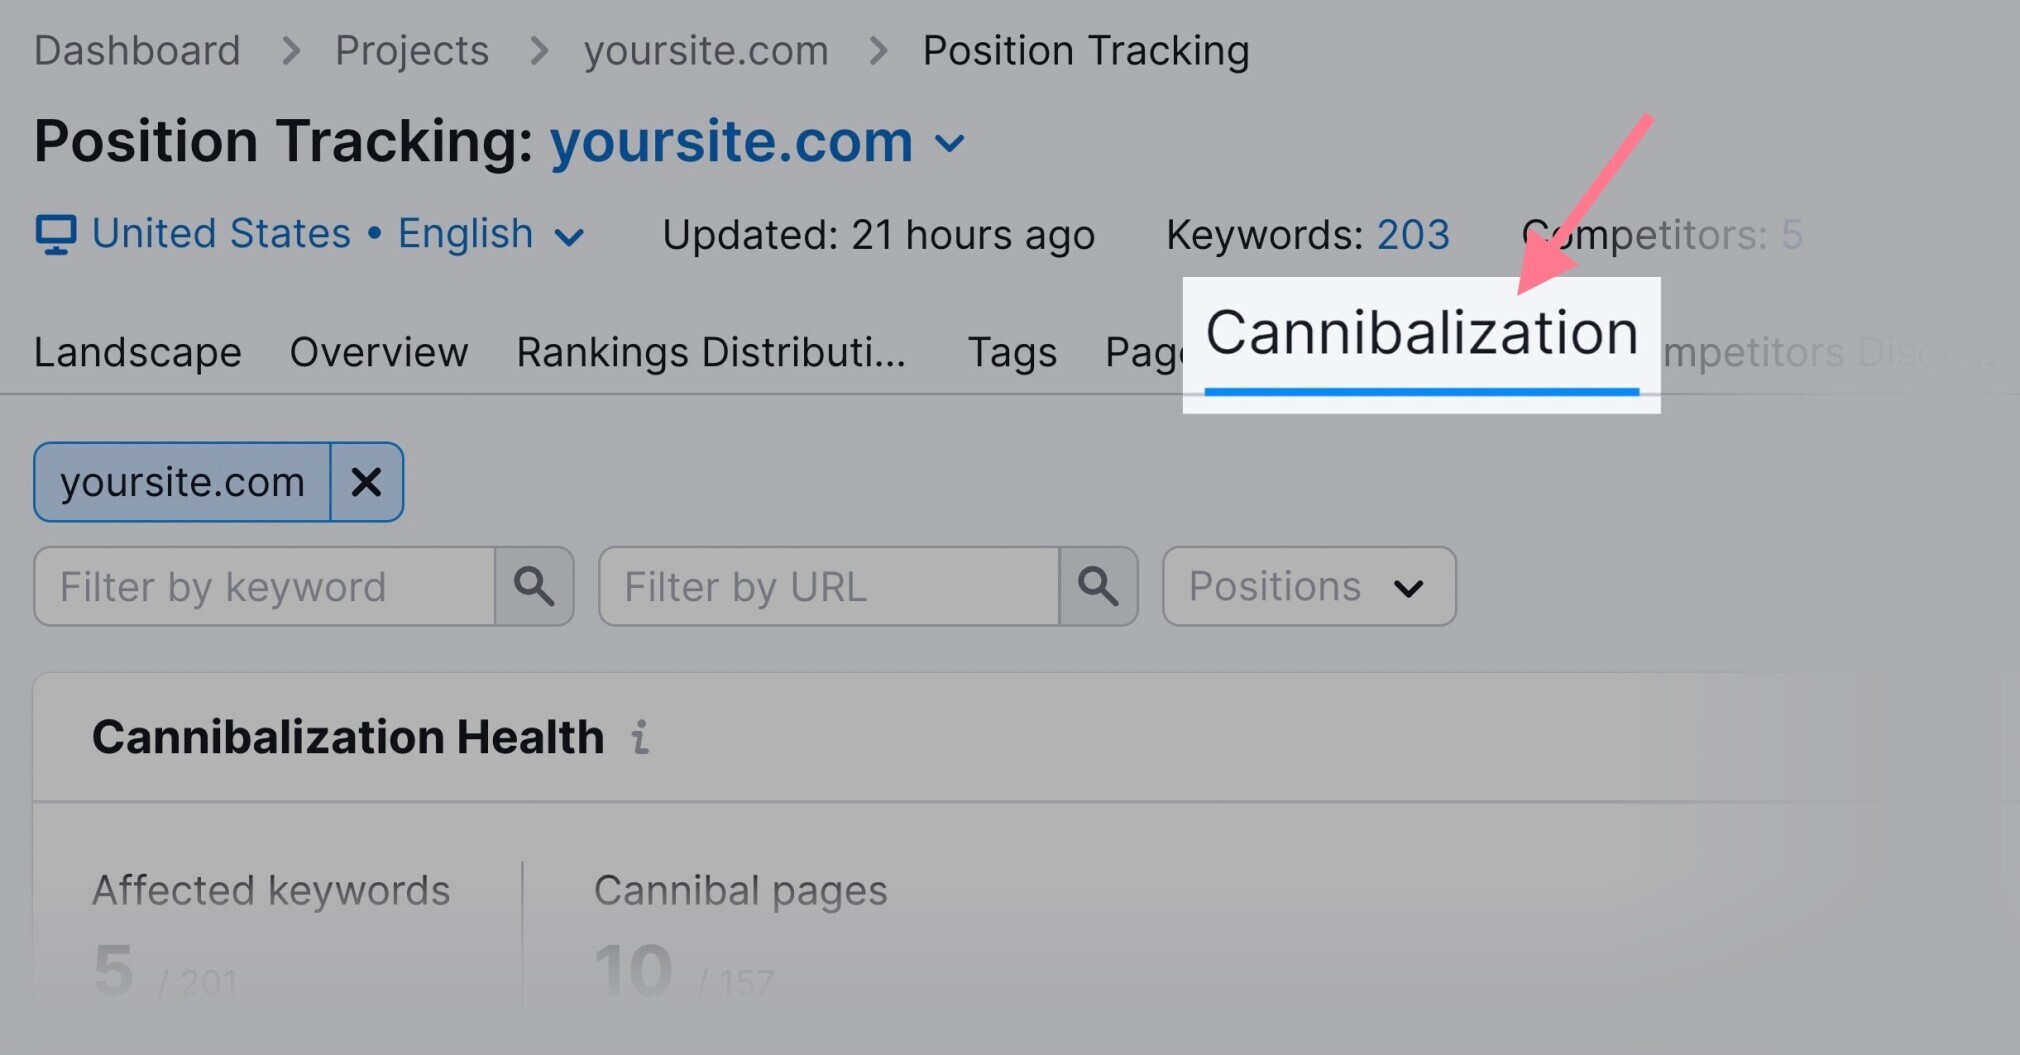
To learn more about how to spot and fix cannibalization issues in Semrush, follow this guide.
11. Nest Your Pages into Subfolders
Nesting your pages means grouping similar pages into subfolders within your URL architecture.
By default, WordPress creates URLs without nesting.
For example, without nesting, the URLs on a freelance photographer’s website would look something like this:
- domain.com
- domain.com/services
- domain.com/wedding-photography
- domain.com/portrait-photography
- domain.com/family-photography
- domain.com/blog
- domain.com/editing-process
- domain.com/family-portrait-tips
However, to make the URL structure more logical—don’t forget that search engine crawlers **** order and structure—we could nest the pages in this way:
- domain.com
- domain.com/services
- domain.com/services/wedding-photography
- domain.com/services/portrait-photography
- domain.com/services/family-photography
- domain.com/blog
- domain.com/blog/editing-process
- domain.com/blog/family-portrait-tips
In that example, the pages are nested into more descriptive categories. The services offered are nested in the “Services” subfolder and blog posts are nested in the “Blog” subfolder.
To nest a page in WordPress, you need to edit the page. Then, go to “Page Attributes”and select the desired “Parent Page.”
For example, for the wedding photography page, we would select “Services” as a parent page.
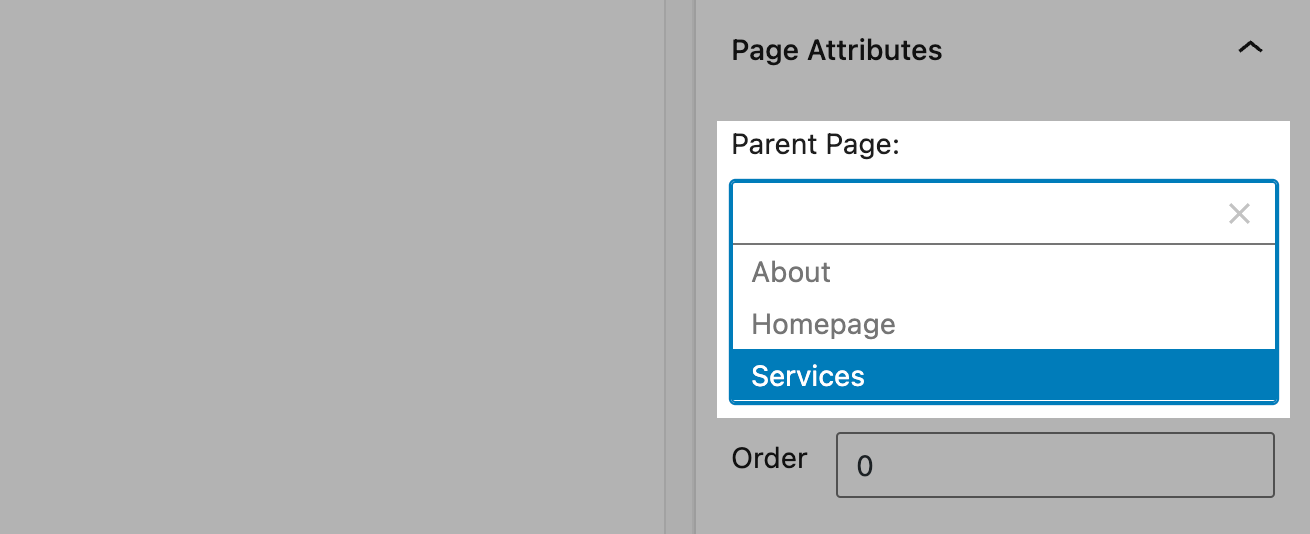
That would cause the Services subfolder to be included in the wedding photography page’s URL: domain.com/services/wedding-photography
Note: If you are changing URLs of existing pages with nesting, you will likely need to set up redirects. For help, check out our guide to redirections.
A menu is a crucial navigational element of any website. It helps your visitors find the most important pages.
It is also important for SEO. Because it provides further information about the structure of your website and its key pages.
Your main menu should be:
- Clear: Do not overwhelm your users with too many menu items. Consider creating sub-menusor moving less used items to the footer menu.
- Simple and helpful: Always follow the “user comes first” principle. Try to step into your visitor’s shoes and make sure the navigation is 100% understandable.
- Predictable: Do not experiment. Includeitems people (and search engine crawlers) expect to find in a menu and use traditional names (like “Pricing” instead of “How much will it cost” or “Blog” instead of “Field notes”).
To create a menu in WordPress:
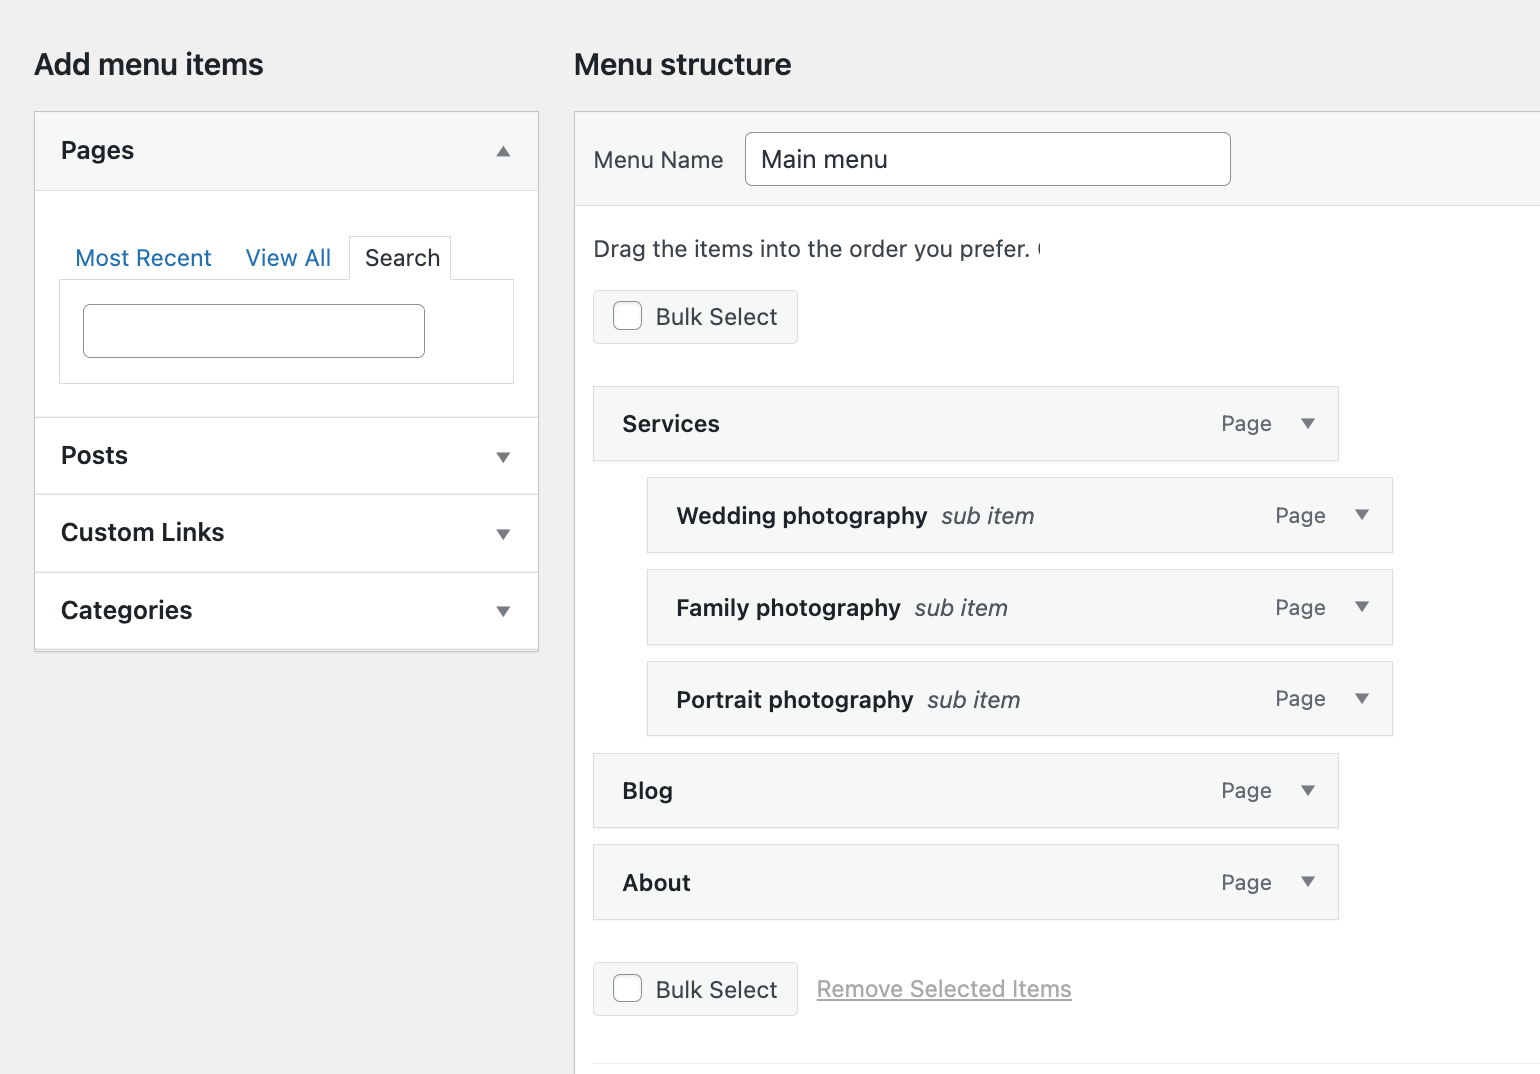
1. Go to Appearance > Menus > edit your menu or click the “Create a new menu” link.
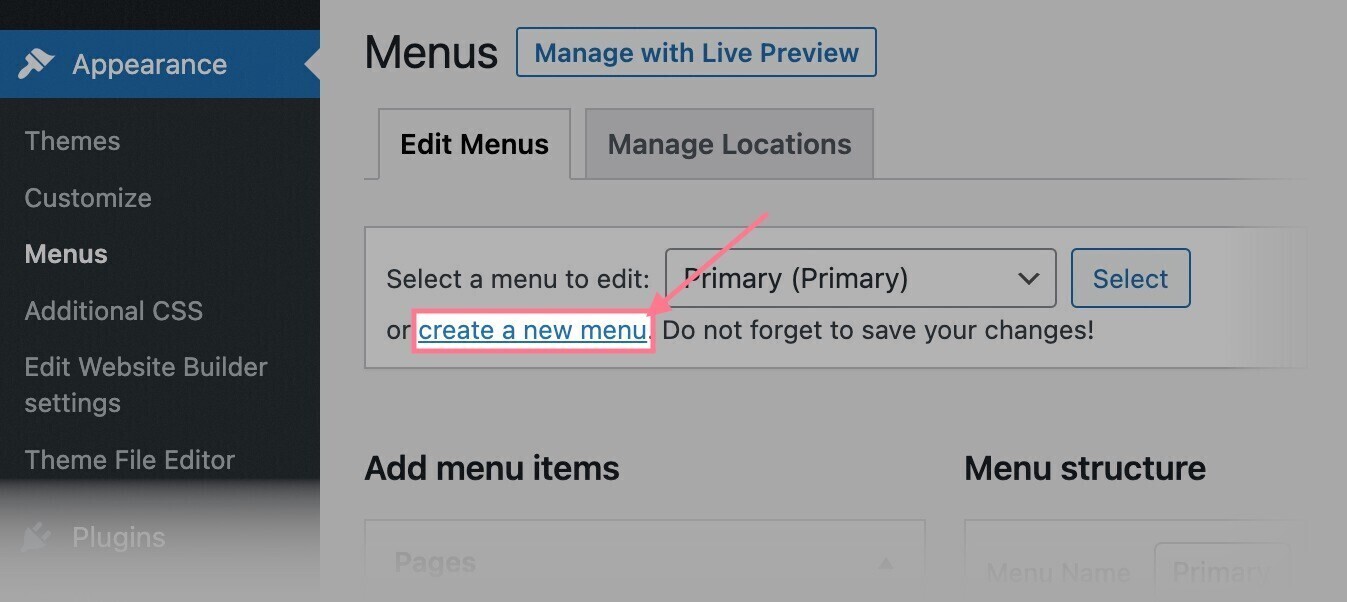
2. Add pages (or other types of content) to your menu in the “Add menu items” section.
3. Drag and drop the menu items to change their order and/or rename them in the ‘Menu structure’ section.
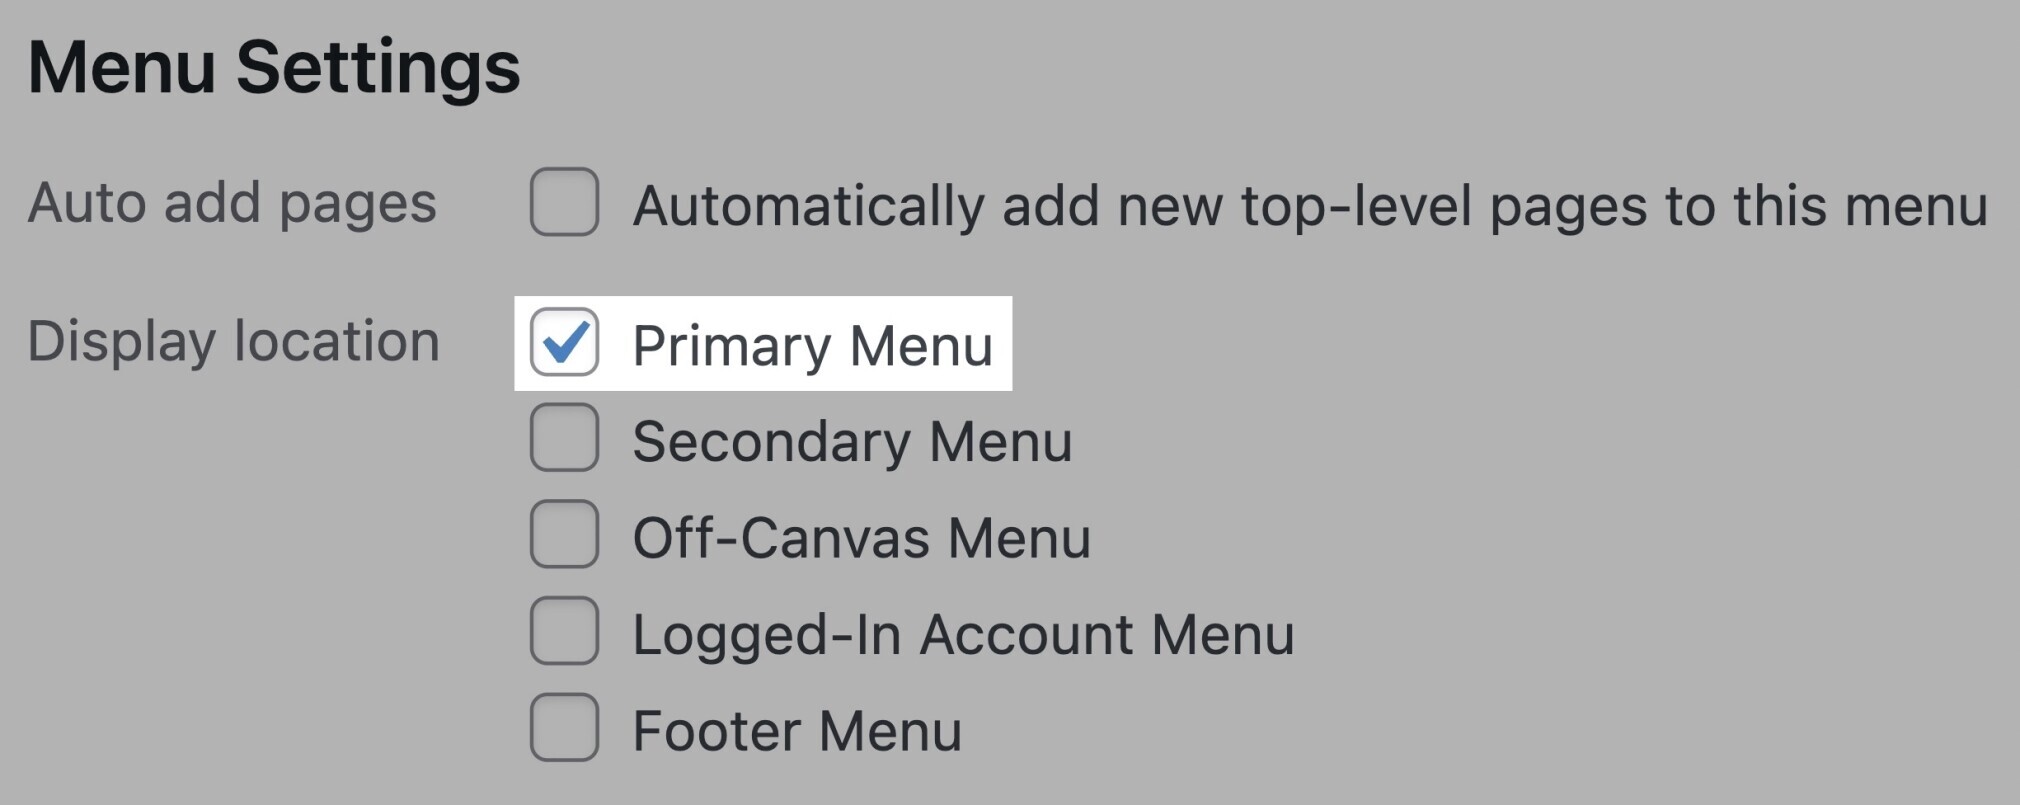
To make the menu appear in the website’s header, don’t forget to mark it as “Primary Menu” in the settings at the bottom:
You can create multiple menus in the “Menus” section of WordPress (e.g., a footer menu, standalone blog navigation, etc.). Their implementation will depend on your theme and/or page builder.
13. Use Post Categories Correctly
Categories are a useful way to:
- Organize your blog posts into logical groups: Becausecategories can be nested, they provide a unique opportunity to create a hierarchy within your blog topics
- Improve the internal linking of your website: Your category archive pages can become useful content hubs interlinking all the relevant posts covering one topic
- Help visitors find other relevant posts: Categorization of your posts allows you to show related posts to your readers
Since categories are compulsory for WordPress posts (if you don’t assign a category to your post, WordPress will use the default “Uncategorized” one), you might as well get the most out of them.
Assigning a category to your post is easy. Open the page’s Editor and scroll to the Categories section in the right panel.
There, you can then select the category or create a new one:
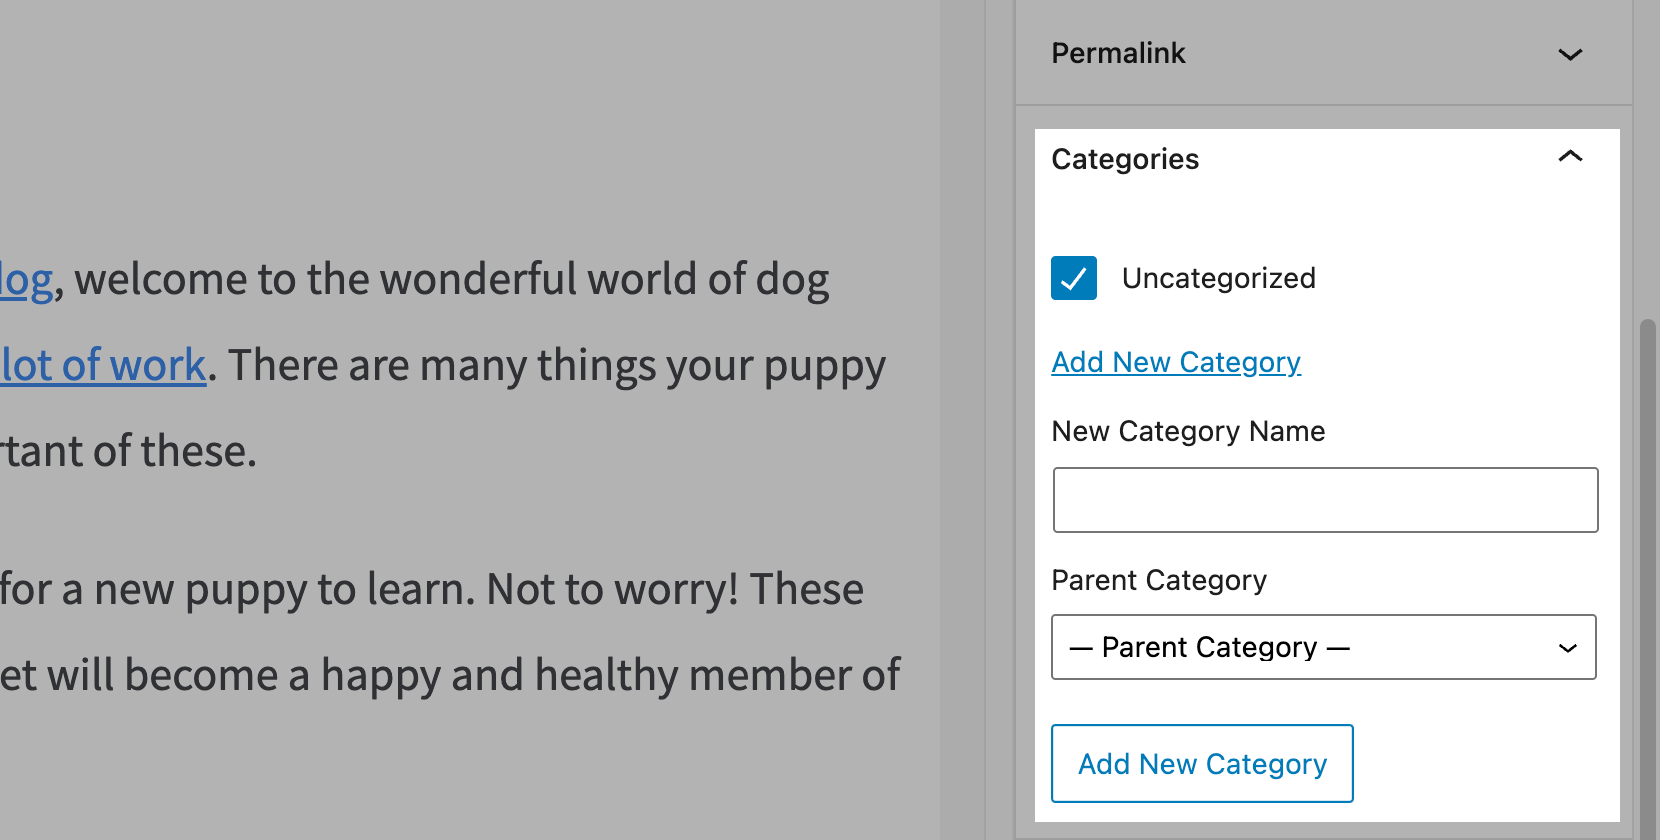
Note: Another type of WordPress taxonomy is a tag. Tags can help you group posts from different categories based on a common subtopic. However, tags are not obligatory and aren’t as popular as they used to be.
Finally, let’s take a look at what you can do to optimize your WordPress categories …
Using a Reasonable Number of Categories
There are no restrictions when it comes to the number of categories you can use.
However, to make your blog easy to browse without overwhelming the reader, the ideal number is somewhere between five and 10 categories.
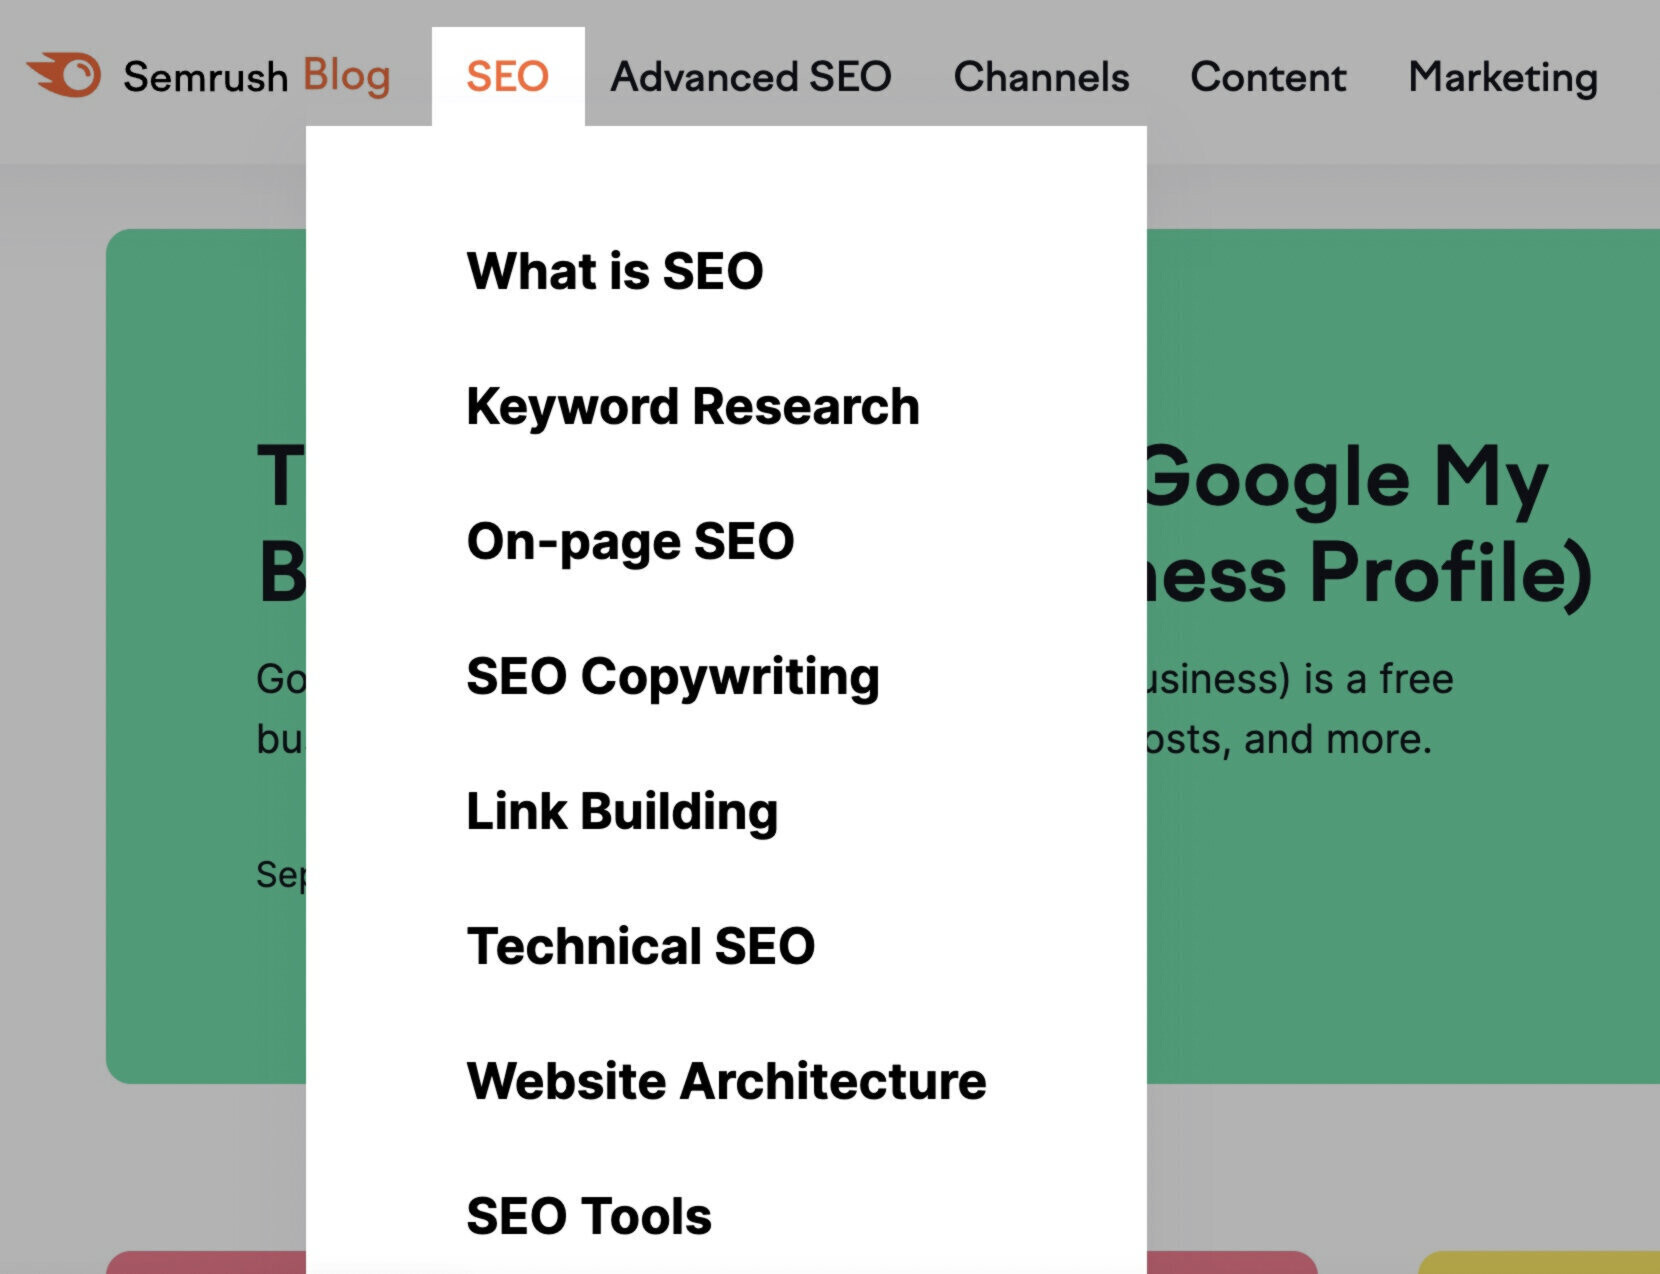
Let’s take a look at the categories used on Semrush blog:
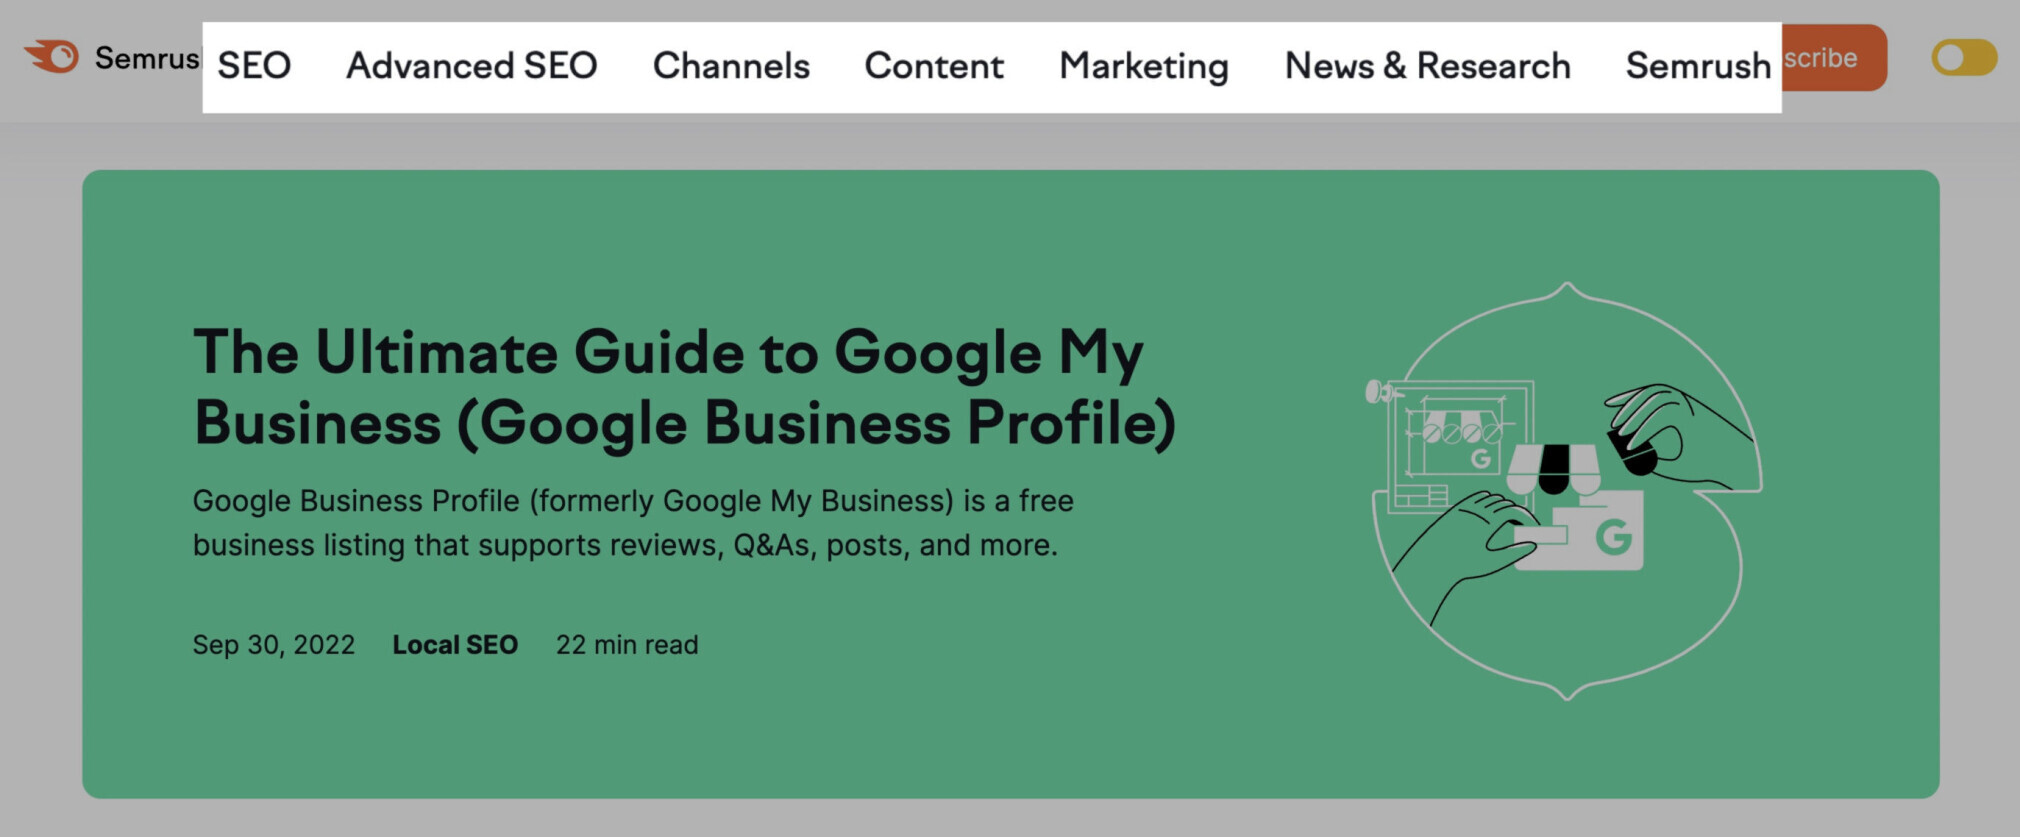
The parent categories like “SEO” or “Marketing” provide the basic categorization. Then, each category has subcategories that further group related content.
For example, the “SEO” category has subcategories like “Keyword Research,” “On-Page SEO,” and “Link Building.”
Try to create categories broadly. That way, you don’t end up with categories with only a couple of posts.
Tip: You can’t delete the default “Uncategorized” category. But you can avoid using it or rename it.
Optimizing Category Pages
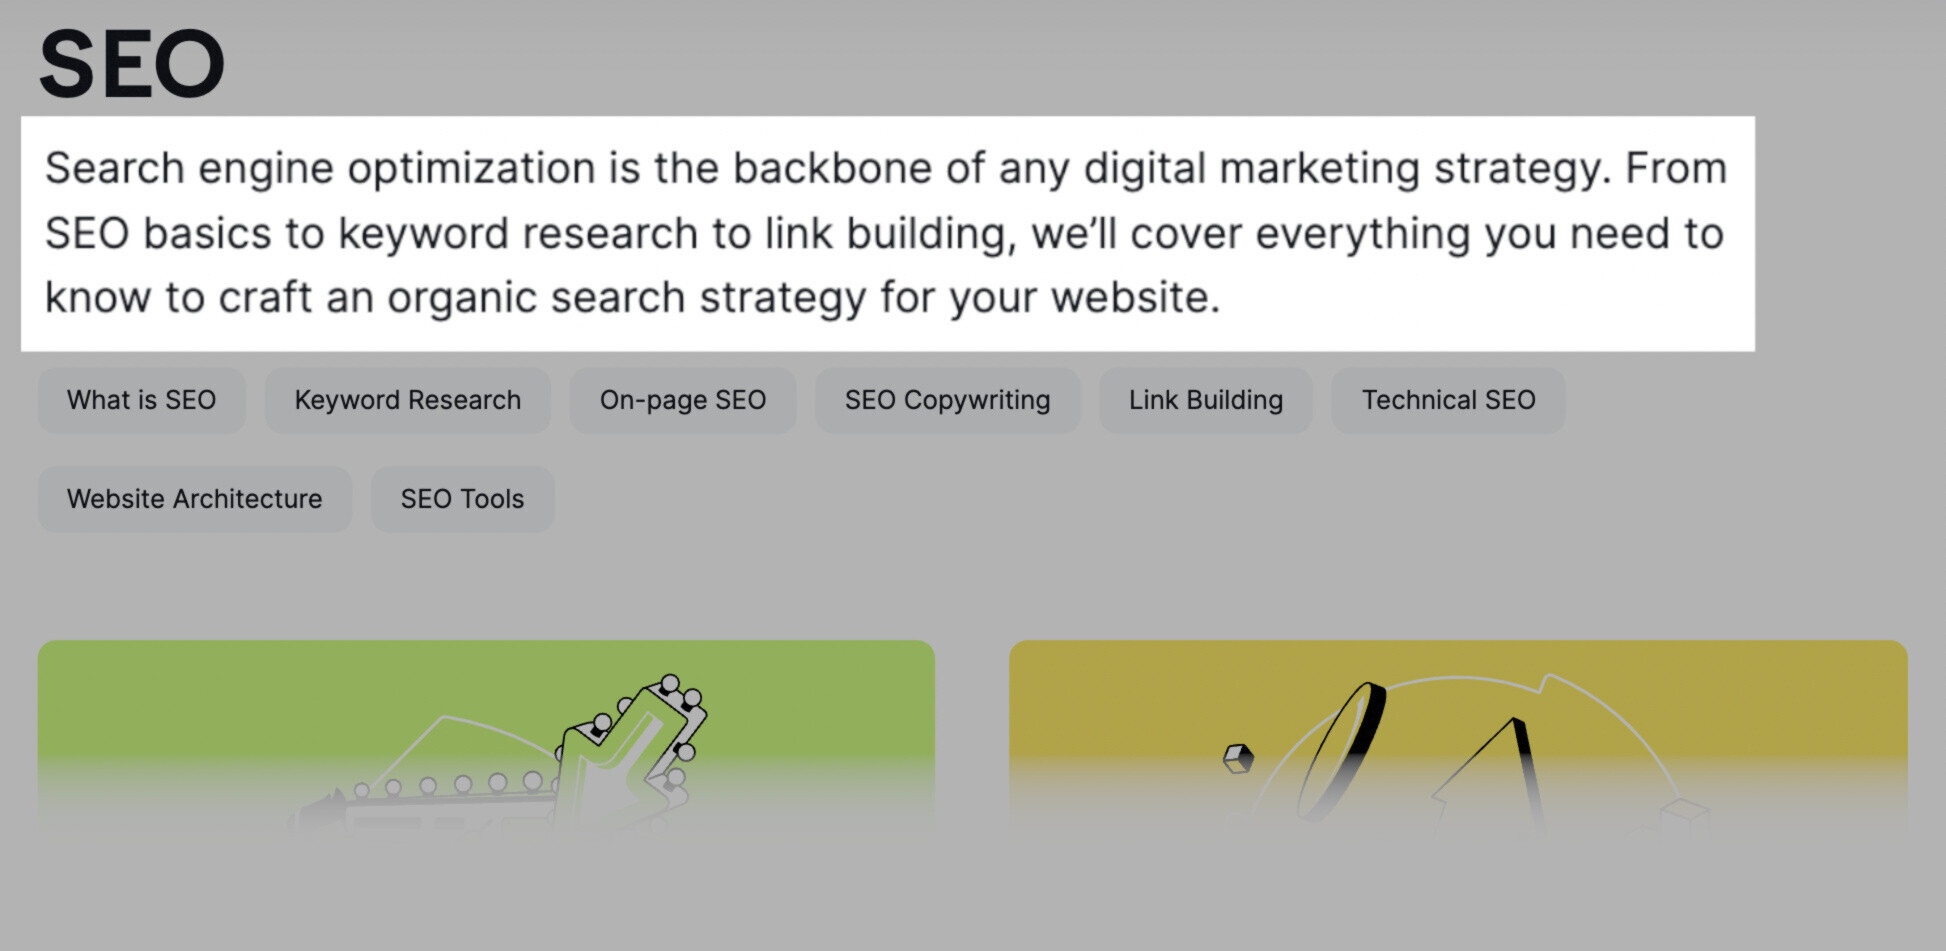
Each category archive page should have a short description. This allows you to introduce the category to readers and provide unique content for search engines.
Here’s an example from the “SEO” category page on the Semrush Blog:
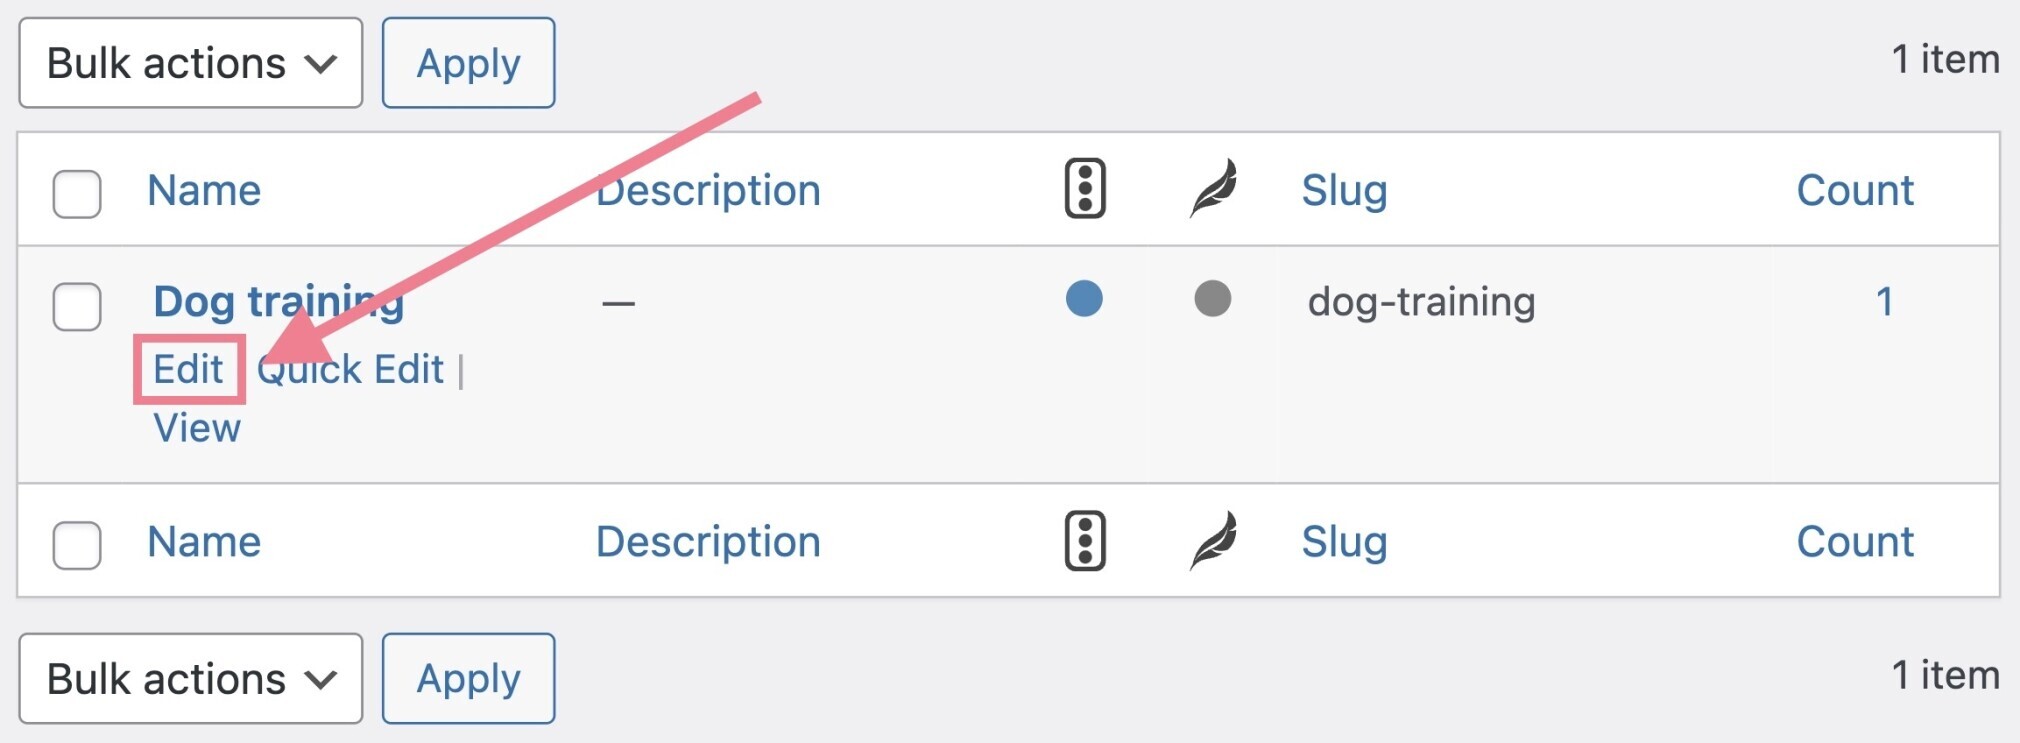
To add a description to your category page, go to Post > Categories > and click “Edit.”
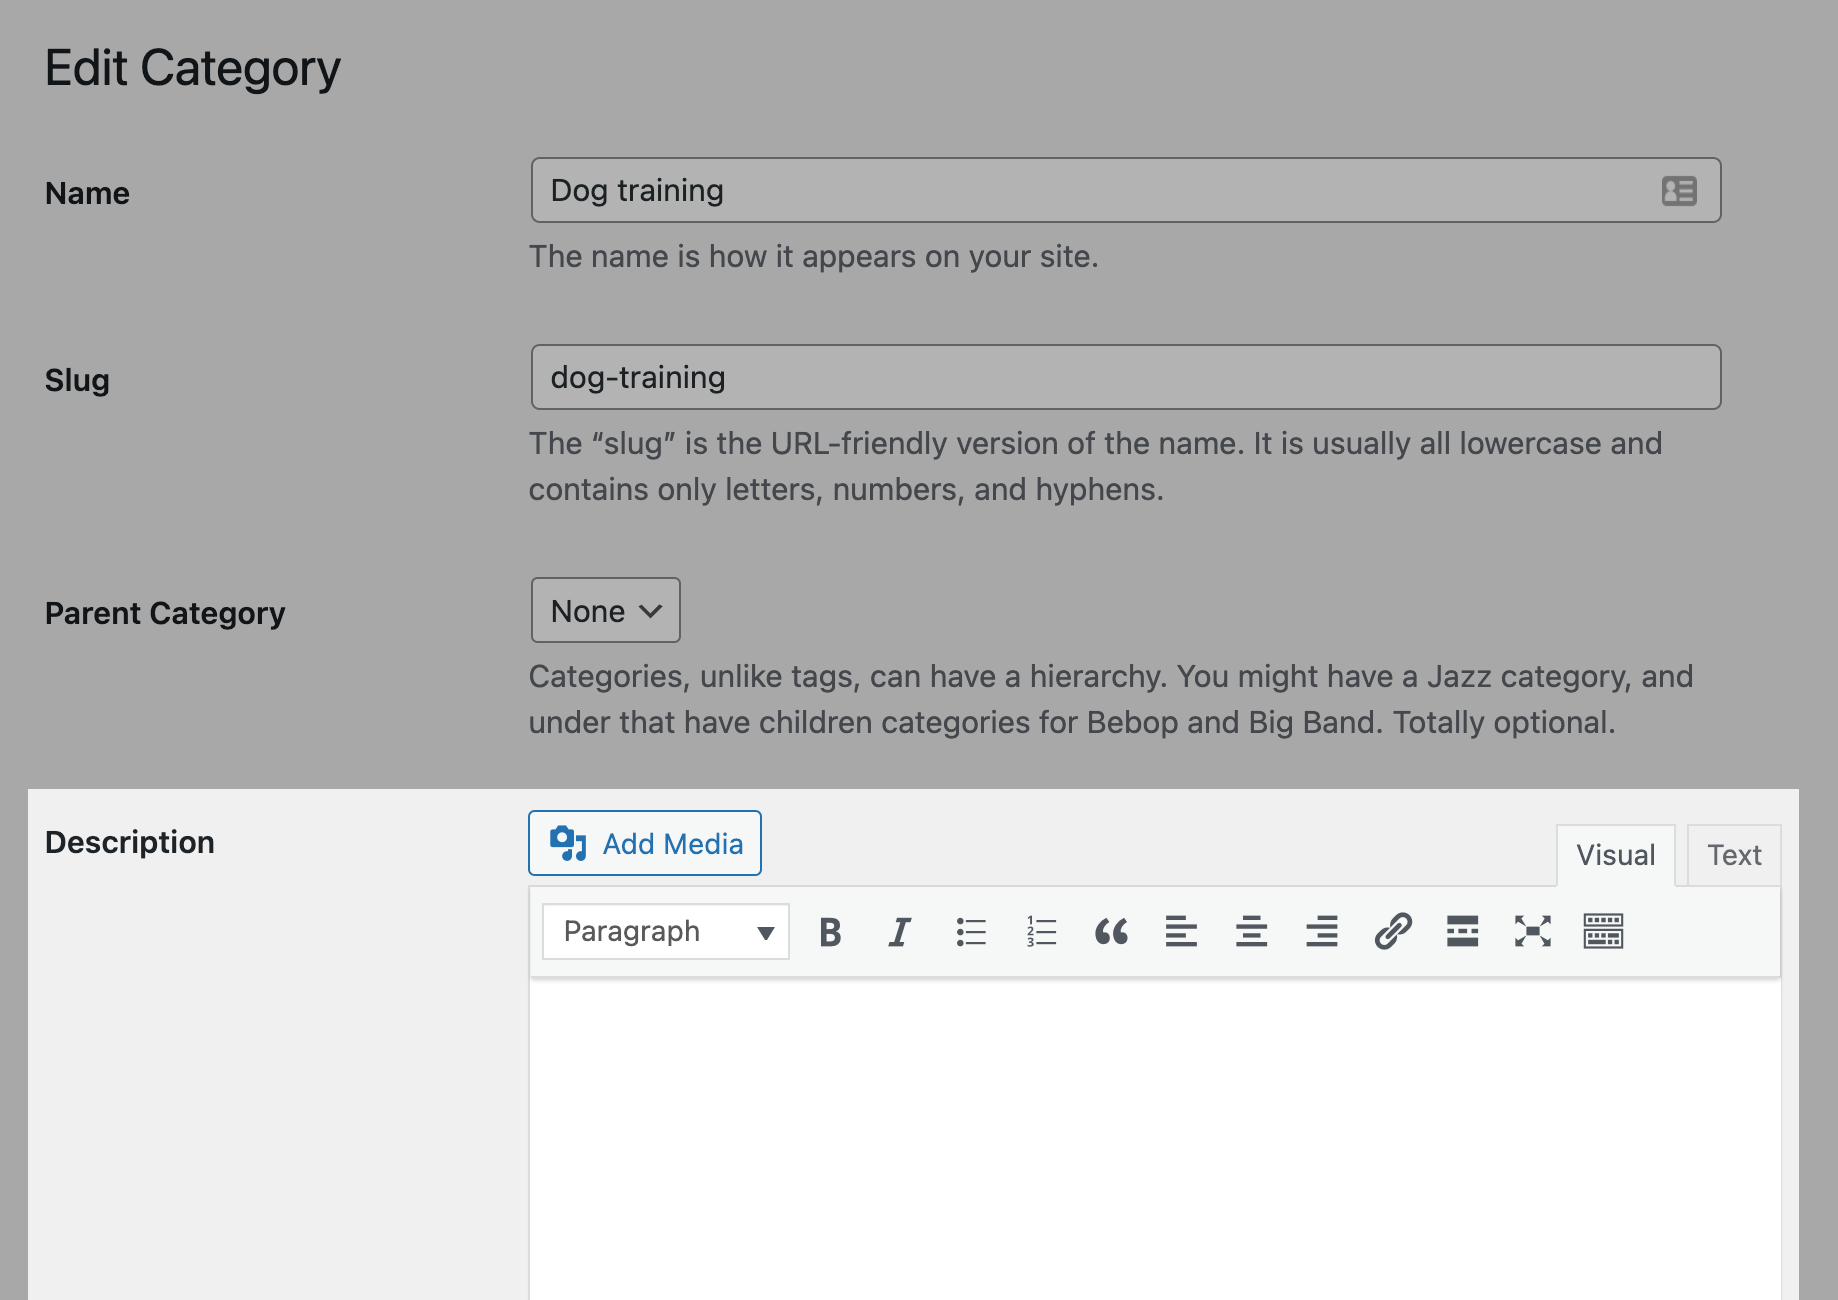
Then, describe your category in a couple of sentences in the “Description” field:
As we mentioned earlier, category archive pages can create great content hubs (serving as “topic gateways” for various topics on your blog).
That’s why you may want them to be indexed and appear in the SERPs (search engine results pages).
To have good-looking snippets in the search results, you should optimize the title tags and meta descriptions of your category pages.
Here’s an example of a well-optimized SERP snippet of a category page:

We’ll cover title tag and meta description optimization best practices in Steps 19 and 20.
14. Enable Breadcrumbs
A breadcrumb is a text path, often located at the top of a page, that indicates the position of the page within the site structure.
It looks like this:

The main reason to use breadcrumbs is that they help visitors navigate your website.
Secondly, they can appear in search results and enrich your SERP snippets:

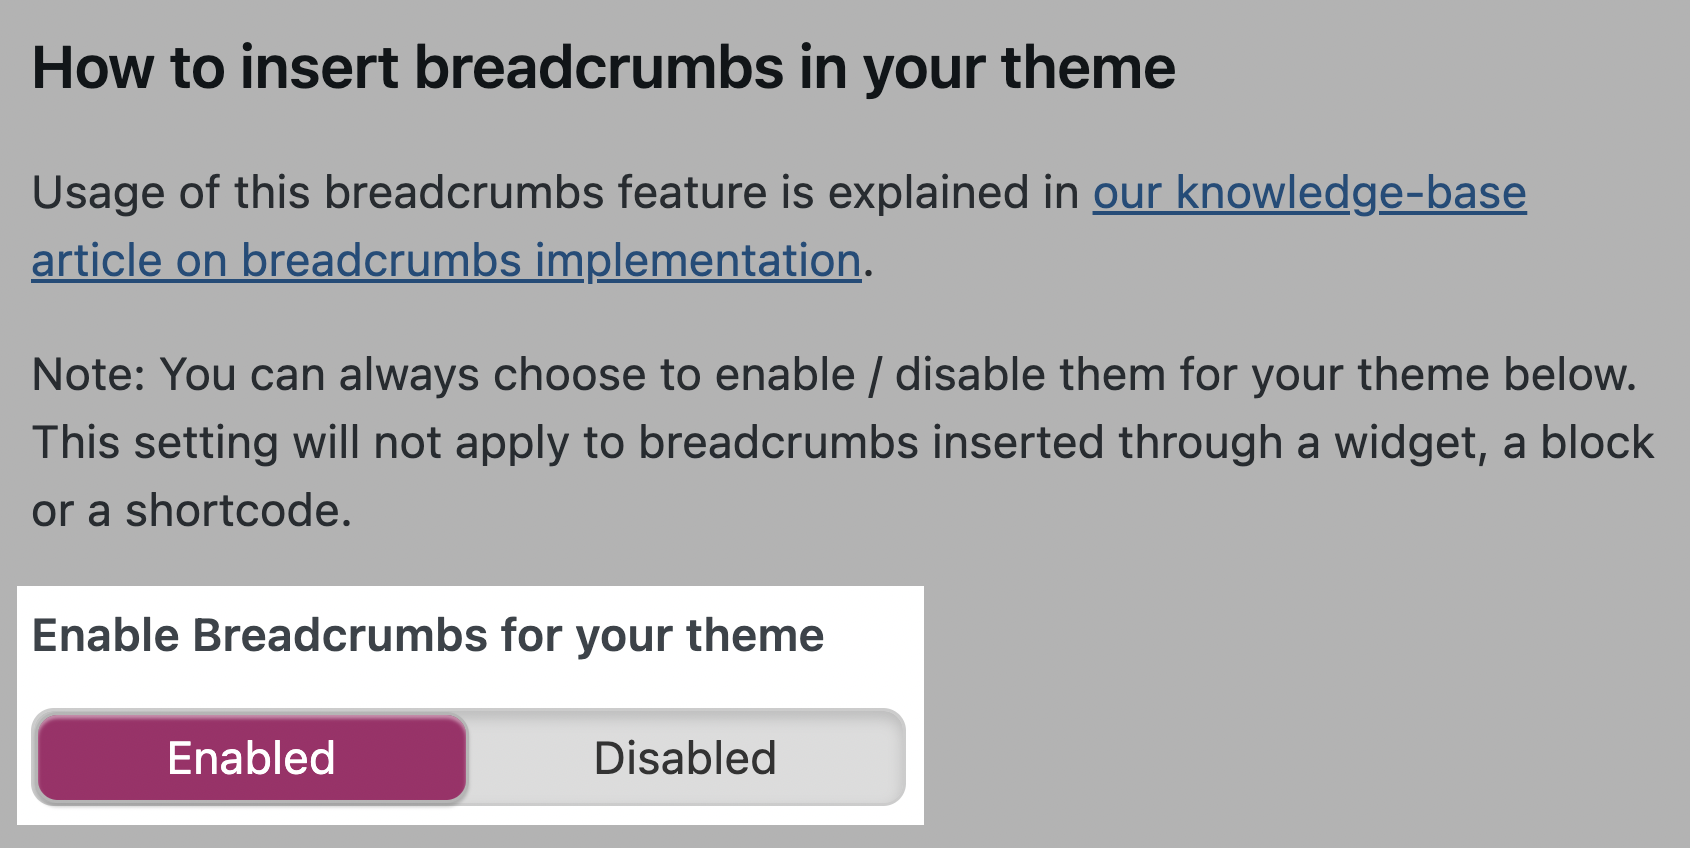
The easiest way to enable breadcrumbs on WordPress is to use Yoast SEO. Under “Search Appearance,” click on “Breadcrumbs.” On the next page, click “Enabled.”
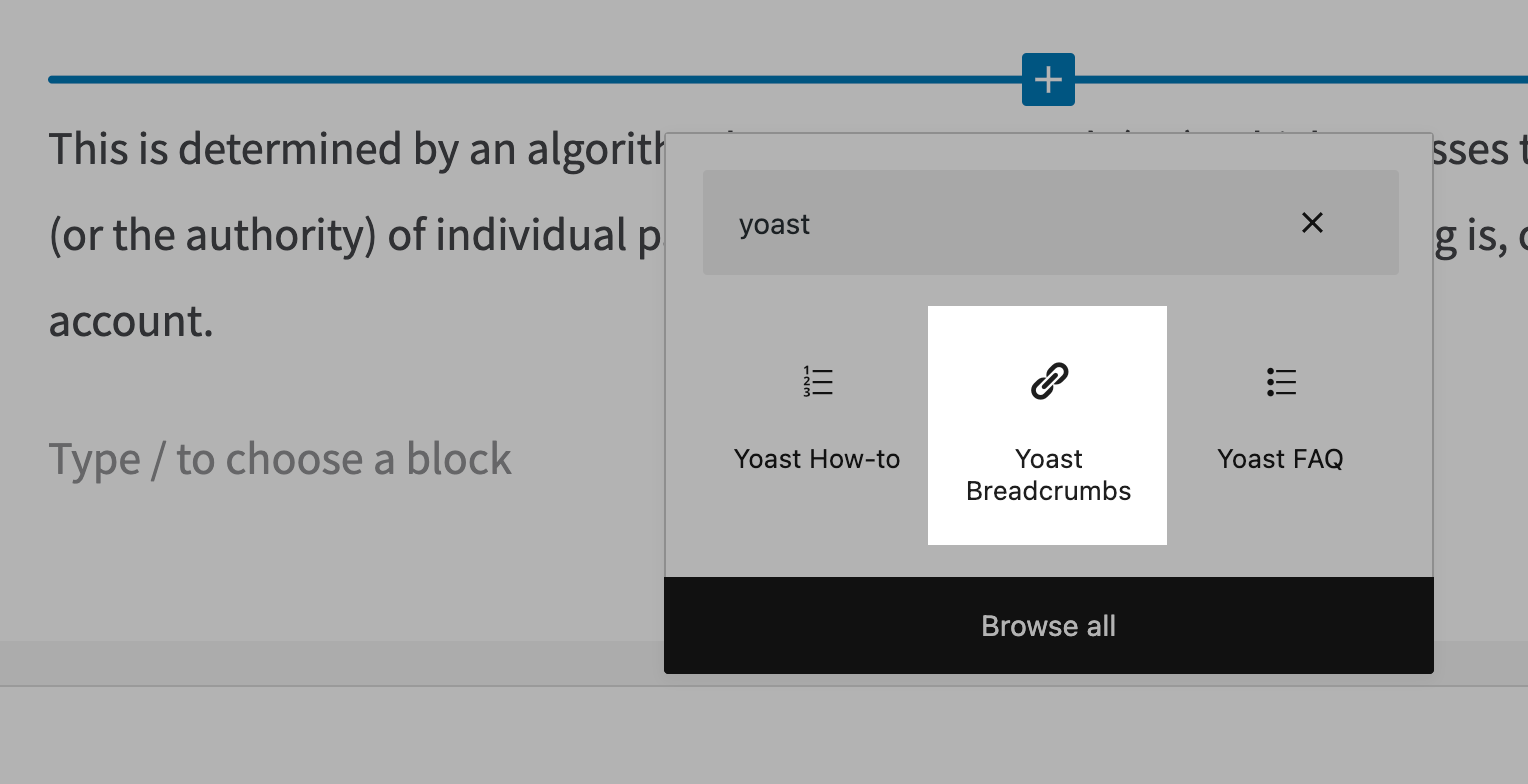
If you’re using Yoast with the standard WordPress Gutenberg editor, you can simply add a new block called “Yoast Breadcrumbs” to show breadcrumbs in your post:
Note: Breadcrumbs are a type of schema markup. We will talk more about schema in Step 23.
To learn more about this subject, check out our detailed guide to breadcrumbs.
15. Do Keyword Research
One of the most essential WordPress SEO tasks is to find the keywords your audience types into Google so you can target them and get relevant traffic.
This process is called keyword research.
Finding Keywords
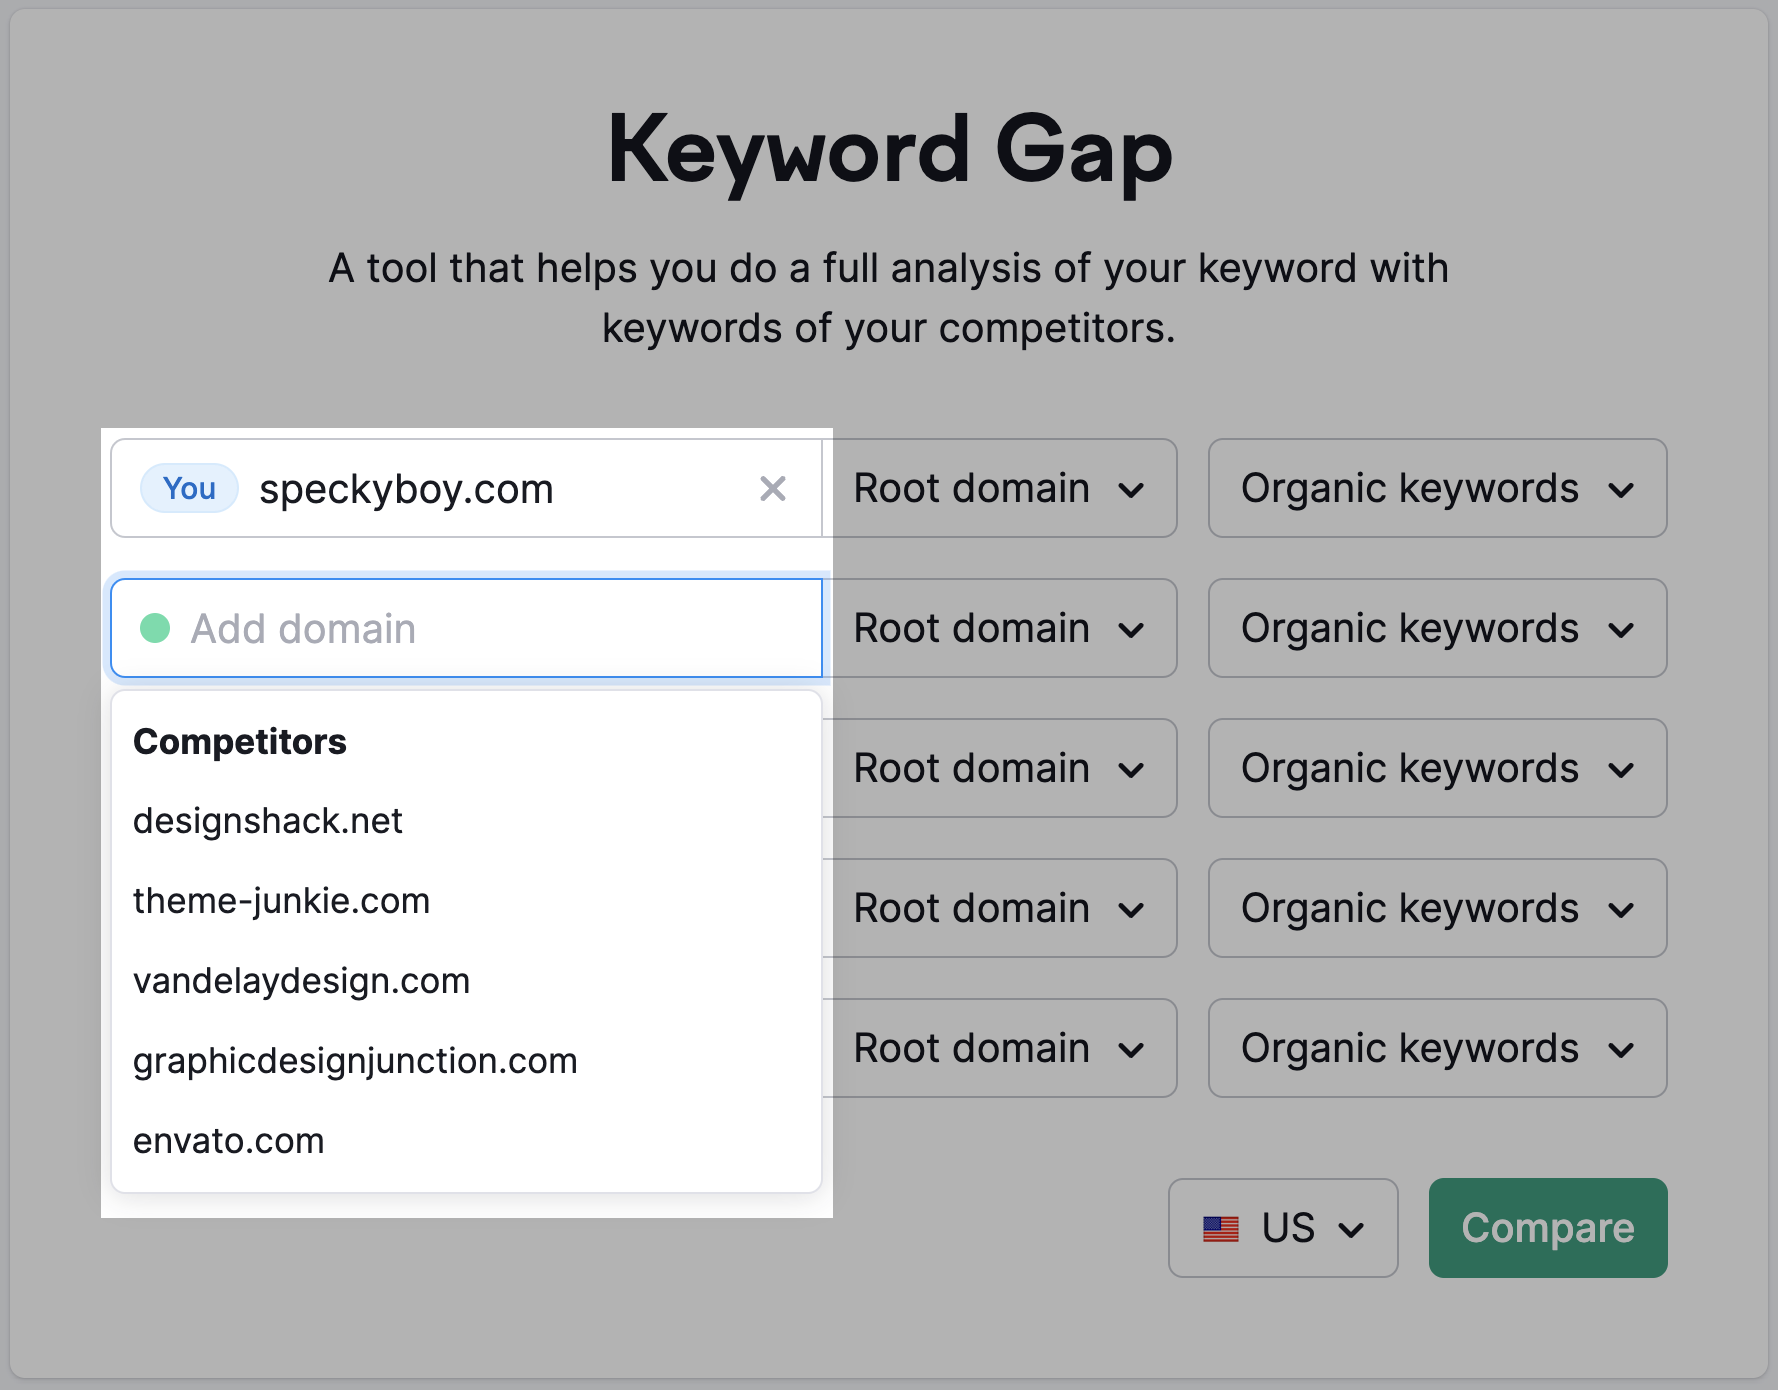
The easiest way to find relevant keywords is to look at what your competitors rank for. In Semrush, there’s a dedicated tool for this. It’s called Keyword Gap.
Let’s say you run a web design agency and you’re looking for topic ideas for your blog.
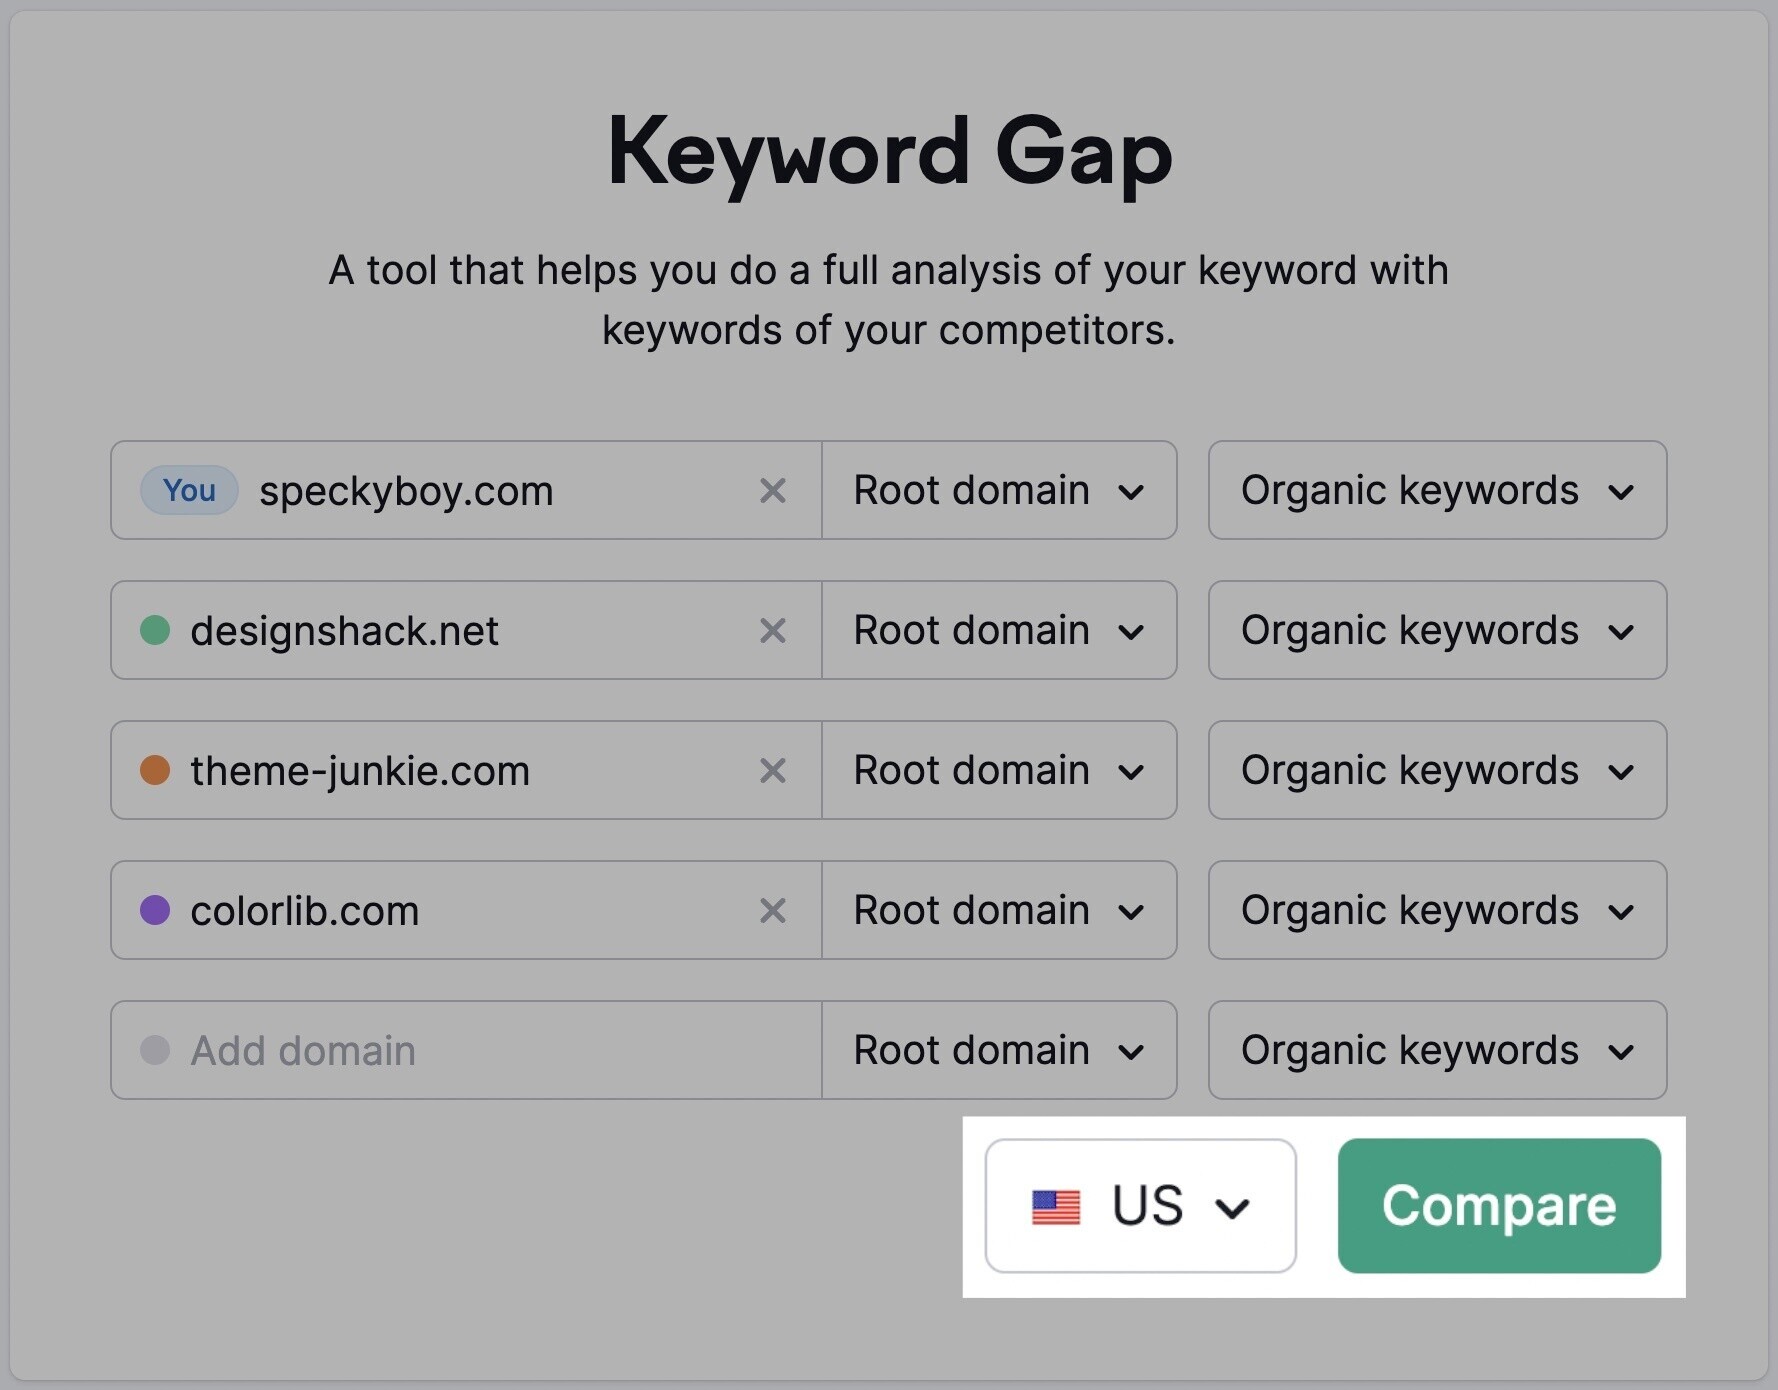
All you need to do is to enter your domain and up to four domains of your competitors. (The tool will suggest some, or you can type them in manually.)
Next, select your target location and hit “Compare.”
Then, just look at the keyword list and focus on these two tabs:
- Missing: Keywords all of your competitors rank for but you don’t
- Weak: Keywords all of your competitors rank for higher than you
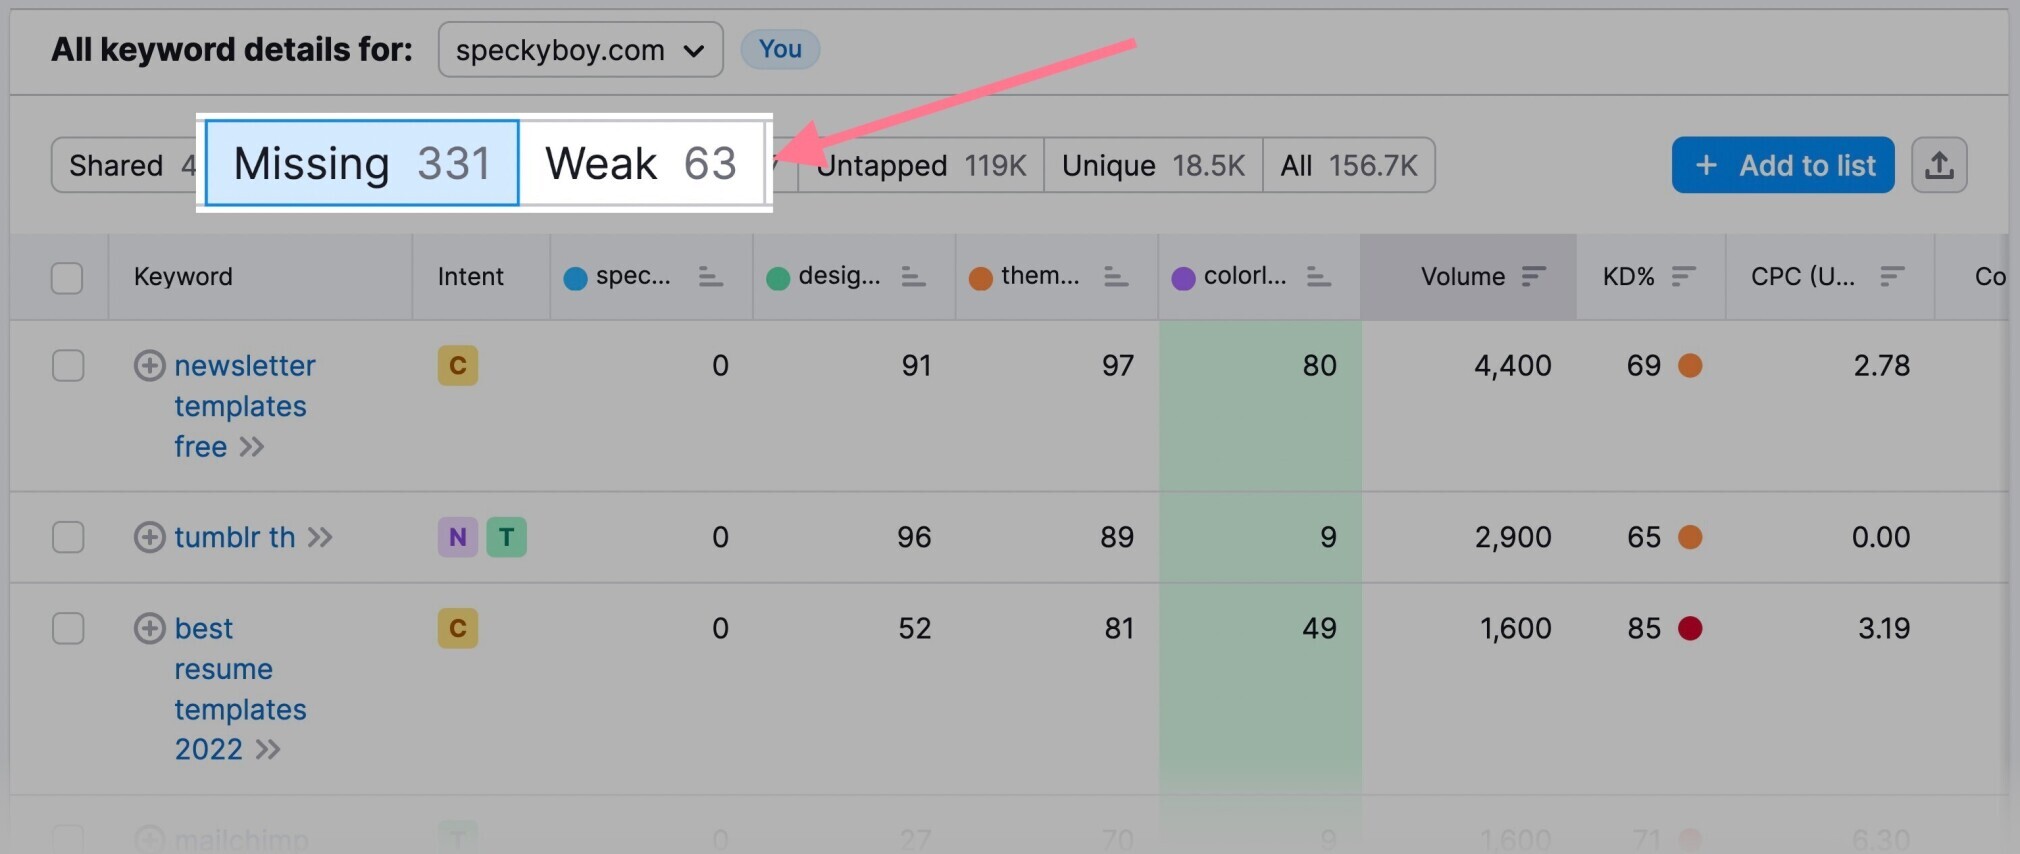
All of these are relevant keywords your competitors use and/or rank for. You could target those keywords with your content.
Go through the list and get some inspiration.
Tip: Another simple way to find more keywords is to enter any bigger keyword from your niche—also called “seed keyword”—and see terms related to it. In Semrush, there’s a dedicated tool for this called the Keyword Magic tool.
Choosing Keywords
Now that you’ve found the keywords, you’ll need to take a closer look at their metrics to choose the target keywords—keywords that will best represent your respective pages or posts.
To choose target keywords, you’ll need to take a closer look at their metrics. Namely:
- Search volume: How often do people search for the keyword?
- Keyword difficulty (KD): How hard is it to rank for the keyword?
- Search intent: What kind of content do people expect when using the keyword in their search?
In both Keyword Gap and Keyword Magic, you can see all these metrics in a table that allows you to prioritize and filter your keywords easily.
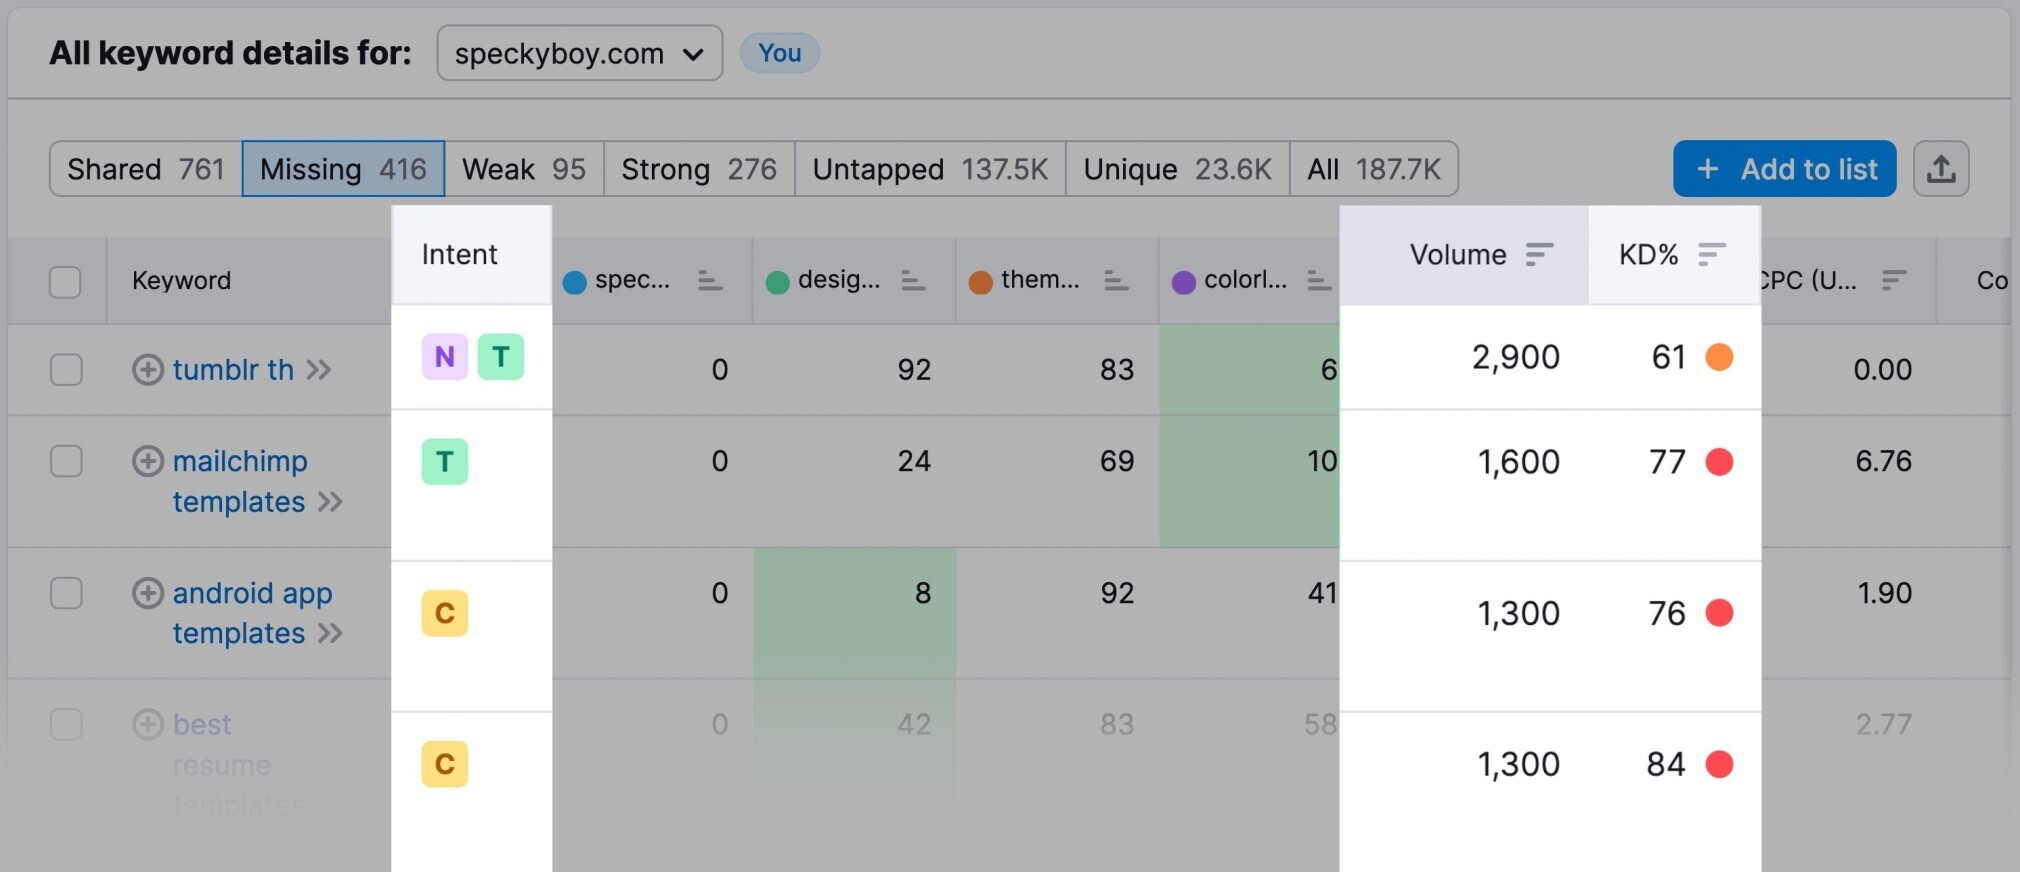
Once you find your ideal target keyword for a page or post, optimize the content for that target keyword.
That doesn’t mean stuffing the keyword everywhere.
Instead, include the target keyword (or its variants) in some of the key elements of the page. Such as:
- Headers
- Title tag
- Body
- Inbound internal links
Tip: To learn how to use Semrush for keyword research in more detail, take a look at this guide.
16. Create Great Content (Duh!)
Quality content is a general SEO requirement (not connected only to WordPress SEO). But it’s so essential that we can’t omit it in this guide.
Let’s dive in …
Nailing Search Intent
Nailing search intent means making sure your page provides exactly what a user is looking for.
A great way to start is to analyze the SERP of your target keyword.
You can use Semrush’s Keyword Overview tool to see a SERP from any country location and get some useful metrics:
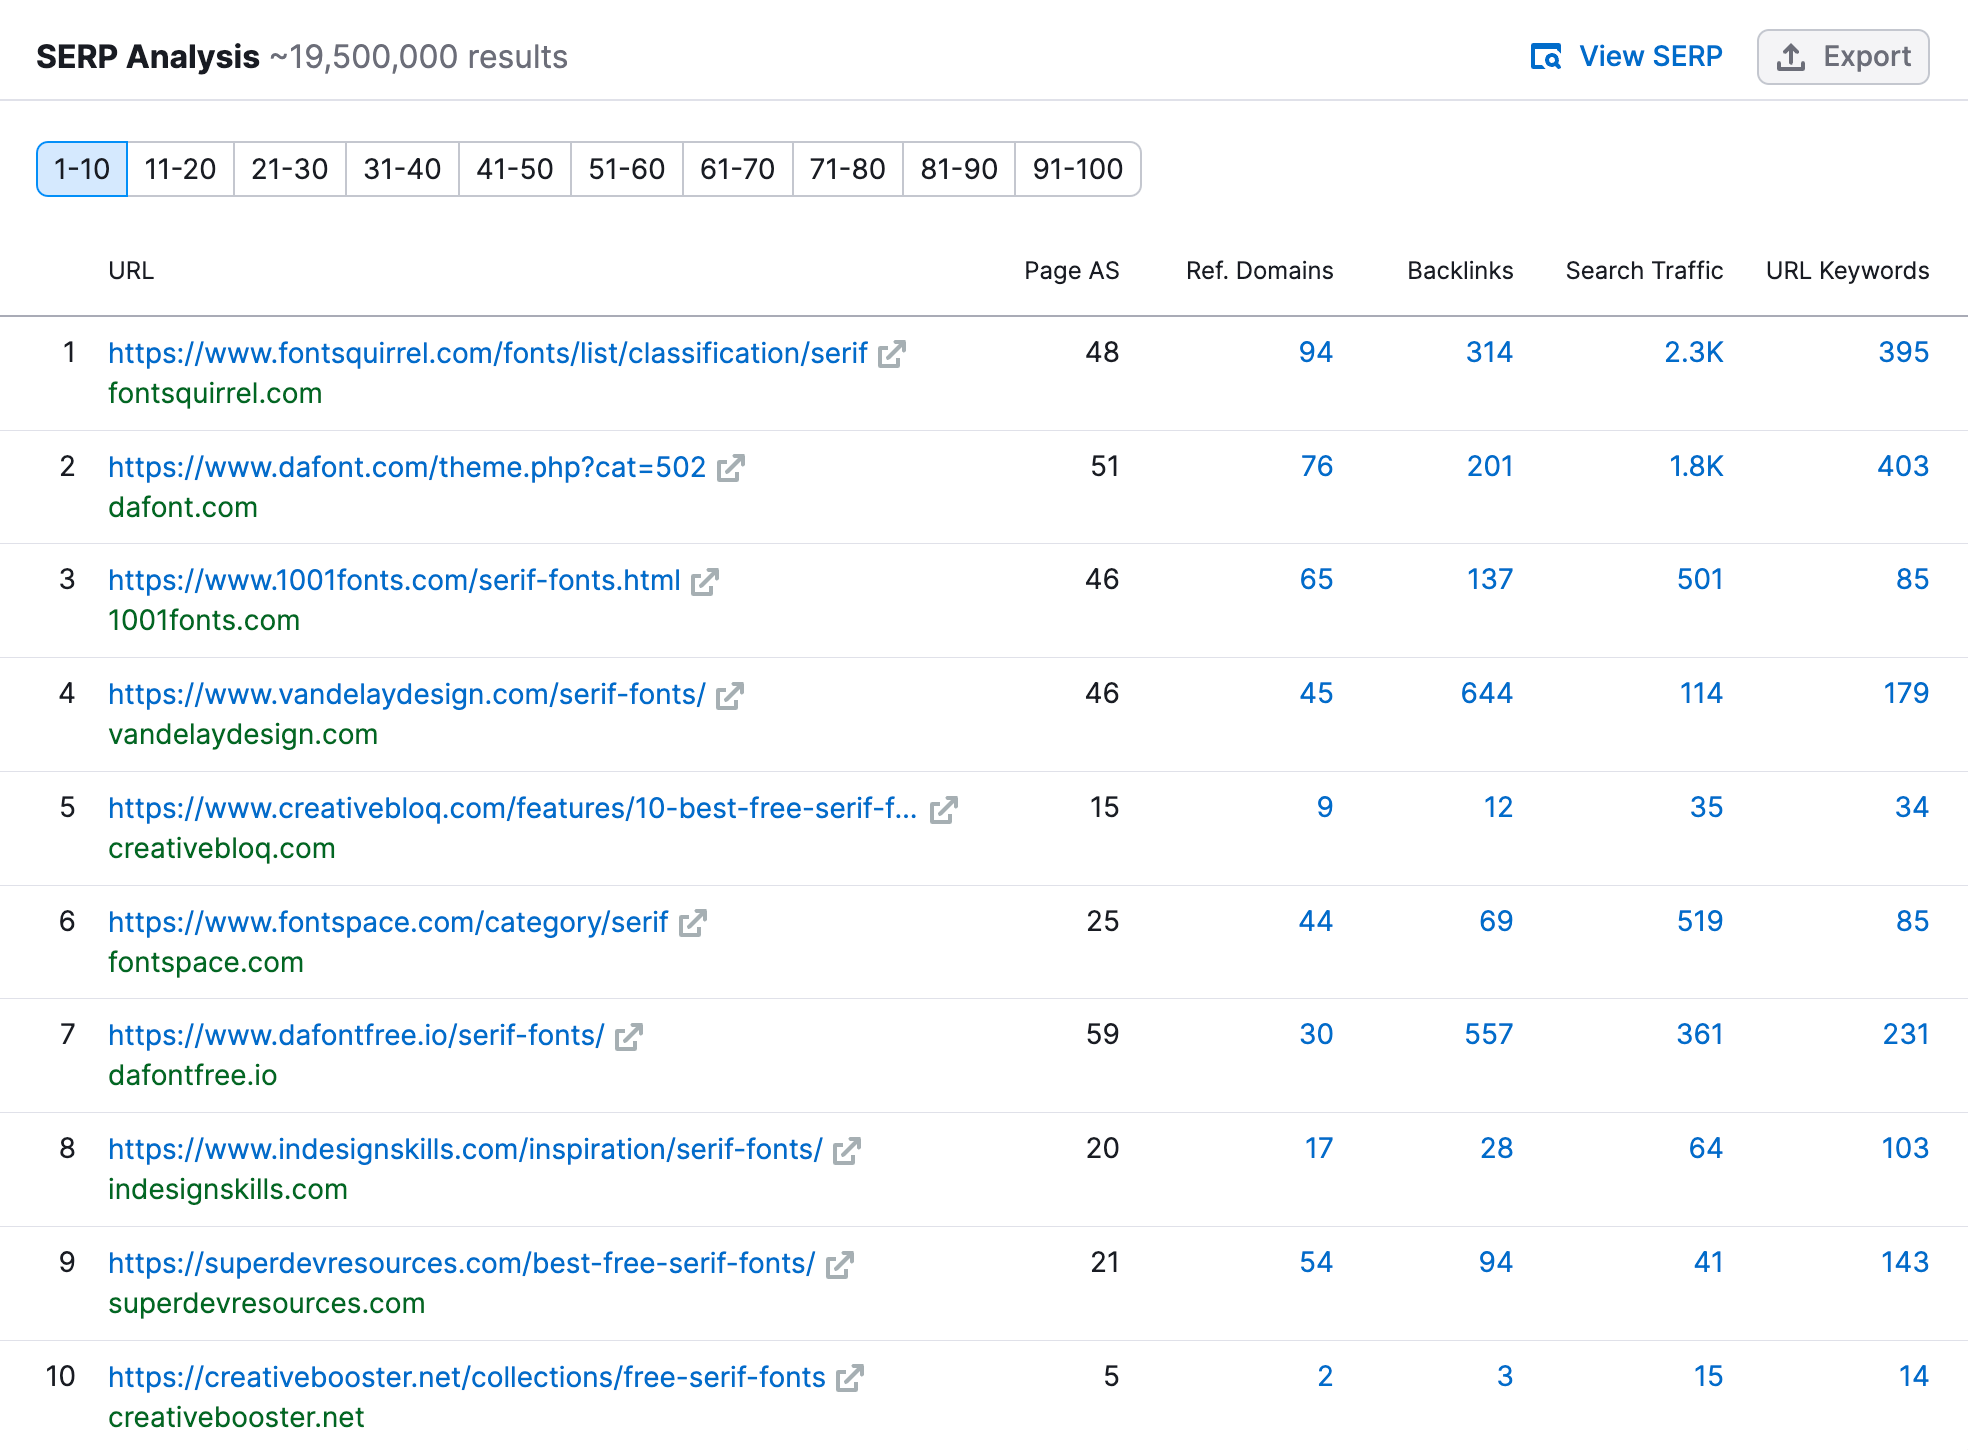
Just go through the results and take a closer look at the top pages.
The SERP analysis will help you to nail search intent by:
- Picking the right type of content: You’ll see what type of content ranks for the keyword (e.g., landing pages, reviews, informational posts, etc.) so you can also target it with the right type of content
- Understanding the topic better: You’ll see many of the questions a user might have so you can answer them in your content
- Analyzing your competitors: You’ll be able to see what pages rank for the keyword so that you can get inspiration from them
- Finding opportunities to provide added value: Seeing what your competitors have published can help you come up with ways to stand out from them(by providing a unique angle, data, examples, media, etc.)
Providing Reliable Information
E-A-T (Expertise, Authoritativeness, and Trustworthiness) is an important SEO concept that is a part of how Google evaluates your website.
A huge part of demonstrating good E-A-T is connected to having high-quality backlinks.
But many on-page best practices will help you with that, too.
Namely:
- Writing about things within your field of expertise
- Providing information about your authors and their expertise
- Being factually accurate and comprehensive
- Backing up your claims with stats and other reliable data
- Providing transparent information about your website (About page, Contact page)
This is not a complete list but you get the idea: Be an online resource that you, yourself, would trust.
Optimizing for Readers
Many people focus too much on optimizing content for search engines and forget about their readers. These two goals are not exclusive. By improving the user experience, you’ll also improve your SEO. And vice versa.
Semrush has a handy WordPress plugin called SEO Writing Assistant that will help you improve your text on the go. (It is also available in Semrush’s interface and as a Google Docs and Microsoft Office add-on.)
To install it, go to “Plugins” in your WordPress control panel. Then, click “Add New” and look for “Semrush SEO Writing Assistant.” Then click “Install Now”and “Activate.”
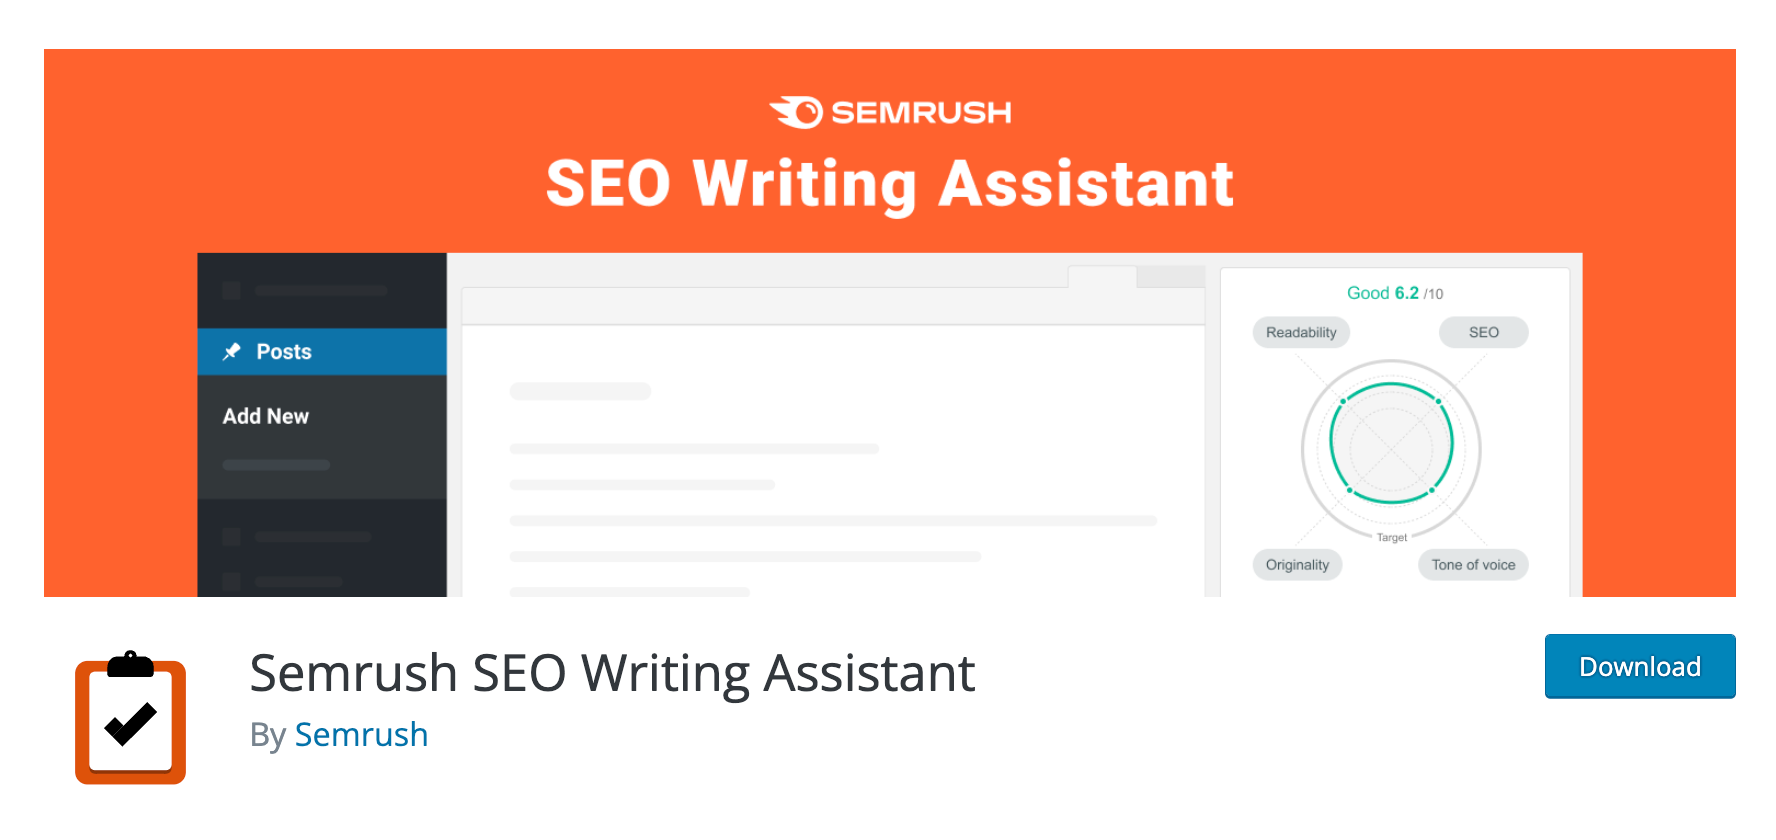
The assistant will appear at the bottom of any post or page editor and provide a detailed analysis in four areas:
- Readability
- SEO
- Originality
- Tone of voice
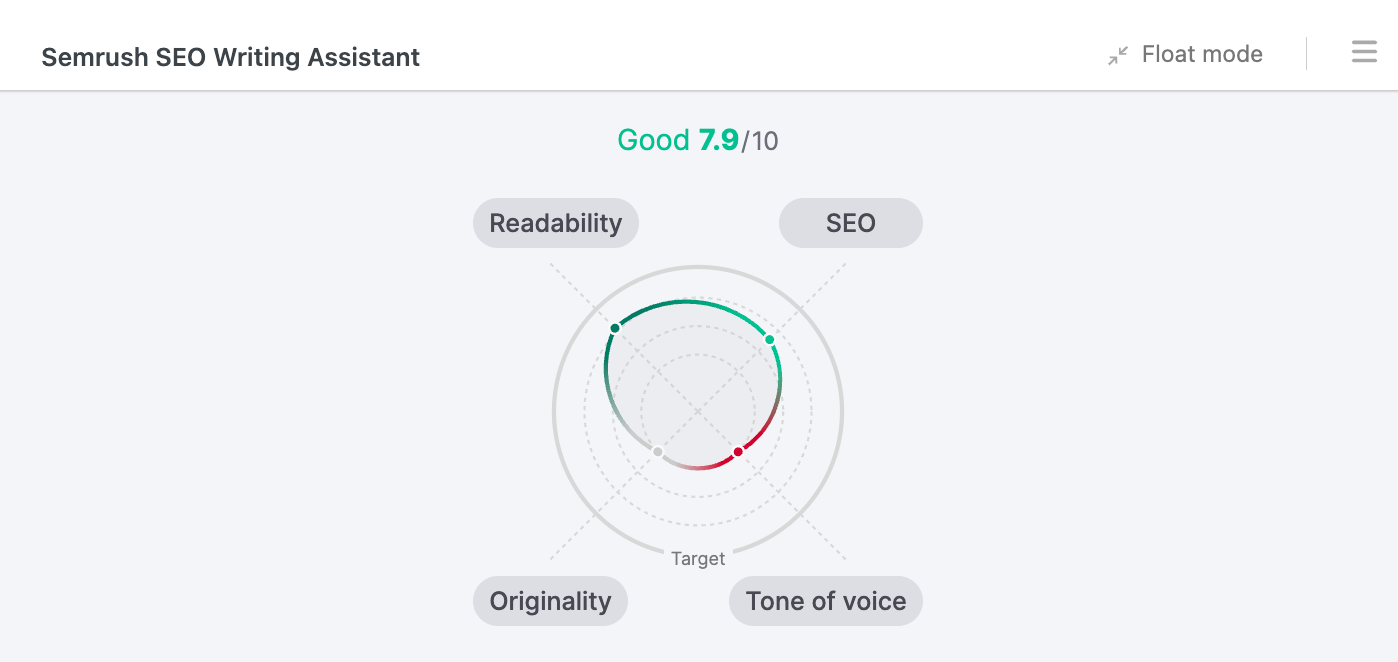
Tip: You can use the “Float mode” to be able to see the assistant in a sidebar view.
When it comes tothe SEO section, the tool focuses on keyword optimization. Itwill check whether you’ve used your target keyword in the page’s title and content.
And it will recommend some other keywords you could use on the page.
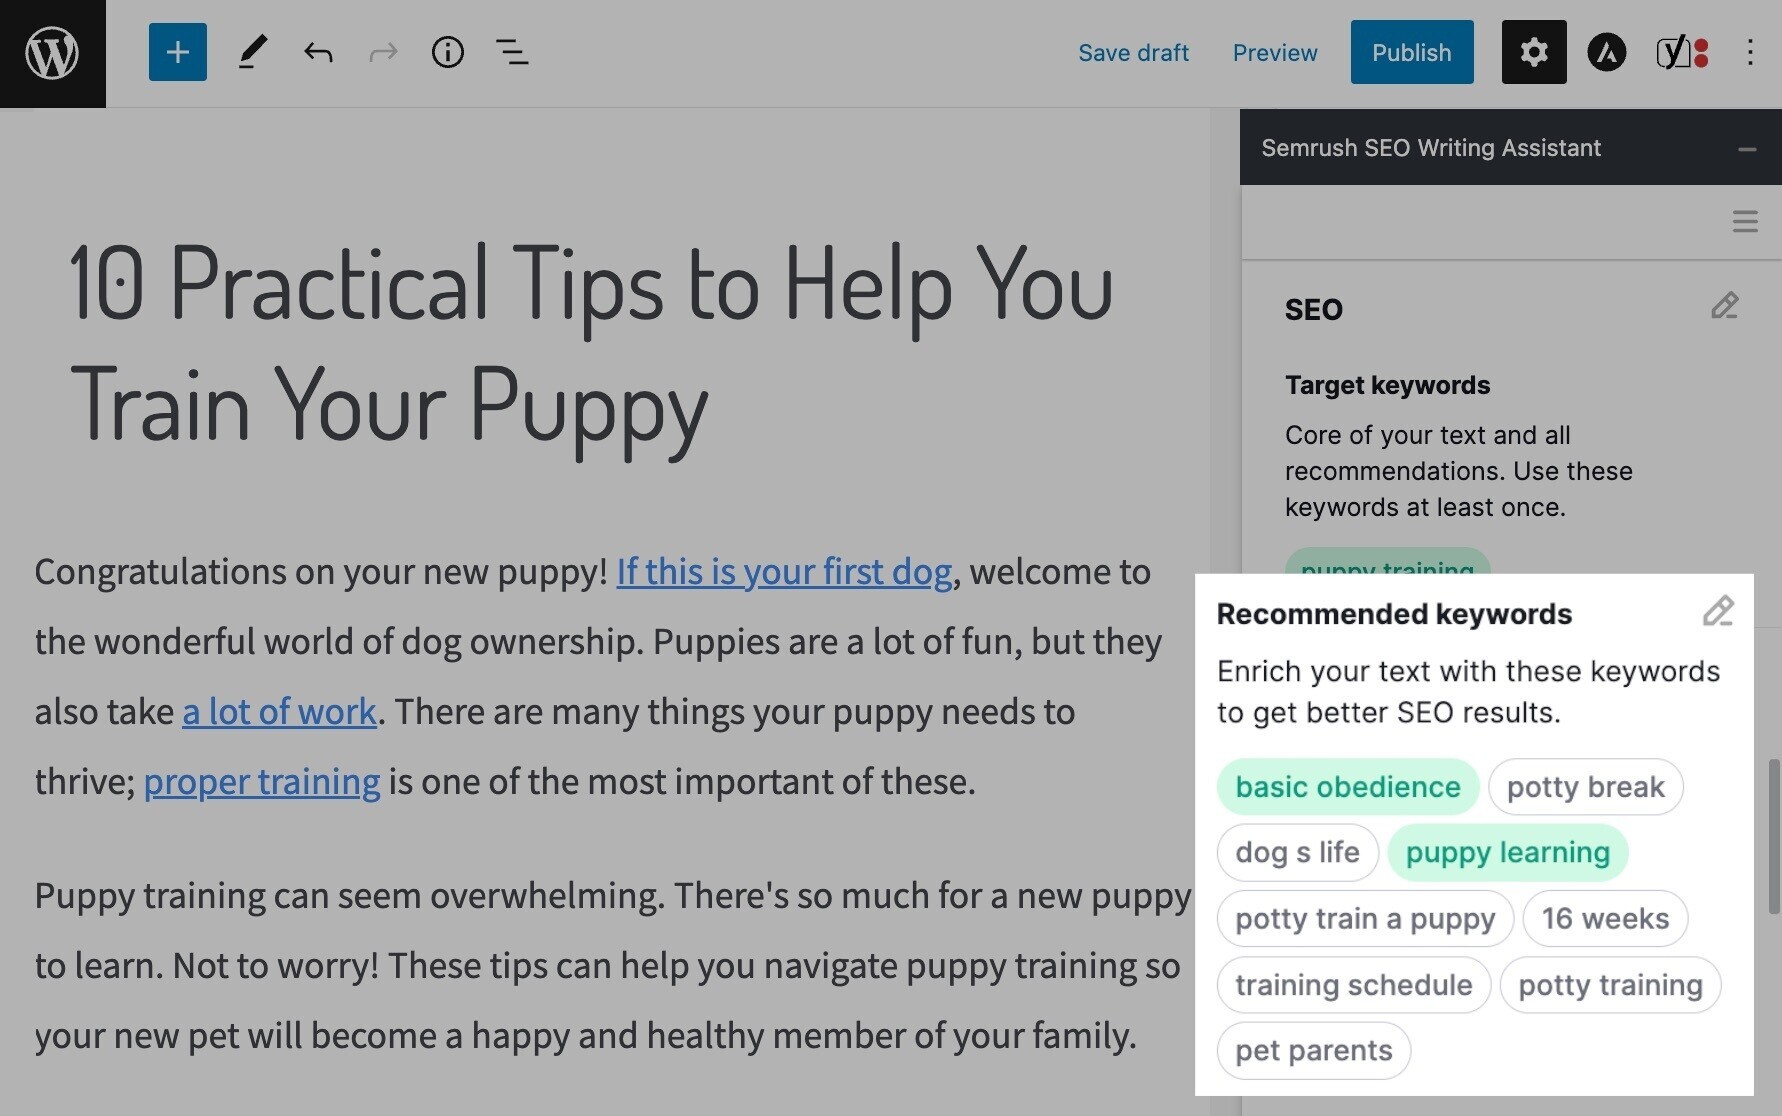
The recommendations are based on the keywords from the top-ranking pages. They can serve as a great overview of various subtopics your competitors cover.
Take these keyword recommendations as useful insights into what your competitors covered—not something you need to include at all costs.
(If you try too hard to include every recommendation, your content could sound a little unnatural and keyword-stuffed.)
When it comes to readability, the plugin will suggest the optimal difficulty level (based on the average readability level of the top-ranking pages) and score your text.
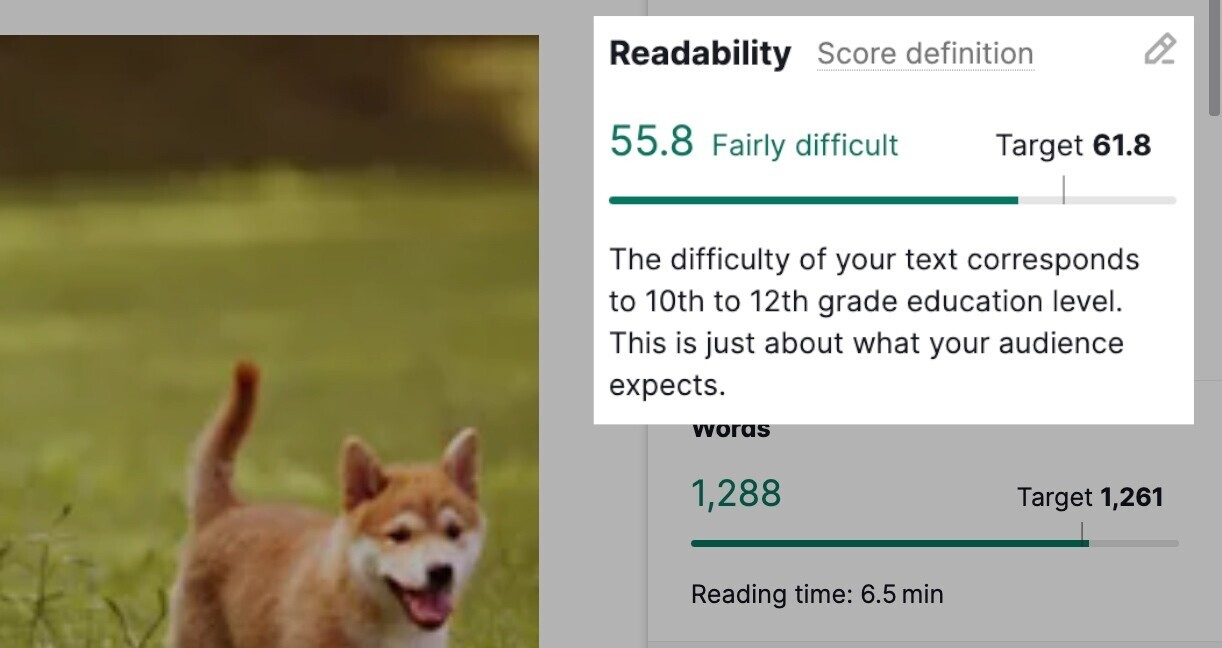
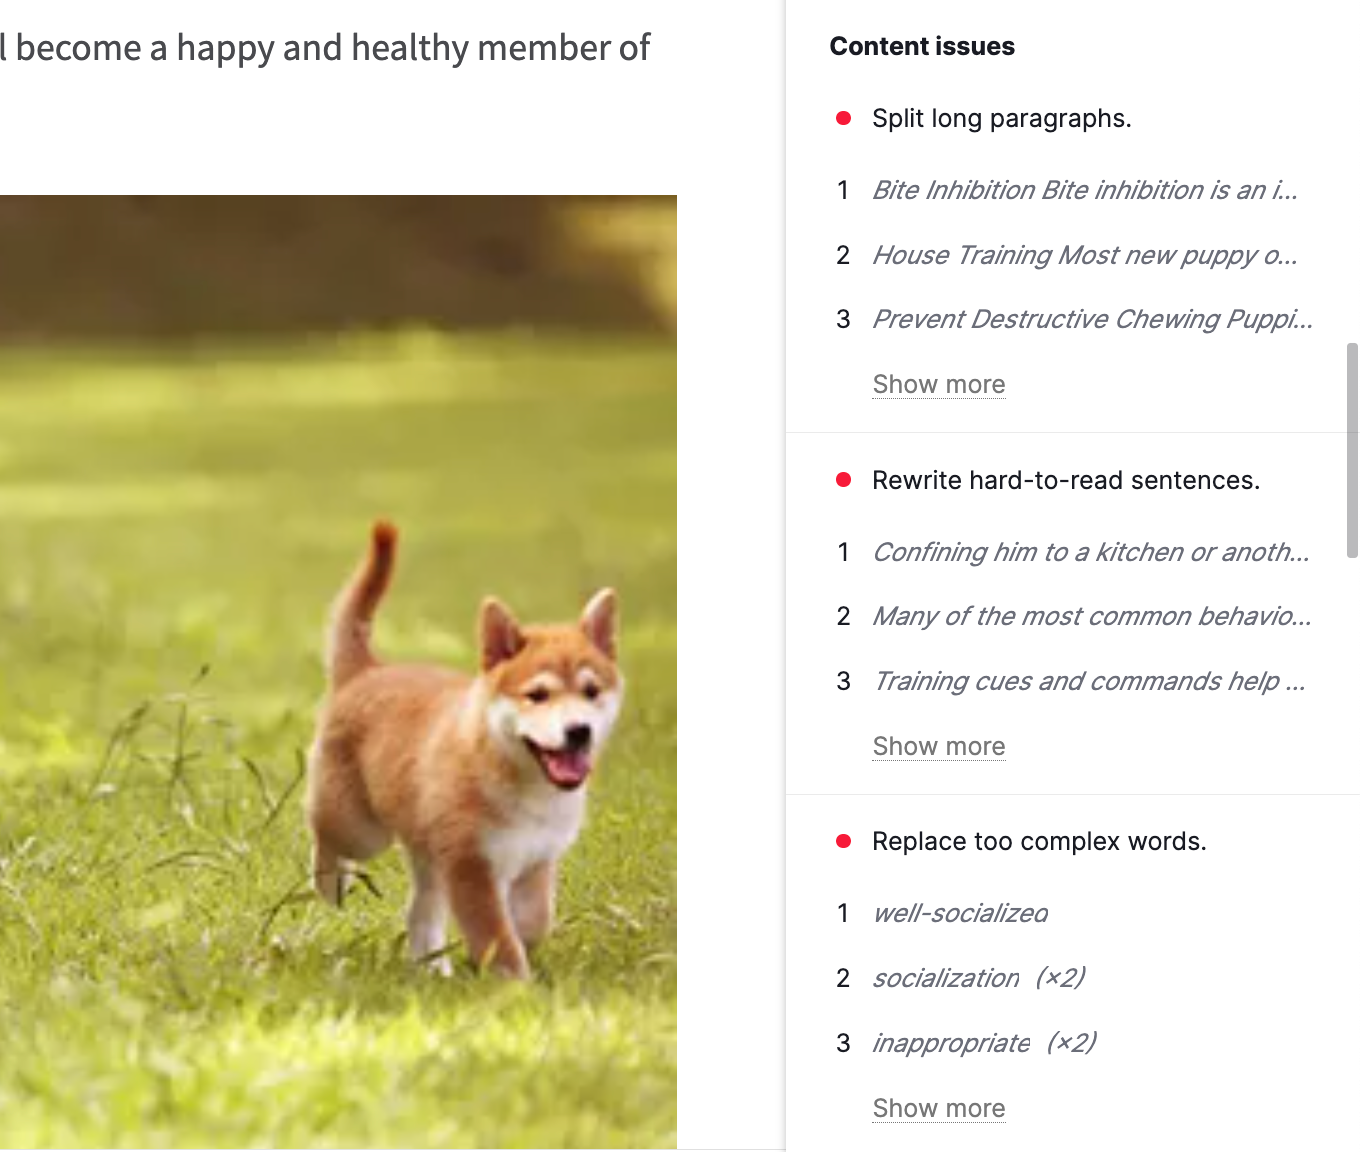
If the readability score is too low, the tool will prompt you to fix long paragraphs, hard-to-read sentences, and complex words:
The tool also lets you pick your target tone of voice.
Based on your choice, it will analyze the text and show tonal inconsistencies. You can then fix the text so it matches your target tone more clearly.
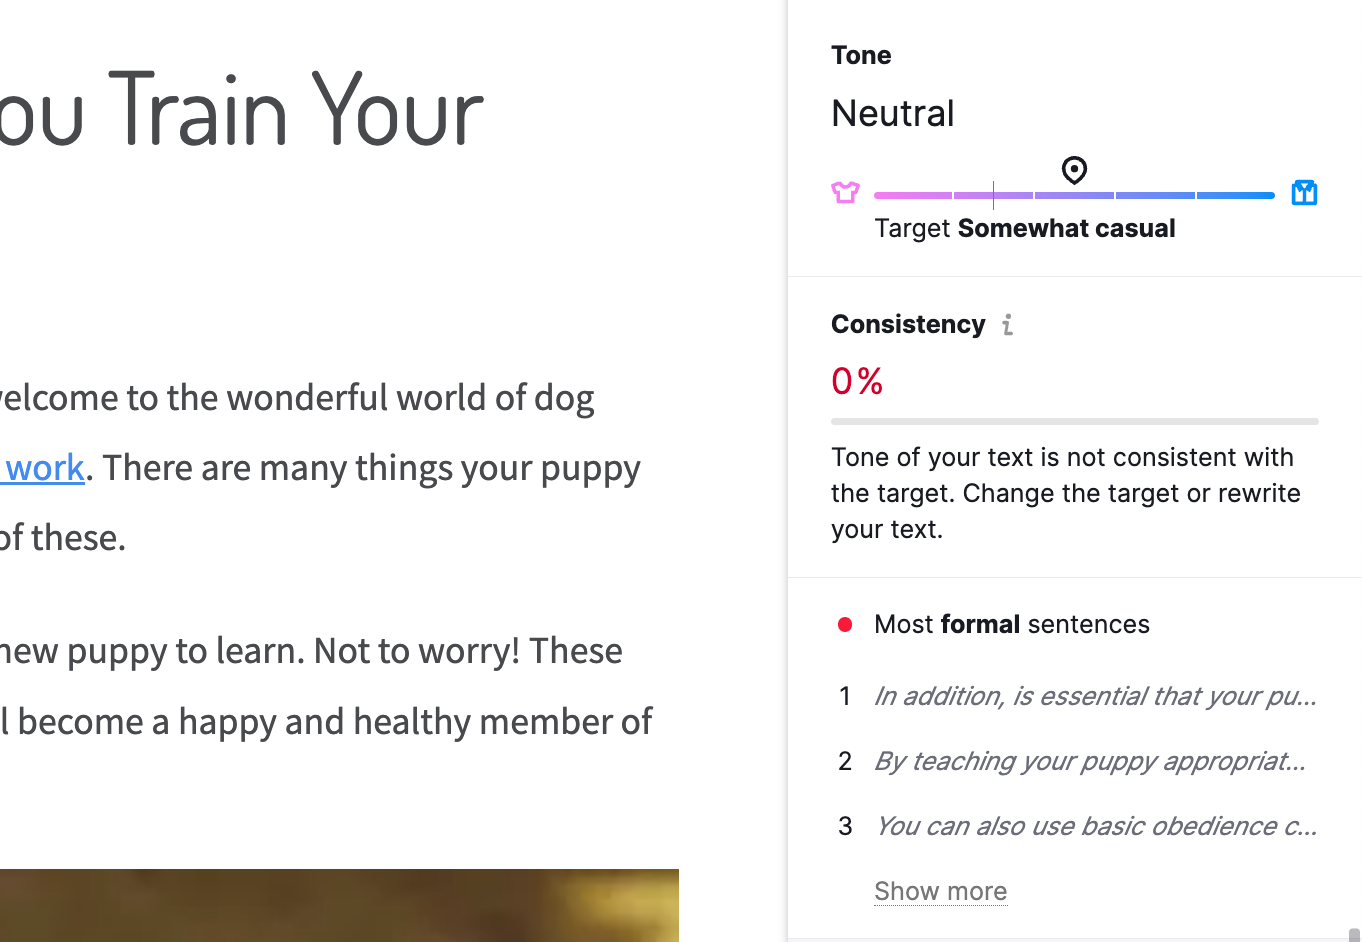
Finally, the tool can check the originality of your content.

Google explicitly says that authors should “avoid simply copying or rewriting (other) sources and instead provide substantial additional value and originality.”
Make sure your content is not just a copy of something else in slightly different words.
17. Write SEO-Friendly URLs
By default, WordPress uses your page’s titles to create URLs. As a result, the URLs on your site can become lengthy.
For example, a URL of a post about puppy training could look like this by default:
https://petblog.com/10-practical-puppy-training-tips-to-help-you-train-your-puppy
The problem with long URLs is that they’ll probably be truncated in search results. Which is not a great look:

To create a more SEO-friendly URL, scroll down to the “Permalink” section in the page/post editor and change the “URL Slug.”
In the case of the example above, a much better URL would be something like:
https://petblog.com/puppy-training-tips

Alternatively, you can change URLs in the Yoast SEO settings at the bottom of the editor. The plugin will also show a live snippet preview:
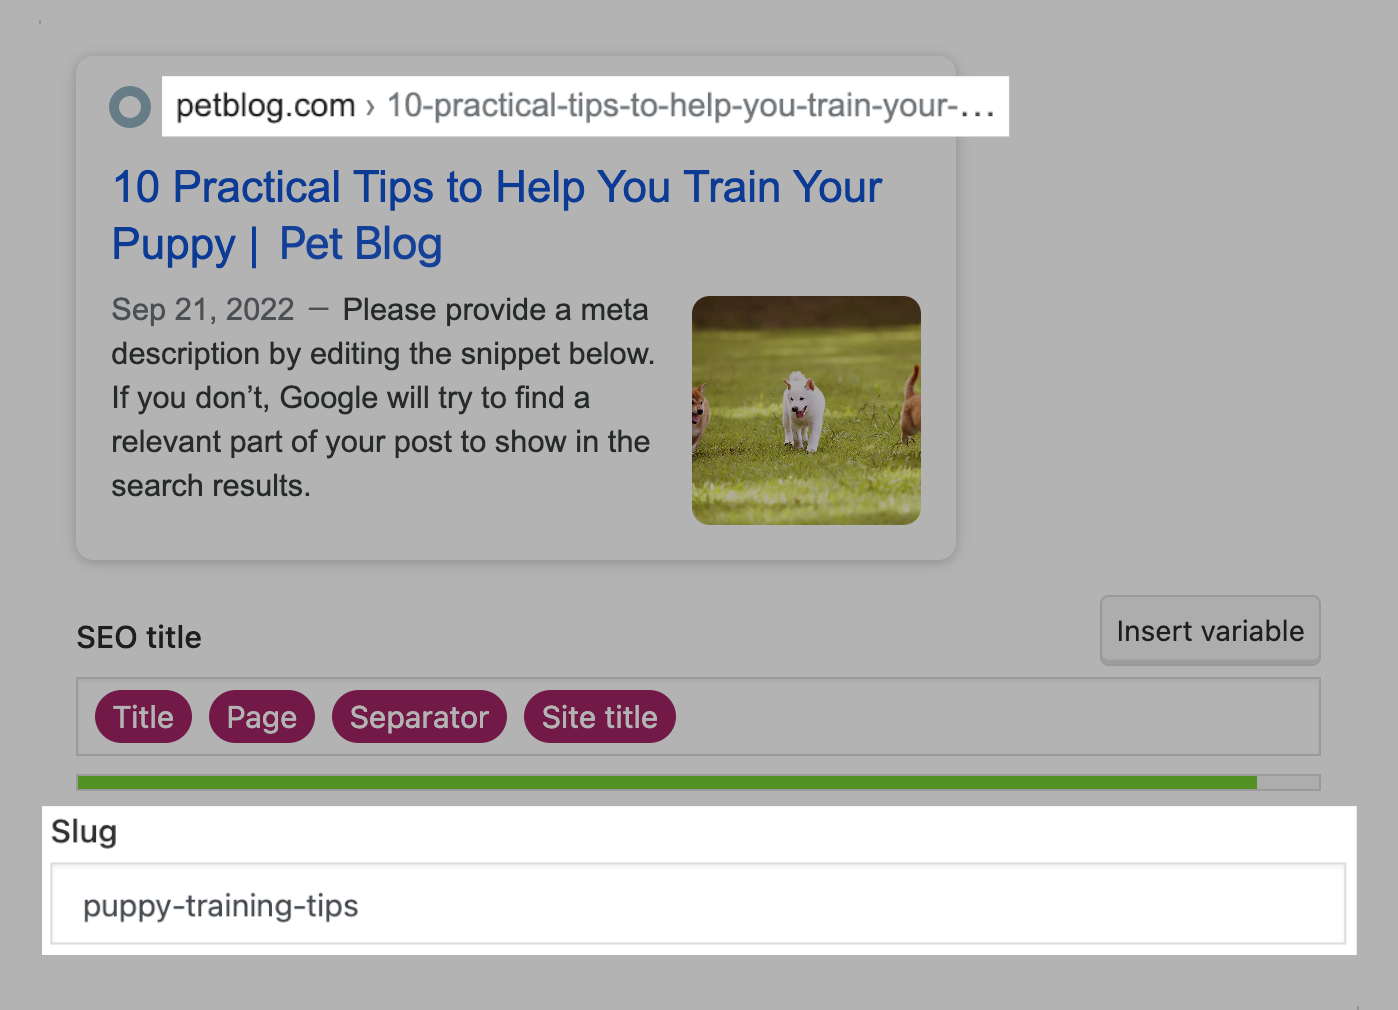
Here are some other tips for creating SEO-friendly URLs:
- Keep it short: It looks better, and it won’t be truncated in search results
- Include the target keyword: This helps users quickly figure out what the page is about, and it’s a minor ranking factor
- Don’t include numbers (unless you’re 100% sure they won’t change):If the number in the post (e.g., number of tips or the year) changes in the future, you would have a URL that is inconsistent with your content
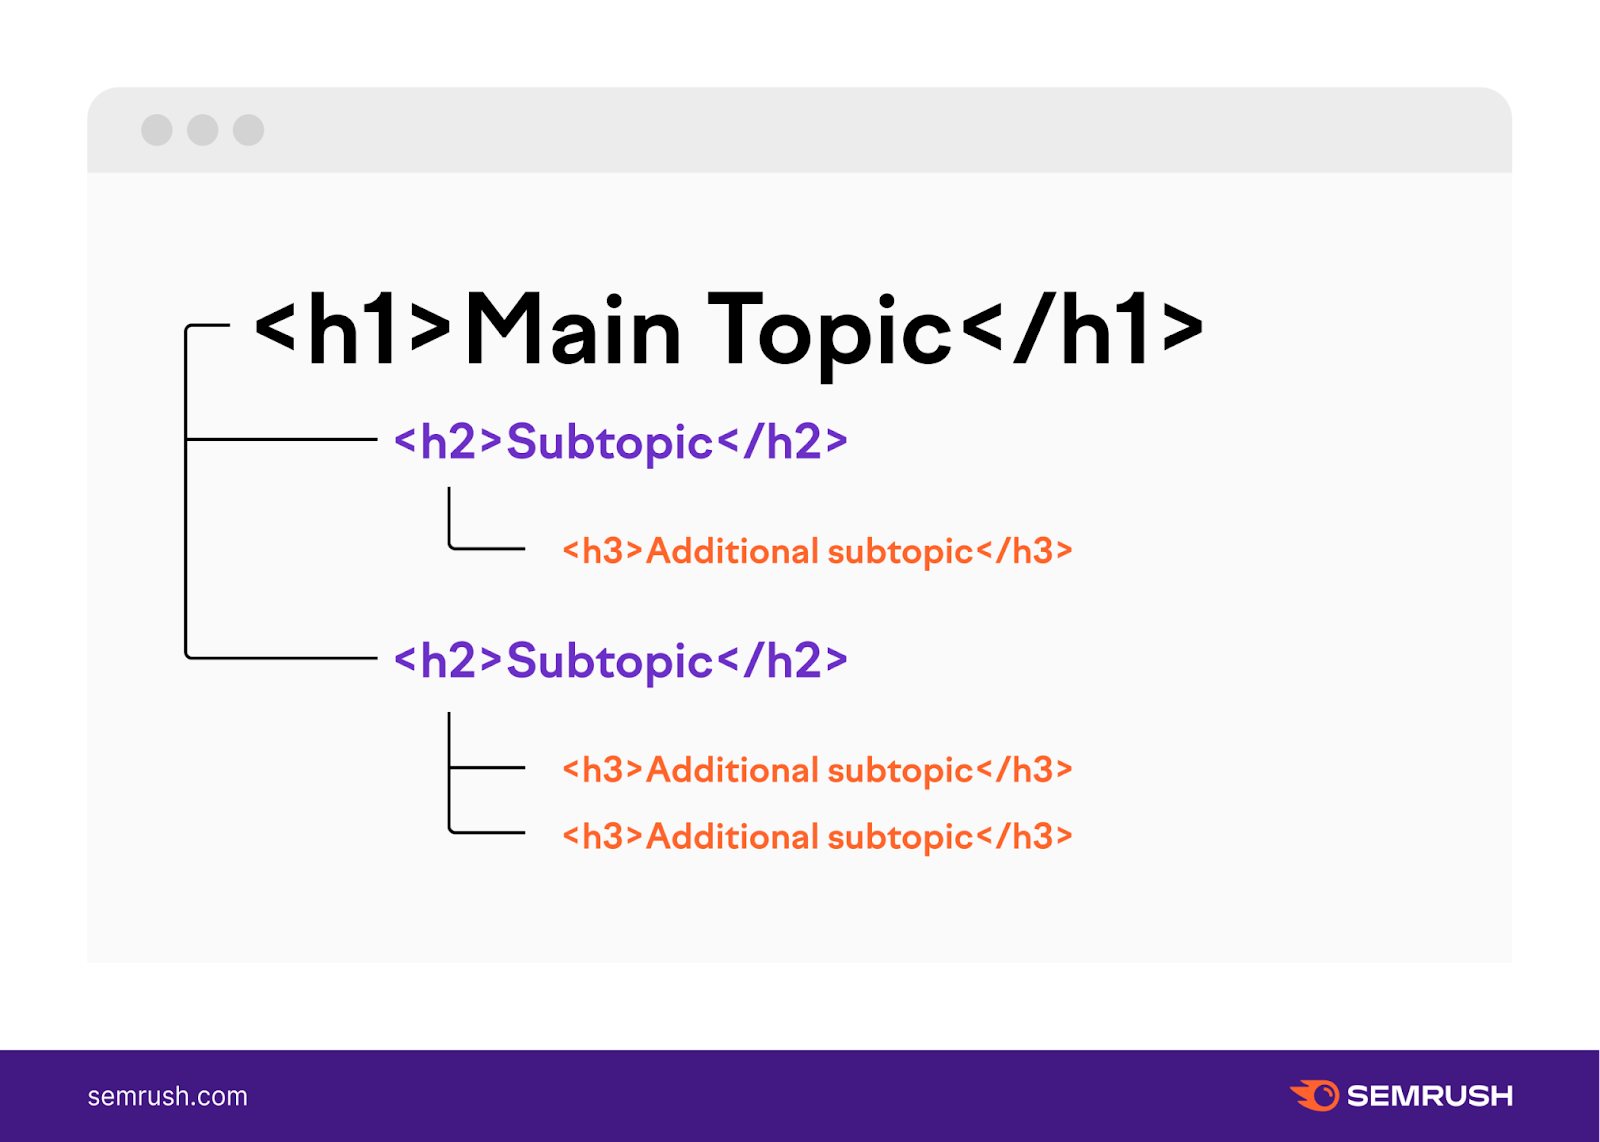
Headers are some of the most important elements in the structure of a single page:
- They create a clear hierarchy of the page’s content
- They communicate what the page is about
- They break up the text to make it easier to read
Here’s how they work:
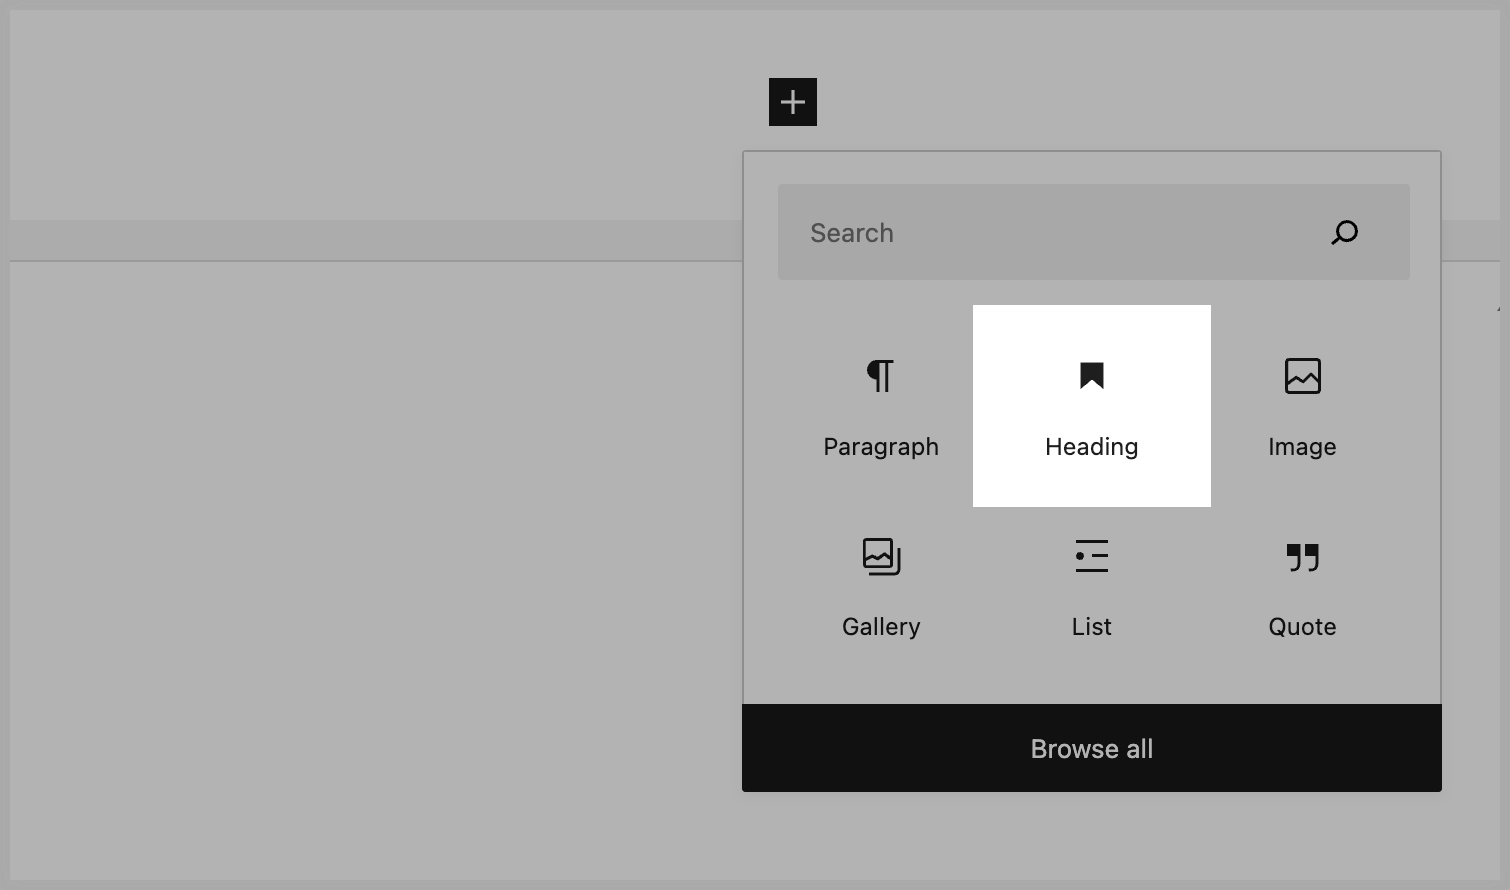
To add headings in the WordPress Gutenberg editor, just open the page or post. Then, click the Plus (+) icon to add a new block. Select “Heading”:
Then, select what type of heading you need:
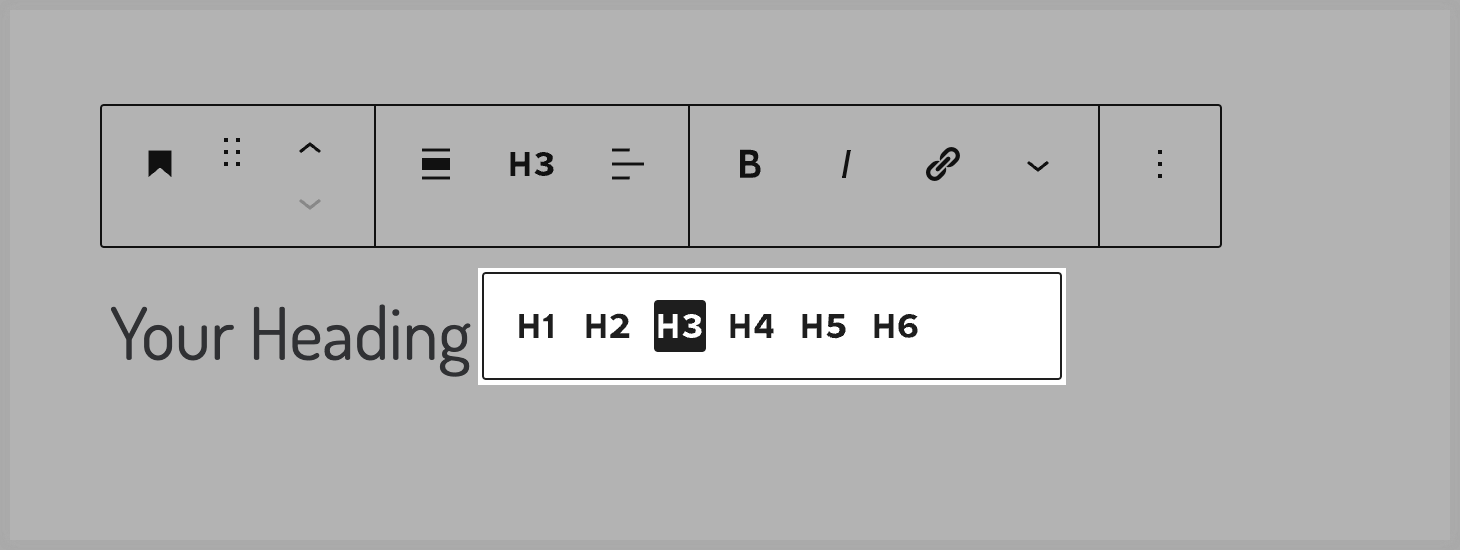
To see how your page is organized by headings, you can open your document outline.
Just click the “Info” icon in the top navigation of your editor. It’s the letter “i” in a circle:
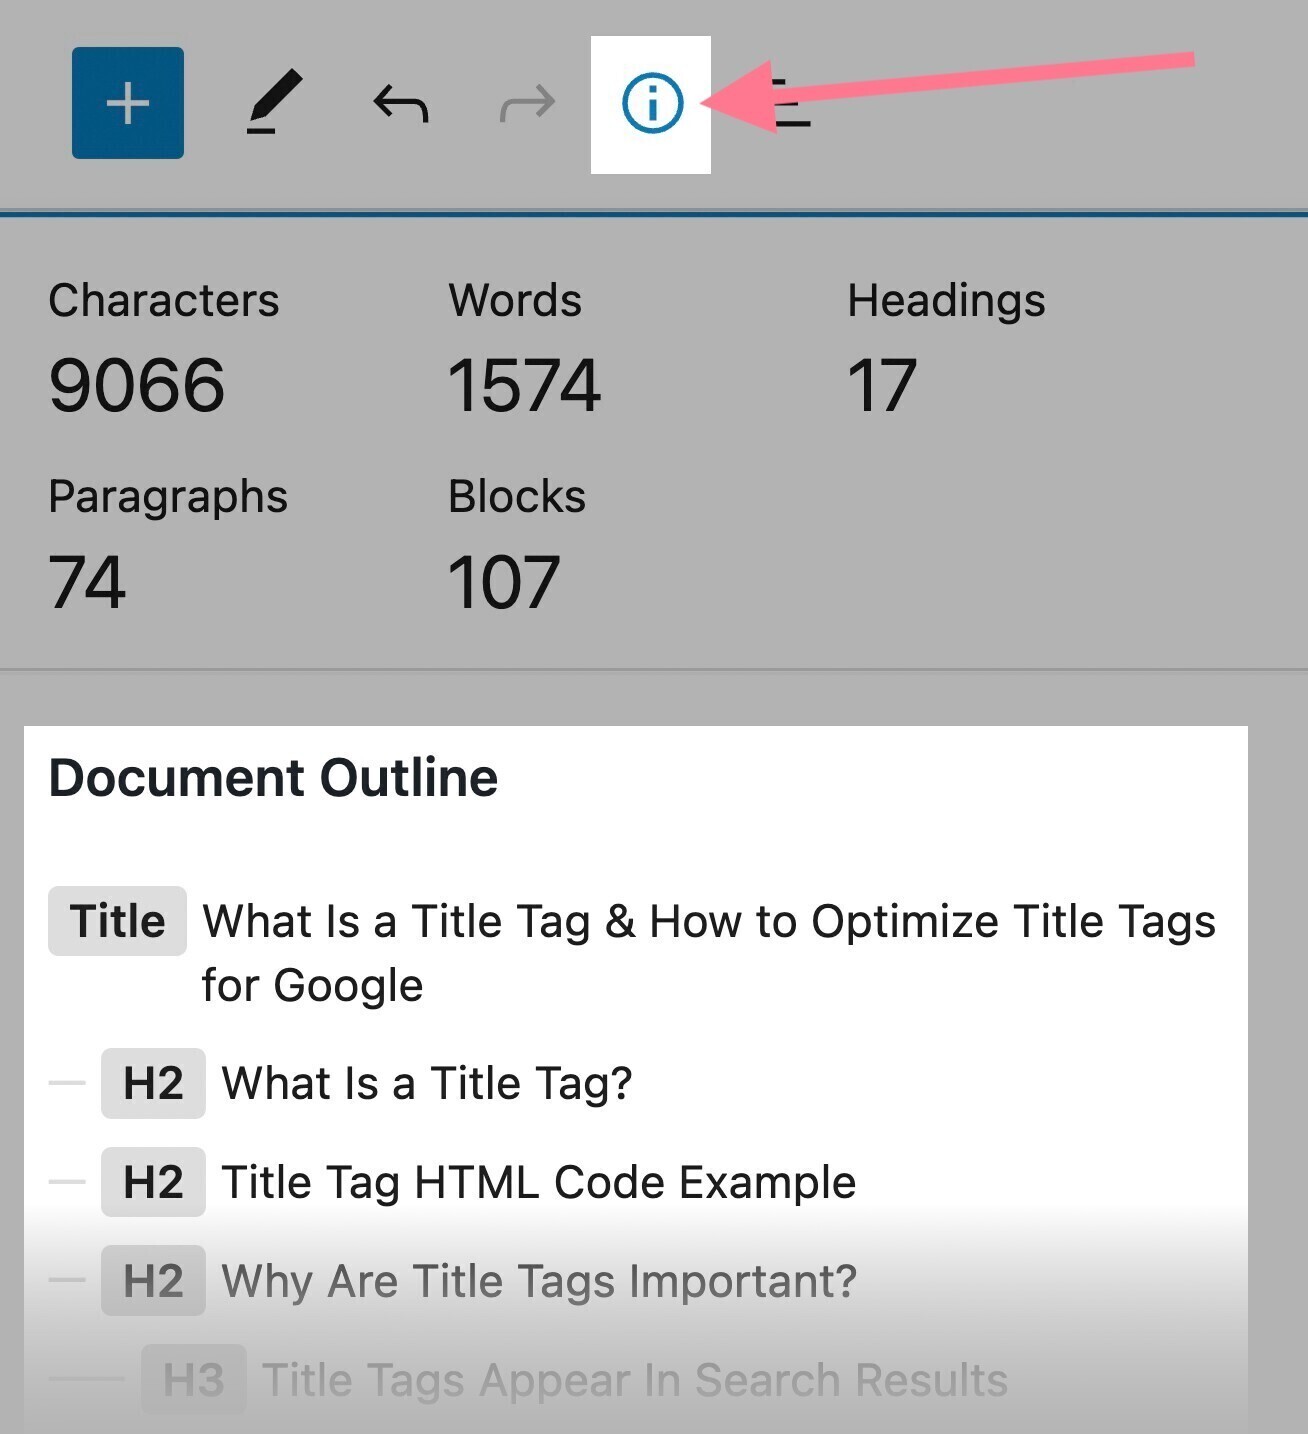
Then, you can ask yourself the following questions:
- Are the headings nested in a logical way? (H3s under H2s, etc.)
- Are the same-level headings consistent grammatically and stylistically?
- Could the headings serve as a standalone table of contents and still make sense?
If the answer to all of these questions is yes, congratulations! You’ve used your headings correctly.
Your page’s title tag tells users and search engines what your page is about. And it’s an important ranking factor.
It appears in search engine snippets and browser tabs:
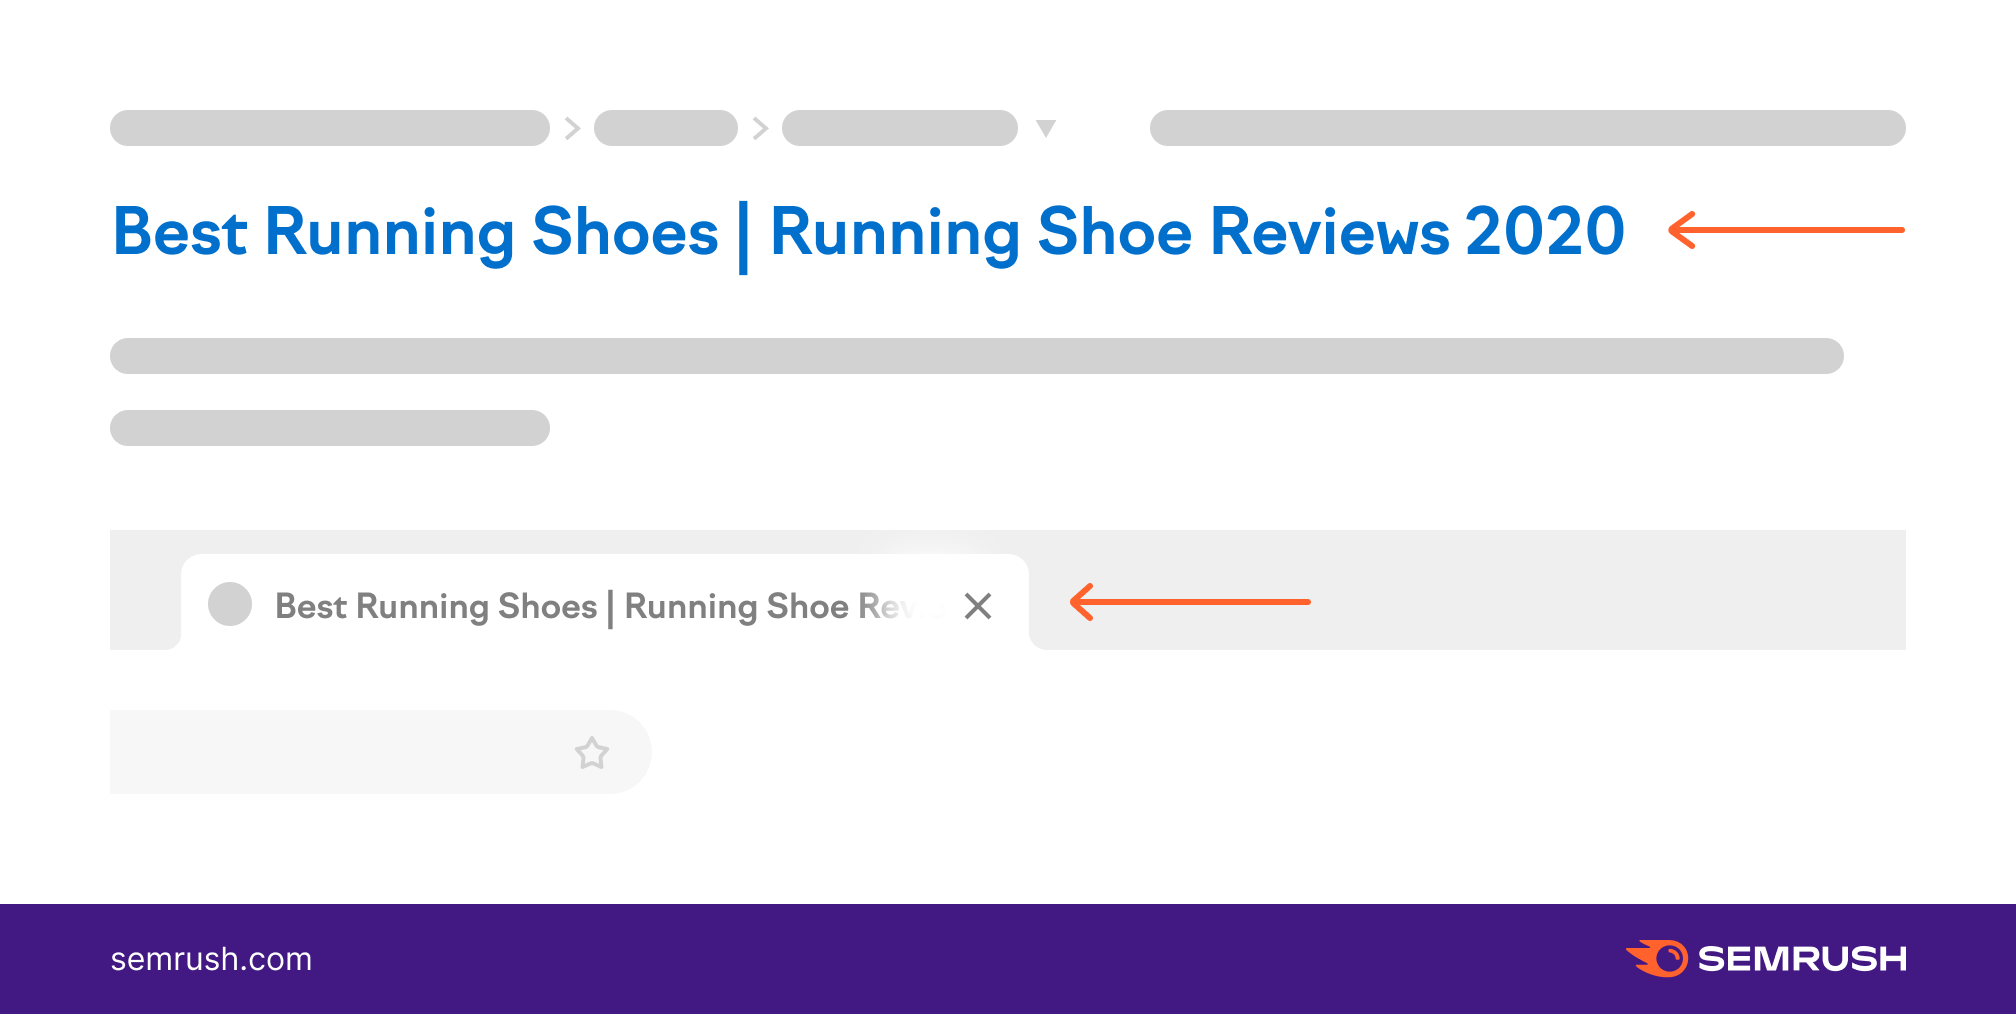
So crafting strong, well-optimized title tags is an important on-page SEO task.
The Yoast SEO plugin can help here, too. Just scroll down to the bottom of the page you’re editing and edit the field under “SEO title”:
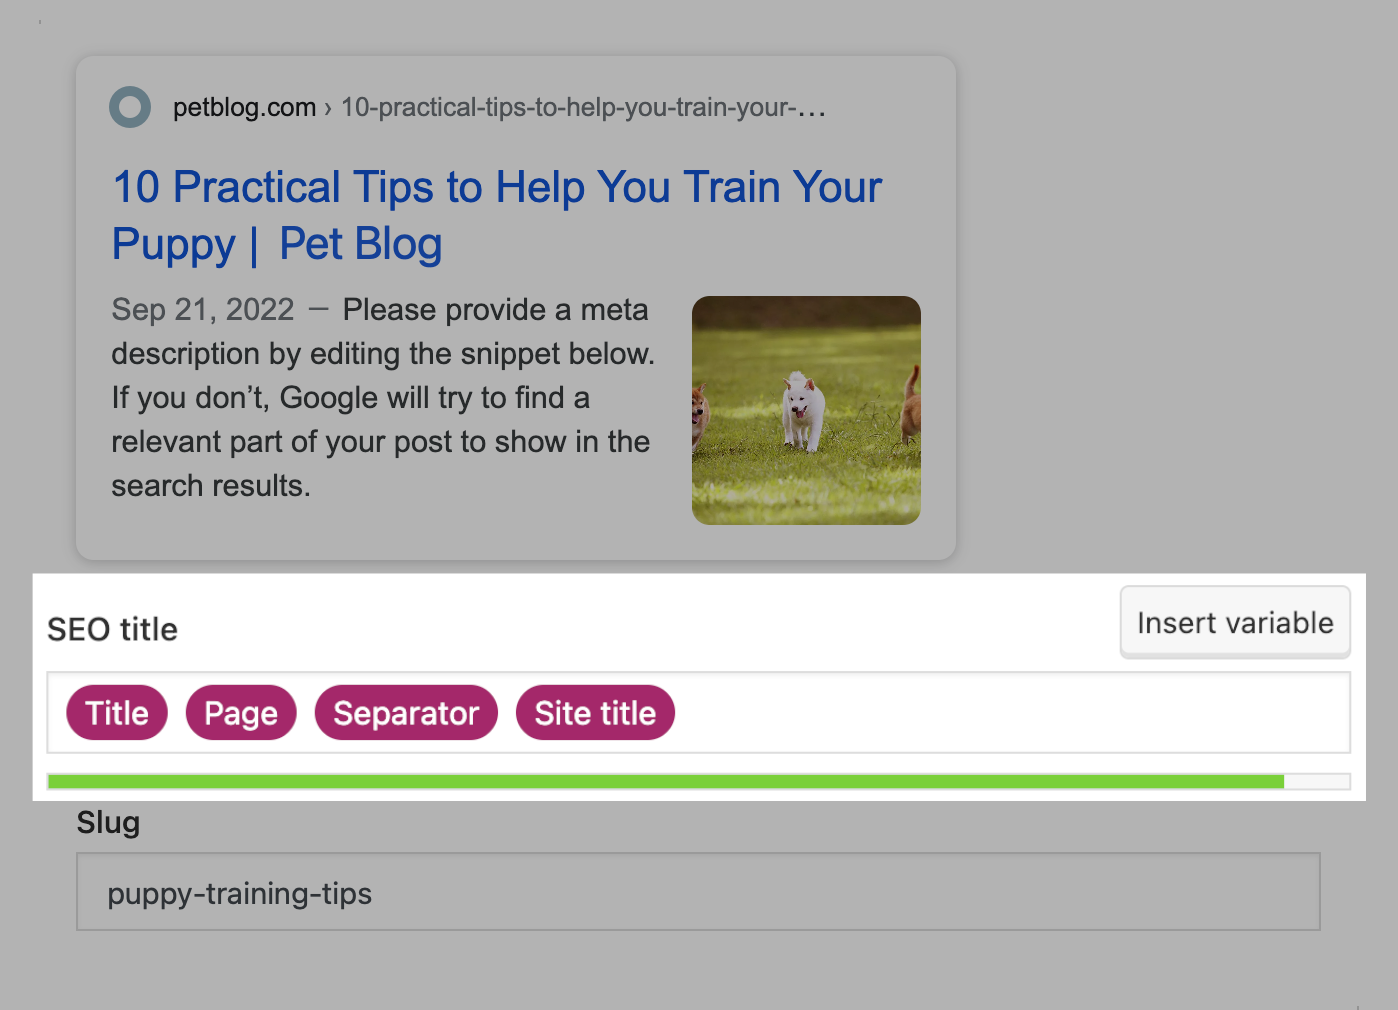
The “Title”and “Page” placeholders will be automatically populated with the title of the post or the page.
You can delete them and write your own SEO-friendly title tag. Sometimes, all you need to do is shorten the title and change a couple of words.
Tip: We recommend keeping the “Separator” and “Site title” variables intact. You can change them sitewide if needed. This way, you won’t have to manually rewrite all your older title tags in case you change one of them.
Here are some tips to write eye-catching title tags:
- Provide a unique title for each page/post
- Make sure the title tag is less than 600px wide (the progress bar below the “SEO title” input in the Yoast SEO plugin will help you with that; try to stay in the green zone)
- Put your target keyword first (but don’t stuff the keywords at all costs)
- Include your brand name if possible (sometimes it can make the title too long, so this depends on your needs)
- Use actionable, persuasive words (things like “review,” “best,” “checklist,” or “step-by-step”)
- Use numbers (things like “top 10” or “in 2022” catch people’s attention)
To learn more about the importance of title tags, read our guide to title tag optimization.
Although meta descriptions are not a direct ranking factor, they impact your CTR (click-through rate).
In other words, writing great meta descriptions can get more people to click on your link in search results.
A truncated meta description is not an SEO disaster. But it doesn’t look good either:

You can add meta descriptions in Yoast SEO within the same section as title tags. The progress bar will help you keep your meta description within the ideal length range.
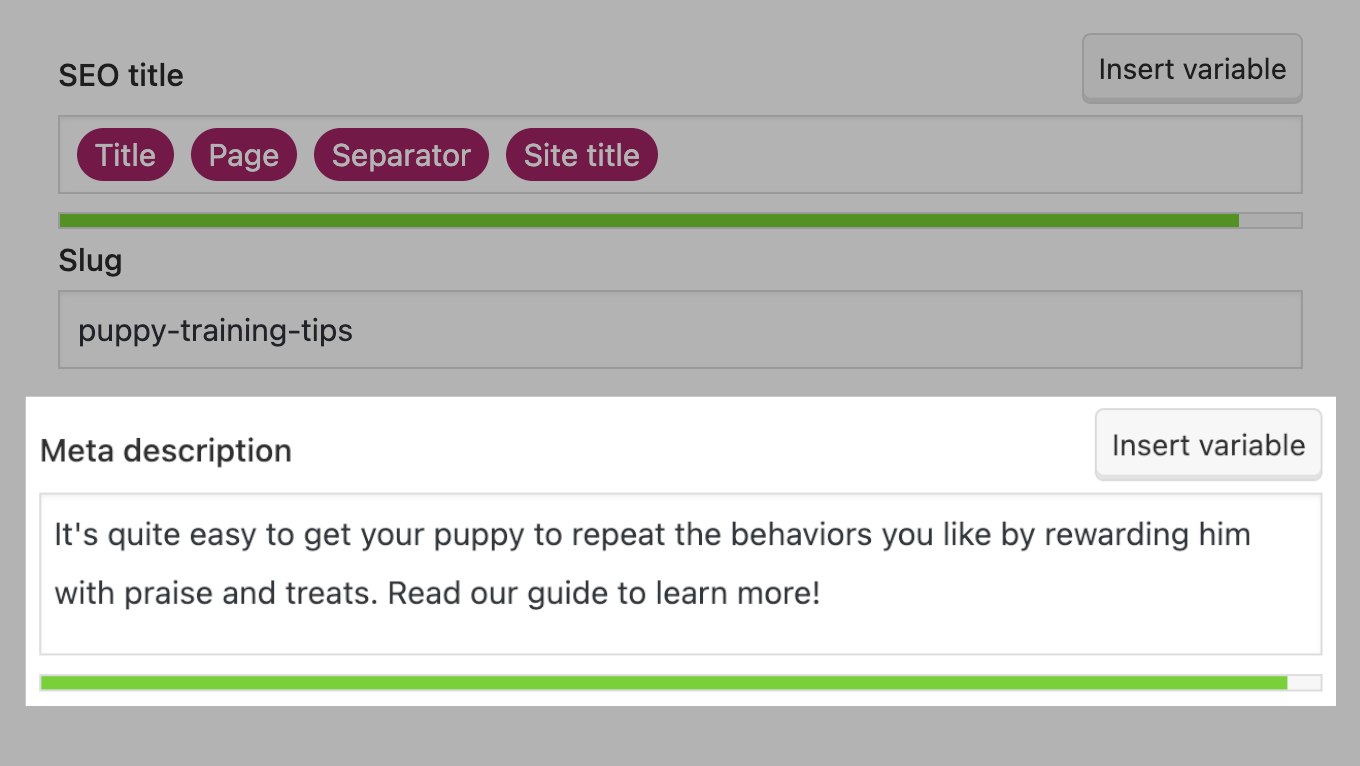
The following rules will help you write amazing meta descriptions:
- Provide a unique meta description for each page
- Aim for 120 characters (so that it doesn’t get truncated in mobile results)
- Include your target keyword (again, do it naturally, without keyword stuffing)
- Think about the search intent
- Be clear and use active voice
- Show value and add a call to action at the end
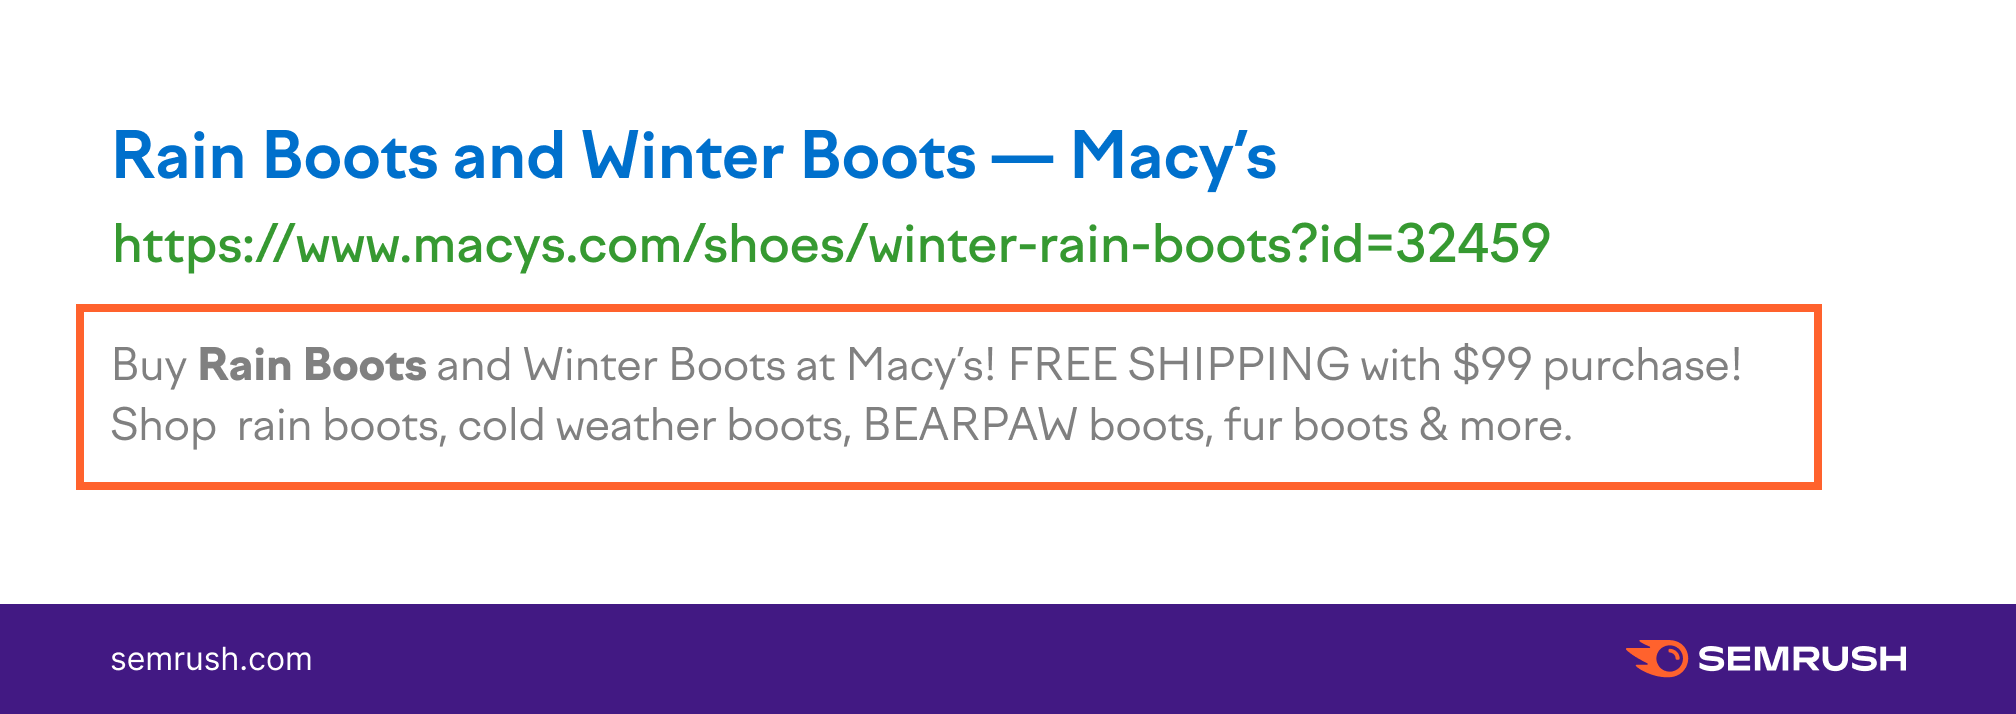
Now, let’s take a look at an example of a well-crafted meta description:

As you can see, the meta description has the ideal length, covers the search intent (transactional; contains info about free shipping) and includes the target keyword (“men’s winter boots”).
Moreover, it contains a call to action to entice users to click the link (“Shop for…”). And it uses short, actionable sentences.
21. Link Internally
An internal link is any link that points from one page to another page on the same domain.
There are two types of internal links:
- Navigational internal links: Links that are part of the website’s structure (such as menus, categories, or breadcrumbs—we’ve covered these in steps 12 through 14).
- Contextual internal links: Links to relevant pages on your domain that are placed within the body copy.
Internal links are a great way to pass authority from one page to another in a way that is (unlike with backlink building) 100% under your control.
Let’s take a look at this example:
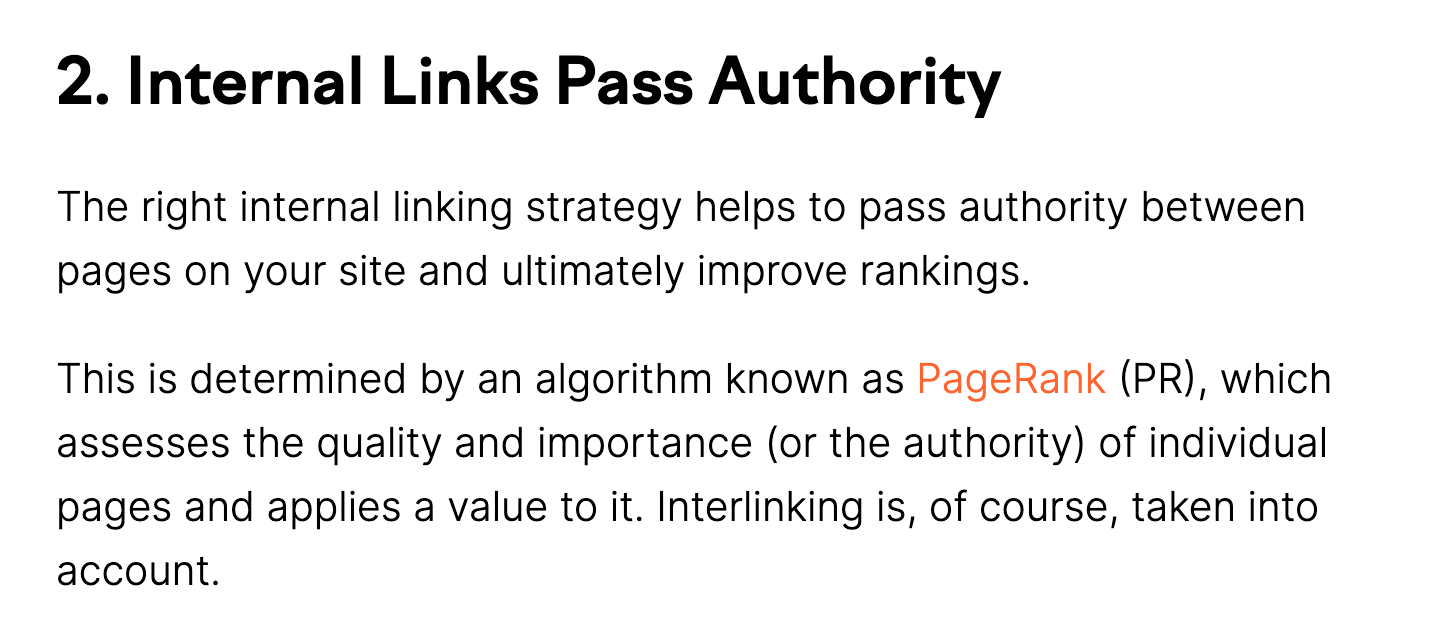
Our guide to internal linking (see? another internal link) links to our post on the PageRank algorithm. The link provides additional information on the topic contextually—right within the text of the post.
Creating Internal Links
You can create internal links whenever you write new content.
Adding internal links in WordPress is easy:
First, select the text you want to link (the anchor text). Then, click the little chain icon.

Then search for a page or post you want to link to and select it by clicking on it.
You can also just paste the URL of the target page if you have it already.
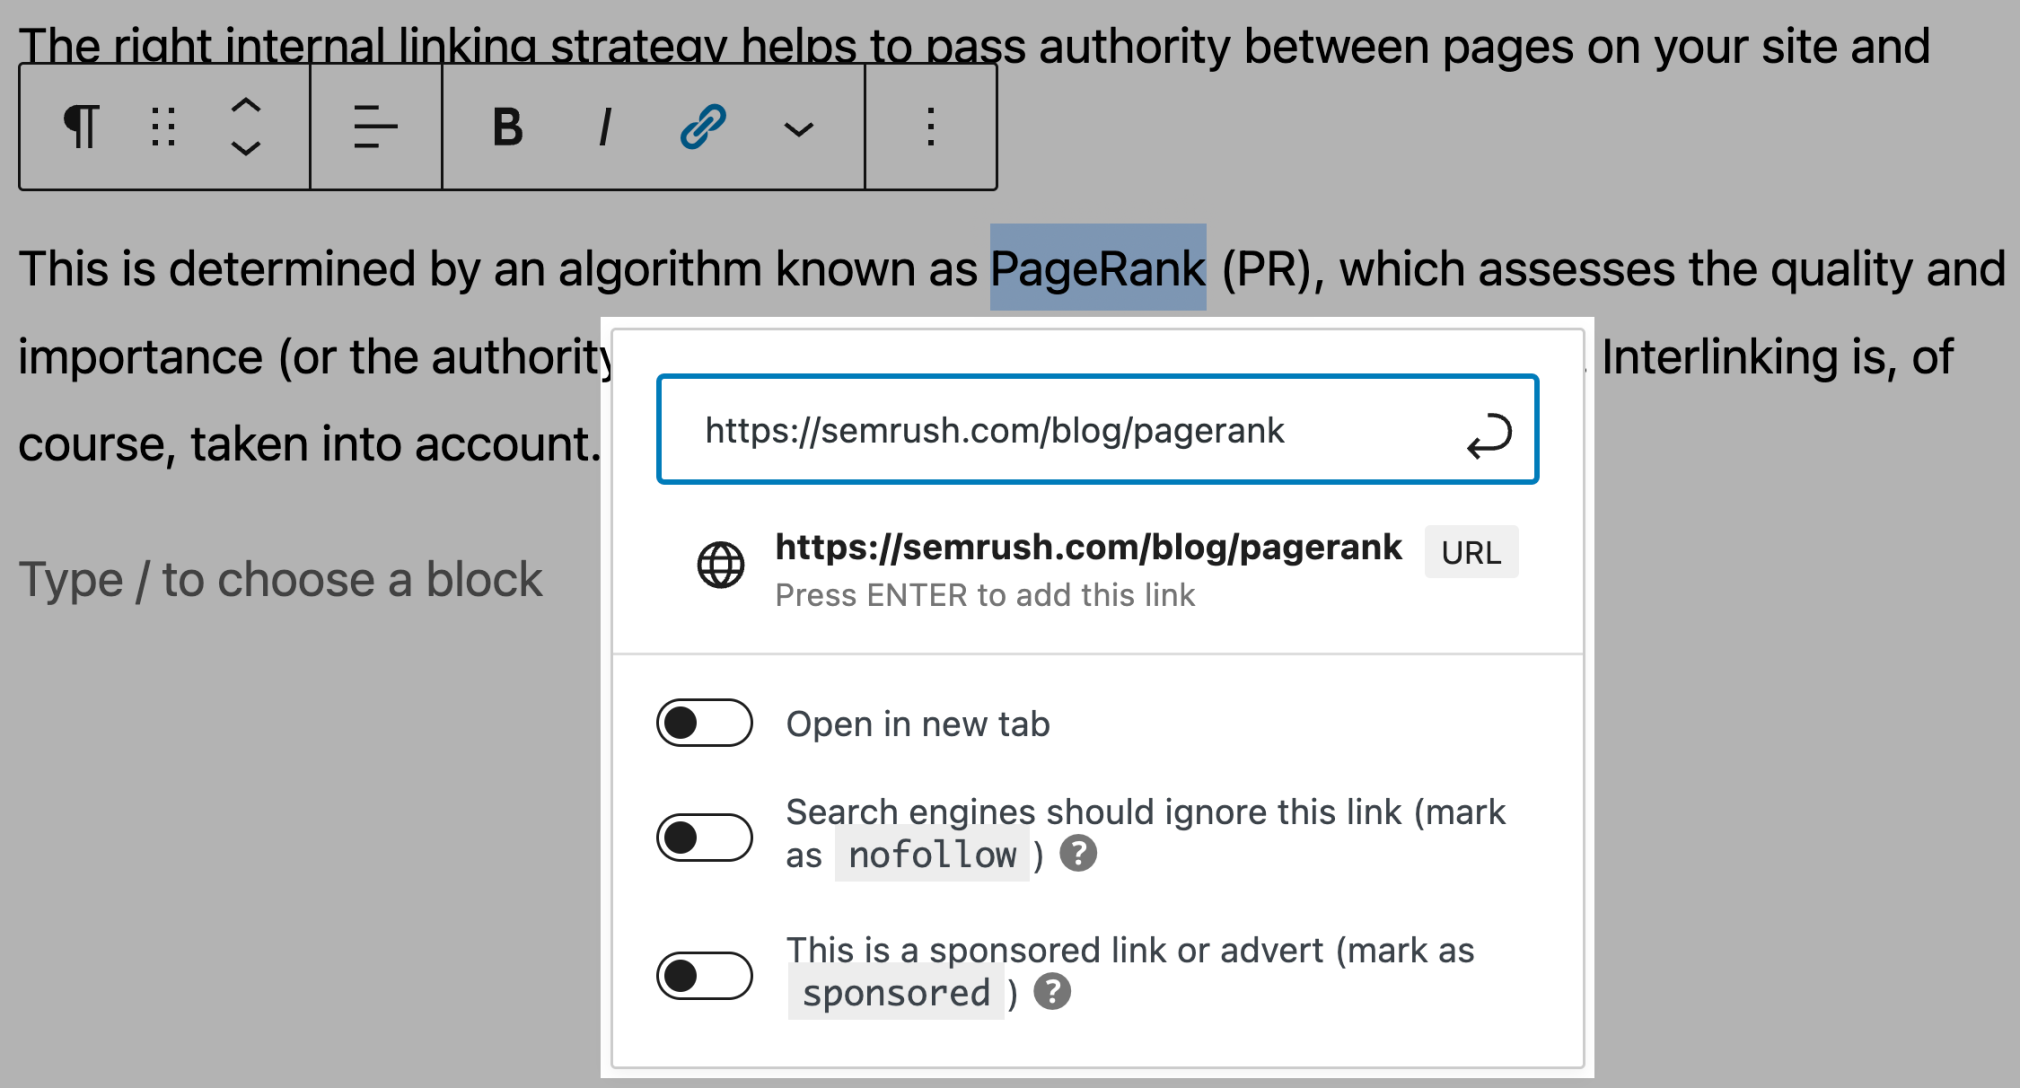
Voila! You have a new internal link.
Tip: Alternatively, you can use aWordPress pluginthat will automate the creation of your internal links based on selected keywords (like Internal Link Juicer).
A good practice is to make internal linking part of your publishing workflow:
- Before publishing: When writing a new piece of content, make sure you link to other posts or pages that could be useful for your readers.
- After publishing: Once the post is live, look for your older posts that could link to your new piece of content.
Make sure to use internal links strategically to support your important pages and posts. (Our post on website architecture can help you with that.)
Auditing Your Internal Links
If you have a well-established website with many internal links, it’s a good idea to run a simple audit in Semrush’s Site Audit tool to find any internal linking issues.
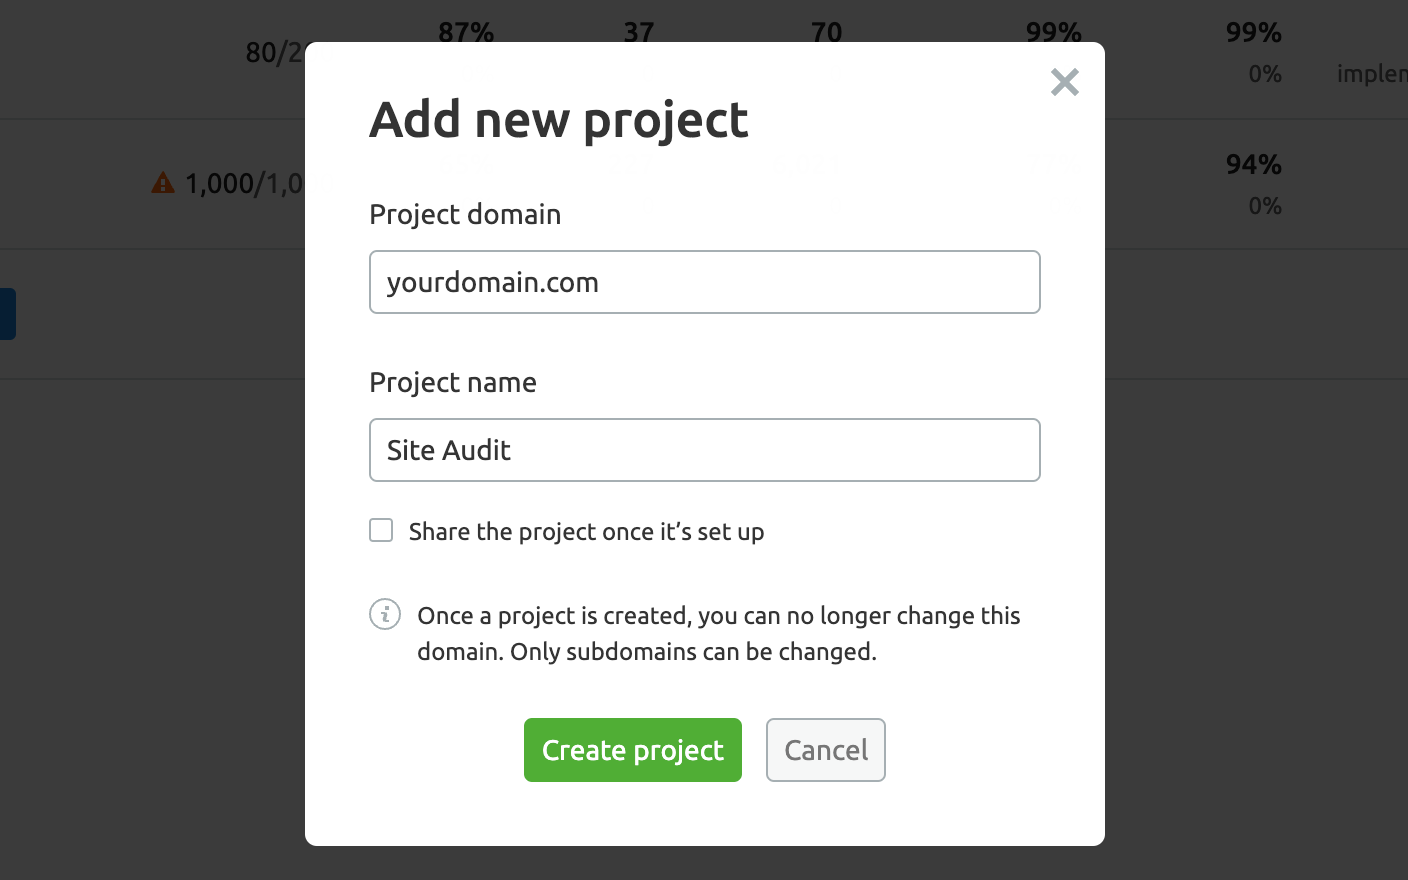
First, create a new project and run the audit.
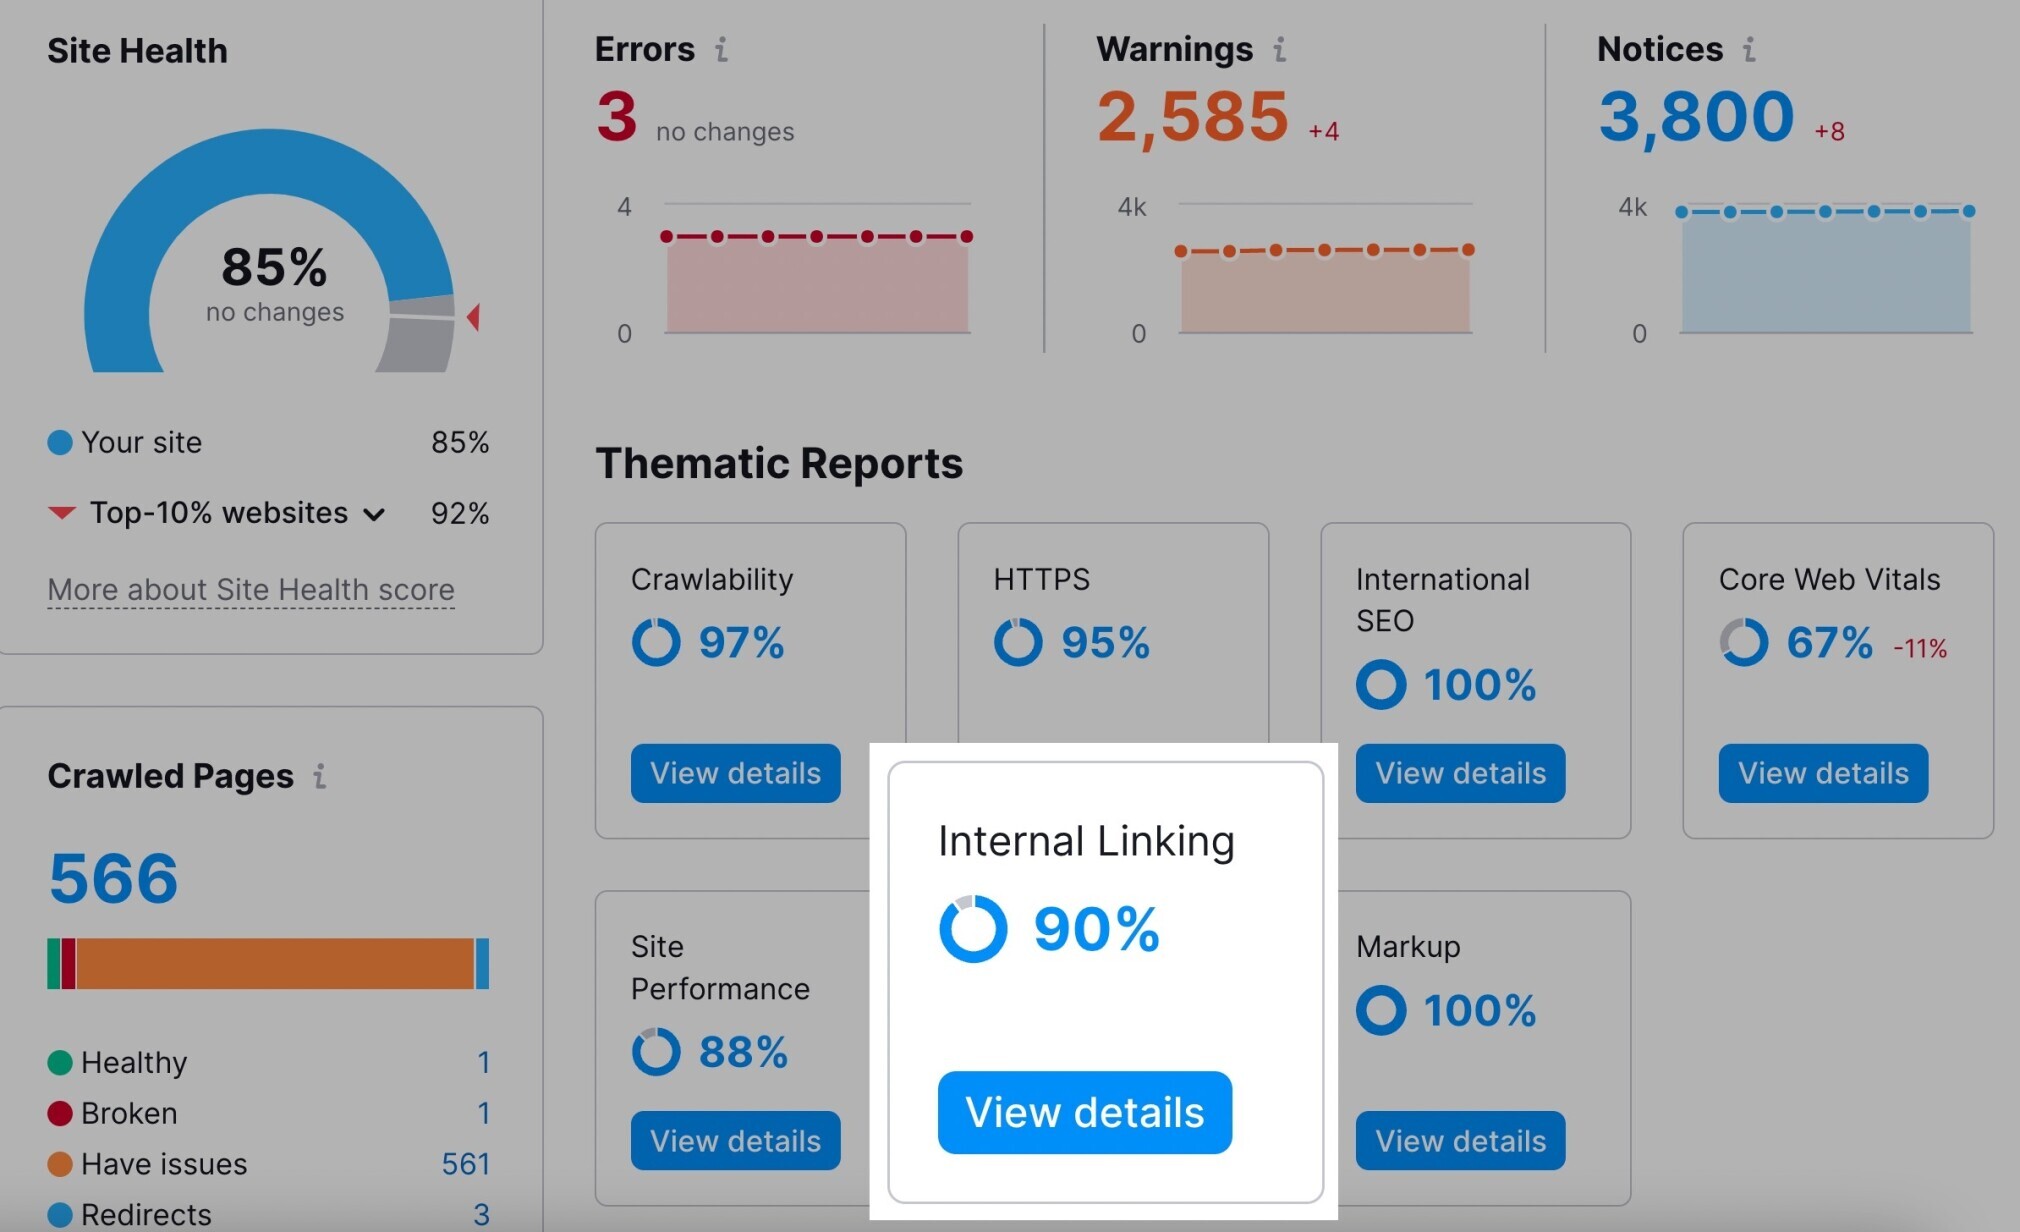
Once your audit is finished, head to the “Internal Linking” section to see more details.
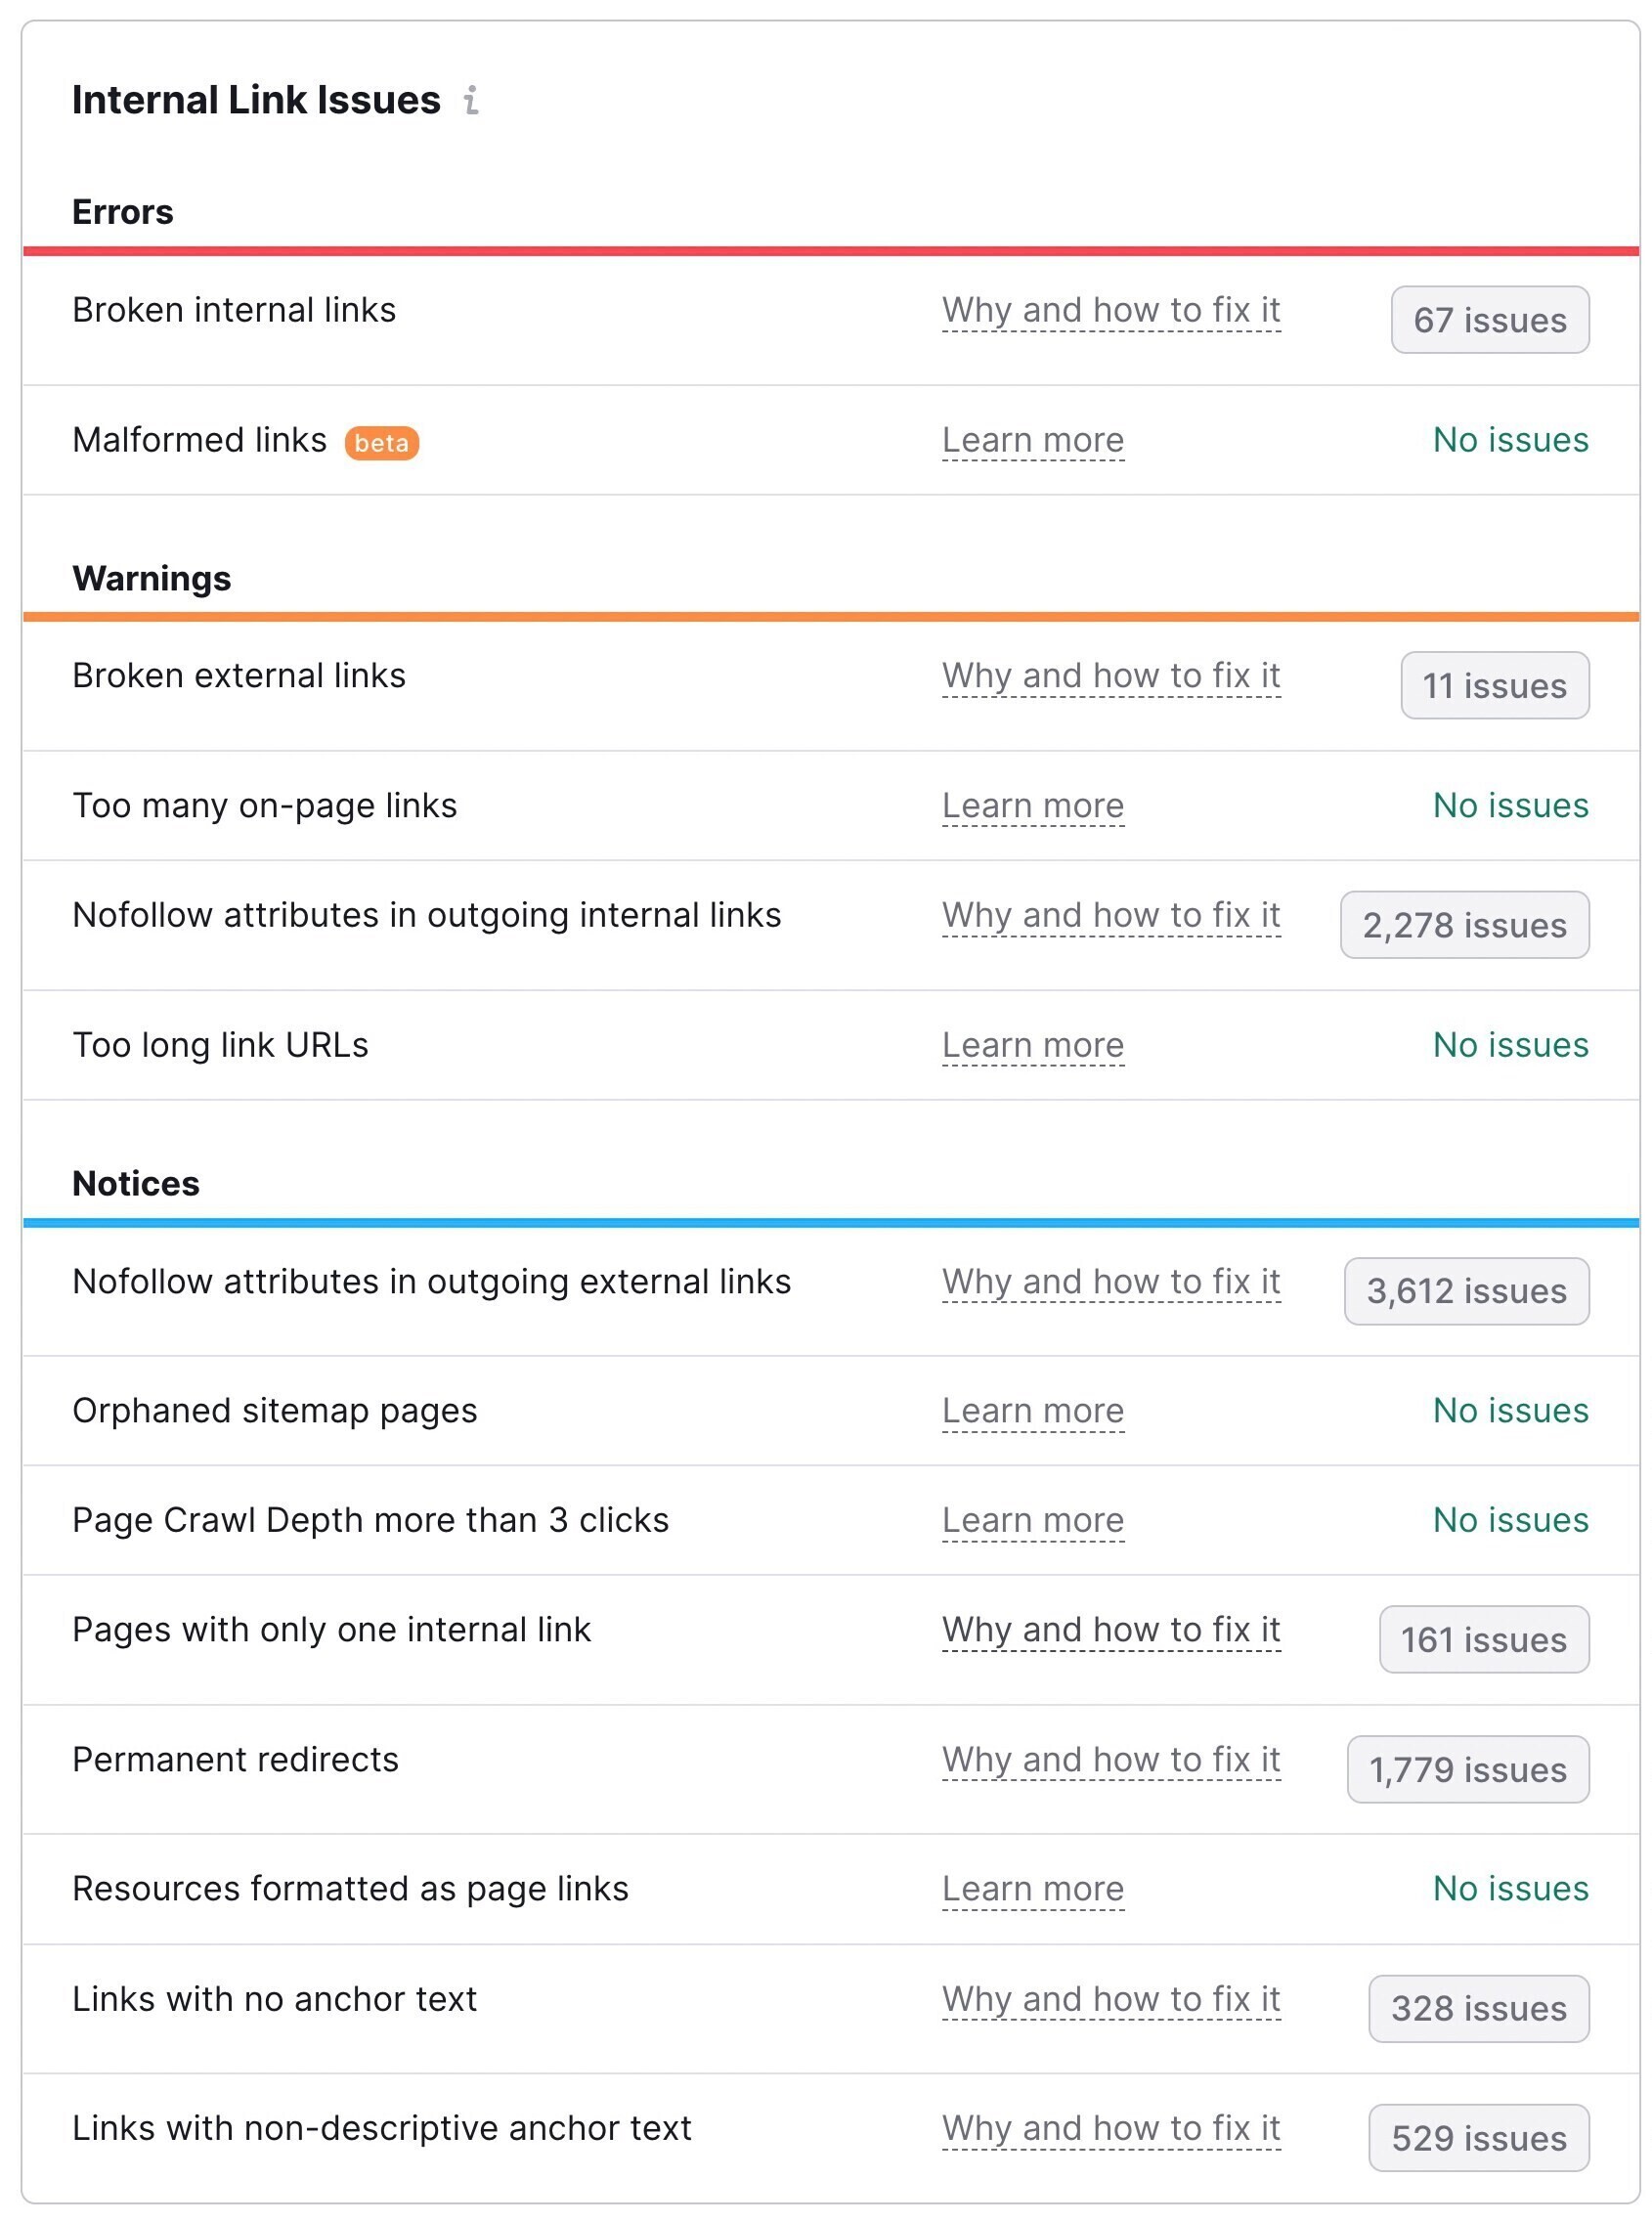
Here, you’ll find a list of errors and warnings regarding your internal links. They are ranked in order of importance, so it’s a good idea to start from the top.
Just click on the number of issues to see all the affected URLs.
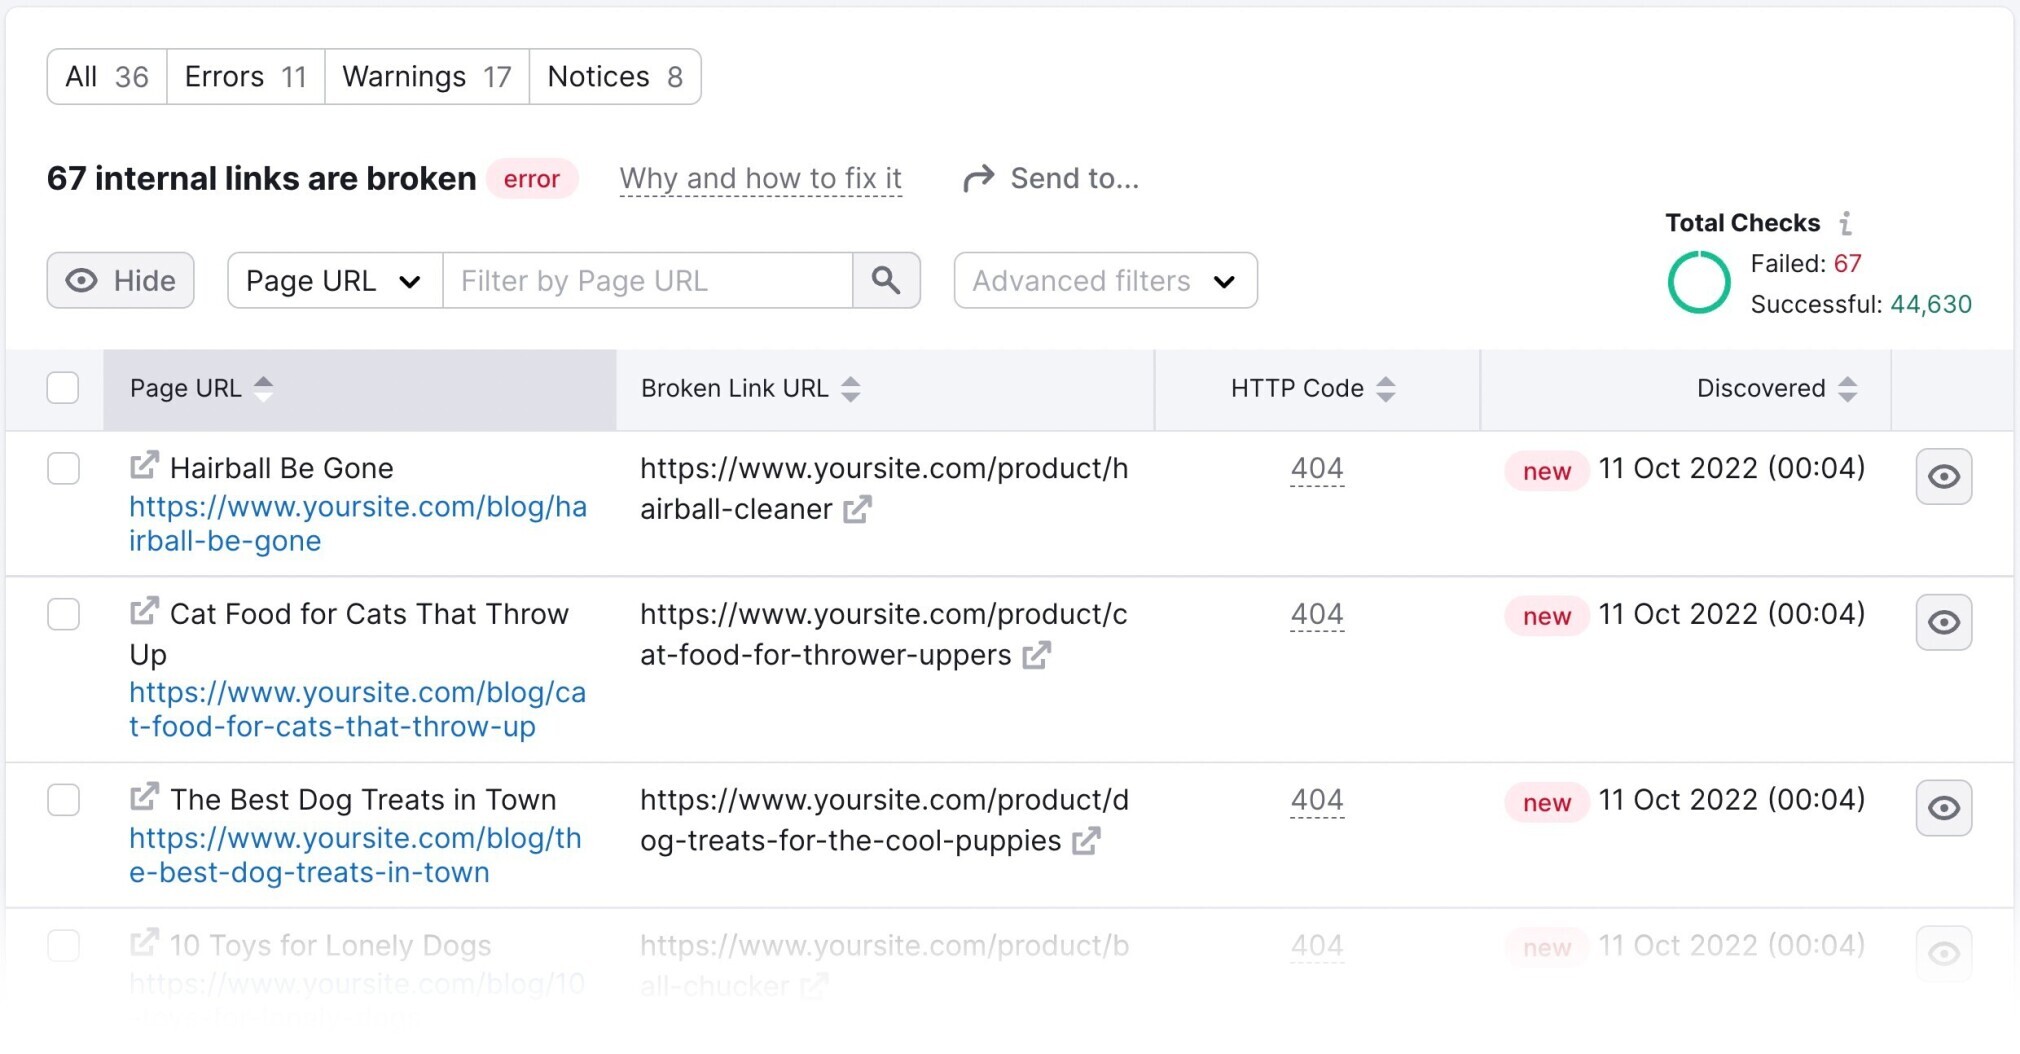
Besides the list of affected URLs, you’ll find detailed explanations and useful tips on how to fix each issue.
To learn more about setting up the Semrush Site Audit, check out our detailed configuration guide.
22. Write Descriptive Image Alt Text
Adding descriptive alt text to your images is an important practice in SEO for WordPress or any similar platform.
The Google Search Central blog states that Google uses alt text to “understand the subject matter of the image.”
Moreover, alt text is a critical user experience element—screen readers read alt text to users who have visual impairments.
So, how do you create good alt text?
Let’s take a look at this image and some examples of alt text it could have:

- Bad alt text (keyword stuffing):“chess, chess board, men playing chess, chess history”
- Bad alt text (no alt text):“”
- Bad alt text (too vague):“chess”
- OK alt text: “two men playing chess”
- Great alt text: “two old men playing chess on a bench in Central Park in 1946”
As you can see, your alt text should be descriptive and helpful. This is not a place to stuff your keywords (although it is a good practice to include the keyword if it’s relevant and natural).
To add alt text to an image in WordPress:
Go to Media > Library and select the image you want to edit. Write your alt text in the “Alt Text” field.
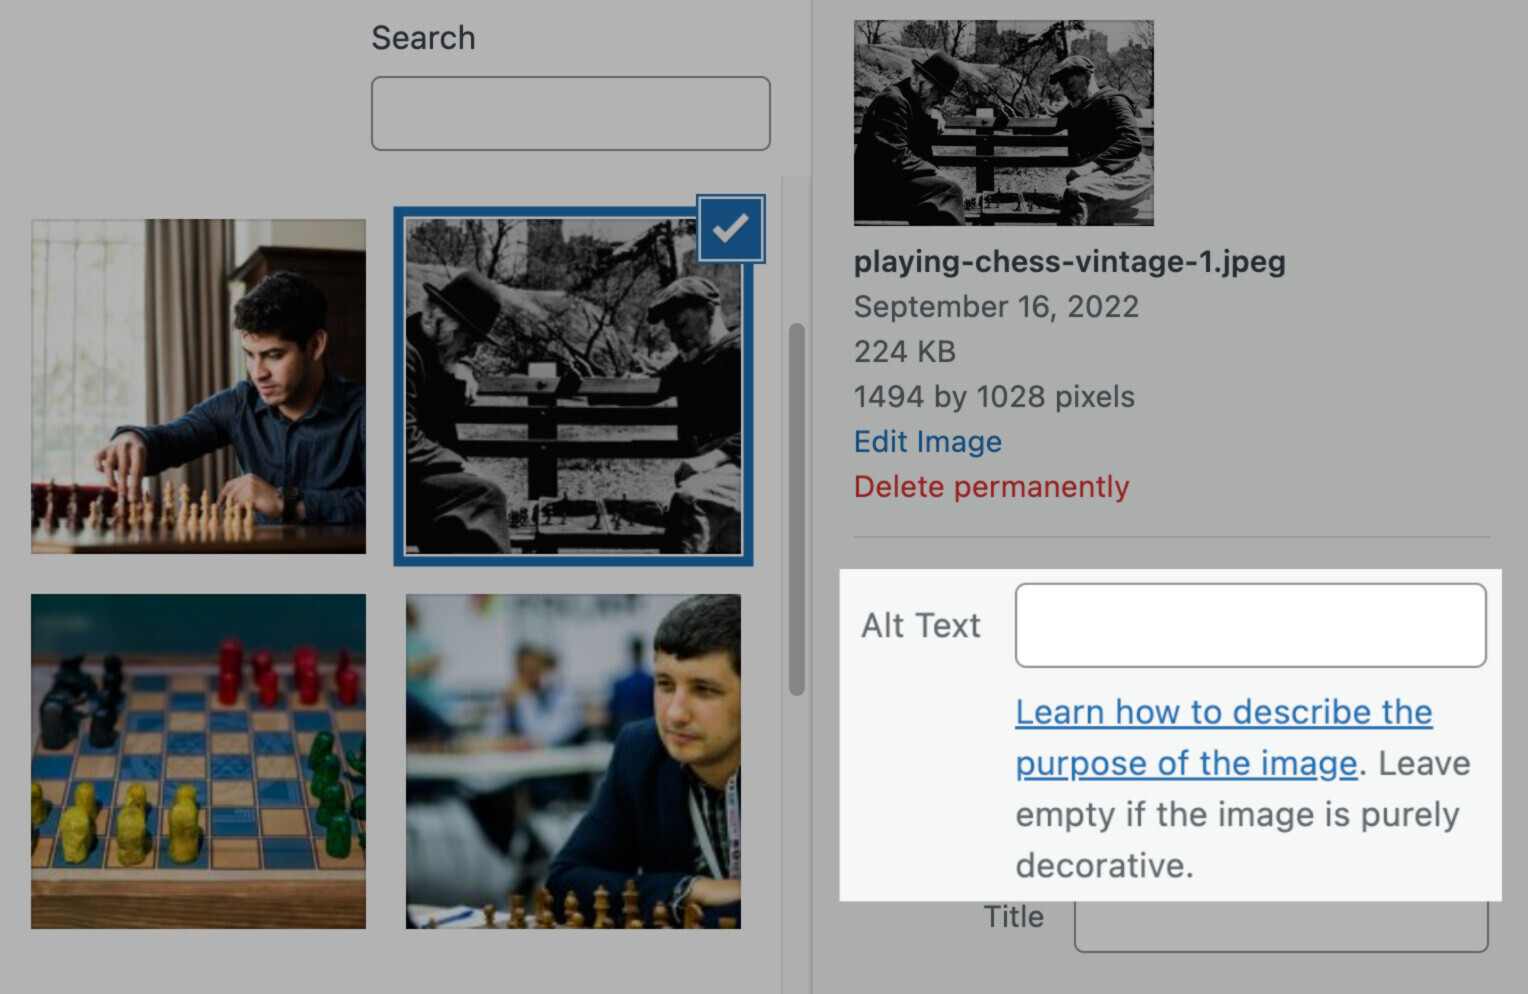
Also, remember that alt text is not always necessary. You don’t need to write alt text for:
- Images with a purely decorative purpose
- Images that contain text that is also written as real text nearby
For more information, check out our guide to writing great alt text.
Tip: Another piece of metadata Google uses to understand an image is its file name.
So, next time you name your image file before uploading it to WordPress, remember that a descriptive filename like red-butterfly.jpg is always better than FPglP6jWYAM6TbK.jpg.
Writing comments on other websites to get backlinks used to be a popular link building technique.
Of course, it doesn’t work as much as it used to in the past (for example, all links in WordPress comments are nofollowed by default—i.e., they don’t pass any authority).
But a lot of spammers still try. So you’ve probably come across one of these:

Having spammy comments on your website probably won’t hurt your SEO efforts. Still, Google encourages website owners to fight spam content.
Why?
Because spammy content can still impact your website in other ways:
- It hurts your trustworthiness
- It provides no added value for users
- It is irrelevant to your content
Luckily, there’s a very simple solution in WordPress:
In your control panel, under “Settings,” click on “Discussion.” Then, check “Comment must be manually approved.”

This way, you will have to approve every new comment on your website before it can appear on a page.
Yes, it adds an additional task to your workflow. But it’ll prevent spammy comments from hurting your website.
24. Speed Up Your Website
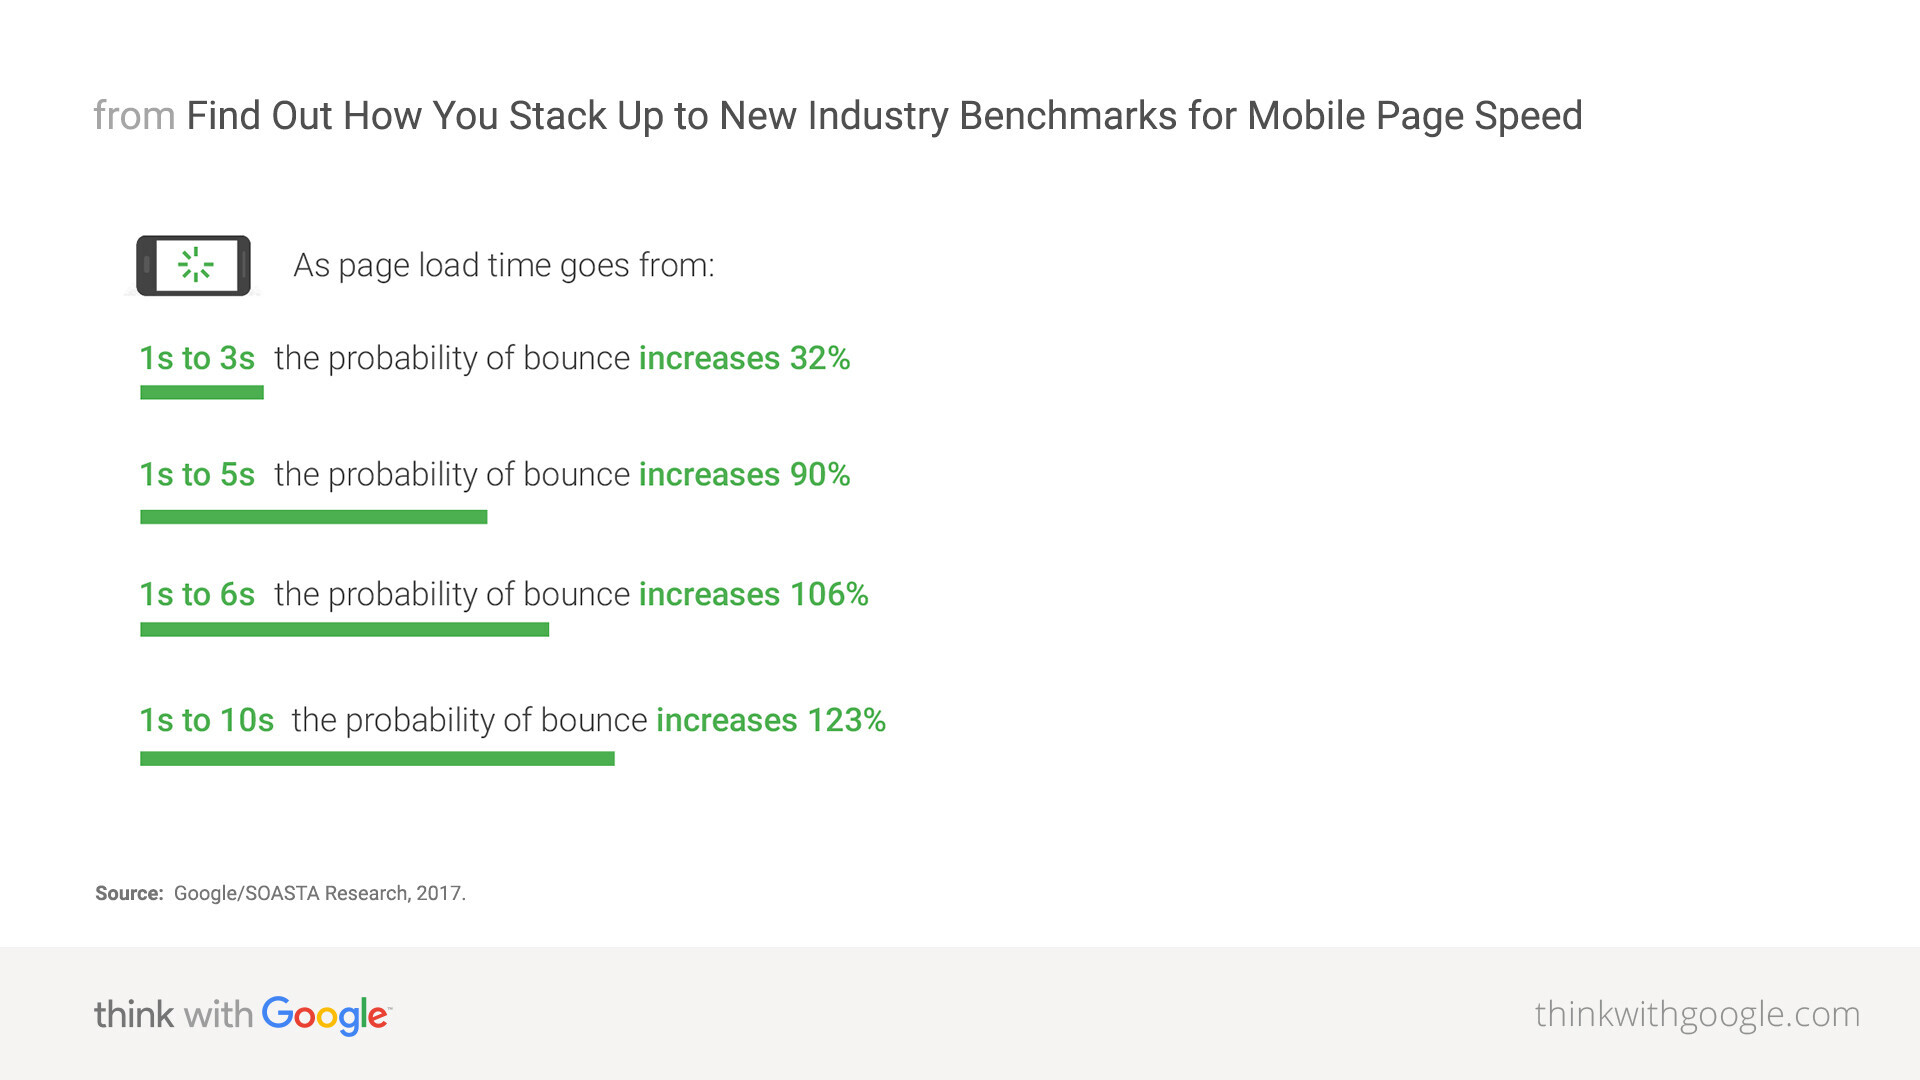
When it comes to page speed, every second counts.
Page speed is also a confirmed ranking factor. That means having a slow website can hurt your rankings.
Moreover, a Google study revealed a clear correlation between higher page load time and the probability of a user leaving the website:
There are many ways to optimize your WordPress website to improve your page speed:
- Installing a caching plugin: A caching plugin will store parts of your website data after the first load so that every future request is served faster
- Using a Content Delivery Network: CDNs distribute your website content to various servers across the world to speed up the loading time in various locations further from your original server (An example of a popular CDN service is Cloudflare.)
- Minifying your code: Making your source code smaller (e.g., by removing unnecessary characters) can help it load faster
Going deeper into each of these different types of performance optimizations would go beyond the scope of this guide.
Instead, we’ll recommend some reliable plugins that will help you with your WordPress site’s performance.
Free plugins:
Premium plugins:
Note: Page speed optimization isone of the most technically challenging aspects of WordPress SEO.Although there are many step-by-step guides for each of the plugins we listed above, sometimes, things can get tricky. If you’re not sure about something, ask a professional for help.
Last but not least, an important part of the process of speeding up your website is image optimization. Here’s more on that:
25. Optimize Your Images
Large image files are one of the most common reasons why webpages load slowly.
Fortunately, plenty of WordPress plugins can help you optimize your images in various ways. For example, the Smush plugin covers all the image optimization basics.
To install the plugin, go to Plugins > Add New > search for “smush” > Install Now > Activate.
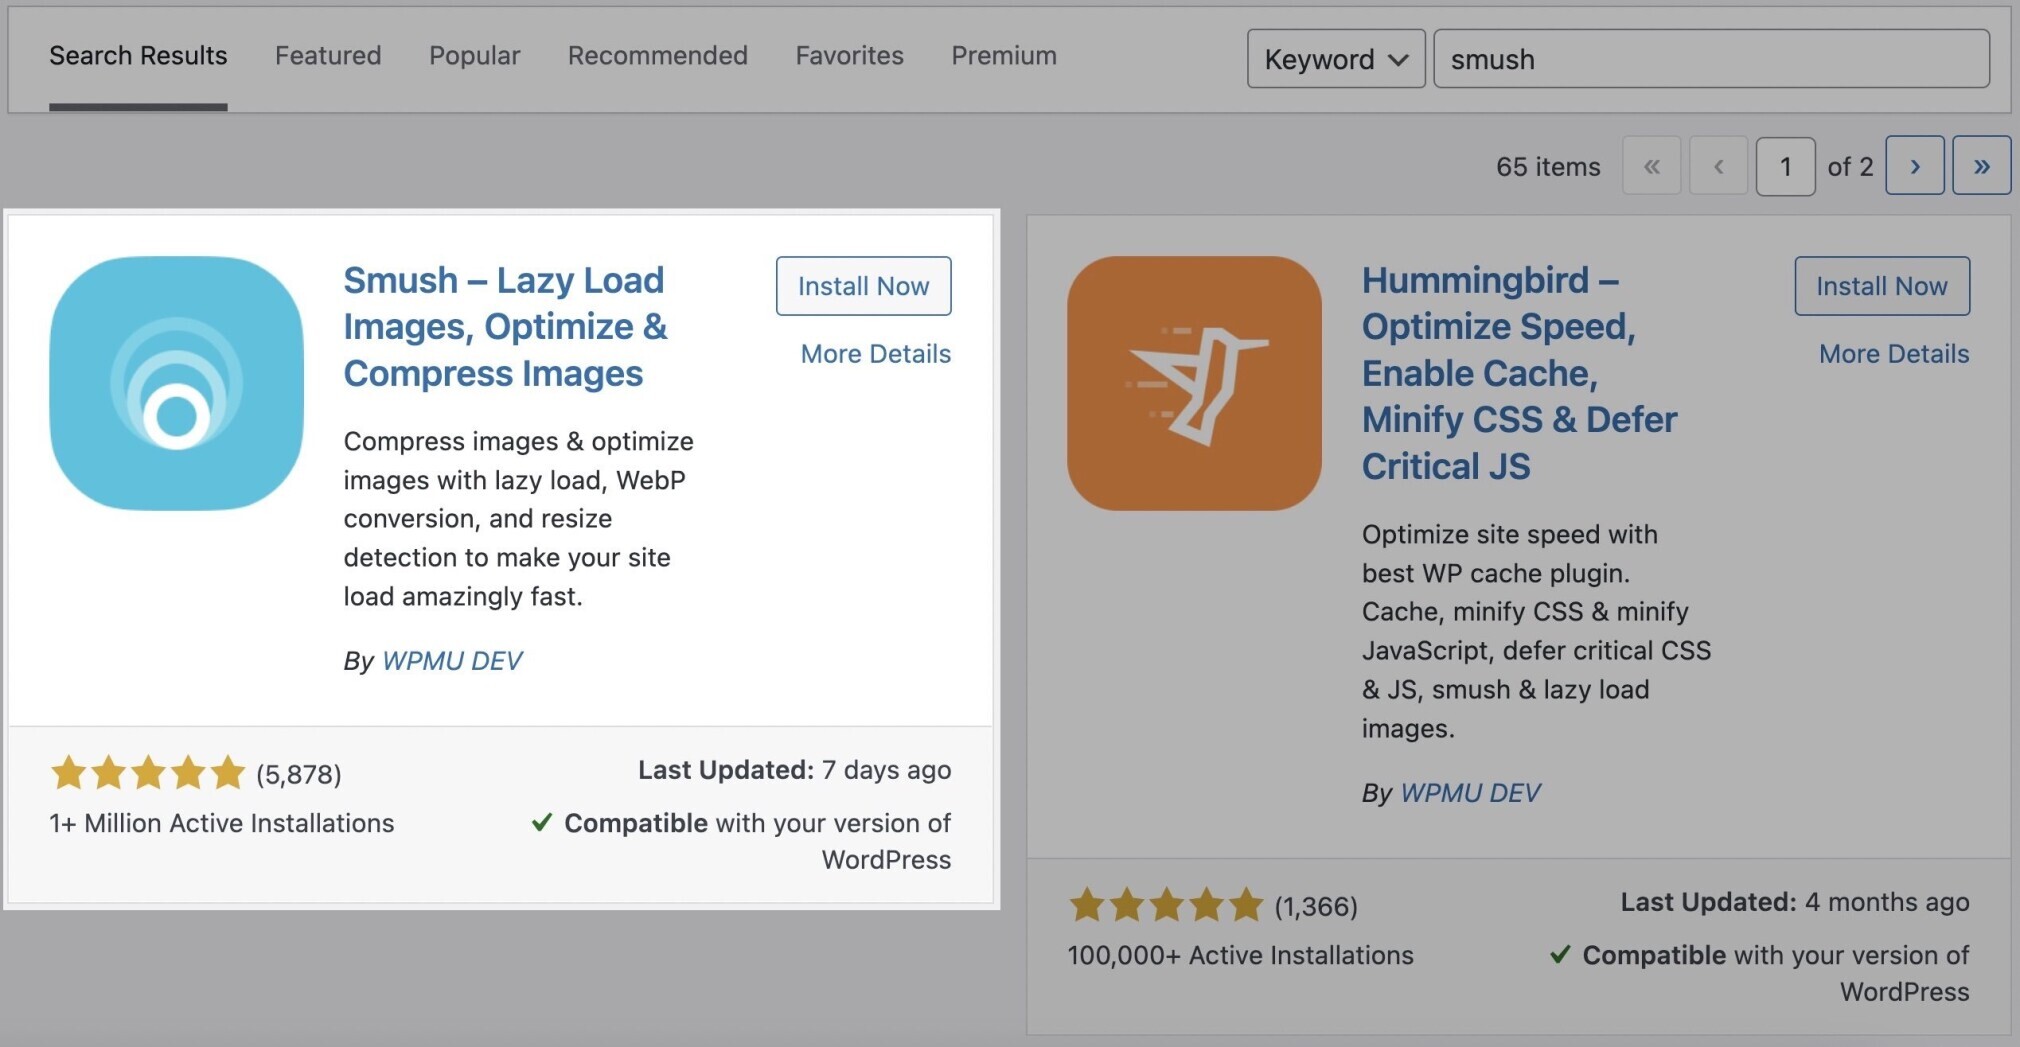
Let’s see what it can do for you.
Compressing Your Images
Image compression is one of the most effective ways to reduce image file size.
Once you install the Smush plugin, go to its dashboard (just click “Smush” in the left sidebar WordPress menu). It will prompt you to do the initial setup.
Enable “Automatic Compression.”
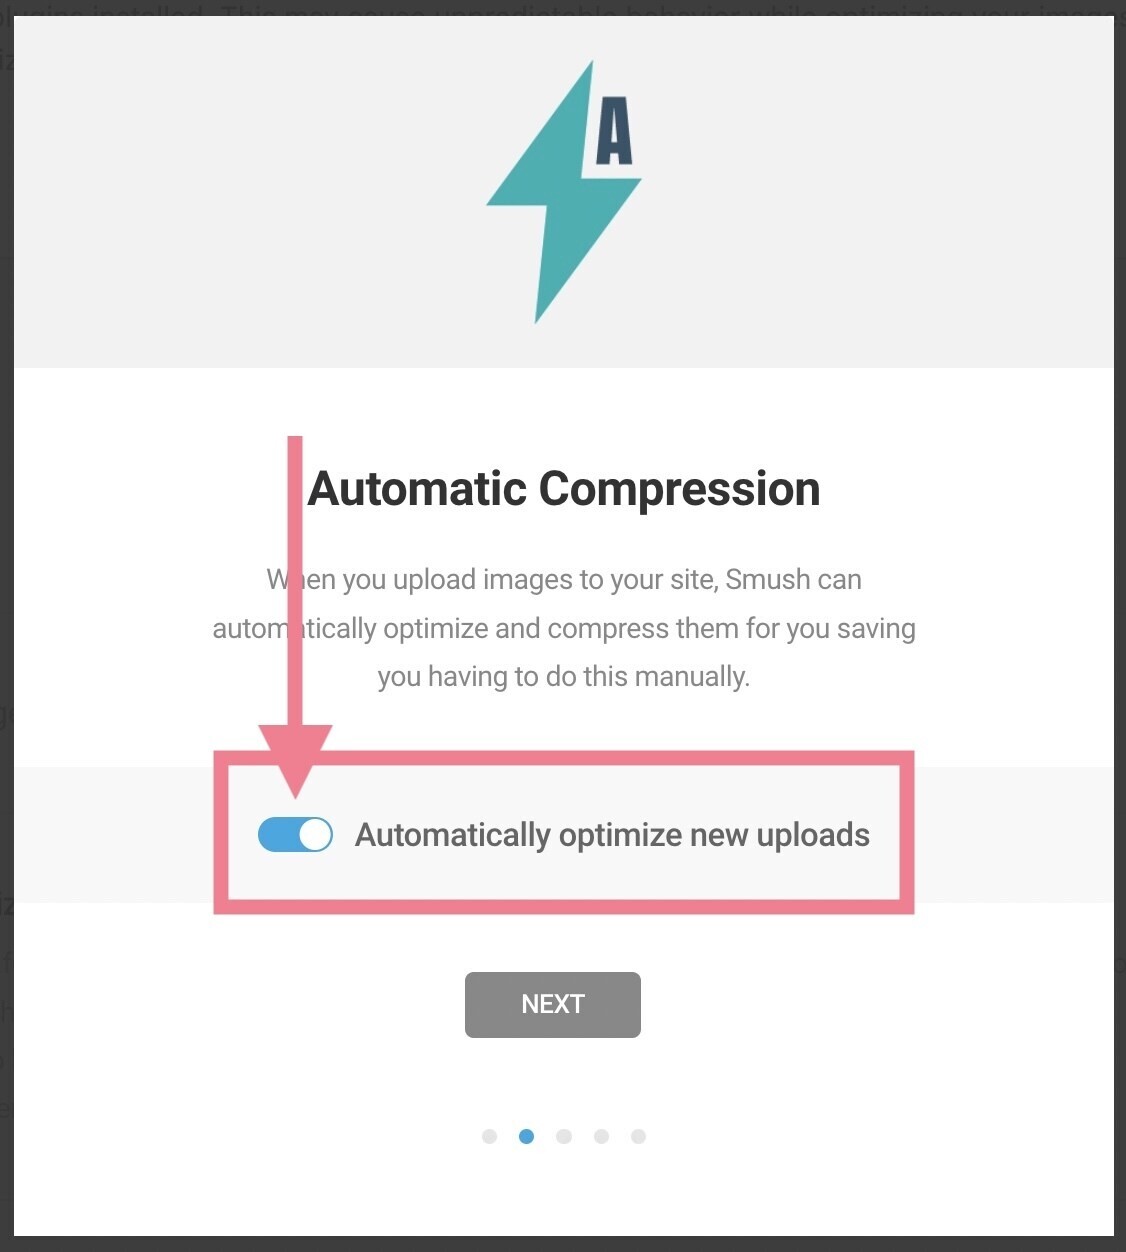
When it comes to the next step—the “Advanced (lossy) compression”—there are pros and cons. It will reduce the file sizes significantly. But sometimes, it can lead to reduced image quality.
Keep this inactive if your website relies on high-quality images or if you’re simply not sure. You can always enable it later.
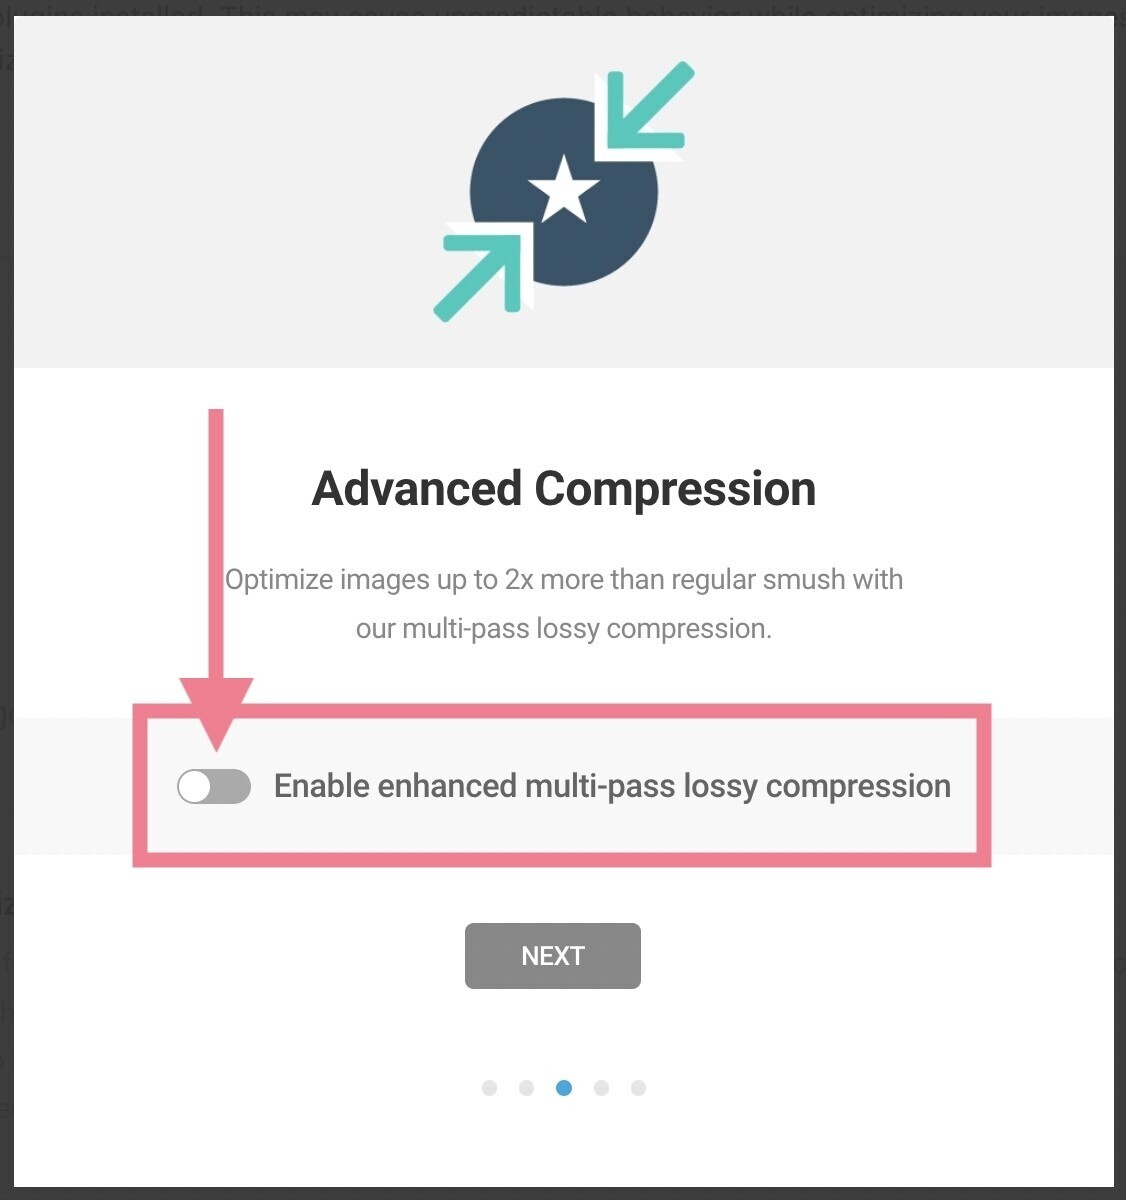
Let’s take a look at the meaning of the other two options—“Stripping image metadata” and “Lazy loading.”
- Stripping image metadata: This will remove unnecessary information (such as **** and time) from your image file to make it smaller
- Lazy loading: This will allow loading images that are placed further down the page with a slight delay to improve the initial loading time of your page
You can enable both of them.
Now you’ve completed the setup. The plugin will process all your new images according to your settings. You can also bulk compress all the images you’ve uploaded to your website so far.
Go to Smush > Bulk Smush > Bulk Smush Now. You can compress up to 50 images at once in the free version of the plugin.
Using Proper Image Sizes
Images that are too large for your website can also slow down your loading speed.
For example, if the width of your content is 1,000 pixels, having images wider than that will unnecessarily slow down your page loading speed. It is a common mistake that you can easily prevent.
In Smush, you can enable the detection of images that are either too large or too small for your page layout.
Go to Smush > Settings > toggle the “Detect and show incorrectly sized images” option.

Don’t forget to click “Save changes” at the bottom of the page.
This way, you’ll be able to see images that are either too large or too small for their containers. You can resize and reupload them.
26. Mark Up Your Pages with Schema
Structured data is a piece of code written in a specific format (called schema markup) that helps Google understand the content of a page.
For example, say you run a crafts blog that gives detailed, step-by-step instructions for each project.
By adding the HowTo markup, you can mark up each step, as well as how much time the task will take, to help Google read and understand these individual steps.
Then, Google can use this information in a search results snippet:

You can mark up almost anything, from the basic information about your website (like organization name, articles, or authors) to more specific things (like events, products, reviews, recipes, FAQs, how-tos, etc.)
If you’re using the Yoast SEO plugin, it takes care of all the basic markup for you based on your site settings and the information you give in the initial configuration.
You can also mark up some specific content types in the “Schema” tab of the Yoast box you see when editing a page or a post. Then, select a schema type.
For example, you can mark up a page with the About page schema or the Checkout page schema.
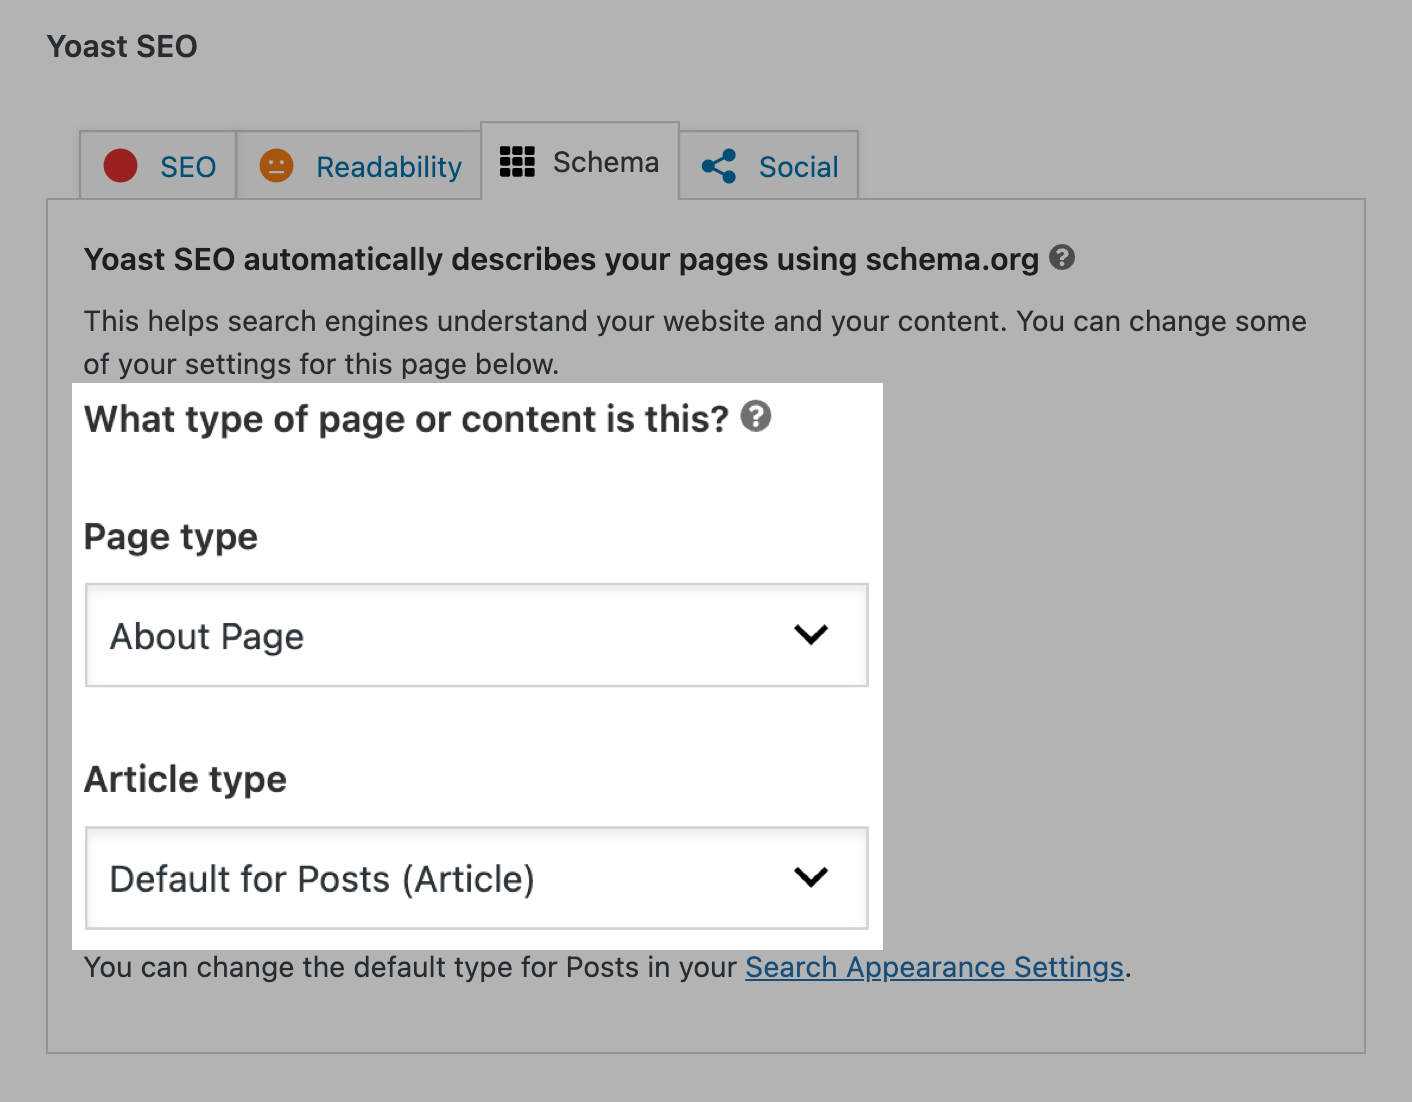
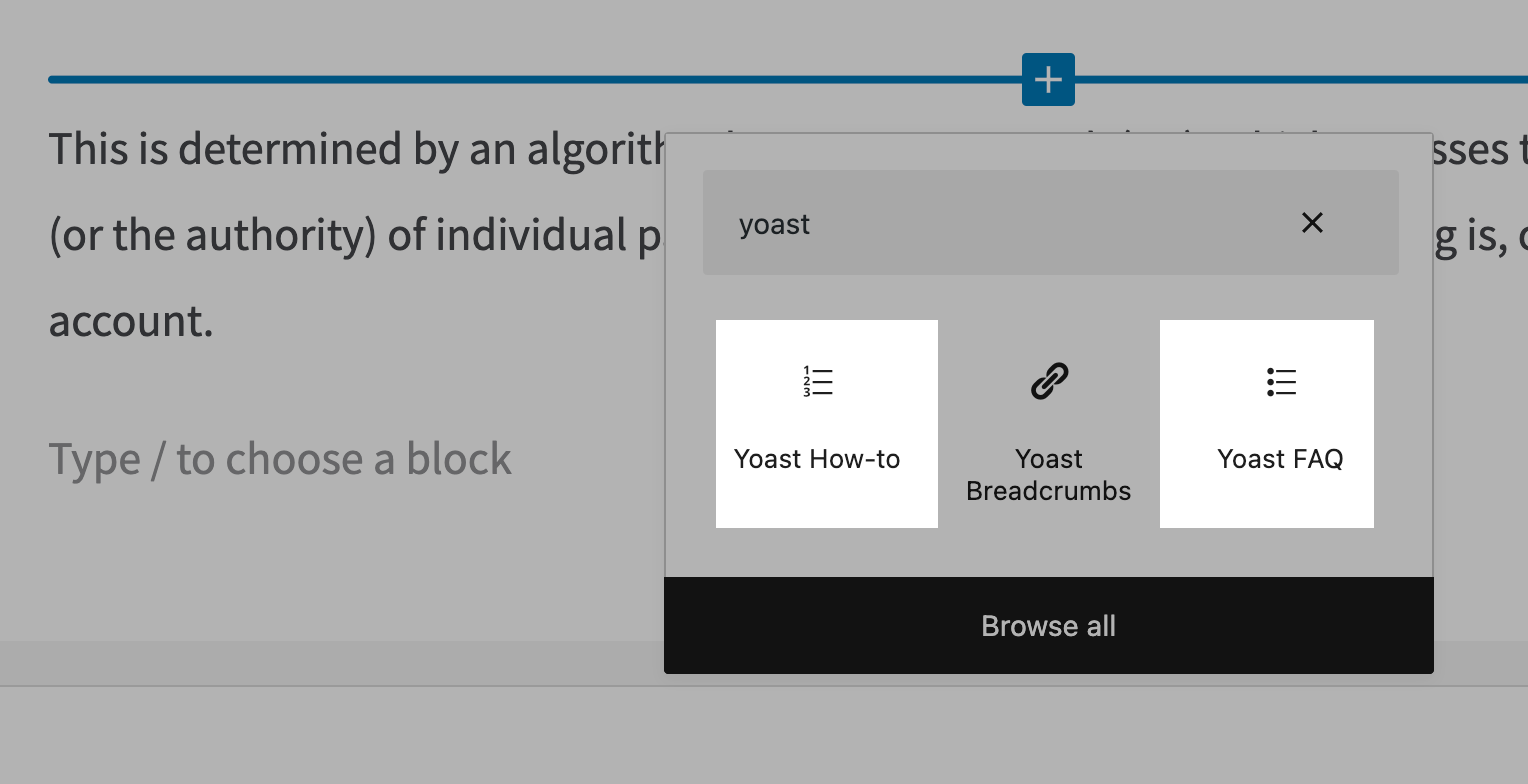
Moreover, you can add some Yoast structured data blocks in the standard WordPress (Gutenberg) editor.
Just click the Plus (+) icon to add a new block and search for “yoast.” You’ll be able to add a how-to block and an FAQ block.
If you need to add some specific structured data that Yoast doesn’t support, you can. Use one of the many WordPress plugins dedicated to schema markup.
27. Secure Your WordPress Website
Website security is an integral part of SEO (although it may not be obvious at first).
In fact, one study revealed that one of the most common reasons a site gets hacked is to manipulate its outgoing links (i.e., to make your site link to another site without you knowing about it).
Linking to irrelevant, spammy websites can definitely hurt your rankings.
We’ve already talked about using an SSL certificate in Step 4. Now, let’s take a look at other ways you can secure your website against attacks.
Using a Backup Plugin
The first step would be to install a good backup plugin—like UpdraftPlus—so you can easily restore your website to the previous version in case something goes wrong.
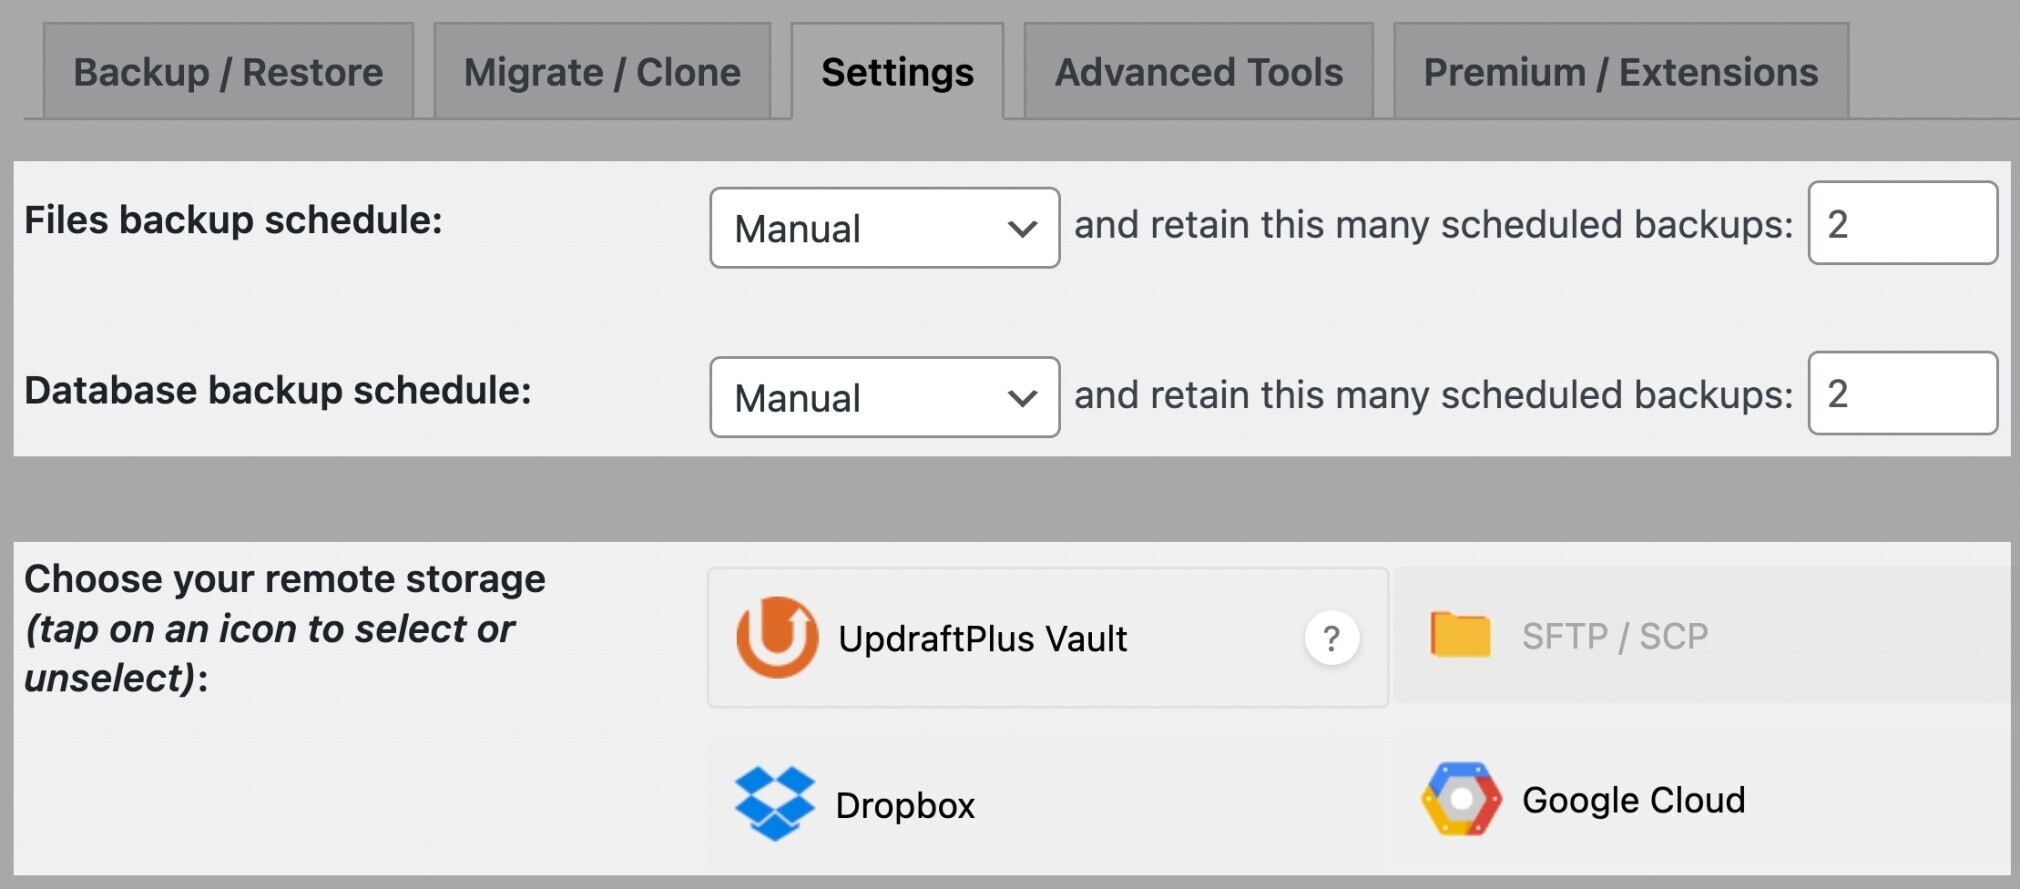
Once you install it, go to the plugin’s settings to set it up:
- Regular backups: The frequency depends on how often you make changes to your website (we recommend at least weekly backups)
- Remote storage: Where your backups will be stored (e.g., Google Drive)
Using a Security Plugin
A security plugin will block any malicious traffic and regularly scan for any issues related to security—from suspicious login attempts to malware infections.
There are many great WordPress security plugins.
Here are some of our recommendations:
Updating Regularly
Outdated software may have bugs that attackers can exploit. Regular updates fix those vulnerabilities.
You need to regularly update your:
- WordPress core
- Plugins
- Themes
All you need to do is to go to Dashboard > Updates and see what needs to be updated.
Alternatively, you can visit the plugins (Plugins > Installed Plugins) and themes (Appearance > Themes) sections to manage the updates of these respective installations.
When an update is available, WordPress will notify you by showing a red circle with a number of items that need updates:

Warning: Always make sure your website is backed up before making any updates.
Installing Only Trusted Plugins
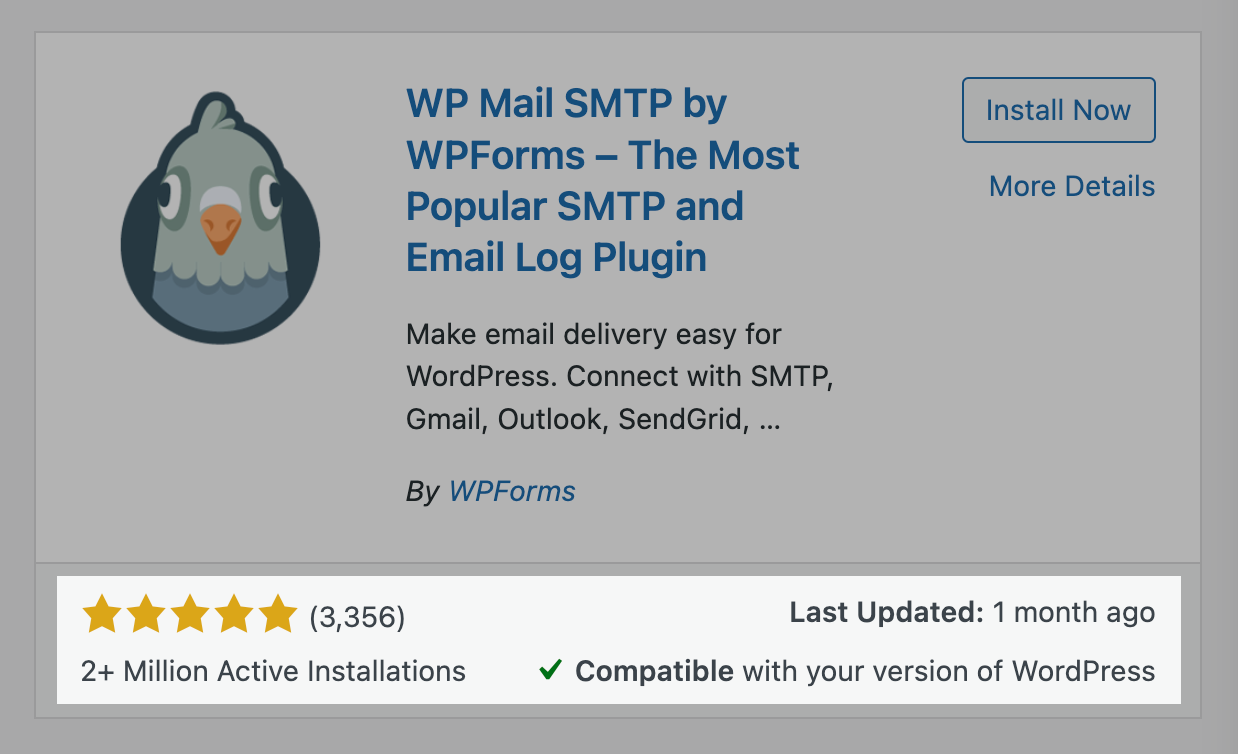
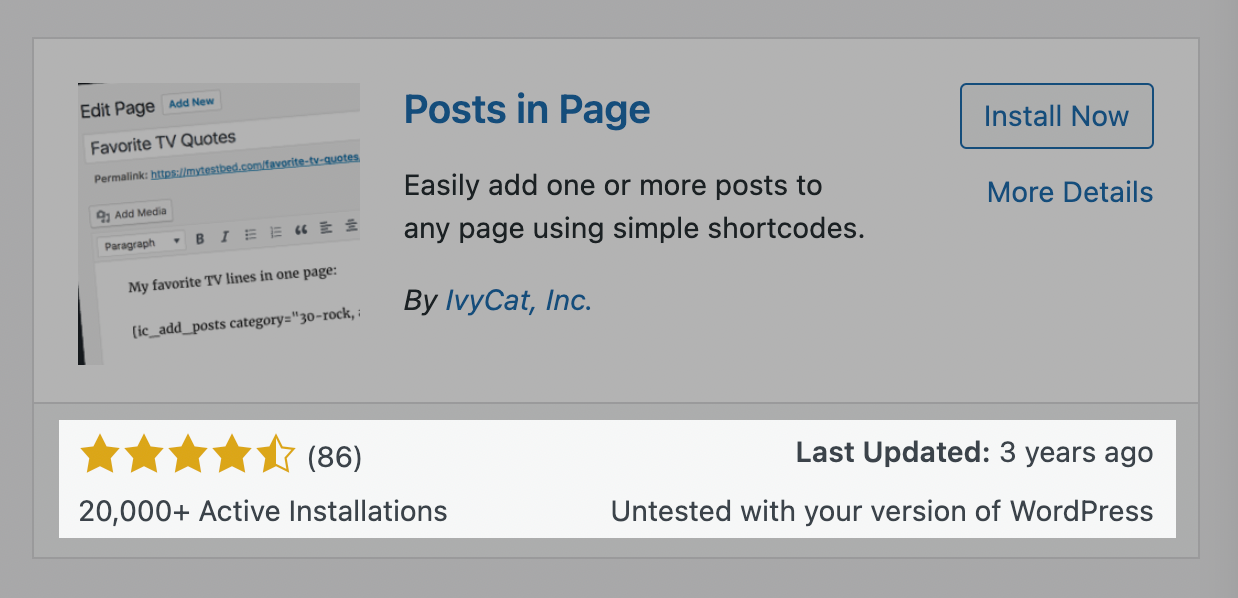
WordPress makes it easy to spot the best plugins. Every time you are about to install a new plugin, make sure it meets the following criteria:
- It has been updated recently
- It is compatible with your version of WordPress
- It has a reasonable number of installations and good ratings
Here’s an example of a plugin that is updated, compatible, and popular:
And here, on the other hand, is an example of a plugin that might be a security risk:
28. Use ‘Last Updated’ Dates
You should regularly update your content to ensure it stays fresh and relevant.
And when you update your content, you’ll also want to change its **** to show users and search engines that your content was updated.
A great way to do this is to show the **** of when a piece of content was last updated.
Here’s how Backlinko’s Brian Dean does it:
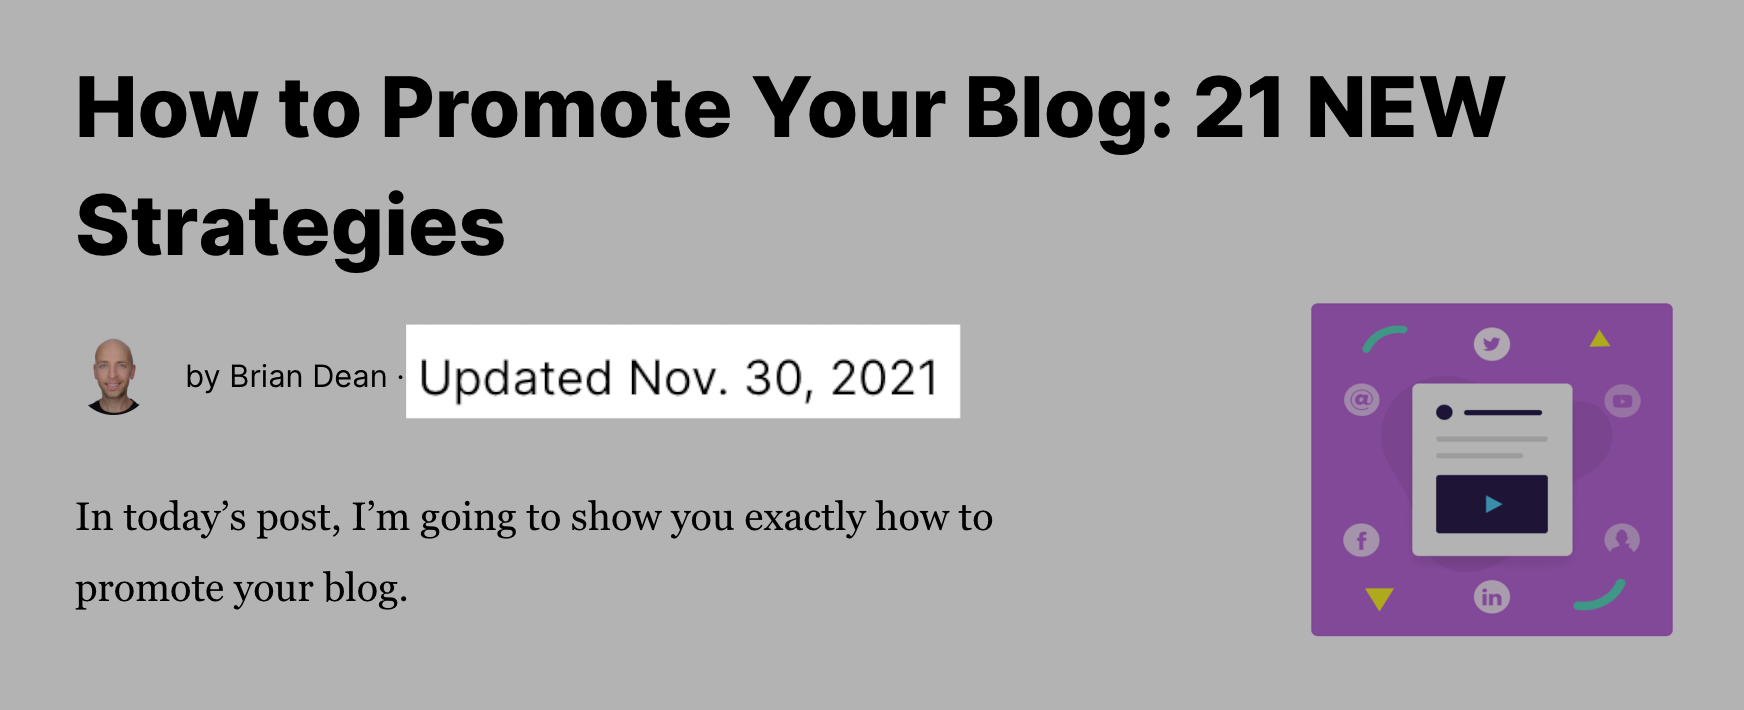
If you look at the page source, you can see that it was published in June 2021 and updated in November 2021.

That means:
Win-win.
A handy WordPress plugin will help you add the “Last updated” ****. It’s called WP Last Modified Info.
Go to Plugins > Add new > search for “wp last modified info” > click the Install Now button > Activate.
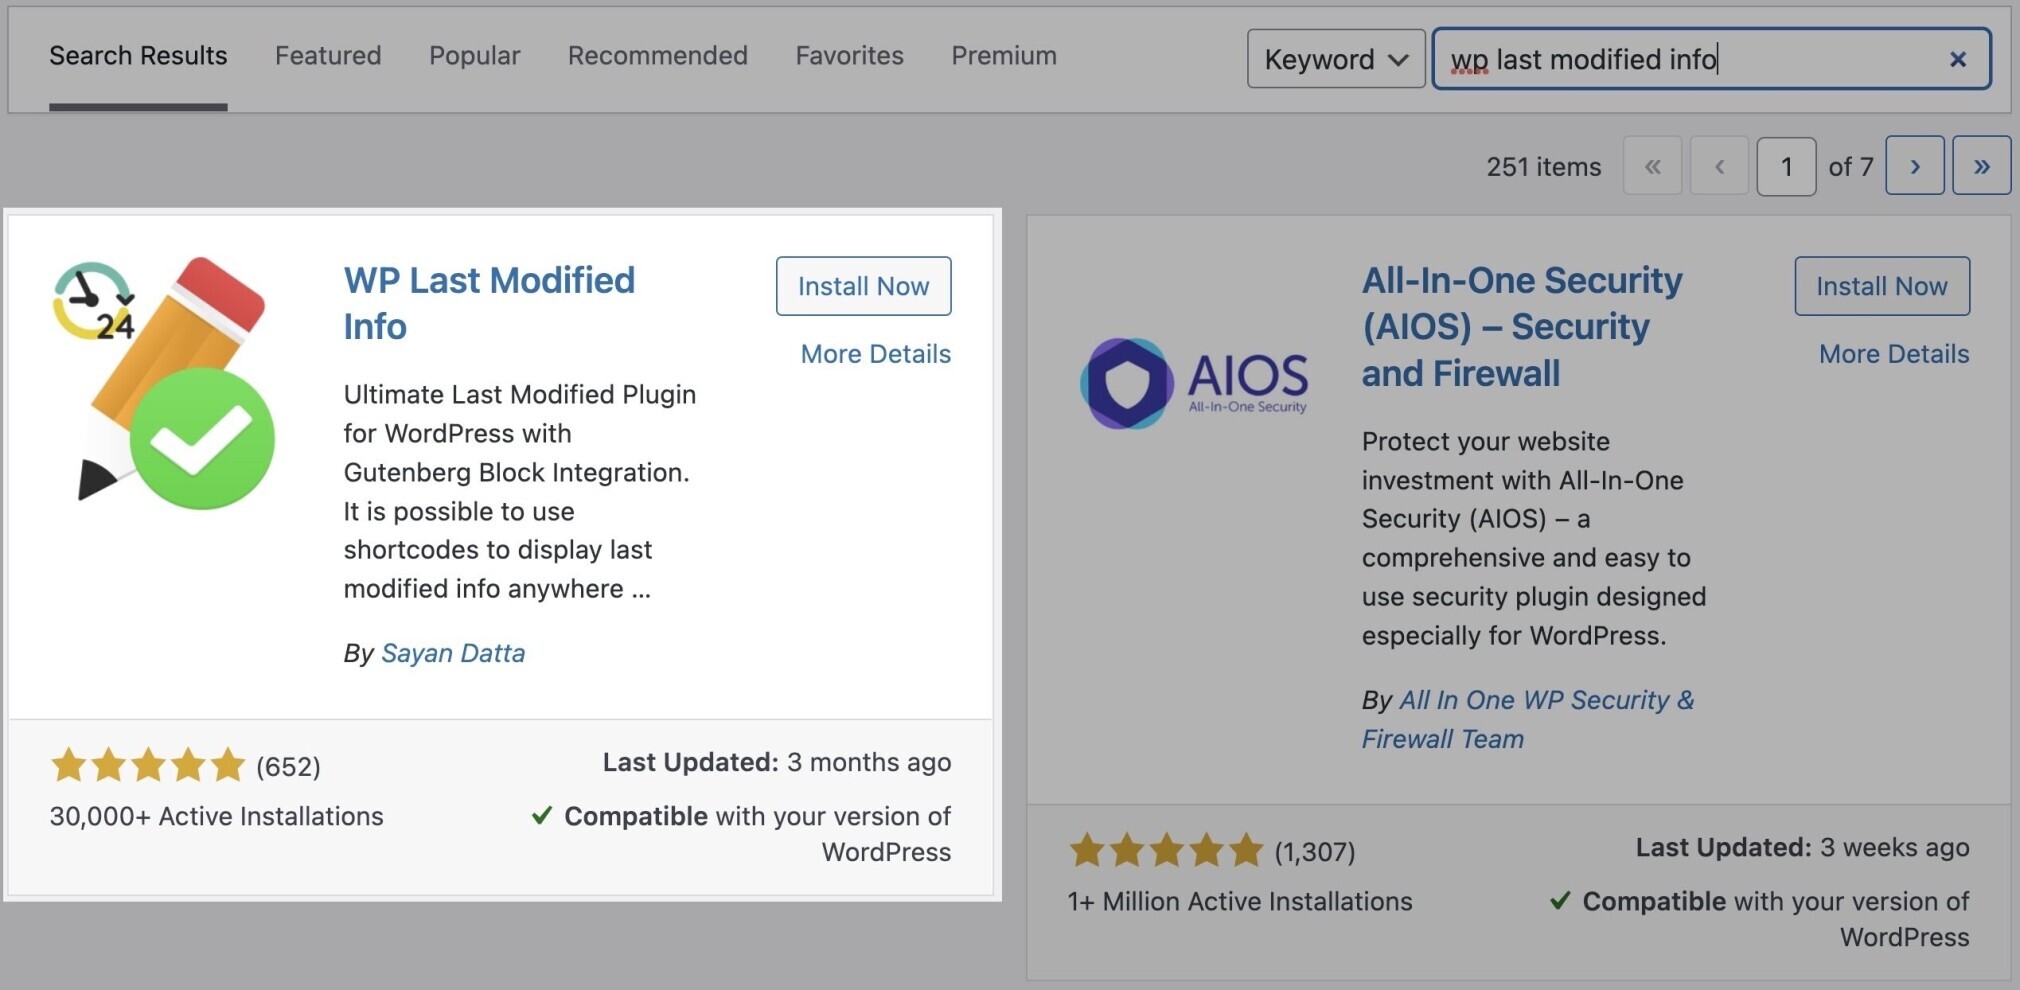
Then go to Settings > WP Last Modified Info > Posts > and toggle the button next to “Show Info on Frontend” to show the last modified **** in your posts.

You can go through other settings to edit the **** format, template, or archive pages you want to exclude.
Then hit “Save Settings.”
Last but not least, go to the “Schema Options”tab in the plugin settings and enable schema markup. (The “Default Mode” will be the best option in most cases).
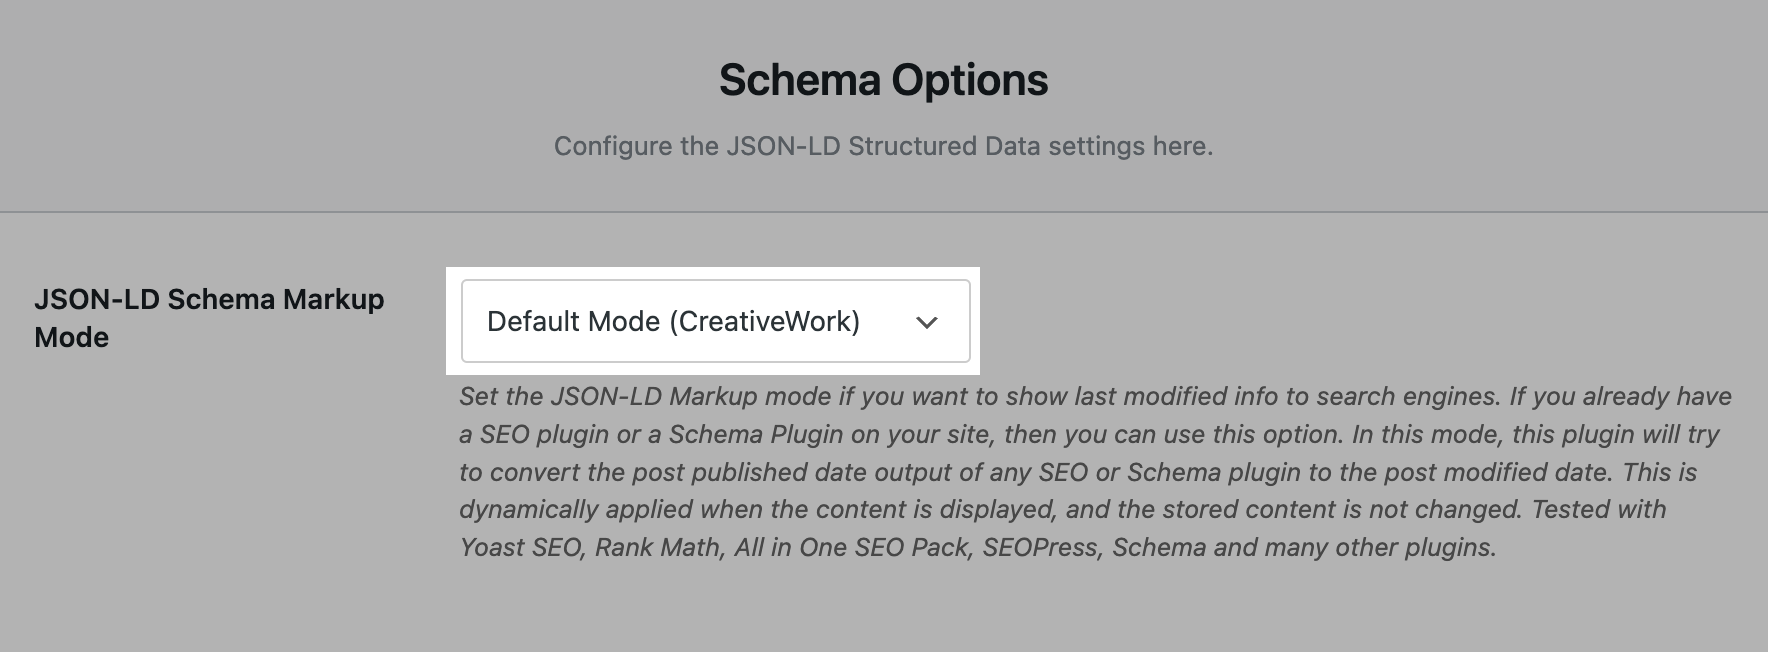
This way, Google can use your “Last updated” **** in search results snippets.
FAQs
Is WordPress Good for SEO?
Yes, WordPress is very SEO-friendly. But it’s only a CMS. So you’ll still need to put in the hard work to make your website succeed in organic search.
Does Google Favor WordPress?
Google does not favor any CMS. It may be true that WordPress is better for SEO than some other CMSs, but it is usually not the choice of CMS that wins the SEO battle. That being said, WordPress is definitely a good choice for SEO.
Which SEO Plugin Is Best for WordPress?
When it comes to all-in-one SEO plugins, three of the most popular ones are Yoast SEO, All-in-One SEO, and Rank Math. Of course, there are many other great WordPress SEO plugins dedicated to specific SEO tasks.
Next Steps
You’ve made it to the end of our WordPress SEO guide. Great work.
After you’ve completed all of the steps above, what’s next? Here’s an idea:
Look into ways to improve your website’s authority by getting some quality backlinks. These guides will help you do that:
Source link : Semrush.com
